
Full Product Manual


Page 3
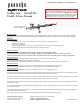
Paasche® RG Gravity Feed, Double Action Airbrush
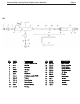
REMOVING / REPLAClNG THE NEEDLE AND HANDLE
1. Unscrew the handle and loosen the Locknut- #TAL-19 by turning counterclockwise. Depress the Trigger- #TAL-37 and hold in down
position while removing or inserting the needle. This assures the needle moves freely through the trigger. Gently remove the needle,
rotating if necessary, Do NOT force out!
2. Inspect the condition of the needle. If it is bent or misshapen in any way, replace it with a new needle. A bent needle can damage or
split the Tip- #TT causing bubbles or a rough spray pattern.
3. Hold trigger in DOWN position, insert the new needle into the Rocker Assembly- #TAL-18. Gently push needle through, rotating if
necessary, push gently forward until the needle stops in the front of the tip.
4. Release trigger and tighten locknut by turning clockwise.
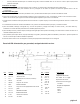
REPLACING THE FINGER LEVER ASSEMBLY (Illustration B):
If the Trigger- #TAL-37 is removed, it is easiest to replace before the Rocker Assembly- #TAL-18 is inserted. The needle must be removed.
1. Hold trigger so the round side of the stem is to the front and flat side to the back of the airbrush (see B - END VIEW).
2. Insert trigger straight DOWN through the opening in the top of the airbrush shell (see B - TOP VIEW).
4. You want the bottom of the trigger to cover the round ball on top of the exposed plunger. Once the connection is made you should have
spring action when pushing down on the trigger. Proceed to replace Rocker Assembly- #TAL-18 and balance of parts as above. When
the needle is inserted it will prevent the removal of the trigger.
REPLACING THE TIP:
1. Remove handle, loosen Locknut- #TAL-19 and withdraw needle about one inch (1").
2. Un-screw the Aircap- #TA and remove. The Tip- #TT can now be unscrewed with Wrench- #TAL-28.
3. Place a new tip into position and tighten with wrench. The tip must be wrench tight. Finally push the needle forward until it is seated
fully forward into tip.
ADJUSTING WORN PACKING WASHER:
1. If Packing Assembly- #TAL-8 becomes worn or loose it must be tightened or replaced.
2. Tighten packing nut with small screwdriver. To reach packing all internal parts must be removed.
3. Replace needle and make sure packing nut is not too tight. A slight resistance to movement is needed when needle is passed through.
4. Completely re-assemble guts of airbrush.
CLEANING THE AIRBRUSH:
1. Spray airbrush cleaner through airbrush until it has no more color spraying out of airbrush.
2. Remove needle and wipe clean then replace.
3. If paint has dried for a time you can remove the front tip, and aircap for soaking or soak just the front of the airbrush in cleaner.
4. Any paint cleaner is fine. Keep trigger area dry if soaking.
PERSONAL SETTINGS:
Spring Housing- #TAL-17 Used to increase or decrease spring tension for the trigger pull back. Thread into the shell until the trigger
stroke feels comfortable. Threading in until it stops can cause the trigger to jam.
TROUBLESHOOTING:
Bubbling in cup:
1. Aircap- #TA needs to be tightened
2. Tip- #TT needs to be tightened further
Skipping or Spitting:
1. Paint too thick -reduce with thinner
2. Tip not seated -tighten Tip- #TT with wrench
3. Tip split or damaged needle -replace tip or needle
4. Needle or tip dirty -clean and replace
5. Air pressure too low -increase pressure or thin paint further (need 20 or more PSI to spray most paints)
Airbrush Not Spraying:
1. Clogged Tip- #TT -remove tip and clean
2. Needle not moving -tighten needle locknut
3. Low air pressure -increase pressure (need 20 or more PSI to spray most paint)
Sprays double line or heavy to one side:
1. Split Tip- #TT or bent Needle- #TN - replace
2. Dirty tip or needle - remove and clean
Jammed trigger or poor trigger motion:
1. Adjust Spring Housing- #TAL-17 - screw or unscrew the spring housing to lessen or increase tension on trigger motion
2. Paint leaking to trigger area - remove guts of airbrush and slightly tighten packing or replace if needed
3. Lubricate needle and trigger - apply Paasche Airbrush Lube (AL-2) to needle shaft and trigger slot area