
Manual


STEP 2: INSTALL WIRING HARNESS
INSTALLATION INSTRUCTIONS
3
HARDWARE USED:
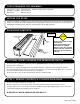
WIRE HARNESS x 1
ZIP TIES x 5
(If the optional wire harness Part# BL1120 is used, you may want to tape it to the main
harness to ease having to pull them through the bottom of bed separately).
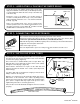
In the truck bed, remove the 2 factory bolts from both of the front upper tie down brackets
using a #50 torx bit and set aside (for step 4).
Remove the 6 factory bolts using a #40 torx bit that hold the front bed panel to the cab.
Temporarily remove front bed panel.
Find the wire harness and remove the fuse holder from the harness. Tape the 2 wires
together where the fuse holder was removed.
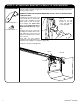
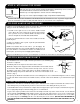
Carefully feed the end of the wire through the bottom of the bed between the cab and the
bottom bed panel. (This step will take one person under the truck with a fl ashlight to see
and grab the wire when it exits the bed while being fed down from the top.)
Run the opposite end of the wire up the left side of the bed wall to the ledge just below
where the upper tie down bracket was.
Leave approximately one foot of slack inside the bed from the front bed panel after it is
reinstalled. Put the front bed panel in place but leave it loose for now.
Pull the remaining slack in the harness under the truck and to the battery in the engine
compartment.
Attach the fuse holder to the end of the red/positive wire.
Reinstall the 6 factory bolts in the front bed panel and tighten them up.
(Do not attach to the battery yet.)
Secure the harness with wire ties provided after slack from the canister has been taken
out.
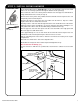
REMOVED FRONT
UPPER TIE DOWN
BRACKET
WIRE HARNESS
FRONT BED
PANEL
LEDGE BELOW
UPPER TIE DOWN
BRACKET