
Manual


INSTALLATION INSTRUCTIONS
5
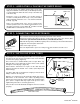
STEP 4: INSTALL CAB END RAIL BRACKETS & PREPARE BED
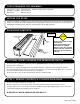
Find the two front rail brackets with rail mounting block attached to them in the hardware kit.
Place the front rail bracket in front (mounting
block up) of the upper tie down bracket and
run factory bolts back in making sure the
upper tie down bracket is exactly the way it
was when removed. (Figure 4a)
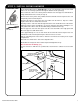
Find the two black bed hole plugs in the
hardware kit box and put them in the two
upper middle holes in the bed wall.
While in the truck bed remove the factory bolt in
the bed wall at the tailgate end of the truck bed
with the #40 torx bit. (Figure 4b)
HARDWARE USED:
FRONT RAIL BRACKET x 2
FRONT RAIL
BRACKET
FRONT UPPER
TIE DOWN
BRACKET
FACTORY
BOLTS
FIG.4a
BED HOLE PLUG x 2
FIG.4b
REMOVE FACTORY
BOLTS NEAR TAILGATE
OF TRUCK BED
FLAT WASHER x 2
LOCK WASHER x 2
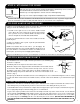
With one person on each side of the canister grab the rails and take the cover to the center of
the truck bed, place the cover inside the bed and slide the canister evenly up to the cab and
in between the front upper tie down and the mounting block on the front rail bracket ending
up on the lip of the bed bulkhead.
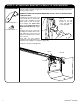
Find the two M6 x 30mm bolts, lock washers, fl at washers and the two nylon spacers in the
component box.
Take the M6 bolts with lock washer and fl at washer and run them through each of the rear
rail brackets, take the two nylon spacers and put them on the M6 bolts between the truck bed
and back of the bracket (before tightening the M6 bolts be sure that the canister is tight to the
bulkhead to prevent cross threading) (Figure 5a)
Tighten the two M6 bolts.
Place the two front rail bracket screws in between the hole in the upper tie down bracket and
through the hole in the rail and tighten down completely. (Figure 5b)
STEP 5: INSTALL COVER IN TRUCK BED
HARDWARE USED:
M6 x 30mm BOLTS x 2
NYLON SPACER x 2
FRONT RAIL BRACKET
SCREW x 2
NYLON
SPACER
BOLT &
WASHERS
REAR
RAIL
BRACKET
RAIL
FIG.5a
UPPER
TIE DOWN
BRACKET
RAIL
FRONT RAIL
BRACKET
SCREW
FIG.5b
MOUNTING
BLOCK