
Owner's manual

INSTALLATION INSTRUCTIONS
5
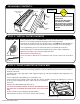
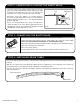
STEP 8: INSTALLING DRAIN TUBES
First ensure that the washer is in place on the drain tube end being inserted into the canister (This will prevent water
leakage).
With the cover opened, insert the drain tube fi ttings into the pre-drilled holes on the underside of the canister by
pushing them in place from under the canister. Drain tube should click into place.
Place the other end of the drain tube through the grommet or through the pre-drilled holes in the fl oor or the front
wall of the truck bed.
FOAM WASHER
DRAIN TUBE FITTING
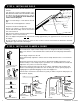
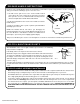
Locate the sweep seals (rubber weather strips) on the rails.
Open the provided 303 brand protectant sponge pack (fi nd
it adhered to the underside of the top cover) and wipe the
underside of the sweep seal and the top of the wear strip.
Extend the cover to the tailgate. Use an Allen wrench if
needed to carefully draw out the sweep seal (seal should be
angled outwards toward the cover – not rolled in toward the
bed rail). (Fig. 6A)
Proper care and placement of the sweep seal will ensure
smooth operation of the cover. Alcohol, petroleum based or
silicon-based cleaners such as Armor-All
®
should be avoided
and ARE NOT recommended for our covers
STEP 6: LUBRICATING & PLACING THE SWEEP SEALS
RIBBED BLANKET
SWEEP SEAL
WEAR STRIP
RAIL
FIG.6A
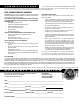
The electronics box has been pre-mounted to the inside of the canister.
Connect the battery wire harness into the 2-wire plug at the end of the canister (also
connect the optional manual switch harness, if installed at this time)
Attach the Red (positive) and Black (negative) wires to the battery or the truck manufacturers
suggested connection points at this time.
Unit is now ready to operate.
Press the Open button to open cover and press the Close button to shut the cover.
2-BUTTON REMOTE
KEY FOB x 2
STEP 7: CONNECTING THE ELECTRONICS
HARDWARE USED: