
Installation Guide

Installation of Last Tile In a Row
If you are using corner and/or L-trims for a Palisade shower kit installation,
the following information will show how to install the last, short tile at the
end of a row. Read and follow if your project looks like this. Optional
rubber gloves may make this task easier.
The challenge is to place the remaining tile section into the edge trim while
also getting the interlocking tile edges locked together (image Q).
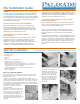
First, install the inside corner trims
into each corner using adhesive.
Allow 24 hours for the adhesive to
cure. Make sure the corner trims
are oriented as in the image below.
Each inside corner trim piece has
a full and a partial channel. The
full channel will be against the
back wall.
The drawing below shows a top
cross-section view of facing
inside corners.
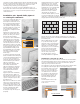
Next, determine the length of the tile
section. Measure from the inside lip
of the previously installed tile to the
inside edge of the pre-installed trim.
See image at right for details. In this
case, the length to cut the nal tile in
the row is 4-3/4-inches (image R).
After cutting tile to length, apply
adhesive to the substrate, as shown
(image S).
Insert the cut tile edge into the L-trim
while holding the interlocking
joint-edge away from its mating tile.
Insert the cut end into the edge of
trim channel while holding other
edge up (image T).
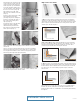
Push the tile into the edge trim while
laying the tile down toward the
substrate. When pushed into the
trim entirely, the interlocking edges
will be exposed (image U).
R
S
T U
V W
Apply sealant to the interlocking edges if this installation is for a wet
environment.
The tile can now be manually pulled into place. Pull the tile toward the
interlocking joint (image V). If necessary, rubber gloves can be used to
increase grip friction with the surface of the tile. Keep pulling until the
interlocking joint is tight and in place (image W).
Use a damp rag or paper towel to clean off any sealant or adhesive that
may have been squeezed onto the tile surface.
J-Trim are used to nish the terminal end of tiles when not adjoined to
anything. To install, don’t dispense adhesive a few inches from the tile’s
edge where you intend to use the J-Trim. This will allow the trim to slide in
place. Dispense a bead of sealant into the receiving channel of the trim
and then press the trim into place.
Edge and Corner Trims
Inside Corner Trim should be attached with adhesive to the substrate.
Dispense a small bead of adhesive directly to the substrate corner or on
the trim itself. Also dispense a bead of sealant into each of the trim’s
channels to prevent water from reaching the substrate.
L-Trim are used to cover existing exposed tiles to provide a nished look.
Install by dispensing a thin bead of sealant on the Palisade side and a thin
bead of adhesive on the substrate side. Press trim into place. If trim will
not stay in-place, use some masking or painter’s tape to hold until
adhesive sets.
When attaching accessories like coat hooks, mirrors or lighting xtures
that will carry a heavy load, drill a hole through tile and fasten to the
framing inside the wall. Use a stud nder to locate framing before drilling
through tiles.
Wall
Wall
Palisade Tile
J-Trim
Cross-section View
Cross-section View
Palisade Tile
Palisade Tile
Wall
Wall
Inside Corner Trim
Cross-section View
Transition Tile/Wall
Palisade Tile
L-Trim
L-Trim
J-Trim
Inside Corner Trim
10-29-2022
Palisade-les.com