AG-3200P-EN.fm Page 1 Tuesday, June 11, 2002 10:29 AM Operating Instructions Video Cassette Recorder AG- REW P FF 24HR QUICK REC LINK PROGRAM POWER INSERT A.DUB S-VIDEO Before attempting to connect, operate or adjust this product, please read these instructions completely.
AG-3200P-EN-1.fm Page 2 Tuesday, May 28, 2002 2:54 PM CONTENTS Buttons, Connectors and Indicators ................................................5 Connections and Plug&Play Setting ................................................6 Initial Settings ..............................................................................7 Dear Customer, Thank you for purchasing the PANASONIC S-VHS video cassette recorder.
AG-3200P-EN-1.fm Page 3 Tuesday, May 28, 2002 2:54 PM Failure to heed the following precautions may result in damage to the VCR, Remote or video cassette. 1. DO NOT place the VCR . . . ...in an environment prone to extreme temperatures or humidity. ...in direct sunlight. ...in a dusty environment. ...in an environment where strong magnetic fields are generated. ...on a surface that is unstable or subject to vibration. 2. DO NOT block the VCR’s ventilation openings. 3.
$* 3 (1 IP 3DJH 0RQGD\ -XQH 30 USE 1. Accessories To avoid personal injury: ● Do not place this product on an unstable cart, stand, tripod, bracket, or table. It may fall, causing serious injury to a child or adult, and serious damage to the product. ● Use only with a cart, stand, tripod, bracket, or table recommended by the manufacturer or sold with the product.
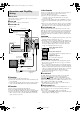
$* 3 (1 IP 3DJH 7XHVGD\ -XQH 30 Remote Buttons, Connectors and Indicators Front Panel Cassette loading slot Number keys Advanced JOG dial FF REW 24HR QUICK REC LINK PROGRAM POWER INSERT A.
AG-3200P-EN-1.fm Page 6 Tuesday, May 28, 2002 2:54 PM S-video Connection Connections and Plug&Play Setting (allows you to make the most of the S-VHS picture performance.) If your TV is equipped with a S-video input connector A Perform “RF Connection” above. B Connect a S-video cable between the S VIDEO OUT connector on the rear of the VCR and the S-video input connector on the TV. C Connect an audio cable between the AUDIO OUT connectors on the rear of the VCR and the audio input connectors on the TV.
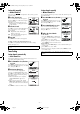
AG-3200P-EN-1.fm Page 7 Tuesday, May 28, 2002 2:54 PM Setting clock semiautomatically — Semiauto Clock Set Initial Settings You can change the host channel/D.S.T. (Daylight Saving Time)/ time zone setting manually. First follow steps 1 to 2 in “Preparations” above, then go to the following steps. Language Setting The default setting is “ENGLISH”. A Access Main Menu screen, then Initial Set screen Press MENU on the Remote. Press rt to move the highlight bar (arrow) to “INITIAL SET”, then press OK or e.
AG-3200P-EN-1.fm Page 8 Tuesday, May 28, 2002 2:54 PM Setting clock manually — Manual Clock Set First follow steps 1 to 2 in “Preparations” above, then go to the following steps. Setting channels manually — Manual Channel Set You can add the channels you want or delete the channels you do not want manually. A Set time, date and year A Access Main Menu screen, then Tuner Press rt until the desired time appears, then press OK or e. Set the date and year in the same way.
AG-3200P-EN-1.fm Page 9 Tuesday, May 28, 2002 2:54 PM Playback Basic Playback Reverse A Load a cassette Make sure the window side is up, the rear label side is facing you and the arrow on the front of the cassette is pointing towards the VCR. ● Do not apply too much pressure when inserting. ● The VCR turns on, and the counter on the on-screen display is reset, automatically. ● If the cassette’s record safety tab has been removed, playback begins automatically.
AG-3200P-EN-1.fm Page 10 Tuesday, May 28, 2002 2:54 PM Automatic operations after rewinding — Next Function Memory Locating beginning of timer recordings — Instant Review The Next Function Memory “tells” the VCR what to do after rewinding is complete. Ensure that the VCR is in stop mode. ● For Automatic Playback Start Press REW (3), then press PLAY (4) within 2 seconds. ● For Automatic Power Off Press REW (3), then press POWER 1 within 2 seconds.
AG-3200P-EN.fm Page 11 Wednesday, June 5, 2002 1:43 PM Recording Features Recording Specifying recording length — Instant Timer Recording (ITR) It may be unlawful to record or play back copyrighted material without the consent of the copyright owner. Accidental erasure prevention To prevent accidental recording on a recorded cassette, remove its record safety tab. To record on it later, cover the hole with adhesive tape.
AG-3200P-EN.fm Page 12 Wednesday, June 5, 2002 1:43 PM VCR Plus+® Timer Programing Timer Recording The PlusCode programing numbers are the numbers next to the program in most TV listing. Load a cassette with the record safety tab intact. The VCR turns on, and the counter is reset, automatically. Up to 8 timer recording programs can be made using VCR Plus+ timer programing, Express timer programing or 24HR Quick Programing method as far as a year in advance.
AG-3200P-EN-1.fm Page 13 Tuesday, May 28, 2002 2:54 PM D Press TIMER. The VCR turns off automatically and “#” is D Cancel or change program setting 24HR Quick Programing To cancel a program, press CANCEL when the Program screen you do not want is shown. To change a program, press the appropriate button: START+/–, STOP+/–, DATE+/–, CH+/–, DAILY (M-F) (Number key “8”), WEEKLY (Number key “9”), and/or SP/EP when the Program screen on which you want to make changes is shown. displayed on the display panel.
AG-3200P-EN-1.fm Page 14 Tuesday, May 28, 2002 2:54 PM 䡵 S-VHS ET — ON/OFF Other Functions Timer warning display –WARNING– A warning appears on the TV screen to tell TIMER RECORDING TO START SOON you that the timer-recording is to start in (CANCEL) 5 minutes if you are not in the timer recording standby mode at that time. Press TIMER to put the VCR into timer recording standby mode. To clear the display, press CANCEL on the Remote.
AG-3200P-EN-1.fm Page 15 Tuesday, May 28, 2002 2:54 PM 䡵 AUTO TIMER — ON/OFF ● When this function is set to “ON”: The timer recording standby mode is automatically engaged when the VCR is turned off. It is temporarily canceled when the VCR is turned on. You do not have to press TIMER to engage or disengage the timer recording standby mode. ● When this function is set to “OFF”: You have to press TIMER to engage or disengage the timer recording standby mode.
AG-3200P-EN-1.fm Page 16 Tuesday, May 28, 2002 2:54 PM 䡵 FRONT AUX INPUT — VIDEO/S-VIDEO Multi-Brand Remote Control You have to select which terminal — either VIDEO (composite) or S VIDEO (Y/C separate signals) to use as the video input terminal on the front panel. Make sure to select the correct terminal; otherwise, you may fail in recording (editing) on this VCR. This Remote can control some functions of remote controllable TVs, cable boxes or DBS (Direct Broadcast Satellite) receivers listed below.
AG-3200P-EN.fm Page 17 Tuesday, June 4, 2002 2:12 PM Changing Remote Control Code Cable Box or DBS Receiver Brand Setting A Turn on cable box or DBS receiver Turn on the cable box or DBS receiver using the Power button on the unit or its Remote. B Enter brand code A Press and hold CABLE/DBS. B Press MBR SET. C Press the Number keys to enter your cable box’s (or DBS A Set remote control code for Remote receiver’s) brand code. D Press OK, and release CABLE/DBS.
AG-3200P-EN-1.fm Page 18 Tuesday, May 28, 2002 2:54 PM Example 3: When another VCR is S-VHS VCR and when using this VCR as the recording VCR Editing This VCR (for recording) Editing with Another VCR You can use your VCR as the playback or recording VCR. You can use a camcorder as the playback VCR and your VCR as the recording VCR. Refer also to the other components’ instruction manuals for connection and its operations.
AG-3200P-EN-1.fm Page 19 Tuesday, May 28, 2002 2:54 PM Various connection for editing tapes NOTES: ● When monitoring the sound during Audio Dubbing, the normal soundtrack is automatically selected. If you wish to hear the Hi-Fi or mixed sound (Hi-Fi + normal soundtracks), press A.MONITOR to select “NORM HI-FI”. (墌 pg. 9, “Selecting monitor sound”) ● Audio Dubbing stops automatically when the counter reaches “0:00:00”, and the VCR enters the Play mode.
AG-3200P-EN-1.fm Page 20 Tuesday, May 28, 2002 2:54 PM B Select input mode G Start editing Select “F-1” —when connecting the other component to the audio/video input connectors on the front panel. Select “L-1” —when connecting the other component to the audio/video input connectors on the rear panel. Press AUX or CH+/– on the Remote. Or push the JOG dial, then turn it to the left or right. Load the source cassette and engage the Play mode of the other component, then press PLAY (4) on the VCR.
AG-3200P-EN-1.fm Page 21 Tuesday, May 28, 2002 2:54 PM TUNER Specifications Tuning system Channel coverage VHF UHF CATV RF output GENERAL Power requirement Power consumption Power on Power off Temperature Operating Storage Operating position Dimensions (W x H x D) : AC 120 Vd, 60 Hz : 17 W : 1.5 W 5°C to 40°C (41°F to 104°F) –20°C to 60°C (–4°F to140°F) Horizontal only 435 mm x 94 mm x 247 mm (17-3/16" x 3-3/4" x 9-3/4") : 2.8 kg (6.
$* 3 (1 IP 3DJH 7XHVGD\ -XQH $0 Troubleshooting Before requesting service, use this chart and see if you can repair the trouble yourself. Small problems are often easily corrected, and this can save you from the trouble of sending your VCR off for repair. Power SYMPTOM The power will not come on. POSSIBLE CAUSE ● The AC power cord is disconnected. ● The Child Lock function is activated.
$* 3 (1 IP 3DJH 7XHVGD\ -XQH $0 Memo — 23 — Page 23 June 11, 2002 10:22 am
AG-3200P-EN-1.fm Page 24 Tuesday, May 28, 2002 2:54 PM PANASONIC BROADCAST & TELEVISION SYSTEMS COMPANY UNIT COMPANY OF MATSUSHITA ELECTRIC CORPORATION OF AMERICA Executive Office: One Panasonic Way 4E-7, Secaucus, NJ 07094 (201) 348-7000 EASTERN ZONE: One Panasonic Way 4E-7, Secaucus, NJ 07094 (201) 348-7621 Southeast Region: 1225 Northbrook Parkway, Ste 1-160, Suwanee, GA 30024 (770) 338-6835 Central Region: 1707 N Randall Road E1-C-1, Elgin, IL 60123 (847) 468-5200 WESTERN ZONE: 3330 Cahuenga Blvd W.