
Operating Instructions
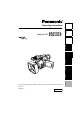
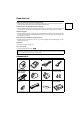
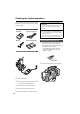
Table Of Contents
- Important Safeguards
- Contents
- Read this first!
- Accessories
- Operating precautions
- Checking the system operations
- Adjusting the hand strap
- Attaching the shoulder strap
- Attaching the lens hood
- Attaching the lens-cap strap
- Cassette tapes
- Description of parts
- The remote control
- The battery
- Viewfinder
- Time data
- Regular shooting
- Shooting techniques for different targets
- Check what you have shot (rec check)
- Finding specific scenes (image search)
- Zoom
- Low-angle shooting
- Self-portrait shooting
- Zebra pattern
- Marker
- ONE-SHOT recording
- Changing the image size
- Optical Image Stabilizer
- Using the USER buttons
- Backlight compensation
- Index recording
- Color bars
- Adding effects to images
- Backup recording
- Switching to manual mode
- Adjusting the volume while shooting
- Shooting in progressive mode
- Focus
- Adjusting the shutter speed
- Adjusting the white balance
- Adjusting Iris, Gain, and Light Intensity
- Switching Audio Input
- Using scene files
- Transferring scene files
- Playback
- Variable-speed playback
- Using the Counter
- Connecting external units
- Audio dubbing
- Dubbing
- Screen displays
- Using the setup menus
- Setup menu structure
- Setup menu list
- Before calling for service
- Condensation
- Tally lamp
- System resetting
- Video Heads
- Cleaning
- Storage Precautions
- Specifications

10
Checking the system operations
After purchase, do these system checks to ensure
that the unit is working properly before you attempt
to shoot anything.
1 Lift up the viewfinder.
2 Press on the DC cord’s battery connector and
move it down until it clicks into place.
3 Connect the DC cord to the AC adapter.
4 Plug the AC cord into the power outlet.
5 Return the viewfinder to its original position.
1 Slide the EJECT switch in the direction shown
by the arrow to open the cassette holder.
The cassette holder opens automatically when
the cassette cover is fully open.
• The cassette holder will not open if the
camera is not supplied with power (AC
adapter or battery).
2 Insert the cassette as shown in the diagram.
Items to prepare
AC adapter AC power supply cord
DC cord Mini DV cassette tape
Connect the AC power supply cord
Connect the cords properly as shown in the
figure above.
• You cannot charge the battery when supplying
power to the camera-recorder from the AC
adapter.
CAUTION:
• This unit will operate on 110/120/220/240 V AC.
An AC plug adapter may be required for voltages
other than 120 V AC.
If a conversion plug is required, consult with your
dealer as to which one is to be purchased.
Insert the Mini DV cassette tape
EJECT switch
P
U
S
H