00.AJ-YAX800G表1 05.4.5 9:36 AM ページ1 AJ- G Bitte lesen Sie diese Bedienungsanleitung vor der Inbetriebnahme dieses Produkts aufmerksam durch, und bewahren Sie sie für späteres Nachschlagen auf. Avant d’utiliser l’appareil, lire attentivement ce mode d’emploi, et le conserver à des fins de référence ultérieure. Prima di far funzionare questo prodotto, leggere attentamente le istruzioni e conservare questo manuale per riferimenti futuri.
01.AJ-YAX800G(E)14 05.4.5 9:36 AM ページ1 FCC NOTICE (USA) This device complies with Part 15 of FCC Rules. Operation is subject to the following two conditions: (1) This device may not cause harmful interference, and (2) this device must accept any interference received, including interference that may cause undesired operation. To assure continued compliance, follow the attached installation instructions and do not make any unauthorized modifications.
• Use of DCF Technologies under license from Multi-Format, Inc. • This product is licensed under the MPEG-4 Visual patent portfolio license for the personal and non-commercial use of a consumer for (i) encoding video in compliance with the MPEG-4 Visual Standard (“MPEG-4 Video”) and/or (ii) decoding MPEG-4 Video that was encoded by a consumer engaged in a personal and non-commercial activity and/or was obtained from a video provider licensed by MPEG LA to provide MPEG-4 Video.
01.AJ-YAX800G(E)14 05.4.5 9:36 AM ページ3 Features The AJ-YAX800G (“P2 PROXY card”) is a PC card type video encoder card (same shape as a P2 card). It can create a compressed data file from material recorded with a Memory Card Camera-Recorder (“P2 cam”), and store that file separately from the original material. Files created with this function include an audiovisual file that is compressed using the MPEG4 format, and a real-time metadata file (time code, user’s bit and UMID information).
01.AJ-YAX800G(E)14 05.4.5 9:36 AM ページ4 Installing a P2 PROXY card Insert a P2 PROXY card into the OPTION slot of the P2 cam. Note that the card should be inserted in P2 card slot No. 5 if another card is already inserted in the OPTION slot. 1 Turn off the P2 cam. A P2 PROXY card will not be recognized if it is inserted in the camera while the power is on. 2 Remove the two screws, and lift off the cover of the OPTION slot. 4 Replace the cover of the OPTION slot, and refasten with the two screws.
01.AJ-YAX800G(E)14 05.4.5 9:36 AM ページ5 Checking operations Turn on the P2 cam to confirm that the P2 PROXY card is operating. OWhen a P2 PROXY card is inserted in the OPTION slot and it is recognized property, the display window of the P2 cam displays “OP-SLOT”. DF 0 VTCG 10 h minM s frm 20 F 30 F 40 OO OP-SLOT 13 -dB 24 OWhen a P2 PROXY card is inserted in P2 card slot No. 5 and it is recognized property, the access LED flashes in orange.
01.AJ-YAX800G(E)14 05.4.5 9:36 AM ページ6 Checking operations (continued) “SOFT: NO VERSION” message is displayed. This does not indicate an error, but results from the fact that with proxy data recording the version is reflected. ENGLISH Checking on the thumbnail screen 1Press the THUMBNAIL button to display the thumbnail screen. 2Press the MENU BAR button to move the pointer to the menu bar. 3Press the cursor button to move the pointer to “PROPERTY”, and press the SET button.
01.AJ-YAX800G(E)14 05.4.5 9:36 AM ページ7 PROXY menu Setting the menu 1Insert a P2 PROXY card into the P2 cam, and turn on the power. 2Press the THUMBNAIL button to display the thumbnail screen. 3Press the MENU BAR button to move the pointer to the menu bar. 4Select OPERATION 5 DEVICE SETUP 5 PROXY using the cursor buttons and the SET button. 5Select menu items and specify values using the cursor buttons and the SET button.
01.AJ-YAX800G(E)14 05.4.5 9:36 AM ページ8 PROXY menu (continued) $ To display information captured by proxy data recording on the viewfinder of the P2 cam, select “ON” as the “PROXY REC” menu item from the screen of the menu VF page of the P2 cam. Either “PROXY REC P2” or “PROXY REC P2&SD” will be displayed at the beginning of the recording.
01.AJ-YAX800G(E)14 05.4.5 9:36 AM ページ9 PROXY menu (continued) Proxy recording in 24P/24PA mode [Applicable only to NTSC (525i)] When the operating mode of the P2 cam is set to 24P (2:3) or 24PA (2:3:3:2) for proxy recording, the 5-frame sequence will be as follows, depending on the recording rate: Recording rate: 768 kbps, 1500 kbps 24P (2:3) Sequence No.
01.AJ-YAX800G(E)14 05.4.5 9:36 AM ページ10 For proxy data recording, 256 MB, 512 MB or 1 GB SD memory cards with “High Speed” indication should be used. For more information, please visit: http://panasonic.biz/sav/p2 For proxy data recording, format the SD memory card, using a P2 cam. OSD memory cards formatted under the SD standard on a PC can also be used. OFor more information about handling of SD memory cards, see the P2 cam’s instruction manual.
01.AJ-YAX800G(E)14 05.4.5 9:36 AM ページ11 Recording on SD memory cards (continued) Formatting an SD memory card 1Insert an SD memory card into the P2 cam. 2Press the THUMBNAIL button to display the thumbnail screen. 3Press the MENU BAR button to move the pointer to the menu bar. 4Select OPERATION 5 FORMAT 5 SD CARD 5 YES, using the cursor buttons and the SET button. Approximate recording time for proxy data recording This completes formatting of the SD memory card. Part No.
01.AJ-YAX800G(E)14 05.4.5 9:36 AM ページ12 Errors in proxy recording If an error occurs during proxy data recording, refer to the following for the appropriate action: Viewfinder: TURN POWER OFF Display window: E-30 Viewfinder: REC WARNING Display window: 00:00:00:11 Viewfinder: EOM (SD) Operation and causes Action Proxy data recording stops. Turn off the P2 cam and then turn O Either the P2 card or the P2 PROXY card it on again, to perform recording is removed during recording.
01.AJ-YAX800G(E)14 05.4.5 9:36 AM ページ13 Errors in proxy recording (continued) Restoring clips 1Press the THUMBNAIL button to display the thumbnail screen. 2Position the pointer over the clips to be restored using the cursor buttons, and press the SET button. 3Press the MENU BAR button to move the pointer to the menu bar. 4Select OPERATION 5 REPAIR CLIP 5 YES, using the cursor buttons and the SET button. When clips are restored; OProxy data recorded on the P2 card are deleted.
01.AJ-YAX800G(E)14 05.4.5 9:36 AM ページ14 Input voltage: DC 3.3 V ±0.3 V Power consumption: Maximum 1.5 W Operating temperature: 0 °C to +40 °C (32 °F to +104 °F) Operating humidity: 10 % to 85 % (no condensation) Storage temperature: –20 °C to +60 °C (–4 °F to +140 °F) Storage humidity: 10 % to 85 % (no condensation) Mass: approx. 43 g (1.5 oz) Dimensions (WkHkD): approx. 54 mm k 5 mm k 85.
02.AJ-YAX800G(G)13 05.4.5 9:38 AM ページ1 • Öffnen und zerlegen Sie Ihre Ausrüstung nicht, um Feuer, Stromschläge, Beschädigungen und Funktionsstörungen zu vermeiden. • Brechen Sie die Benutzung der Karte sofort ab, falls Sie Rauch, seltsame Gerüche oder Geräusche feststellen oder falls Flüssigkeiten in die Karte eindringen.
02.AJ-YAX800G(G)13 05.4.5 9:38 AM ページ2 Leistungsmerkmale DEUTSCH Die AJ-YAX800G (“P2-PROXY-Karte”) ist eine PC-Video-Encoder-Karte (gleiche Größe wie eine P2-Karte), die ist in der Lage, aus mit einem SpeicherkartenCamcorder (“P2-Cam”) aufgenommenem Material eine komprimierte Datendatei zu erzeugen und diese Datei separat vom Originalmaterial zu speichern.
02.AJ-YAX800G(G)13 05.4.5 9:38 AM ページ3 Einsetzen einer P2-PROXY-Karte Setzen Sie eine P2-PROXY-Karte in den Steckplatz OPTION der P2-Cam ein. Beachten Sie bitte, dass die karte in den P2-Kartensteckplatz Nr. 5 eingesteckt werden muss, falls bereits eine Karte in den Steckplatz OPTION eingesteckt ist. Einsetzen der Karte in den Steckplatz OPTION 1 Schalten Sie die P2-Cam aus. Eine P2-PROXY-Karte wird nicht erkannt, falls sie eingesetzt wird, während die Kamera eingeschaltet ist.
02.AJ-YAX800G(G)13 05.4.5 9:38 AM ページ4 Überprüfungen DF W 10 h minM s frm Initialisieren einer P2-PROXY-Karte 1Setzen Sie eine P2-PROXY-Karte in die P2-Cam ein und schalten Sie sie ein. 2Drücken Sie die Taste THUMBNAIL, um die Miniaturansicht anzuzeigen. 3Drücken Sie die Taste MENU BAR, um den Zeiger auf die Menüleiste zu setzen. 4Wählen Sie OPERATION 5 DEVICE SETUP 5 PROXY 5 INITIALIZE 5 YES mit den Cusortasten und der Taste SET. Dadurch wird durchgeführt.
02.AJ-YAX800G(G)13 05.4.5 9:38 AM ページ5 Überprüfungen (Fortsetzung) Überprüfung auf der Miniaturansicht 1Drücken Sie die Taste THUMBNAIL, um die Miniaturansicht anzuzeigen. 2Drücken Sie die Taste MENU BAR, um den Zeiger auf die Menüleiste zu setzen. 3Drücken Sie die Cursortaste, um den Zeiger auf “PROPERTY” zu bewegen, und drücken Sie die Taste SET. 4Drücken Sie die Cursortaste, um den Zeiger auf “DEVICES” zu bewegen, und drücken Sie die Taste SET.
02.AJ-YAX800G(G)13 05.4.5 9:38 AM ページ6 PROXY-Menü PROXY-Menü Positionen REC MEDIA Einstellbereich OFF P2 P2&SD Wählen Sie das Medium für die ProxyDatenaufnahme. OFF: Keine Proxy-Daten aufgenommen. P2: Die Proxy-Daten werden auf der P2-Karte aufgenommen. P2&SD: Die Proxy-Daten werden auf der P2-Karte und der SD-Speicherkarte aufgenommen. O Das Voice-Memo wird auf der P2-Karte und der SD-Speicherkarte aufgenommen, wenn Sie während der Proxy-Datenaufnahme ein VoiceMemo aufnehmen.
02.AJ-YAX800G(G)13 05.4.5 9:38 AM ページ7 PROXY-Menü (Fortsetzung) $ Die Proxy-Daten werden während der folgenden Betriebsweisen nicht aufgenommen: OIEEE1394 digitale Aufnahme OINTERVAL REC OLOOP REC $ Wählen Sie zum Anzeigen der von der Proxy-Datenaufnahme aufgezeichneten Informationen im Viewfinder der P2-Cam “ON” für die Menüposition “PROXY REC” der Anzeige der Menüseite VF der P2-Cam. Bei Beginn der Aufnahme wird PROXY REC P2” oder “PROXY REC P2&SD” angezeigt.
02.AJ-YAX800G(G)13 05.4.5 9:38 AM ページ8 PROXY-Menü (Fortsetzung) Proxy-Aufnahme im Modus 24P/24PA [Nur anwendbar auf NTSC (525i)] Wenn die Betriebsweise der P2-Cam für die Proxy-Aufnahme auf 24P (2:3) oder 24PA (2:3:3:2) eingestellt ist, ergibt sich in Abhängigkeit von der Aufnahmerate die folgende 5-Frame-Sequenz: Aufnahmerate: 768 kbps, 1500 kbps 24P (2:3) 0 1 2 3 4 Bilder der Proxy-Aufnahme 0 1 1 2 3 3 4 O Unterstrichen gibt die Bilder des zweiten Felds an. 24PA (2:3:3:2) Sequenz Nr.
02.AJ-YAX800G(G)13 05.4.5 9:38 AM ページ9 Aufnahme auf SD-Speicherkarten Für die Proxy-Datenaufnahme sollten SD-Speicherkarten zu 256 MB, 512 MB oder 1 GB mit der Angabe “High Speed” verwendet werden. Für weitere Informationen siehe bitte: http://panasonic.biz/sav/p2 Formatieren Sie die SD-Speicherkarte für die Proxy-Datenaufnahme mit einer P2-Cam. OSD-Speicherkarten, die mit dem SDStandard auf einem PC formatiert werden, können ebenfalls verwendet werden.
02.AJ-YAX800G(G)13 05.4.5 9:38 AM ページ10 Aufnahme auf SD-Speicherkarten (Fortsetzung) Dadurch wird die SD-Speicherkarte formatiert. Annährende Aufnahmezeit für die Proxy-Datenaufnahme Teilenr.
02.AJ-YAX800G(G)13 05.4.5 9:38 AM ページ11 Fehler bei der Proxy-Aufnahme Siehe die folgenden Angaben zur Vorgehensweise, falls Fehler während der ProxyDatenaufnahme auftreten: Fehleranzeige Viewfinder: TURN POWER OFF Anzeigefenster: E-30 Viewfinder: REC WARNING Anzeigefenster: 00:00:00:11 Viewfinder: EOM (SD) Betrieb und Ursachen Vorgehensweise Schalten Sie die P2-Cam aus und Proxy-Datenaufnahme hält an.
02.AJ-YAX800G(G)13 05.4.5 9:38 AM ページ12 Fehler bei der Proxy-Aufnahme (Fortsetzung) DEUTSCH Wiederherstellung von Clips 1Drücken Sie die Taste THUMBNAIL, um die Miniaturansicht anzuzeigen. 2Positionieren Sie den Zeiger mit den Cursortasten auf den wieder herzustellenden Clips und drücken Sie die Taste SET. 3Drücken Sie die Taste MENU BAR, um den Zeiger auf die Menüleiste zu setzen. 4Wählen Sie OPERATION 5 REPAIR CLIP 5 YES mit den Cusortasten und der Taste SET.
02.AJ-YAX800G(G)13 05.4.5 9:38 AM ページ13 Spezifikationen Eingangsspannung: 3,3 V dc ±0,3 V Stromverbrauch: Max. 1,5 W Betriebstemperatur: 0 °C bis +40 °C Betriebsfeuchtigkeit: 10 % bis 85 % (nicht kondensierend) Lagerungstemperatur: –20 °C bis +60 °C Lagerungsfeuchtigkeit: 10 % bis 85 % (nicht kondensierend) Masse: ca. 43 g Abmessungen (BkHkT): ca.
03.AJ-YAX800G(F)13 05.4.5 9:39 AM ページ1 • Pour éviter les dangers d’incendie, de choc électrique, les dommages ou les dysfonctionnements de votre appareil, ne le démontez pas et ne le remodelez pas. • Cessez immédiatement d’utiliser la carte si vous remarquez de la fumée, des odeurs ou des bruits bizarres ou si du liquide pénètre dans la carte. Table des matières Manipulation et rangement . . . . . . . . 1 Menu PROXY . . . . . . . . . . . . . . . . . . 6 Caractéristiques . . . . . . . . . . . . . . . . .
03.AJ-YAX800G(F)13 05.4.5 9:39 AM ページ2 Caractéristiques L’AJ-YAX800G (“Carte P2 PROXY”) est une carte pour encodeur vidéo du type carte de PC (elle a la même forme que la carte P2). Elle permet de créer un fichier de données compressées à partir du matériel enregistré avec un caméscope à carte mémoire (“caméscope P2”) et de mémoriser ce fichier en le séparant du matériel original.
03.AJ-YAX800G(F)13 05.4.5 9:39 AM ページ3 Installation d’une carte P2 PROXY Insérez une carte P2 PROXY dans la fente OPTION du caméscope P2. Notez que la carte devrait être introduite dans la fente de carte P2 No 5 s’il y a déjà une autre carte dans la fente OPTION. Introduction d’une carte dans la fente OPTION 1 Éteignez le caméscope P2. Le caméscope ne reconnaît pas la carte P2 PROXY si celle-ci est introduite alors qu’il est allumé.
03.AJ-YAX800G(F)13 05.4.5 9:39 AM ページ4 Opérations de vérification Allumez le caméscope P2 pour vérifier si la carte P2 PROXY fonctionne. OLorsqu’une carte P2 PROXY est introduite dans la fente OPTION et qu’elle est correctement reconnue, la fenêtre d’affichage du caméscope P2 affiche “OP-SLOT”. DF W 0 VTCG Lors de la première utilisation d’une carte P2 PROXY sur le caméscope P2, il faut initialiser la carte à partir du menu PROXY.
03.AJ-YAX800G(F)13 05.4.5 9:39 AM ページ5 Opérations de vérification (suite) Bouton MENU BAR Bouton THUMBNAIL Le message “SOFT: NO VERSION” s’affiche. Cela n’indique par une erreur, mais résulte du fait que la version est reflétée avec l’enregistrement des données proxy.
03.AJ-YAX800G(F)13 05.4.5 9:39 AM ページ6 Menu PROXY Paramétrage du menu 1Introduisez une carte P2 PROXY dans le caméscope P2 et mettez-le sous tension. 2Appuyez sur le bouton THUMBNAIL pour afficher l’écran d’image miniature. 3Appuyez sur le bouton MENU BAR pour déplacer le pointeur dans la barre de menu. 4Sélectionnez OPERATION 5 DEVICE SETUP 5 PROXY à l’aide des touches curseur et du bouton SET. 5Sélectionnez les options de menu et indiquez les valeurs avec les touches curseur et le bouton SET.
03.AJ-YAX800G(F)13 05.4.5 9:39 AM ページ7 Menu PROXY (suite) $ Pour afficher les informations capturées par enregistrement de données proxy sur le viseur du caméscope P2, sélectionnez “ON” comme option de menu “PROXY REC” dans l’écran du menu page VF du caméscope P2. “PROXY REC P2” ou “PROXY REC P2&SD” s’affiche au début de l’enregistrement.
03.AJ-YAX800G(F)13 05.4.
03.AJ-YAX800G(F)13 05.4.5 9:39 AM ページ9 Pour l’enregistrement de données proxy, utilisez des cartes mémoires SD de 256 Mo, 512 Mo ou 1 Go avec l’indication “High Speed”. Pour plus d’informations, veuillez aller au site: http://panasonic.biz/sav/p2 Pour l’enregistrement de données proxy, formatez la carte mémoire SD à l’aide du caméscope P2. OVous pouvez aussi utiliser les cartes mémoires SD formatées suivant le standard SD sur un PC.
03.AJ-YAX800G(F)13 05.4.5 9:39 AM ページ10 Enregistrement sur des cartes mémoires SD (suite) Formatage d’une carte mémoire SD 1Introduisez une carte mémoire SD dans le caméscope P2. 2Appuyez sur le bouton THUMBNAIL pour afficher l’écran d’image miniature. 3Appuyez sur le bouton MENU BAR pour déplacer le pointeur dans la barre de menu. 4Sélectionnez OPERATION 5 FORMAT 5 SD CARD 5 YES à l’aide des touches curseur et du bouton SET. Le formatage de la carte mémoire SD est terminé.
03.AJ-YAX800G(F)13 05.4.5 9:39 AM ページ11 Erreurs d’enregistrement proxy S’il y a une erreur pendant l’enregistrement de données proxy, veuillez intervenir comme suit: Viseur: TURN POWER OFF Fenêtre d’affichage: E-30 Viseur: REC WARNING Fenêtre d’affichage: 00:00:00:11 Viseur: EOM (SD) Opération et causes Intervention Éteignez le caméscope P2 et rallumez-le pour vérifier le fonctionnement des opérations d’enregistrement et de lecture.
03.AJ-YAX800G(F)13 05.4.5 9:39 AM ページ12 Erreurs d’enregistrement proxy (suite) Restauration de clips 1Appuyez sur le bouton THUMBNAIL pour afficher l’écran d’image miniature. 2Positionnez le pointeur sur les clips à restaurer à l’aide des touches curseur et appuyez sur le bouton SET. 3Appuyez sur le bouton MENU BAR pour déplacer le pointeur dans la barre de menu. 4Sélectionnez OPERATION 5 REPAIR CLIP 5 YES à l’aide des touches curseur et du bouton SET.
03.AJ-YAX800G(F)13 05.4.
04.AJ-YAX800G(I)13 05.4.5 9:40 AM ページ1 • Per ridurre il pericolo d’incendio, scosse, danni o funzionamento non corretto, evitare di smontare o modificare il prodotto. • In caso di emissione di fumo, odori o suoni anomali, oppure se la scheda dovesse entrare in contatto con un liquido, interrompere immediatamente l’utilizzo della scheda.
04.AJ-YAX800G(I)13 05.4.5 9:40 AM ページ2 Caratteristiche L’unità AJ-YAX800G (“scheda P2 PROXY”) è una scheda di codifica video di tipo simile a una scheda PC (la forma è identica a quella di una scheda P2). Essa è in grado di creare un file di dati compressi dal materiale registrato con un Camcorder a schede di memoria (“cam P2”), e memorizzare quel file in una posizione separata rispetto al materiale originale.
04.AJ-YAX800G(I)13 05.4.5 9:40 AM ページ3 Installazione della scheda P2 PROXY Inserire una scheda P2 PROXY nello slot OPTION della cam P2. Inserire la scheda nello slot per scheda P2 N. 5 se vi fosse un’altra scheda già inserita nello slot OPTION. Inserimento di una scheda nello slot OPTION 1 Spegnere la cam P2. Se viene inserita quando la camera è accesa, la scheda P2 PROXY non viene riconosciuta. 2 Rimuovere le due viti e sollevare il coperchio dello slot OPTION.
04.AJ-YAX800G(I)13 05.4.5 9:40 AM ページ4 Operazioni di verifica Accendere la cam P2 per verificare che la scheda P2 PROXY sia operativa. OQuando una scheda P2 PROXY viene inserita nello slot OPTION e viene correttamente riconosciuta, sul display della cam P2 viene visualizzata l’indicazione “OP-SLOT”. DF W 0 VTCG La prima volta che una scheda P2 PROXY viene utilizzata su una cam P2, è necessario inizializzare la scheda utilizzando il menu PROXY.
04.AJ-YAX800G(I)13 05.4.5 9:40 AM ページ5 Operazioni di verifica (continua) Verifiche sulla schermata delle icone miniaturizzate 1Premere il pulsante THUMBNAIL per visualizzare la schermata delle icone miniaturizzate. 2Premere il pulsante MENU BAR per spostare il puntatore verso la barra dei menu. 3Premere il pulsante del cursore per spostare il puntatore su “PROPERTY” e premere il pulsante SET. 4Premere il pulsante del cursore per spostare il puntatore su “DEVICES” e premere il pulsante SET.
04.AJ-YAX800G(I)13 05.4.5 9:40 AM ページ6 Menu PROXY Menu PROXY Voci REC MEDIA Intervallo di Regolazione OFF P2 P2&SD Selezionare il supporto per la registrazione dei dati proxy. OFF: Non vengono registrati dati proxy. P2: I dati proxy vengono registrati su scheda P2. P2&SD: I dati proxy vengono registrati sia sulla scheda P2 che sulla scheda di memoria SD.
04.AJ-YAX800G(I)13 05.4.5 9:40 AM ページ7 Menu PROXY (continua) $ I dati proxy non vengono registrati nelle seguenti modalità: ORegistrazione digitale IEEE1394 OINTERVAL REC OLOOP REC $ Per visualizzare sul mirino della cam P2 le informazioni catturate con la registrazione dei dati proxy, selezionare “ON” come voce del menu “PROXY REC” dalla schermata del menu alla pagina VF sulla cam P2. All’inizio della registrazione apparirà l’indicazione “PROXY REC P2” o quella “PROXY REC P2&SD”.
04.AJ-YAX800G(I)13 05.4.5 9:40 AM ページ8 Menu PROXY (continua) Registrazione proxy in modalità 24P/24PA [disponibile solo per NTSC (525i)] Se la modalità operativa della cam P2 è impostata su 24P (2:3) o 24PA (2:3:3:2) per la registrazione proxy, la sequenza in 5 quadri apparirà nei seguenti modi a seconda delle velocità di registrazione: Velocità di registrazione: 768 kbps, 1500 kbps 24P (2:3) Sequenza N.
04.AJ-YAX800G(I)13 05.4.5 9:40 AM ページ9 Registrazione su scheda di memoria SD Per la registrazione dei dati proxy si dovrebbero utilizzare schede SD da 256 MB, 512 MB o 1 GB con indicazione “High Speed”. Per maggiori informazioni andare alla pagina: http://panasonic.biz/sav/p2 Per la registrazione dei dati proxy, formattare la scheda di memoria SD utilizzando una cam P2. OÈ possibile utilizzare anche schede di memoria SD formattate con il PC secondo lo standard SD.
04.AJ-YAX800G(I)13 05.4.5 9:40 AM ページ10 Registrazione su scheda di memoria SD (continua) Formattazione di una scheda di memoria SD 1Inserire una scheda di memoria SD nella cam P2. 2Premere il pulsante THUMBNAIL per visualizzare la schermata delle icone miniaturizzate. 3Premere il pulsante MENU BAR per spostare il puntatore verso la barra dei menu. 4Selezionare OPERATION 5 FORMAT 5 SD CARD 5 YES utilizzando i pulsanti del cursore e il pulsante SET.
04.AJ-YAX800G(I)13 05.4.5 9:40 AM ページ11 Errori nella registrazione proxy Se dovesse verificarsi un errore nel corso della registrazione di dati proxy, consultare la tabella in basso per intraprendere l’azione appropriata: Indicazione di errore Mirino: TURN POWER OFF Finestra display: E-30 Mirino: REC WARNING Finestra display: 00:00:00:11 Mirino: EOM (SD) Operazione e cause Azione La registrazione di dati proxy si interrompe.
04.AJ-YAX800G(I)13 05.4.5 9:40 AM ページ12 Errori nella registrazione proxy (continua) Ripristino dei clip 1Premere il pulsante THUMBNAIL per visualizzare la schermata delle icone miniaturizzate. 2Posizionare il puntatore sopra i clip da ripristinare utilizzando i pulsanti del cursore e premere il pulsante SET. 3Premere il pulsante MENU BAR per spostare il puntatore verso la barra dei menu. 4Selezionare OPERATION 5 REPAIR CLIP 5 YES utilizzando i pulsanti del cursore e il pulsante SET.
04.AJ-YAX800G(I)13 05.4.
05.AJ-YAX800G(S)13 05.4.5 9:41 AM ページ1 • Para reducir el riesgo de incendios, sacudidas eléctricas, daños o mal funcionamiento de su equipo, no lo desmonte ni lo modifique. • Deje inmediatamente de utilizar la tarjeta si nota humo, olores o sonidos extraños, o si en la tarjeta se vierte algún líquido.
05.AJ-YAX800G(S)13 05.4.5 9:42 AM ページ2 Características El AJ-YAX800G (“Tarjeta P2 PROXY”) es una tarjeta codificadora de video de tipo tarjeta de PC (misma forma que una tarjeta P2). Puede crear un archivo de datos comprimido a partir del material grabado con un camascopio basado en tarjeta de memoria (“Cámara P2”), y guardar ese archivo por separado respecto al material original.
05.AJ-YAX800G(S)13 05.4.5 9:42 AM ページ3 Instalación de la tarjeta P2 PROXY Inserte una tarjeta P2 PROXY en la ranura OPTION de la cámara P2. Note que la tarjeta tiene que insertarse en la ranura de tarjeta P2 No. 5 si en la ranura OPTION ya hay instalada otra tarjeta. Cómo insertar una tarjeta en la ranura OPTION 1 Apague la cámara P2. La cámara no reconocerá la tarjeta P2 PROXY si ésta se inserta en la cámara cuando está encendida. 2 Quite los dos tornillos y levante la tapa de la ranura OPTION.
05.AJ-YAX800G(S)13 05.4.5 9:42 AM ページ4 Verificación de las operaciones Encienda la cámara P2 para comprobar si la tarjeta P2 PROXY está funcionando. OCuando en la ranura OPTION se inserta una tarjeta P2 PROXY y se reconoce correctamente, la ventana de visualización de la cámara P2 muestra “OP-SLOT”. DF W La inicialización ha terminado. 10 h minM s frm 20 F 30 F 40 OO OP-SLOT 13 -dB 24 OCuando en la ranura para tarjetas P2 No.
05.AJ-YAX800G(S)13 05.4.5 9:42 AM ページ5 Verificación de las operaciones (continuación) Verificación en la pantalla de las miniaturas 1Pulse el botón THUMBNAIL para visualizar la pantalla de las miniaturas. 2Pulse el botón MENU BAR para mover el puntero en la barra de menús. 3Pulse el botón CURSOR para mover el puntero en “PROPERTY”, y pulse el botón SET. 4Pulse el botón CURSOR para mover el puntero en “DEVICES”, y pulse el botón SET.
05.AJ-YAX800G(S)13 05.4.5 9:42 AM ページ6 Menú PROXY Ajuste del menú 1Inserte una tarjeta P2 PROXY en la cámara P2 y luego enciéndala. 2Pulse el botón THUMBNAIL para visualizar la pantalla de las miniaturas. 3Pulse el botón MENU BAR para mover el puntero en la barra de menús. 4Seleccione OPERATION 5 DEVICE SETUP 5 PROXY utilizando los botones CURSOR y el botón SET. 5Seleccione los elementos del menú y especifique los valores utilizando los botones CURSOR y el botón SET.
05.AJ-YAX800G(S)13 05.4.5 9:42 AM ページ7 Menú PROXY (continuación) $ Los datos proxy no se graban durante la operación en los siguientes modos: OGrabación digital de IEEE1394 OINTERVAL REC OLOOP REC $ Para visualizar la información capturada por medio de la grabación de datos proxy en el visor de la cámara P2, seleccione “ON” como elemento de menú de “PROXY REC” desde la pantalla de la página VF del menú de la cámara P2.
05.AJ-YAX800G(S)13 05.4.5 9:42 AM ページ8 Menú PROXY (continuación) Grabación proxy en el modo 24P/24PA [Aplicable tan sólo al NTSC (525i)] Cuando el modo de funcionamiento de la cámara P2 está fijado en 24P (2:3) o 24PA (2:3:3:2) para la grabación proxy, la secuencia de 5 fotogramas será como sigue, dependiendo de la velocidad de grabación: Velocidad de grabación: 768 kbps, 1500 kbps 24P (2:3) Secuencia No.
05.AJ-YAX800G(S)13 05.4.5 9:42 AM ページ9 Para la grabación de datos proxy, hay que utilizar tarjetas de memoria SD de 256 MB, de 512 MB o de 1 GB con la indicación “High Speed”. Para más información, visite el sitio: http://panasonic.biz/sav/p2 Para la grabación de datos proxy, formatee la tarjeta de memoria SD utilizando una cámara P2. OTambién pueden utilizarse tarjetas de memoria SD formateadas en un PC bajo el estándar SD.
05.AJ-YAX800G(S)13 05.4.5 9:42 AM ページ10 Grabación en tarjetas de memoria SD (continuación) Formateo de una tarjeta de memoria SD 1Inserte una tarjeta de memoria SD en la cámara P2. 2Pulse el botón THUMBNAIL para visualizar la pantalla de las miniaturas. 3Pulse el botón MENU BAR para mover el puntero en la barra de menús. 4Seleccione OPERATION 5 FORMAT 5 SD CARD 5 YES, utilizando los botones CURSOR y el botón SET.
05.AJ-YAX800G(S)13 05.4.5 9:42 AM ページ11 Fallos en la grabación proxy Si se produce un fallo durante la grabación de datos proxy, consulte lo siguiente para llevar a cabo la acción más apropiada: Visualización fallo Operación y causas Acción La grabación de datos proxy se detiene. Apague la cámara P2 y luego Visor: O La tarjeta P2 o la tarjeta P2 PROXY se ha vuélvala a encender para llevar a TURN POWER OFF removido durante la grabación.
05.AJ-YAX800G(S)13 05.4.5 9:42 AM ページ12 Fallos en la grabación proxy (continuación) Cómo restaurar los clips 1Pulse el botón THUMBNAIL para visualizar la pantalla de las miniaturas. 2Coloque el puntero encima de los clips por restaurar utilizando los botones CURSOR y pulse el botón SET. 3Pulse el botón MENU BAR para mover el puntero en la barra de menús. 4Seleccione OPERATION 5 REPAIR CLIP 5 YES, utilizando los botones CURSOR y el botón SET.
05.AJ-YAX800G(S)13 05.4.5 9:42 AM ページ13 Especificaciones Voltaje de entrada: DC 3,3 V ±0,3 V Consumo de energía: Máximo 1,5 W Temperatura de funcionamiento: De 0 °C a +40 °C Humedad de funcionamiento: Entre el 10 % y el 85 % (sin condensación) Temperatura de almacenamiento: De –20 °C a +60 °C Humedad ambiental de almacenamiento: Entre el 10 % y el 85 % (sin condensación) Masa: aprox. 43 g Dimensiones (AnkAlkProf): aprox.
O 为避免火灾、电击以及设备的损害或故障,不要分解和改装本机。 O 如果发现冒烟、闻到强烈的气味或听到声音时,或者如果液体进入卡内时,请立 即停止使用该卡。 本产品相关软件信息 顾客公告:本产品中包括基于 GNU General Public License (GPL) 和 GNU Lesser General Public License (LGPL) 授权的软件,顾客有权获得、变更和再次发布这些软 件的源代码。 可以在本说明书的 GPL/LGPL 部中找到关于 GPL/LGPL 的详细资料。其内容以原文 (英文)记载。 另外,请浏览下述网站以获得源代码。 http://panasonic.biz/sav/ 恕不答复有关顾客从上述网站所获得的源代码内容的咨询。 目录表 操作和保存时的注意事项 . . . . . . . . . . 1 代理服务器菜单 . . . . . . . . . . . . . . . . . 6 特点 . . . . . . . . . . . . . . . . . . . . . . . . . . 2 在 SD 存储卡上记录 . . . . . . . . . . .
特点 AJ-YAX800G ("P2 代理服务器卡") 是一种 PC 卡型视频编码卡 (形状与 P2 卡相同)。 它可以将广播级数字摄录一体机 (“P2 摄录一体机”) 记录的素材生成一个压缩数据 文件,并可以将该文件与原始素材分别保存。 用本功能制作的文件包括一个用 MPEG4 格式压缩的视听文件和一个实时元数据文件 (时间码、用户比特和 UMID 信息)。这些文件可以存储在 P2 卡或 SD 存储卡上。 用 P2 摄录一体机记录的素材可以存储为数据文件,它会比原始资料的容量要小一些。 产品的构成 OP2 代理服务器卡 . . . . . . . . . . . . . .k1 O盒盖 . . . . . . . . . . . . . . . . . . . . . . .k1 O盒子 . . . . . . . . . . . . . . . . . . . . . . .
安装 P2 代理服务器卡 将 P2 代理服务器卡插入 P2 摄录一体机的选件插槽。 如果其他卡已经插入该选件插槽,则 P2 代理服务器卡应插在 5 号 P2 卡插槽中。 将卡插入选件插槽 1 关闭 P2 摄录一体机。 如果在电源打开时将 P2 代理服务器卡 插入摄像机,则该卡将不能被识别。 2 取下两个螺丝,取下选件插槽的盖子。 4 装上选件插槽盖,再次固定两个螺丝。 从选件插槽中取出 P2 代理服务器卡 1按下弹出按钮,确认按钮已经弹起。 2再次按下弹出按钮。 本操作将弹出 P2 代理服务器卡。从插 槽中将其取出。 3 确认按下弹出按钮,然后将 P2 代理服 务器卡插入槽中。 弹出按钮 将 P2 代理服务器卡插入 P2 卡插槽中 请务必将 P2 代理服务器卡插入 5 号插 槽。如果 P2 代理服务器卡插在别的插槽 中,则不能执行代理服务器数据记录。 有关插入卡的更多信息,请参阅 P2 摄录 一体机的操作手册。 5 3 (C)
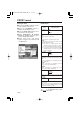
确认操作 打开 P2 摄录一体机确认 P2 代理服务器卡 正在工作。 O当 P2 代理服务器卡插入到选件插槽并 被识别时,P2 摄录一体机的显示窗显 示出“OP-SLOT” 。 在 P2 摄录一体机上第一次使用 P2 代理 服务器卡时,需要从代理服务器菜单将 卡初始化。 初始化 P2 代理服务器卡 1将 P2 代理服务器卡插入 P2 摄录一体 机后打开电源。 2按下缩略图按钮显示缩略图画面。 3按下菜单栏按钮将指针移动到菜单栏。 4用光标按钮和 SET 按钮,选择“操作” 5“设备设置”5“低码率素材”5 “初始化”5“是” 。 这样初始化完成。 DF W 0 VTCG 10 h minM MEDIA E BATT E s frm 20 F 30 F 40 OO OP-SLOT 13 -dB 24 O当 P2 代理服务器卡插入到 P2 卡的 5 号插槽并被识别时,访问 LED 呈橙色 闪烁。 访问 LED 中 文 4 (C)
确认操作 (继续) 在缩略图画面上确认 1按下缩略图按钮显示缩略图画面。 2按下菜单栏按钮将指针移动到菜单栏。 3按下光标按钮将指针移动到“属性”, 然后按下 SET 按钮。 4按下光标按钮将指针移动到“设备”, 然后按下 SET 按钮。 5按下光标按钮将指针移动到“低码率 素材” ,然后按下 SET 按钮。 显示出“软件版本:不能取得”的信息。 这并不表示出现了错误,而是代理服务 器数据记录版本所反映事实的结果。 电源打开时 菜单栏按钮 代理服务器数据记录后 (选件插槽) 缩略图按钮 光标按钮 SET 按钮 (5 号 P2 卡插槽) 5 (C)
代理服务器菜单 设置菜单 1将 P2 代理服务器卡插入 P2 摄录一体 机后打开电源。 2按下缩略图按钮显示缩略图画面。 3按下菜单栏按钮将指针移动到菜单栏。 4用光标按钮和 SET 按钮,选择“操作” 5“设备设置”5“低码率素材” 。 5用光标按钮和 SET 按钮,选择菜单项 目和指定值。 代理服务器菜单 项目 记录元数据 可调整的范围 OFF P2 P2&SD 为代理服务器数据记录选择媒体。 OFF: 不记录代理服务器数据。 P2: 在 P2 卡上记录代理服务器数据 P2&SD: 同时在 P2 卡和 SD 存储卡上记录代理服务器数 据。 O 如果在代理服务器数据记录的时候记录语音 提示,语音提示会同时记录在 P2 卡和 SD 存 储卡上。 O 如果在代理服务器数据记录后记录语音提示, 语音提示仅记录在 P2 卡上。 TC 字符 OFF 上段 下段 指定一项,将时间码添加到记录的视频上,作为代 理服务器数据显示。 OFF: 在记录的视频上不添加时间码显示。 上段: 在记录视频的上部添加时间码显示。 下段: 在记录视频的下部添加时间码显示。 记录码率 192kbps 768kbps 1500 k
代理服务器菜单 (继续) $ 在下列模式下操作时,不能记录代理 服务器数据: OIEEE1394 数字记录 OINTERVAL REC OLOOP REC 记录速率和记录信号 (视频和音频) 记录速率 192 kbps $ 若想在 P2 摄录一体机的寻像器上显示 用代理服务器数据记录拍摄的信息, 请从 P2 摄录一体机的 VF 菜单页的 画 面 中 将 “PROXY REC”菜单项选择为“ON” 。 在记录的开始“PROXY REC P2”和 “PROXY REC P2&SD”都不会显示。 $ 在素材拍摄的过程中,如果代理服务 器数据记录在 P2 卡上,则记录的时间 可能比 P2 卡操作手册上说明的时间 短。 $ 在代理服务器菜单设置过程中,P2 摄 录一体机不能进行任何记录操作。 7 (C) 768 kbps 1500 kbps 视频 (QVGA) NTSC(525i) 15 帧/秒 PAL(625i) 12.
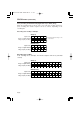
代理服务器菜单 (继续) 24P/24PA 模式 [仅适用于 NTSC (525i)] 下的代理服务器记录 当 P2 摄录一体机的操作模式被设置为 24P (2:3) 或 24PA (2:3:3:2) 进行代理服务器记 录时,根据记录的速率连续的 5 帧将如下显示: 记录速率: 768 kbps,1500 kbps 24P (2:3) 序号 0 1 2 3 4 原始素材的图像 0 0 1 1 1 2 2 3 3 3 代理服务器记录的图像 0 1 1 2 3 3 4 O 下划线表示第二区的图像。 24PA (2:3:3:2) 序号 0 1 2 原始素材的图像 0 0 1 1 1 2 2 2 3 3 代理服务器记录的图像 0 1 1 2 3 记录速率: 192 kbps 如果记录速率是 192 kbps,则不能正确记录连续的 5 帧。 24P (2:3) 序号 0 1 2 3 4 0 1 2 3 4 原始素材的图像 0 0 1 1 1 2 2 3 3 3 4 4 5 5 5 6 6 7 7 7 代理服务器记录的图像 0 1 3 5
在 SD 存储卡上记录 对于代理服务器数据记录,可以使用带 有“高速”指示的 256 MB、512 MB 或 1 GB 的 SD 存储卡。 有关更多的信息,请浏览: http://panasonic.
在 SD 存储卡上记录 (继续) 格式化 SD 存储卡 1将 SD 存储卡插入 P2 摄录一体机中。 2按下缩略图按钮显示缩略图画面。 3按下菜单栏按钮将指针移动到菜单栏。 4用光标按钮和 SET 按钮,选择“操作” 5 “格式化”5 “SD 存储卡”5 “是” 。 这样 SD 存储卡的格式化完成。 代理服务器数据记录的近似记录时间 商品号和 SD 存储卡的容量 记录速率和记录时间 192 kbps 768 kbps 1500 kbps RP-SDH256N1A (256 MB) 约 137 分钟 约 35 分钟 约 19 分钟 RP-SDH512N1A (512 MB) 约 278 分钟 约 71 分钟 约 39 分钟 RP-SDH512J1A (512 MB) 约 237 分钟 约 69 分钟 约 38 分钟 RP-SDH0G1J1A (1 GB) 约 536 分钟 约 139 分钟 约 77 分钟 RP-SDK0G1J1A (1 GB) 约 536 分钟 约 139 分钟 约 77 分钟 实际记录时间将视记录条件而定 (场景数量、语音提 示和片段。) < 注意 > 如果
代理服务器记录时的错误 如果在代理服务器数据记录过程中发生错误,请参阅下表进行适当处理: 显示的错误 寻像器: TURN POWER OFF 显示窗: E-30 寻像器: REC WARNING 显示窗: 00:00:00:11 寻像器: EOM (SD) 操作和原因 动作 停止代理服务器数据记录。 关闭 P2 摄录一体机,然后再次打开, O 记录过程中取出 P2 卡或 P2 代理服务器卡。 为检查请进行记录和重放的操作。 修复取出的 P2 卡上的场景片段 (请 参阅第 12 页)。 O 记录在 P2 卡上的代理服务器数 停止代理服务器数据记录。 据被删除。 O 在 P2 卡上记录时出现错误。 O 记录在 SD 存储卡上的代理服务 器数据不能被修复。 停止 SD 存储卡上的代理服务器数据记录,但 记录结束后插入一张新的 SD 存储 P2 卡上的记录继续。 卡。 O SD 存储卡上没有剩余容量。 O 记录在 SD 存储卡上的代理服务 器数据被删除。 若想修复被删除的代理服务器数据, 在 P2 卡上选择场景片段,然后复制 到 SD 存储卡上 (请参阅第 12 页)。 寻像器: SD CARD WRITE
代理服务器记录时的错误 (继续) 修复场景片段 1按下缩略图按钮显示缩略图画面。 2用光标按钮确定要修复的场景片段上指 针的位置,然后按下 SET 按钮。 3按下菜单栏按钮将指针移动到菜单栏。 4用光标按钮和 SET 按钮,选择“操作” 5“修复场景片段”5“是” 。 < 注意 > 修复场景片段时 O记录在 P2 卡上的代理服务器数据被删除。 O记录在 SD 存储卡上的代理服务器数据不能被修复。 将片段复制到 SD 存储卡上 1按下缩略图按钮显示缩略图画面。 2用光标按钮确定要复制的场景片段上指 针的位置,然后按下 SET 按钮。 3按下菜单栏按钮将指针移动到菜单栏。 4用光标按钮和 SET 按钮,选择“操作” 5“复制”5“SD 存储卡”5“是” 。 中 文 12 (C)
规格 输入电压: DC 3.3 V ± 0.3 V 消耗功率: 最大 1.5 W 工作温度: 0°C~+40°C 工作湿度: 10%~85% (无结露) 保管温度: –20°C~+60°C 保管湿度: 10%~85% (无结露) 质量: 约 43 g 外观尺寸 (宽×高×深) 约 54 mm × 5 mm × 85.6 mm 接口: 标准 PC 卡 文件格式: MP4 (ISO/IEC14496 标准) 视频压缩格式: MPEG4 简单版 (4:2:0) 音频压缩格式: AAC (Advanced Audio Coding) 设置模式: 192kbps 视频 : QVGA,15 帧/秒 (525i),12.
07.AJ-YAX800G(J/GPL/表4)24 05.4.5 9:13 AM ページ1 保証書別添付 製造番号は、品質管理上重要なものです。 製品本体と保証書の製造番号をお確かめください。 本製品に関するソフトウェア情報 本製品には、GNU General Public License(GPL)ならびに、GNU Lesser General Public License(LGPL)に基づきライセンスされるソフトウェアが含 まれており、お客様は、これらのソフトウェアのソースコードの入手・改変・再配 布の権利があることをお知らせいたします。 GPL と LGPL に関する詳細は、本書の GPL/LGPL 部でご覧いただけます。なお、 原文(英文)で記載しております。 また、ソースコードの入手については、下記のホームページをご覧ください。 http://panasonic.biz/sav/ なお、お客様が入手されたソースコードの内容等についてのお問い合わせは、ご遠 慮ください。 目 次 ご注意 . . . . . . . . . . . . . . . . . . . . . .
07.AJ-YAX800G(J/GPL/表4)24 05.4.
07.AJ-YAX800G(J/GPL/表4)24 05.4.5 9:13 AM ページ3 特 長 AJ-YAX800G は、PC カード型(P2 カードと同じ形状)のビデオエンコーダー カード(以下“P2 PROXY カード”と記載)です。 メモリーカードカメラレコーダー(以下“P2 カム”と記載)で撮影した素材を圧 縮データファイルにして、素材とは別の領域に記録する機能を持っています。 このファイルは、MPEG4 型式で圧縮した映像音声ファイルとリアルタイムメタデ ータファイル(タイムコード・ユーザーズビット・ UMID 情報)で、P2 カードや SD メモリーカードに記録します。 撮影した素材を、素材よりも容量の少ないデータファイルとして記録することがで きます。 商品構成 O P2 PROXY カード . . . . . . . . . .k1 O キャップ . . . . . . . . . . . . . . . . . .k1 O ケース . . . . . . . . . . . . . . . . . . . .
07.AJ-YAX800G(J/GPL/表4)24 05.4.
07.AJ-YAX800G(J/GPL/表4)24 05.4.
07.AJ-YAX800G(J/GPL/表4)24 05.4.
07.AJ-YAX800G(J/GPL/表4)24 05.4.
07.AJ-YAX800G(J/GPL/表4)24 05.4.
07.AJ-YAX800G(J/GPL/表4)24 05.4.5 9:13 AM ページ9 PROXY メニュー(つづき) 24P/24PA モードでのプロキシ記録 [NTSC (525i) のみ] P2 カムの動作モードを 24P(2 : 3)や 24PA(2 : 3 : 3 : 2)に設定して プロキシデータを記録した場合、記録レートにより 5 フレームのシーケンスは下記 のようになります。 記録レート: 768 kbps、1500 kbps 24P (2:3) シーケンス No. 0 1 2 3 4 素材の映像 0 0 1 1 1 2 2 3 3 3 プロキシ記録の映像 0 1 1 2 3 3 4 O アンダーラインは、第 2 フィー ルドの映像を示します。 24PA (2:3:3:2) シーケンス No.
07.AJ-YAX800G(J/GPL/表4)24 05.4.5 9:13 AM ページ10 SD メモリーカードへの記録 プロキシデータの記録を行う SD メモ リーカードには、「High Speed」など と表示された 256 MB、512 MB、1 GB の SD メモリーカードを使用してくだ さい。 詳しくは、下記のホームページをご覧 ください。 http://panasonic.
07.AJ-YAX800G(J/GPL/表4)24 05.4.
07.AJ-YAX800G(J/GPL/表4)24 05.4.
07.AJ-YAX800G(J/GPL/表4)24 05.4.
07.AJ-YAX800G(J/GPL/表4)24 05.4.
07.AJ-YAX800G(J/GPL/表4)24 05.4.5 9:13 AM ページ15 定 格 入力電圧: DC 3.3 V ± 0.3 V 消費電力: 最大 1.5 W 動作温度: 0 ℃∼+ 40 ℃ 動作湿度: 10 %∼ 85 %(結露がないこと) 保存温度: − 20 ℃∼+ 60 ℃ 保存湿度: 10 %∼ 85 %(結露がないこと) 質量: 約 43 g 外形寸法(幅×高さ×奥行): 約 54 mm × 5 mm × 85.6 mm インターフェース: PC カード規格 ファイルフォーマット: MP4 (ISO/IEC14496 規格) ビデオ圧縮フォーマット: MPEG4 シンプルプロファイル(4 : 2 : 0) オーディオ圧縮フォーマット: AAC (Advanced Audio Coding) 設定モード: 192 kbps ビデオ :QVGA、15 フレーム/秒(525i)、12.
07.AJ-YAX800G(J/GPL/表4)24 05.4.5 9:13 AM ページi GPL $ GNU GENERAL PUBLIC LICENSE Version 2, June 1991 Copyright (C) 1989, 1991 Free Software Foundation, Inc. 59 Temple Place - Suite 330, Boston, MA 02111-1307, USA Everyone is permitted to copy and distribute verbatim copies of this license document, but changing it is not allowed. Preamble The licenses for most software are designed to take away your freedom to share and change it.
07.AJ-YAX800G(J/GPL/表4)24 05.4.5 9:13 AM ページii GPL (continued) Thus, it is not the intent of this section to claim rights or contest your rights to work written entirely by you; rather, the intent is to exercise the right to control the distribution of derivative or collective works based on the Program.
07.AJ-YAX800G(J/GPL/表4)24 05.4.5 9:13 AM ページiii GPL (continued) 8. If the distribution and/or use of the Program is restricted in certain countries either by patents or by copyrighted interfaces, the original copyright holder who places the Program under this License may add an explicit geographical distribution limitation excluding those countries, so that distribution is permitted only in or among countries not thus excluded.
07.AJ-YAX800G(J/GPL/表4)24 05.4.5 9:13 AM ページiv LGPL Version 2.1, February 1999 Copyright (C) 1991, 1999 Free Software Foundation, Inc. 59 Temple Place, Suite 330, Boston, MA 02111-1307 USA Everyone is permitted to copy and distribute verbatim copies of this license document, but changing it is not allowed. [This is the first released version of the Lesser GPL. It also counts as the successor of the GNU Library Public License, version 2, hence the version number 2.1.
07.AJ-YAX800G(J/GPL/表4)24 05.4.5 9:13 AM ページv LGPL (continued) TERMS AND CONDITIONS FOR COPYING, DISTRIBUTION AND MODIFICATION 0. This License Agreement applies to any software library or other program which contains a notice placed by the copyright holder or other authorized party saying it may be distributed under the terms of this Lesser General Public License (also called “this License”). Each licensee is addressed as “you”.
07.AJ-YAX800G(J/GPL/表4)24 05.4.5 9:13 AM ページvi LGPL (continued) 5. A program that contains no derivative of any portion of the Library, but is designed to work with the Library by being compiled or linked with it, is called a “work that uses the Library”. Such a work, in isolation, is not a derivative work of the Library, and therefore falls outside the scope of this License.
07.AJ-YAX800G(J/GPL/表4)24 05.4.5 9:13 AM ページvii LGPL (continued) 9. You are not required to accept this License, since you have not signed it. However, nothing else grants you permission to modify or distribute the Library or its derivative works. These actions are prohibited by law if you do not accept this License.
07.AJ-YAX800G(J/GPL/表4)24 05.4.
07.AJ-YAX800G(J/GPL/表4)24 05.4.5 9:13 AM ページix PANASONIC BROADCAST & TELEVISION SYSTEMS COMPANY UNIT COMPANY OF PANASONIC CORPORATION OF NORTH AMERICA Executive Office: One Panasonic Way 4E-7, Secaucus, NJ 07094 (201) 348-7000 EASTERN ZONE: One Panasonic Way 4E-7, Secaucus, NJ 07094 (201) 348-7621 Southeast Region: 1225 Northbrook Parkway, Ste 1-160, Suwanee, GA 30024 (770) 338-6835 Central Region: 1707 N Randall Road E1-C-1, Elgin, IL 60123 (847) 468-5200 WESTERN ZONE: 3330 Cahuenga Blvd W.