Digital Imaging System Operating Instructions (For Copier) DP-6000/7000 Options DA-FS700/MA700/XT700/TR700 Before operating this machine, please read these instructions completely and keep these operating instructions for future reference.
TRADEMARKS/COPYRIGHTS The following trademarks and registered trademarks are used throughout this manual. Microsoft, MS-DOS, Windows, and Windows NT are either registered trademarks or trademarks of Microsoft Corporation in the United States and/or other countries. i386, i486, and Pentium are either registered trademarks or trademarks of Intel Corporation.
Preface Thank you for choosing Panasonic DP-6000/7000 Series. This manual aims to provide all the information necessary for effectively operating the copier together with notes on safety precautions and maintenance tips. To get the most out of your copier, please read the manual carefully and completely before using the machine. Keep this manual handy as a quick reference should you encounter any difficulties when using the copier. In this manual, safety instructions are preceded by the symbol .
FCC This equipment has been tested and found to comply with the limits for a Class A digital device, pursuant to Part 15 of the FCC Rules. These limits are designed to provide reasonable protection against harmful interference when the equipment is operated in a commercial environment. This equipment generates, uses, and can radiate radio frequency energy and, if not installed and used in accordance with the instruction manual, may cause harmful interference to radio communications.
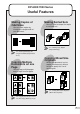
DP-6000/7000 Series Useful Features Making Copies of Odd Sizes You can make copies by changing the length/width of your document. Making Sorted Sets You can select to output the copies as collated sets. 4-7 Collating Copy Output (Output/Finishing) 4-4 Reducing/Enlarging the Length and Width (Independent X-Y%) Copying Multiple Documents on one Page You can copy multiple pages onto a single sheet of paper.
Creating a Binding Margin You can shift the copy image to create a binding margin at the edge. Making Copies of a Bound Document onto Separate Sheets You can make copies from a bound document onto separate sheets of paper. 5-7 Setting the Margins (Image Shift) 5-6 Copying Facing Pages onto Separate Sheets (Book Copying) Inserting Blank Sheets Between Copied Transparencies You can insert blank sheets as separators between the copied transparencies. Copies for distribution can also be made simultaneously.
Specifying the Size of a Document You can specify the area of the document you wish to copy. Creating a Negative-type Image You can create a negative-type image on a copy by reversing the black and white areas of the original. 5-12 Selecting the Original Size (Original Size) 5-14 Creating Negative-like Images (Negative Image) Creating Mirror Images You can create a copy containing the mirror image of a document by reversing its orientation.
Making Duplex Copies of Facing Pages You can make two sided copies of documents with facing pages. 5-17 Making Duplex Copies of Facing Pages (Book Duplex) Enhancing the Sharpness of a Photo You can enhance or reduce the sharpness of a photo. 5-13 Enhancing Sharpness (Sharpness) Inserting Covers Stapling/Punching Holes in Copies (optional) You can insert a cover such as a colored sheet as the front copy. You can staple and output the copies. Alternatively, you can punch holes in the copies.
Using These Operating Instructions This manual consists of the following chapters. Chapter 1 Getting to Know Your Copier This chapter contains operating instructions about your copier like information on the major components, the methods of switching the power On and Off and how to use the touch panel display. After the copier has been properly installed, be sure to read this chapter completely before operating the machine.
Chapter 7 Troubleshooting This chapter describes the actions to be taken in the event of errors or machine faults. Read this chapter for instructions on how to resolve these errors if they occurred. Chapter 8 Daily Care This chapter provides information on regular maintenance such as replacing drum/toner cartridges, checking the meters and cleaning the machine. Read this chapter when necessary. Chapter 9 Using the Auditron Feature This chapter explains the Auditron feature of this copier.
Conventions The manual uses the following conventions.
Safety Notes Read these safety notes carefully before using this product to ensure that you operate the machine properly. This section explains the graphic symbols used throughout this guide. Warnings alert you to potential hazard that could result in serious injury or death. Cautions alert you to operations that may result in minor injury or damage to the machine.
When moving the machine, be sure to unplug the Power Cord from the outlet. If the machine is moved with the Power Cord connected, it can cause damage to the cord which could result in fire or electric shocks. After the machine is installed, be sure to lock the caster stoppers. An unlocked machine may fall over or slide and cause injuries. When moving the machine, do not tilt it more than indicated below. If tilted excessively, the machine may fall over and cause injuries.
Do not attempt to rework, pull, bend, chafe, or otherwise damage the Power Cord. Do not place a heavy object on the cord. A damaged cord can cause fire or electric shocks. Never touch a Power Cord with wet hands. Danger of electric shock exists. Stop operation immediately if your machine produces smoke, smell, excessive heat, or unusual noise, or if water is spilt onto the machine. These conditions can cause fire.
Other Precautions When installed at a certain location, the machine may cause interference with radio and television reception. If you notice flickering or distorted images or noises on your audio-visual units, your machine may be causing radio interference. Switch it Off, and if the interference disappears, the machine is the cause of radio interference. Perform the following procedures until the interference is corrected: Move the machine, and the TV and radio away from each other.
Do not place a heavy object or lean your elbow on the touch-sensitive panel or display. The panel or display can break and the broken glass can cause injuries. Do not use papers that conduct electricity (for example, origami paper, carbon paper and coated paper). If the paper is jammed in the machine, it can result in a short circuit or fire. Do not staple document with punched holes (e.g. perforated paper available in the market) as the resultant detached staples can injure your fingers.
- Handling Instructions Used Drum Cartridges and Toner Cartridges should be properly disposed of. Contact your local authorized Panasonic service representative for disposal. Administer emergency treatment as follows: If toner gets into your eyes, rinse them well with plenty of clean water. Consult a doctor, if necessary. If toner adheres to your skin, wash it with soap and water, then rinse it well. If you inhale toner, exit the area immediately and gargle with plenty of water.
The Objective of the International Energy Star Program As a member of the International ENERGY STAR® Program, Panasonic confirms that this product satisfies the requirements for International ENERGY STAR® Program standards. To protect the global environment and conserve energy sources, the International Energy Star Program encourages the following product features. Panasonic confirms the DP-6000/7000 Series satisfy the requirements for this program.
Table of Contents Preface Useful Features Using These Operating Instructions Conventions Safety Notes The Objective of the International Energy Star Program Chapter 1 1-1 1-2 1-3 1-4 1-5 Chapter 2 2-1 2-2 2-3 2-4 Getting to Know Your Copier Main Components and Their Functions ..................................................................................... 2 Switching On and Off .................................................................................................................
Chapter 3 3-1 3-2 Chapter 4 4-1 4-2 4-3 4-4 4-5 4-6 4-7 4-8 4-9 4-10 4-11 4-12 4-13 Chapter 5 5-1 5-2 5-3 5-4 5-5 5-6 5-7 5-8 5-9 5-10 5-11 xviii Loading Documents Documents .............................................................................................................................. 34 Loading Documents in the DADF ................................................................................ 34 Placing Documents on the Document Glass ............................................
5-12 5-13 5-14 5-15 5-16 5-17 5-18 5-19 5-20 5-21 5-22 Chapter 6 6-1 6-2 6-3 Chapter 7 7-1 7-2 Selecting the Original Size (Original Size) ............................................................................ 106 Enhancing Sharpness (Sharpness) ....................................................................................... 108 Creating Negative-like Images (Negative Image) .................................................................. 110 Creating Mirror Images (Mirror Image) .....
7-3 7-4 Chapter 8 8-1 8-2 8-3 8-4 8-5 8-6 8-7 8-8 8-9 Chapter 9 9-1 9-2 9-3 9-4 9-5 9-6 9-7 9-8 Document Jams .................................................................................................................... 183 Document Jam at the Feeding Point of the DADF .................................................... 183 Document Jam Inside the DADF ............................................................................... 184 Document Jam at the Document Tray ........................
1 Getting to Know Your Copier 1-1 Main Components and Their Functions ........................ 2 1-2 Switching On and Off .................................................... 6 1-3 Using the Touch Panel Display ..................................... 8 1-4 Entering Password 1-5 (When the Auditron Feature is Enabled) ....................... 13 Saving Power ................................................................
Getting to Know Your Copier Main Components and Their Functions Main Components 1 1 Duplex Automatic Document Feeder (DADF) 2 Power Switch Automatically feeds a stack of documents, one sheet at a time, for scanning. For copying a two-sided document, side one is scanned first and the document is flipped in the DADF for side two to be scanned. The DADF serves as the document cover when the document to be copied is placed on the document glass. Switches On/Off the power of the machine.
Getting to Know Your Copier 1 12 Finisher (optional) Enables stapling and hole-punching. 13 Finisher Tray 1 Receives copy output other than stapled, punched, or high capacity. 14 Finisher Tray 2 Receives stapled, punched, or high capacity copy output. 15 Finisher Top Cover Open this cover to remove jammed paper. 16 Finisher Front Door Open this door to remove jammed paper, and replace or remove staples. 17 Fuser Unit Fixes the printed image on the paper by fusing the toner.
Getting to Know Your Copier Control Panel 1 1 1 Brightness Adjustment Dial Adjusts the brightness of the Touch Panel display. 2 Touch Panel Display Touch the feature buttons on this panel to select the desired options for a copy, scan or print job. 3 Settings/Meter Check Button Press this button to go to the Settings/Meter Check screen or screen for setting printer specifications if the printer function is installed. You can also check the meter reading.
Getting to Know Your Copier 1 7 Clear All Button Press this button to clear all settings and return to the default screen. 8 Stop Button Press this button to stop the current copy or print job. 9 Start Button Press this button to start copying or scanning. The Auto indicator light at the upper left lights up when Auto Start is activated. 10 Clear C Button Press this button to delete a wrong character entry, and stop a copy or print job.
Switching On and Off Switch On the power before operating the copier. This section will show you how to switch the copier On/Off. 1 Breaker Switch If the breaker trips repeatedly, contact your local authorized Panasonic service representative. Check the Ground Fault Interrupter once a month to ensure that it works correctly. The Breaker Switch is normally set to the "I" position. However, when it is not used for an extended period of time or when it is to be relocated, switch it to the "O" position.
Getting to Know Your Copier Switching Off the Power Turn the power switch to the " " position. The power is switched Off. If the machine is switched On but has been left unused for a fixed period of time, the Power Saver feature will reduce the power consumption of the machine to conserve energy. See 1-5: Saving Power for details. 1 Switching Off the Power Automatically This feature is available for models with only the copy function.
Getting to Know Your Copier Using the Touch Panel Display You can select a feature shown on the Touch Panel display by touching its corresponding button on the display. Here, the Basic Features screen is used to explain the respective parts of a screen. In this section, the Touch Panel display will be referred to as the “display”. 1 Feature Status Mark The status of a feature is indicated by a mark. Message Area The status of the machine and its operating instructions are displayed here.
Getting to Know Your Copier Changing the Display Screen The System Administrator can use the Tools Mode to select the screens to be displayed. See sections on Feature Defaults and Screen Layout in 6-1: List of Custom Preset Functions for details. The screen on the right has the Tray 6 (High Capacity Feeder), and Finisher installed. Four screens are available for selection on the display. They are the Basic Features screen, Customized Features screen, Features Menu screen and Stored Jobs screen.
Getting to Know Your Copier Selecting a Feature Touch a displayed button to select a feature or value. See “Chapters 4 to 6” for details.
Getting to Know Your Copier When there are Scroll Buttons 1 Functions of the Reset, Cancel and Close/Save Buttons Returns all the selected features and values to their original settings when the screen was first displayed. Cancels all the selected features and values of the displayed screen and returns to the previous screen. Registers all the settings and returns to the previous screen. When a Button Is Not Available An unavailable button is dim and grey in color.
Getting to Know Your Copier Message Pop-up and Confirmation Pop-up Screens A message pop-up screen will be displayed to show warning or caution notes. Select Close to exit from this screen. A confirmation pop-up screen will be displayed when an action requires your confirmation. Select either Yes or No to exit from this screen.
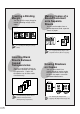
Entering Password (When the Auditron Feature is Enabled) The Auditron feature allows you to control the number of copies that a department (account user) can make by assigning a password to the user. The diagram shows the relationship between the Password Entry screen and the default screen. This section describes the procedures for entering the password when the Auditron mode is On. 1 Chapter 9 Using the Auditron Feature for details on the functions and settings of the Auditron feature.
Getting to Know Your Copier Procedure If you made a mistake while entering the password, press the Clear C button to clear and re-enter. When the Password screen is being displayed, enter your Password by using the keypad. Each input digit is represented by an asterisk. 1 Select Confirm. You can change the maximum display time (time-out) of the default screen by using the Auditron Administration Mode. See 9-7: The default screen appears.
Saving Power The machine has a power-saving feature, which lowers the power consumption when copying is stopped for a period of time. This consists of two modes based on the level of power consumption. Normal power consumption during machine standby is 270 W. When the machine is not used for a set period of time, it automatically goes into the low power mode (Power Saver mode) (factory default is 15 minutes).
Getting to Know Your Copier Entering Power Saver Mode Automatically By factory default, the shift to Power Saver mode and Auto Power Off mode after the last copy job or action is set as 15 minutes and 60 minutes respectively. These time-out periods can be changed. See Time- 1 Outs in 6-1: List of Custom Preset Functions for details. For models which come with the printer feature see the Operating Instructions (For Printer) regarding setting the power-saving feature. Sleep mode can be disabled.
2 Loading Paper 2-1 What Paper to Use ..................................................... 18 2-2 Storing and Handling Paper ........................................ 20 2-3 Loading Paper ............................................................ 21 2-4 Changing the Paper Tray Size ....................................
Loading Paper What Paper to Use This section describes the paper stock that can be used on this machine. Weights of Paper 2 The weights of paper for the respective trays are as shown below. The Tray 6 (High Capacity Feeder) is optional. For two-sided copying, use 12 - 28 g/m2 paper.
Loading Paper Types of Special Media The types of media for the respective trays are as shown below. The special media mentioned on the right cannot be used for 2-Sided copying. Tray Special Media Trays 2 to 4 Transparencies, perforated paper (30-hole) Tray 5 (Bypass) Transparencies, perforated paper (30 hole), tracing paper, label stock 2 Do not use paper with glue or tape on it. Special Media cannot be loaded in Trays 1 and 6 (High Capacity Feeder) (optional).
Loading Paper Storing and Handling Paper Observe the following when storing paper: • Always store paper in a cabinet or at a place with low humidity. Damp paper may cause jams or affect the image quality. • Always re-pack unused paper, preferably with desiccant. • Always store paper on a flat surface to prevent bending or curling. 2 Observe the following when handling paper: • Do not combine and load paper left-over from different reams into a tray. • Do not use folded or wrinkled paper.
Loading Paper Loading Paper During a copy job, paper can be added to a tray not selected for the current job that is in progress. The following screen will appear when paper runs out during a copy job. Add paper according to the displayed instructions. After adding the paper, you can resume the copy job by pressing the Start button. 2 This section will show you how to add paper to Trays 1 to 4, Tray 5 (Bypass), and Tray 6 (High Capacity Feeder).
Loading Paper Push the tray in slowly until it stops. The message, "Ready to copy. Press Start to continue or press C button to cancel the job." appears on the display once you have properly replenished the tray.
Loading Paper Loading Paper in Tray 5 (Bypass) Load special media, non-standard size paper, which cannot be loaded in Trays 1-4, Tray 6 (High Capacity Feeder) (optional), and Tray 5 (Bypass). The Tray 5 (Bypass) has a capacity of 50 sheets. The paper size is as follows. Procedure Open Tray 5 (Bypass) by holding the grip on the left side of the machine. 2 *However, image which can be copied on the Y axis is up to 11 inches. Load perforated paper with the holes toward the back of the tray.
Loading Paper Loading Paper in Tray 6 (High Capacity Feeder) (optional) Load paper in Tray 6 (High Capacity Feeder) (optional) by following the procedures below. Tray 6 (High Capacity Feeder) is optional. The capacity of Tray 6 (High Capacity Feeder) (optional) is 3600 sheets. Procedure Pull the tray out slowly until it stops. 2 Do not load paper above the MAX fill line. When pulling out a paper tray, do it slowly. If pulled out with too much force, the tray can hit and injure your knees.
Changing the Paper Tray Size Changing the Size of Tray 1 2.1 What Paper to Use for information on the types of paper stock that can be used. Original/Paper Size Sensing of 6.1: List of Custom Preset Functions for information on the Tools Mode screen. Paper jam may occur if the paper size has not been changed correctly. Follow the procedures shown below to change the size of Tray 1 in order to load paper stock of the desired size. For changing paper size A5 5.5 x 8.
Loading Paper Place paper stock of the desired size against the bottom-right corner of the tray. Pinch and hold the release on the Lever again and push the Lever forward until it touches the edge of the paper. 2 Paste the new Paper Size Label on the front of the tray. After changing from A5 5.5 X 8.5”, there is a need to adjust settings in Tools Mode screen. See Original/ Paper Size Sensing of 6.1: List of Custom Preset Functions.
Loading Paper Changing the Size of Trays 2 to 4 Request assistance from your System Administrator if you need to change the size of Trays 2 to 4. Your System Administrator can follow the procedures shown below to make the changes. After changing paper size, follow the steps from Step 9 to adjust settings on the Tools Mode screen. Procedure 2 Pull out the tray that you want to change until it stops. When pulling out a paper tray, do it slowly.
Loading Paper Place paper stock of the desired size against the bottom-right corner of the tray. Adjust the Paper Guides according to the size of the paper. 2 If the Paper Guides are not fastened properly, paper jam may occur. Remove the paper from the tray and use a screwdriver to fasten the screws as shown in the diagram. Check that the Paper Guides are locked at the holes with the screws tightened. Then re-load the paper. Paste the new Paper Size Label on the front of the tray.
Loading Paper Press Settings/Meter Check on the control panel. Select Tools Mode. The screen on the right has the Auditron mode enabled. For details, refer to Chapter 9 Using the Auditron Feature. If you made a mistake while entering the Access Number, press the Clear C button to clear and re-enter. The factory default Access Number is "11111". 2 Enter the Access Number of the System Administrator by using the keypad and select Confirm. Each input digit is represented by an asterisk.
Loading Paper The tray can also be selected directly by touching its button on the display. As Tray 1 and Tray 6 (High Capacity Feeder) (optional) can automatically detect the loaded paper size, they are not shown on the screen on the right. Select the tray that you have changed by using the buttons. Then select Change Settings. For example, select Tray 3. 2 Select the desired preset paper size. If the preset paper size is measured in inches, select Inch Size. Then select the desired paper size.
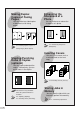
Loading Paper Changing the Size of Tray 6 (High Capacity Feeder) (optional) Tray 6 (High Capacity Feeder) is optional. This section explains the procedures for changing the paper sizes to be loaded in Tray 6 (High Capacity Feeder). Paper sizes that can be loaded are B5 , A4 , and 8.5 x 11" . Procedure Paper jam may occur if paper size has not been changed correctly. Pull Tray 6 (High Capacity Feeder) out slowly until it stops. 2 When pulling out a paper tray, do it slowly.
Loading Paper When the paper size is changed to B5 , remove the Horizontal Guide from the right side of the tray. Insert the Horizontal Guide into the (B5) slot and fasten the screw. 2 When B5 is changed to A4 or 8.5x11" , remove the Horizontal Guide from the (B5) slot and store it on the right side of the tray and tighten the screw. Place the paper against the bottom-right corner of the tray. Paste the new Paper Size Label on the front of the tray. Push the tray in slowly until it stops.
3 Loading Documents 3-1 Documents .................................................................. 34 3-2 Loading Documents ....................................................
Loading Documents Documents Place document on the Document Glass or load it in the Duplex Automatic Document Feeder (DADF). Edge Erase/Copy All is not available when copying some types of documents. Place the following types of documents on the Document Glass. They will cause jams when loaded in the DADF.
Loading Documents Paper Weight is a measure of the substance of paper expressed in pounds (lbs), which does not depend on the number of sheets in the ream. • Paper Weight : • Capacity : 1-Sided : 10 - 34 lbs or 38 - 128 g/m2 2-Sided : 13 - 28 lbs or 50 - 105 g/m2 50 sheets When using the DADF, the paper sizes, which can be automatically detected by the machine are A5, A5 , B5, B5 , A4, A4 , 8.5 x 11"*, 8.5 x 11" , B4, A3, 11 x 17", and 8.5 x 13". However, using Tools Mode, you can change A5 to 5.
Loading Documents Loading Documents Load the documents in the DADF or place it on the Document Glass. Loading Documents in the DADF The DADF lets you load a stack of documents for feeding to the scanner one sheet at a time, and output them after scanning. 50 sheets can be loaded each time, thus saving time of loading documents manually. The DADF cannot be used for some types of documents. See Loading documents in the DADF in 3-1: Documents for the details.
Loading Documents Placing Documents on the Document Glass Procedure Placing documents on the Document Glass in 3-1: Documents for information on the types of documents that can be placed on the Document Glass. For documents of mixed sizes, see Open the document cover. 5-5: Loading Mixed Size Originals (Mixed Size Originals). Open the document cover until the cover is completely released from the sensor rod (approximately 11.8 in (30 cm) and above).
Loading Documents Screen Display When Using Document Glass See 5-12: Selecting the Original Size (Original Size) on how to input the document size. The display of this screen can be enabled via the Tools Mode screen. See System Setup in 6-1: List of Custom Preset Functions. This screen is not displayed by factory default. The message "Size Mismatch" may be displayed if you have pressed the Start button after placing your document on the Document Glass and selecting the copy function.
4 Basic Features 4-1 Overview of Basic Features ........................................ 40 4-2 Selecting a Paper Tray (Paper Supply) ...................... 42 4-3 Reducing/Enlarging (Reduce/Enlarge) ....................... 43 4-4 Reducing/Enlarging the Length and Width (Independent X-Y%) .................................................. 49 4-5 Copying on One Side (2 Sided) .................................. 56 4-6 Copying on Two Sides (2 Sided) .................................
Basic Features Overview of Basic Features The icons and buttons on the display that are used for carrying out a basic copy job are shown in the diagram below. This diagram shows their locations on the control panel as well as the features that they have. You will find it useful to familiarize yourself with the respective locations of the icons and buttons before operating the machine. The screen below has the Tray 6 (High Capacity Feeder), and Finisher installed.
Basic Features Interrupt For interrupting the current job with an urgent job Clear All For clearing and returning the selected settings to their default values 4 Stop For stopping a copy job Keypad For entering numerical Start values such as number For starting a copy job of sets Clear C For clearing a mistake made when entering a value with the keypad 4-1 Overview of Basic Features 41
Basic Features Selecting a Paper Tray (Paper Supply) Before starting a copy job, select a paper tray with the required paper size. There are two methods of selecting a paper tray: A message will appear on the display if the auto-selected tray has no paper or the machine is unable to detect the size of the document. Follow the displayed instructions. A message will appear on the display if the selected tray has no paper. Follow the displayed instructions.
Basic Features Reducing/Enlarging (Reduce/Enlarge) The Reduce/Enlarge feature allows you to adjust the size of your copy image. There are two methods to choose from: Enter the vertical and horizontal ratios of the document. The machine will convert these into length and width, and produce the copy accordingly. See 4-4: Reducing/ Size-for-Size Copying (100%) The copied image is the same size as the original image.
Basic Features Size-for-Size Copying You can make an exact copy of the original by selecting 100% in Reduce/ Enlarge on the Basic Features screen. Procedure Chapter 3 Loading Documents for Load the document. information on how to load documents. On the Basic Features screen, select 100% in Reduce/Enlarge. The factory default for Reduce/ Enlarge is 100%. Reduce/Enlarge can also be selected on the Features Menu screen.
Basic Features Reduction or Enlargement If you have selected Auto % in Reduce/Enlarge, the machine determines an appropriate reduction or enlargement ratio so that the copy image fits onto the paper from the tray which you have selected in Paper Supply. Procedure Load the document. Chapter 3 Loading Documents for information on how to load documents. On the Basic Features screen, select the tray with the desired paper size in Paper Supply. For example, select 4.
Basic Features Preset Percentage Change Procedure The values of the preset ratios can be changed. If you use a ratio more frequently than those shown on the right, then you will find it convenient to change one of those preset ratios to the one that you frequently use. See R/E Presets of 6.1: List of Custom Preset Functions for information on how to change the preset ratios. Load the document. On the Basic Features screen, select Reduce/Enlarge.
Basic Features Variable Percentage Change (Variable %) You can make copies by selecting a ratio between 25-400%. Procedure Load the document. Chapter 3 Loading Documents for information on how to load documents. On the Basic Features screen, select Reduce/Enlarge. Paper Supply can also be selected on the Features Menu screen. The screen on the right has the Tray 6 (High Capacity Feeder), and Finisher installed. 4 Select Variable %. The factory default for Reduce/ Enlarge is 100%.
Basic Features Use buttons, or the keypad displayed on the screen to enter the ratio. Touch C on the screen if you made a mistake while entering the ratio. Select Cancel to cancel the settings. For example, enter 120%. Select Save twice. Some features cannot be selected together with this feature. See 4 Select other features if necessary. Appendix B: Possible Combinations of Features for details. Enter the required number of sets by using the keypad and press Start.
Basic Features Reducing/Enlarging the Length and Width (Independent X-Y%) The Independent X-Y% feature allows you to make copies with independent length or width of the original. There are three methods available. Specifying X/Y Percentage Change (Variable X-Y%) If you have also selected Auto Center (Centre) for Image Shift, then the image will be copied onto the center of the paper as shown in the diagram on the right. You can make copies of the originals by selecting different ratios for X and Y.
Basic Features Specifying X/Y Percentage Change (Variable X-Y%) You can make copies of your original by specifying its X and Y ratios separately. The image will be copied according to the ratios that you have entered. Procedure On the Basic Features screen, select Reduce/Enlarge. The factory default for Reduce/ Enlarge is 100%. Reduce/Enlarge can also be selected on the Features Menu screen. The screen on the right has the Tray 6 (High Capacity Feeder), and Finisher installed.
Basic Features Enter the X and Y ratios by using buttons. For example, enter Y = 120% and X = 200%. You can use buttons below XY on the display to increase or decrease the ratio of X and Y simultaneously. Select Cancel to cancel the settings. Load the original in the orientation of Head to Top, or Head to Left. Chapter 3 Loading Documents for information on how to load documents.
Basic Features Specifying Original/Copy Size (Calculator %) The machine will make copies of your original based on the ratios calculated from the measurements of the original and the copy that you have entered. The machine will automatically adjust the ratio to 25% if the calculated ratio is 25% or below, and 400% if the calculated ratio is 400% and above. The factory default for Reduce/ Enlarge is 100%. Reduce/Enlarge can also be selected on the Features Menu screen.
Basic Features Check that there is a button on the left of Original Size under Y. Enter the length of the document by using the keypad. Use the ruler markings surrounding the Document Glass to set the area of the original for scanning. Select Cancel to cancel the settings. For example, enter "210 mm". Select Enter/Next. The To change the value, select Enter/ Next to move to the value you want. button moves to the left of Copy Size under Y.
Basic Features Automatic X/Y Percentage Change (Auto-Fit) The machine will make copies of your original by calculating the X and Y ratios so that the image can fit onto the selected paper size. Procedure On the Basic Features screen, select the tray with the desired paper size in Paper Supply. Paper Supply can also be selected on the Features Menu screen. The screen on the right has the Tray 6 (High Capacity Feeder), and Finisher installed. For example, select 4.
Basic Features Select Auto-Fit. Select Cancel to cancel the settings. Load the original in the orientation of Head to Top, or Head to Left. Chapter 3 Loading Documents for information on how to load documents. 4 Select the corresponding document orientation of the original loaded. Select Head to Top or Head to Left. Select Save twice. To disable Image Rotation, set it to Off on the Customized Features screen or Features Menu screen. Some features cannot be selected together with this feature.
Basic Features Copying on One Side (2 Sided) The 2 Sided feature allows you to make one sided copies from one sided documents or two sided documents, To make one sided copies from a two sided document, use the DADF. 4 Procedure On the Basic Features screen, select 2 Sided. The screen on the right has the Tray 6 (High Capacity Feeder), and Finisher installed. 2 Sided can also be selected on the Features Menu screen.
Basic Features Select either 1 The factory default is 1 1 Sided. Select Cancel to cancel the settings. 1 Sided or 2 For example, select 2 1 Sided. 1 Sided. When making two sided copies, use the DADF. The Document Glass can only be used for making one sided copies. Select Head to Head or Head to Toe as the image orientation of the document if you have selected 2 1 Sided. Select Cancel to cancel the settings. 4 Head to Head When all sides of a document have the same orientation.
Basic Features Load the original in the orientation of Head to Top, or Head to Left. Chapter 3 Loading Documents for information on how to load documents. For 2 1 Sided copying, use the DADF. 5-10: Selecting the Original Orientation (Original Orientation) for Select the corresponding document orientation of the original loaded. Select Head to Top or Head to Left. details. 4 Select Save. Some features cannot be selected together with this feature.