In-Dash 7 Inch Wide Color LCD TV/DVD-Video/Receiver Moniteur/télé couleur de tableau de bord à ÉCL de 7 po (diagonale)/ récepteur/lecteur DVD-Vidéo Reproductor de DVD-Video/CD con TV y LCD de 7" de Anhco a Color para el Tablero del Auto CQ-VD7200U Operating Instructions Manuel d’instructions Manual de Instrucciones Panasonic Consumer Electronics Company, Division of Matsushita Electric Corporation of America One Panasonic Way, Secaucus, New Jersey 07094 http://www.panasonic.com Panasonic Sales Company.
E N G L I S H Safety Information Consignes de sécurité The following applies only in the U.S.A. WARNING: TO REDUCE THE RISK OF FIRE OR ELECTRIC SHOCK OR PRODUCT DAMAGE, DO NOT EXPOSE THIS APPLIANCE TO RAIN, SPLASHING, DRIPPING OR MOISTURE. CAUTION! THIS PRODUCT UTILIZES A CLASS I LASER. USE OF CONTROLS OR ADJUSTMENTS OR PERFORMANCE OF PROCEDURES OTHER THAN THOSE SPECIFIED HEREIN MAY RESULT IN HAZARDOUS RADIATION EXPOSURE. DO NOT OPEN COVERS AND DO NOT REPAIR YOURSELF.
E N G L I S H Panasonic welcomes you to our ever growing family of electronic product owners. We know that this product will bring you many hours of enjoyment. Our reputation is built on precise electronic and mechanical engineering, manufactured with carefully selected components and assembled by people who take pride in their work. Once you discover the quality, reliability, and value we have built into this product, you too will be proud to be a member of our family. Contents ❏ Features ¢ Features ..
E N G L I S H 1 Use This Product Safely WARNING: TO AVOID RISK OF SERIOUS INJURY OR POSSIBLE VIOLATION OF LAWS, NOT FOR USE WHERE VISIBLE TO DRIVER FOR ANY PURPOSE OTHER THAN NAVIGATION OR USE WITH REAR VIEW CAMERA. When Driving ¡The driver must not operate the color LCD (liquid crystal display) monitor. Operating the color LCD monitor may lead to carelessness and cause an accident. Stop your vehicle in a safe location when operating the unit. ¡The driver must not watch videos while driving.
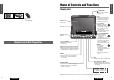
Name of Controls and Functions E N G L I S H Display Unit E N G L I S H [ ] (OPEN/CLOSE) ¡Opens/closes the monitor. (a page 18) 3 4 CQ-VD7200U IN-DASH 7 INCH WIDE COLOR LCD TV / DVD - VIDEO / RECEIVER [TILT] ¡Shows the monitor position setting menu. (a page 19) ¡Tilts the monitor forward temporarily. (a page 19) DISC VOLUME NAVIGATION MUTE MENU MODE POWER NAVI ASPECT ASP P·MODE 1. Display Unit ENTER TRACK/ CHANNEL 1 1 2. Hide-away Unit 3.
Remote Control Unit of the DVD/Video CD/CD/MP3 Playback (Operation only for the remote control) Meaning of symbols [NAVI] (NAVIGATION) ¡Activates/inactivates the car navigation. (a page 23, 38) Indicates the compatible types of disc.
E N G L I S H 7 Indications on the Screen Discs that can be Played Back The State of the Current Output Appears Disc Note: Contents displayed and their positions partly vary with each mode. Refer to the description of each mode for details. DVD video Example: DVD Mode Mark (logo) Disc size Video format Audio format Region No. NTSC Image•Sound/Mode Display Video CD The current mode appears.
/ TRACKL CHANNE DE P·MO ER POW DVD/VCD(Video CD)/ CD/MP3
E N G L I S H TV Tuner It is required to install the supplied antenna to receive TV broadcasts. Refer to the description of mounting the TV antenna. (a page 70) 11 E N G L I S H Preset Channels 12 This function can search for channels automatically. Up to 18 channels can be stored. Press and hold [}] or [{] for more than 2 seconds. [}]: the search starts from ch. 2 successively. [{]: the search starts from ch. 69 in reverse successively.
E N G L I S H VTR You can view the images and listen to the sounds from the connected external devices in the VTR1 mode and VTR2 mode respectively. 13 External Devices Connectable to VTR1/VTR2 E N G L I S H 14 Refer to “Electrical Connections” for each external device connection.
DVD VIDEO VIDEO CD E N G L I S H E N G L I S H Indicates the compatible types of disc. 1 16 1 Note: It is possible to press []] [[] on the display unit instead of [s] [d] on the remote control. ( [[] on the display unit cannot be used in place of [d] that is used for slow playback.
E N G L I S H DVD/Video CD Player (continued) DVD VIDEO VIDEO CD E N G L I S H Indicates the compatible types of disc. Chapter/Title Selection Useful Function 1 17 1 18 Switching the Subtitle DVD Language VIDEO DVD Menu/ Video CD Menu Use this menu during playback to select content, audio, subtitle, etc., from a menu (the DVD/Video CD menu) that is unique to each disc. Switching the Audio DVD Language VIDEO DVD VIDEO Press [SUB] (SUB TITLE) during playback.
E N G L I S H CD/MP3 Player CD MP3 E N G L I S H Indicates the compatible types of disc. Disc Insert The mode that supports the disc is selected, and playback starts. 1 19 1 20 When a disc is in the player, press [MODE] to change to CD or MP3 player mode and playback starts. Notes: ¡Do not insert a disc when disc indicator or eject button lights because a disc is already loaded. ¡The power will be turned on automatically when a disc is loaded. ¡You can play a disc even if the monitor is closed.
E N G L I S H 1 21 CD/MP3 Player E N G L I S H (continued) This player allows you to play MP3 files recorded on CD-ROMs, CD-Rs (Recordable) and CD-RWs (Rewritable). Folder selection order/MP3 file playback order (Example) : [] ][[ ] Root Folder Current Folder Folder in the next lower level of tree What is MP3? MP3, short for MPEG-1 Audio Layer 3, MPEG-2 Audio Layer 3 LSF (Low Sampling Frequency), is a standard for compressing digital video data adopted for video CDs and similar media.
E N G L I S H E N G L I S H 1 1 24 32 CQ-VD7200U CQ-VD7200U 33
E N G L I S H Radio One-touch Selection of a Station 1 25 Up to 6 stations each can be saved in the FM1, FM2, FM3 and AM preset station memories. E N G L I S H 26 1 Select a band and frequency. (step w and e on the previous page) Press and hold [1] to [6] on the remote control for more than 2 seconds. Manual Preset Memory The frequency blinks once, and a receiving station is saved in the memory. Select a band. (step w on the previous page) Press and hold [ENTER] for more than 2 seconds.
E N G L I S H CD Changer Control E N G L I S H Basic Operation 1 27 28 1 Perform these operations with the remote control. All Tracks Press [4] (RANDOM). Press [4] (RANDOM) again to cancel. Random Play All Tracks on Press and hold [4] (RANDOM) for more than 2 seconds. the Current Disc Press and hold [4] (RANDOM) again to cancel. Scan Play The first 10 seconds of each track will be played. All Tracks Press [5] (SCAN). Press [5] (SCAN) again to cancel.
E N G L I S H SET-UP: User Settings (continued) [MODE] (End) 31 [}] [{] [] ] [[ ] (Select/adjust) [ENTER] CQ-VD7200U IN-DASH 7 INCH WIDE COLOR LCD TV / DVD - VIDEO / RECEIVER DISC VOLUME NAVIGATION MUTE MENU MODE POWER NAVI ASPECT ASP ENTER [MENU] TRACK/ CHANNEL P·MODE Notes: ¡Press [MODE] to return to the regular mode. ¡The display returns to the previous one if there is no operation for more than 60 seconds after changing to the setting menu.
Notes: ¡Press [MODE] to return to the regular mode. ¡The display returns to the previous one if there is no operation for more than 60 seconds after changing to the setting menu. CQ-VD7200U IN-DASH 7 INCH WIDE COLOR LCD TV / DVD - VIDEO / RECEIVER DISC VOLUME NAVIGATION MUTE MENU MODE POWER NAVI ASPECT ASP ENTER TRACK/ CHANNEL P·MODE 3 Setting BEEP Beep setting OFF : operation sound (Beep) OFF ON : operation sound (Beep) ON VIDEO-CNT q Press [}] or [{] to select an item.
E N G L I S H SET-UP: Display (Screen) Settings [MODE] (End) 35 [}] [{] [] ] [[ ] (Select/adjust) [ENTER] CQ-VD7200U IN-DASH 7 INCH WIDE COLOR LCD TV / DVD - VIDEO / RECEIVER DISC VOLUME NAVIGATION MUTE MENU MODE NAVI POWER ASPECT ASP ENTER Notes: ¡Press [MODE] to return to the regular mode. ¡The display returns to the previous one if there is no operation for more than 60 seconds after changing to the setting menu.
E N G L I S H SET-UP: DVD Settings [MODE] (End) 37 CQ-VD7200U [}] [{] [] ] [[ ] (Select) [ENTER] IN-DASH 7 INCH WIDE COLOR LCD TV / DVD - VIDEO / RECEIVER DISC VOLUME NAVIGATION MUTE MENU MODE POWER NAVI ASPECT ASP ENTER [MENU] TRACK/ CHANNEL P·MODE Notes: ¡Press [MODE] to return to the regular mode. ¡The display returns to the previous one if there is no operation for more than 60 seconds after changing to the setting menu.
E N G L I S H SET-UP: Clock/date Settings [MODE] (End) 39 [}] [{] [] ] [[ ] (Select/adjust) [ENTER] CQ-VD7200U IN-DASH 7 INCH WIDE COLOR LCD TV / DVD - VIDEO / RECEIVER DISC VOLUME NAVIGATION MUTE MENU MENU MODE MODE POWER NAVI ASPECT ASP ENTER ENTER [MENU] TRACK/ CHANNEL P·MODE Notes: ¡Press [MODE] to return to the regular mode. ¡The display returns to the previous one if there is no operation for more than 60 seconds after changing to the setting menu.
[MODE] (End) [MENU] [}] [{] [] ] [[ ] (Select) [ENTER] 3 Notes: ¡Press [MODE] to return to the regular mode. ¡The display returns to the previous one if there is no operation for more than 60 seconds after changing to the setting menu. Setting q Press [ENTER] to import the image. w Press [[] or []] to select a save area. ¡You can store five images at maximum. ¡The existing image is replaced with a new image when saving an image in an area.
E N G L I S H SET-UP: Capture Function 43 (continued) Notes: ¡Press [MODE] to return to the regular mode. ¡The display returns to the previous one if there is no operation for more than 60 seconds after changing to the setting menu.
[MODE] (End) [MENU] [}] [{] [] ] [[ ] (Select/adjust) [ENTER] 3 Notes: ¡Press [MODE] to return to the regular mode. ¡The display returns to the previous one if there is no operation for more than 60 seconds after changing to the setting menu. Setting BASS Bass adjustment Decrease the bass level. q Press [}] or [{] to select an item. TREBLE Increase the bass level. Treble adjustment w Press [[] or []] to adjust. Decrease the treble level. Increase the treble level.
Aspect Ratio Press [ASP] (ASPECT) on the display unit or press [A] (ASPECT) on the remote control to change the aspect ratio as follows. Default: NORMAL Mode: 4 types NORMAL ¡The conventional display image has a 4 to 3 ratio of horizontal to vertical. ¡In this case, a blank area remains on the right and left sides of the display.
E N G L I S H 49 SET-UP: Other Settings Rear Monitor Set Up Private Mode You can have different picture and sound at the front and rear monitor at the same time. q Press and hold [MENU] for more than 2 seconds. Default: AUTO e Press [ENTER] to set. Preparation: Connect another optional rear monitor. (e.g. CYVMX6800U)(a page 80) w Press [[] or []] to select the setting.
E N G L I S H Installation Guide WARNING 51 ❐ This installation information is designed for experienced installers and is not intended for non-technical individuals. It does not contain warnings or cautions of potential dangers involved in attempting to install this product. Any attempt to install this product in a motor car by anyone other than a qualified installer could cause damage to the electrical system and could result in serious personal injury or death.
E N G L I S H 53 Installation Guide (continued) ❏ Before Installation ❏ Dashboard Specifications Warning ¡Do not install the monitor in a location which obstructs driving, visibility or which is prohibited by applicable laws and regulations. If the monitor is installed in a location which obstructs forward visibility or operation of the air bag or other safety equipment or which interferes with operation of the car, it may cause an accident. THICKNESS MIN. 3/16" (4.75 mm) MAX. 7/32" (5.
E N G L I S H 55 Installation Guide (continued) ❏ Connect All Leads Now that you have identified all the wires in the car, you're ready to begin connecting them to the LCD monitor wires. The wiring diagram (a page 72-83) shows the proper wiring and color coding of the leads. We strongly recommend that you test the unit before making a final installation. You can set the unit on the floor and make temporary connections to test the unit. Use electrical tape to cover all exposed wires.
E N G L I S H Installation Guide E N G L I S H (continued) 57 58 Method for Fixing the Rear of the Unit (a) Using the Rear Support Strap o Drill a hole 6.5 to 7 mm in diameter. y Flange Nut (M6) (b) Using the Rubber Pad r r Rubber Pad t Mounting Bolt (M5) i Washer Assembling Hex. Bolt (M6 x 20 mm) Fire wall of car Display Unit Bracket (On car) o Rear Support Strap u Washer Assembling Hex.
E N G L I S H E N G L I S H Mounting the Hide-away Unit 59 60 Cautions: ¡Never mount the unit in any of the following locations to avoid damage due to overheating; 1. Near the heater port. 2. Places like the dashboard or rear deck, where it may be exposed to direct sunlight. ¡Do not mount the unit near the door, where it could be exposed to rain. ¡Do not separate the hide-away unit. ❑ Mount the unit on the car carpet by using Velcro Tape @3.
E N G L I S H 62 Insert the grounding plate into the antenna body and hold the antenna element with the Antenna Clamp @4. Follow the steps below to install the grounding plate. q Insert the grounding plate into the antenna body. w Hold the grounding plate with the terminal cover. e Screw the grounding plate. r Hold the antenna element with the Antenna Clamp @4. Peel the sheet from the back of antenna body and affix it. Then, affix the grounding plate on a metal part.
E N G L I S H E N G L I S H 63 64 VIDEO-CONT Hide-away Unit (Rear) SIDE BRAKE Note: See next page for hide-away unit electrical connection. REVERSE (Black) Panasonic ACC (Black/green stripe) BATTERY 5A 72 CQ-VD7200U Speaker Note: Supplied only for operational sound such as a beep. Do not use it for a center speaker. Caution: Do not use the supplied speaker for some other units or components.
! @ ! @ ! @ ! @ NAVI MUTE ANT-CONT MAX 0.1A TWIN CD C-CONT AMP-CONT MAX 0.
E N G L I S H Electrical Connections Connecting the Side Brake (Parking Brake) Connection Lead 67 Color of the Connectors 68 Color of the connectors used for the connections in pages 78-83. Caution: For safety, be sure to ask your nearest professional installer to do this connection. Side brake (Parking brake) E N G L I S H (continued) Foot brake Side brake (parking brake) switch Red White Yellow (Not used) The side brake (parking brake) switch position varies with the car model.
E N G L I S H 69 Electrical Connections E N G L I S H (continued) Connection with CD Changer (CX-DP880U) Connection with Dual CD Changer Selector (CA-CD55) Note: Refer to the operating instructions for the connected devices, in addition. 70 Note: Refer to the operating instructions for the connected devices, in addition.
E N G L I S H Electrical Connections E N G L I S H (continued) Connection with Rear View Camera 71 Note: Refer to the operating instructions for the connected devices, in addition.
E N G L I S H 73 Electrical Connections E N G L I S H (continued) Connection with Digital Surround Processor (CY-AC300) @9 Display Unit/Hide-away Unit Connecting Cord Note: Refer to the operating instructions for the connected devices, in addition.
E N G L I S H Troubleshooting Preliminary Steps Check and take steps as described in the tables below. 75 If You Suspect Something Wrong Immediately switch power off. Disconnect the power cable and check that there is neither smoke nor heat from the unit before asking for repairs. Never try to repair the unit yourself because it is dangerous to do so. Cautions: ¡Do not use the unit if it malfunctions or if there appears to be something wrong.
E N G L I S H 77 Troubleshooting ■ DVD video, Video CD, CD, CD-R, CD-RW Trouble ■ CD Trouble Cause/Step The disc is upside down. aPlace the disc in the correction direction, the label side up. The disc is inside but no sound. The disc is ejected automatically. E N G L I S H (continued) The disc is dirty. aClean the disc, referring to the section on “Notes on Discs”(a page 93). 78 CD text is not displayed normally. Disc is dirty, or has scratches.
E N G L I S H 79 Troubleshooting ■ MP3 (Continued) Trouble ■ Display Settings Cause/Step You turned off the ignition switch of the car during playback. aPlaying another file will return the file playing time to normal. File playing time is not displayed correctly. You played a file in which character information had been recorded by use of ID3Tag 2.0 or later version. aA file in which character information was recorded by use of ID3Tag 2.0 or later version may not be reproduced normally.
E N G L I S H 81 Troubleshooting (continued) Error Display Messages If the Unit Begins to Malfunction... ■ CD/MP3/DVD/Video CD/CD Changer Display Reset switch Insert a hard, slender stick into the hole and push the switch. E N G L I S H 82 Cause/Step - E1 - Disc is dirty, or is upside down. aCheck disc. Important Push the switch only when the unit fails to operate with any buttons. (Stored settings and adjustments are not cleared.
E N G L I S H 83 Maintenance To Prevent Damage to the System Exterior Notes on Discs Do not apply pesticides, benzine, thinner or other volatile substances to the unit. The cabinet surface primarily consists of plastic materials. Do not wipe with benzine, thinner or similar substances because this will result in discoloration or removal of the paint. When a cloth with a cleansing chemical is used, follow the caution points.
E N G L I S H 85 Definition of Terms Digital audio output connector (Optical) The digital audio output connector (optical) converts electrical signals into optical signals and transfers them to the amplifier. Consequently, it has a number of features including its immunity from electrical interference from external sources and its ability to prevent the generation of noise and its minimal effect on the external environment.
E N G L I S H 87 Specifications Display Unit Hide-away Unit General Power supply Current consumption Maximum power output (external speaker) Compatible speaker impedance Dimensions (W x H x D) Weight : : : : : : 12 V DC (11 V - 16 V), test voltage 14.4 V, negative ground Less than 1.5 A 0.7 W 8Ω 7” x 1-15/16” x 6-5/16” (178 x 50 x 160 mm) 5 lbs. 1 oz. (2.