
Operating instructions
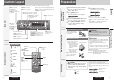

CQ-C5355N
10
CQ-C5355N
11
English
General
General
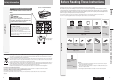
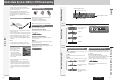
This chapter explains how to turn on or off the power, how to adjust the volume, etc.
Power On
Press [PWR] (Power).
Power Off
Hold down [PWR] (Power) for 1 sec. or
more.
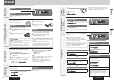
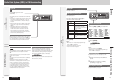
You can remove the face plate to
prevent it from being stolen.
Removing
1
Turn off the power. ( above)
2
Press [OPEN]. The face plate will be
opened.
3
Push the face plate to the
left.
Cautions
• This face plate is not waterproof. Do not expose it to
water or excessive moisture.
• Do not remove the face plate while driving your car.
• Do not place the face plate on the dashboard or
nearby areas where the temperature rises to high.
• Do not touch the contacts on the face plate or on
the main unit, since this may result in poor electrical
contacts.
• If dirt or other foreign substances get on the
contacts, wipe them off with clean and dry cloth.
• To avoid damaging the face plate, do not push it
down or place objects on it while it is open.
Power On/off
(PWR: Power)
Face Plate Removing/Mounting
(Anti-Theft System)
4
Pull it out toward you.
5
Put the face plate in
the case.
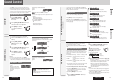
Mounting
1
Fit the face plate with its left hole on the
left pin provided on the main unit.
2
Fit the other hole on the other pin
applying slight pressure.
Volume off (down)
Press [MUTE].
Cancel
Press [MUTE] again.
Note: You can select mute or attenuation. ( page 31)
Up
Down
Setting Range: 0 to 40
Default: 18
Note: The volume level can be set independently for
each source. (For radio, one volume setting for AM
(LW/MW), one volume setting for all FMs)
Volume
Adjustment
(VOLUME)
Temporary Volume Off
(Down)
MUTE (ATT: Attenuation)
Note: For information about connectable devices,
refer to the System Upgrade Guidebook or the
instruction manual for each device.
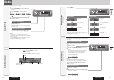
The source changes as follows every time [SOURCE]
is pressed.
USB (Universal Serial Bus) Connector
When the USB memory is connected to the USB
connector via a USB extension cable, the MP3/WMA
fi les stored on the device are played.
Radio
FM1, FM2, FM3, AM ( page 14)
Player
When loading CD ( page 20)
When loading MP3/WMA disc (
page 22)
AUX1
Device connected to the AUX1 terminal of this unit
When an optional device is connected:
Shift to connected device
When connecting CD changer
When connecting iPod
OR
When an expansion module is connected:
The devices connected to the ports 1 to 4 are
activated in sequence after shifting to AUX2 (device
connected to the AUX terminal of the expansion
module).
System-up Connector
Source Selection
(SOURCE)
USB Connector
When an optional USB memory is connected:
When loading MP3/WMA data
( page 26)
When an optional USB memory is not
connected:
Display Change
(DISP: Display)
The display changes as follows every time [DISP] is
pressed. (ACC ON)
At power-off:
Clock display (Default)
Display off
At power-on:
When the power is set to ON, refer to the description for
each source mode.
The 24-hour system is used for the clock.
1
Press [PWR] (Power).
2
Select the radio AM (LW/MW) mode.
( page 14)
3
Hold down [DISP] for 2 sec. or more.
4
Adjust the hour and press [DISP].
[]: Forward
[]: Backward
5
Adjust the minute and press [DISP] to
confi rm the adjustment.
[]: Forward
[]: Backward
Notes:
• Adjust the clock when “NO CT” appears on the display.
• Hold down [] or [] to change numbers
rapidly.
• When a broadcast of FM Radio Data System is
received, the clock is adjusted automatically by the
Clock Time service. (
page 16)
Clock Adjustment