Panasonic Color Tolovfsion Operating Instructlone CT-13R17 CT^13R16 {WHITg CABINET) CT-20R14 Read these instructions completely before operating, Contents subject to change without notice or obligation. C^yrigh» 1997 by Matsushita Elactric Corporation of America. All nghts reserved. Unauthorized copying and distribution is a violation of taw.
Safety Instructions WARNING RISK OF ELECTRIC SHOCK DO NOT OPEN WARNING: To reduce the risk of electric shock do not remove cover or back. No user-serviceable parts inside. Refer servicing to qualified service personnel. él The lightning flash with ar row-head within a triangle is intended to tell the user that parts inside the product are a risk of electric shock to persons.
14. If an outside antenna is connected to the television equipment, be sure the antenna system is grounded so as to provide some protection against voltage surges and built up static charges. In the U.S.
Introduction Congratulations on Your New Purchase Your new video component features an all solid state chassis which is designed to give you many years of enjoyment. It was thoroughly tested and adjusted at the factory for best performance. In order for you to take full advantage of your new video component, please read and follow the installation and operating instructions supplied with this product. Customer’s Record The model and serial number of this product may be found on its back cover.
Receiver Location Installation This unit is intended to be used with an optional stand or entertainment center. Consult your dealer for available options. Locate for comfortable viewing. Avoid placing where sunlight or other bright light (including reflections) will fall on the screen. Use of some types of fluorescent lighting may reduce remote control transmitter range. Adequate ventilation is essential to prevent internal component failure. Keep away from areas of excessive heat or moisture.
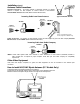
Installation (cont.) Antenna/CableConnections Antenna Connection - For proper reception of VHF/UHF channels, an external antenna is required. For best reception an outdoor antenna is recommended. Antenna Mode must be set to TV. (Refer to Antenna Mode section.
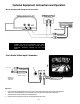
Optional Equipment Connection and Operation Rear Audio/Video Input Connection NOTE: TURN OFF Rear Audio/Video Input device before TURNING ON the Front Audio/Video Input device. If both are ON at the same time it vj'iW cause an Audio/Video Interference between the two input signals. Front Audio/Video Input Connection VIDEO OUT »Sb FROM AUDIO OUTPUT ” #^Oi-'^==== TERMINALS ON CAMCORDER OR VIDEO GAME (CABLES NOT SUPPUED) Operation 1. 2. 3.
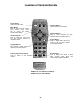
Location of Controls Remote Power Button Press to turn ON or OFF. TV/Video Button Press to select TV or Video Input. Mute Button Press to mute sound. A second press resumes sound. Press also to access and delete Closed Caption display. Channel Buttons Press to select channels. Use with Volume buttons to navigate in menus. Volume Buttons Press to adjust TV sound level. Use with Channel buttons to navigate in menus.
Location of Controls Receiver Power Button - Press to turn ON or OFF. Volume Buttons - Press to adjust Sound Level. Press to adjust Video Menus and select operating features when menus are displayed. Channel Buttons - Press to select programmed channels. Press to highlight desired features when menus are displayed. Action Button - Press to display Main Menu and access On Screen feature and Adjustment Menus. TV/VIdeo Button - Press to select TV or Video Input.
Main Menu Icons Special Functions R-TUNE O R-Tune — Pressing will switch between the last two channels selected on the numeric keypad. NOTE: When rapidly scanning channels with the CHANNEL UP/DOWN button, pressing the R-TUNE button will switch between the last channel scanned, and initial channel at the start of scanning. CHANNEL PREVIOUSLY VIEWED CHANNEL NOW BEING VIEWED NOTE: When Auto Power On feature is activated, Timer Icon will change to Exit Icon.
Menu Language Selection Picture Adjustments The MENU LANGUAGE is factory set to ENGLISH. Follow the instructions to change the Language Menu to SPANISH, FRENCH, and back to ENGLISH. Picture Norm 1. o 3. . 1 Press action . 2. Press Icon. Use to reset picture adjustments back to a factory preset level. and ^ or ^ to highlight the Set-Up oto display the Set-Up Menu. Press action O Press action . 2. Press ^^or^7 and*^or^ to highlight the Picture Icon. 3.
Lock Unlock Game Guard Lock Game Guard Prevents video games and other video sourcesf rom being viewed. Channel 3,4 and video inputs are locked out for 12, 24 or 48 hours. NOTE: Be sure to understand this feature before attempting its use. Use a code that you will easily remember or write down code on a piece of paper. To unlock the Game Guard feature, repeat steps 1 through 3. Enter the same 3 digit code previously used in step 5 with Remote Control Keypad. o 1. Press ACTION , 2.
Channel Caption This feature allows you to enter the call names of up to 30 stations into memory (using up to 4 characters for each station). The Channel Caption will then display along with the channel number when changing channels or pressing RECALL. Melpful Hints: When the Maximum amount of station identifiers are entered, “FULL” will be displayed in the caption position.
Timer Features (cent.) ITIMER^ONTROIB Special Feature; Automatic turn “OFF” after 90 minutes. The TV has a special feature that will shut itself OFF after 90 minutes when turned ON by the program timer unless a function key is pressed during the 90 minutes. This feature is useful so that the TV will not remain ON unattended for an extended period of time. Programming the OFF timer wilt cancel the automatic OFF Special Feature. . ifc 9. ^ ■■* Repeat steps 5 through 7 for setting OFF (time), 10.
Set-Up Features Set Time Clock (when set) will display on screen at initial “Turn On”, after a channel change and when pressing the RECALL button. The time must be set first in order to operate the Program ON/OFF Timer. SET-UP NOTE: This feature will be disabled when Auto Power On is activated. o 1 . Press ACTION . 2. 3. Press ^or^ and*^ or^ to highlight the Set-Up Icon. o to display the Set-Up Menu. Press action rSET?UPJ 4. Press ^ to highlight ANT. 5. Press ^ or ^ to select TV or CABLE. 6.
Set-Up Features (cent.) Manual Prog This feature allows you to select which channels are placed into Channel Scan Memory. NOTE: This feature is disabled when Game Guard Lock is activated. 1. 2. Press ^ or^ and or ^ to highlight the Set-Up Icon. 3. Press action to display the Set-Up Menu. o rSET^UR^ o Press ACTION , 2. Press ^or^ and^ or^ to highlight the Set-Up Icon. 3. Press ACTION to display the Set-Up Menu. o □ rSETiUPJ ANTi^— AUTO^RO^^ I MANUAI^RRGG__ AUTO POWER ON Sfiziiiil.
Troubleshooting Chart Before you call for service, determine the symptoms and make a few simple checks shown below.
NOTES; -18-
NOTES; -19-
Panasonic Sales Company, Division of Matsushita Electric of Puerto Rico Inc. (“PSC”) Panasonic Consumer Electronics Company, Division of Matsushita Electric Corporation of America Ave. 65 de Infanteria, Km 9.5 San Gabriel Industrial Park Carolina, Puerto Rico 00985 Tel. (787) 750-4300 FAX. (787) 768-2910 One Panasonic Way Secaucus, New Jersey 07094 -20- Panasonic Canada inc.