R Room Air Conditioner Climatiseur de fenêtre INSTALLATION AND OPERATING INSTRUCTIONS MANUEL D'INSTALLATION ET D'UTILISATION Model, Modèle : CW-C50GU Please read these operating instructions thoroughly before using your air conditioner and keep for future reference. Il est recommandé de lire attentivement ce manuel avant d'utiliser l'appareil. Conservez ce manuel.
Safety Precautions Safety Precautions Safety Precautions .............3 FOR YOUR RECORDS Write the model and serial numbers here: Model # Serial # You can find them on a label on the side of the unit. Dealer's Name Date Purchased Before you call for service... Features and Installation About the Controls on the Air Conditioner Staple your receipt here for proof of purchase. About the Controls on the Air Conditioner Controls..............................5 Air direction ........................
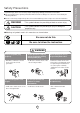
To prevent injury to the user or other people and property damage, follow these instructions. ■ Incorrect operation due to ignoring of instruction will cause harm or damage. The seriousness is classified by the following indications. ■ Because of the heavy weight of the product, it is recommended that you have a helper to assist in the installation. WARNING : This symbol indicates the possibility of death or serious injury.
Safety Precautions When the air filter is to be removed, do not touch the metal parts of the unit. Do not clean the air conditioner with water. When the unit is to be cleaned, switch the unit off, and turn off the breaker. • They are sharp and may cause an injury. • Water may enter the unit and degrade the insulation. It may cause an electric shock. • Since the fan rotates at high speed during operation, it may cause an injury.
About the Controls on the Air Conditioner The controls will look like one of the following: Controls HIGH THERMOSTAT 5 TEMP CONTROL 5 6 4 7 8 2 9 1 10 E COOL R 3 7 3 R OLE CO 4 6 8 2 9 1 10 Off High Fan Low Fan High Cool Low Cool - Turns air conditioner off. - High speed fan operation without cooling. - Low speed fan operation without cooling. - Cooling with high speed fan operation. - Cooling with low speed fan operation. This automatically controls the temperature of the indoor air.
Additional controls and important information. Air Direction About the Controls on the Air Conditioner • ADJUSTING THE AIR DIRECTION USING THE HORIZONTAL AIR-DEFLECTOR CONTROL Using the control tabs, the air flow can be directed to the left, right, straight ahead, or any combination of these directions. Care and Maintenance TURN THE AIR CONDITIONER OFF AND REMOVE THE PLUG FROM THE POWER OUTLET. • TO CLEAN FILTER The air filter will become dirty as it removes dust from the inside air.
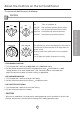
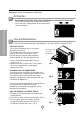
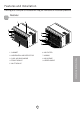
Features and Installation Learning parts name prior to installation will help you understand the installation procedure. Features 1 9 3 2 4 7 6 5 8 6. AIR FILTER 2. HORIZONTAL AIR DEFLECTOR 7. KNOBS 3. COOL AIR DISCHARGE 8. AIR INTAKE 4. FRONT GRILLE 9. UPPER GUIDE 5. INLET GRILLE 7 Features and Installation 1.
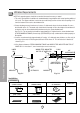
Window Requirements NOTE: All supporting parts should be secured to firm wood, masonry, or metal. 1. This unit is designed for installation in standard double hung windows with actual opening widths of 22" to 36". The upper and lower sash must open sufficiently to allow a clear vertical opening of 13" from the bottom of the sash to the window stool. 2.If storm window presents interference, fasten a 2" wide wood strip to the inner window sill across the full width of the sill.
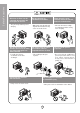
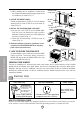
A. BEFORE INSTALLATION 1. Insert the guide panels into the guides of the air conditioner. Fasten the curtains to the unit with screws (TYPE A) as shown Fig. 6. 2. Cut the adhesive-backed seal strip (TYPE D) to the window width. Remove the backing from the seal strip and attach the seal strip to the underside of the bottom window. (Fig. 7) B. NOW START INSTALLATION 1. LOCATING UNIT IN WINDOW Open the window and mark the center line on the center of the inner sill, as shown in Fig. 8. TYPE A Fig.
b. While steadying the air conditioner, carefully bring the window sash down behind the upper guide of the air conditioner, as shown in Fig. 11. 4. SECURE THE GUIDE PANELS Extend the guide panels (TYPE F) to fill the window opening using 4 screws (TYPE B) to secure them, as shown in Fig. 12. 5. INSTALL THE SASH SEAL AND SASH LOCK a. Cut the sash seal (TYPE E) to the window width. Stuff the sash seal between the glass and the window to prevent air and insects from getting into the room, as shown in Fig. 12.
Before you call for service... Troubleshooting Tips save time and money! Review the chart below first and you may not need to call for service. Normal Operation • You may hear a pinging noise caused by water being picked up and thrown against the condenser on rainy days or when the humidity is high. This design feature helps remove moisture and improve efficiency. • You may hear the thermostat click when the compressor cycles on and off.
Mesures de sécurité Mesures de sécurité Mesures de sécurité ........13 ENREGISTREMENT Reportez ici les numéros de modèle et de série : N° de modèle N° de série Ces numéros sont inscrits sur l'étiquette apposée sur le flanc de l'appareil. Raison sociale du vendeur Date d'achat Conseils de dépannage Instructions d'installation Instructions de fonctionnement Agrafez vorte reçu ici pour la preuve d'achat. Instructions de fonctionnement Commandes.....................15 Direction de l'air................
Les instructions ci-après doivent être observées dans le but de prévenir tout risque de dommages corporels ou matériels. ■ L'utilisation non conforme, résultant de la négligence des instructions, est susceptible de provoquer des dommages corporels ou matériels dont la gravité est signalée par les indications suivantes : ■ À cause du poids lourd du produit, il est recommandé que vous ayez recours à de l'aide pour l'installation.
Mesures de sécurité ATTENTION Lorsque le filtre à air doit être retiré, ne pas toucher les parties métalliques de l'appareil. Ne pas nettoyer le climatiseur avec de l'eau. Lorsque l'appareil doit être nettoyé, couper l'alimentation et débrancher la prise d'alimentation ou couper le disjoncteur. • Vous risquez de vous blesser. • L'eau peut s'infiltrer dans l'appareil et affecter l'isolement. Cela peut également provoquer un choc électrique.
Instructions de fonctionnement Les commandes ressembleront à l'une des suivantes. Commandes HIGH THERMOSTAT 5 5 4 7 8 2 9 1 10 E COOL R 3 6 7 3 R OLE CO 4 TEMP CONTROL 6 8 2 9 1 10 Off - Met le climatiseur hors tension. High Fan - Fait fonctionner le ventilateur à haute vitesse sans refroidissement. Low Fan - Fait fonctionner le ventilateur à basse vitesse sans refroidissement. High Cool - Refroidit tout en ventilant à haute vitesse.
Commandes supplémentaires et renseignements importants. Direction de l'air • POUR AJUSTER LA DIRECTION DE L'AIR À L'AIDE DE LA COMMANDE DE DIRECTION HORIZONTALE DE L'AIR Instructions d’utilisation En vous servant des languettes de contrôle, vous pouvez diriger la circulation d'air vers la gauche, la droite, droit devant ou n'importe quelle combinaison de ces directions. Nettoyage et entretien FERMEZ LE CLIMATISEUR ET DÉBRANCHEZ LA FICHE DE LA PRISE DE COURANT.
Instructions d'installation Apprendre le nom des pièces avant l'installation vous aidera à mieux comprendre le processus d'installation Caractéristiques 1 9 3 2 4 7 6 5 8 6. FILTRE À AIR 7. BOUTONS 8. PRISE D'ADMISSION D'AIR 9. GUIDE SUPÉRIEUR 17 Instructions d'installation 1. BOÎTIER 2. DÉFLECTEUR D'AIR HORIZONTAL 3. DÉCHARGE D'AIR FROID 4. GRILLAGE FRONTAL 5.
Dimensions de la fenêtre REMARQUE: Toutes les pièces de support doivent être ancrées solidement dans du bois franc, de la maçonnerie ou du métal. 1. Cet appareil a été conçu pour être installé dans des fenêtres doubles à guillotine dont la largeur d'ouverture varie entre 22 po et 36 po . Le châssis du haut et celui du bas doivent s'ouvrir suffisamment pour permettre une ouverture verticale de 13 po à partir du bas du châssis jusqu'au rebord de la fenêtre. 2.
A. AVANT L' INSTALLATION 1. Insérez les panneaux coulissants dans les guides du climatiseur, Fixez les panneaux coulissants à l'appareil en vous servant des vis de type A, tel qu'illustré au schéma 6. 2. Coupez la bande d'étanchéité autocollante (Type D) selon la largeur de la fenêtre. Retirez l'endos autocollant de la bande et collez-la sur le dessous de la fenêtre du bas. (Voir le schéma 7) TYPE A Schéma 6 TYPE A B. COMMENCEZ L'INSTALLATION MAINTENANT 1.
CADRE DE LA FENÊTRE GUIDE DU DESSUS b. Pendant que vous stabilisez le climatiseur, descendez tranquillement le châssis de la fenêtre en arrière du guide supérieur du climatiseur, tel qu'illustré au schéma 11. BANDE D'ÉTANCHÉITÉ APPROX. 1/4 PO 4. ATTACHEZ LES PANNEAUX COULISSANTS Étirez les panneaux coulissants de façon à ce qu'ils occupent toute l'ouverture de la fenêtre et attachez-les à l'aide des 4 vis (Type B), tel qu'illustré au schéma 12. GUIDE DU DESSOUS Schéma 11 5.
Avant de placer un appel de service... Quelques conseils pour vous dépanner: Épargnez temps et argent! Révisez le tableau ci-dessous et vous éviterez peut-être un appel de service. Fonctionnement normal • Il se peut que vous entendiez un cliquettement causé par l'eau qui est soulevée et projetée contre le condensateur lors des jours de pluie ou lorsque le taux d'humidité est élevé. Cette caractéristique sert à réduire I'humidité et améliorer l'efficacité de I'appareil.
Precauciones Importantes de seguridad Instrucciones de Funcionamiento Instrucciones de Funcionamiento Antes de avisar al Servicio Técnico Requerimientos de la Ventana Precauciones Importantes de Seguridad Precauciones Importantes de seguridad ....................23 PARA SU INFORMACION Escriba aquí los números de serie y modelo de las unidades exterior e interior: Nº de Modelo Nº Serie Los números figuran en una etiqueta en el lateral de cada unidad.
Para prevenir tanto lesiones al usuario u otras personas como daños materiales, es preciso seguir estas instrucciones. ■ El manejo incorrecto debido a la inobservancia de estas instrucciones puede causar lesiones o daños cuya gravedad está clasificada en las siguientes indicaciones. ■ A causa del peso pesado del producto, se recomienda que usted tenga a un ayudante a participa en la instalación. ADVERTENCIA Este símbolo indica la posibilidad de lesiones mortales o graves.
Precauciones Importantes de seguridad Cuando limpie la unidad, desconecte la alimentación y desconecte también el disyuntor. Cuando se vaya a quitar el filtro de aire no toque las partes metálicas de la unidad interior. No limpie el acondicionador de aire con agua. • Esto podría causar heridas. • El agua podría entrar en la unidad y degradar el aislamiento. También podría causar una sacudida eléctrica. No opere sin el filtro de aire o cuando la rejilla frontal de toma de aire haya sido removida.
Instruccionnes de Funcionamiento La apariencia de los controles será como uno de los siguientes. Controles HIGH Off High Fan Low Fan High Cool Low Cool THERMOSTAT 5 5 4 7 8 2 9 1 10 E COOL R 3 6 7 3 R OLE CO 4 TEMP CONTROL 6 8 2 - Apaga el acondicionador. - Permite la velocidad rápida del ventilador. - Permite la velocidad lenta del ventilador. - Permite el enfriamiento con el ventilador en alta velocidad. - Permite el enfriamiento con el ventilador en baja velocidad.
Controles adicionales e informacion importante. Instrucciones de funcionamiento La dirección del aire • PARA AJUSTAR LA DIRECCION DEL AIRE USANDO CONTROL DE LA DIRECCION DEL AIRE Las dos lengüetas horizontales para el control de las rejillas le permiten descargar el aire hacia la izquierda, o algo de aire a la izquierda y otro a la derecha, o todo el aire hacia el frente, o cualquier combinación de las posiciones mencionadas.
Aprender el nombre de las partes antes de la instalación le ayudará a entender el proceso de instalación. Características 1 9 3 2 4 7 6 5 8 1. GABINETE 6. FILTRO DE AIRE 2. DEFLECTOR HORIZONTAL DE AIRE (VENTANILLAS VERTICAKLES) 7. PANEL DE CONTROL 3. SALIDA DE AIRE 9. GUÍA SUPERIOR 5. RECOLECTOR DE AIRE 27 Requerimientos de la Ventana 4. REJILLA FRONTAL 8.
Requerimientos de la ventana NOTA: Todas las partes que soportan la ventana deben de estar bien fijas a madera, metal, o cemento. 1. La unidad está diseñada para ser instalada en una ventana doble con anchos entre 22" y 36". El borde superior e inferior deben de estar lo suficientemente abierto para permitir un espacio vertical de por lo menos 13" de la parte inferior de la ventana hasta la parte superior de la ventana. 2.
A. ANTES DE INSTALAR 1. Introduzca los paneles en los guías del aire acondicionado. Las cortinas atorníllelas con los tornillos (TIPO A), como en la Fig. 6. 2. Corte la banda adhesiva (TIPO D) y colóquela del ancho de la ventana. Remueva el plástico de la banda adhesiva y colóquela en la parte superior de el marco inferior de la ventana. (Ver Fig. 7) B. EMPIEZE LA INSTLACION TIPO A Fig. 6 TIPO A BANDA ADHESIVA (TIPO D) 1.
b.Mientras mantiene el aire acondicionado en posición, cuidadosamente baje el borde de la ventana superior hasta la guía superior del aire acondicionado, como en la Fig.11. 4. ASEGURE LOS PANELES Extienda los paneles para rellenar los orificios de la ventana usando los 4 tornillos (TIPO B) como en la Fig. 12. 5. INSTALE LA BANDA DEL MARCO a. Corte la banda del marco del mismo ancho de la ventana.
Antes de avisar al Servicio Técnico Tips para solucionar problemas (Ahorre temopo y dinero) Cuando tenga algún problema primero consulte el cuadro que se encuentra abajo y tal vez no necesite llamar para solicitar servicio técnico. Operación normal • Durar te dias lluviosos o cuando la humedad es alta usted puede escuchar un ruido metállco causa do por agua recogida y arrojada contra el condensador. Esta caracteristica ayuda a remover la humedad y mejorar la eficiencia.
Nota 32
PRODUCT SPECIFICATION SPÉCIFICATIONS DE L'APPAREIL ESPECIFICIONES DEL PRODUCTO Model Modèle Modelo CW-C50GU COOLING CAPACITY CAPACITÉ DE REFROIDISSEMENT CAPACIDAD DE ENFRIAMIENTO ELECTRICAL RATING CARACTÉRISTIQUES ÉLECTRIQUES CLASIFICION DE LA ELECTRICIDAD Btu/h Phase Phase Fase 5,200 Single Simple Monofasico Frequency Fréquence Frecuencia (Hz) 60 Voltage Tension Voltaja (V) 115 Current Courant Corriente (Amps) (A) (Amps) 4.
PANASONIC CANADA INC. 5770 Ambler Drive, Mississauga, Ontarjo L4W 2T3 CERTIFICAT DE GARANTIE LIMITÉE PANASONIC Panasonic Canada mc. garantit cet appareil contre tout vice de fabrication et accepte, le cas échéant, de remédier à toute défectuosité pendant.la période indiquée ci-dessous et commençant à partir de la date d'achat original.
PANASONIC CANADA INC. 5770 Ambler Drive, Mississauga, Ontario L4W 2T3 PANASONIC PRODUCT - LIMITED WARRANTY Panasonic Canada Inc. warrants this product to be free from defects in material and workmanship and agrees to remedy any such defect for a period as stated below from the date of original purchase.
Panasonic Consumer Electronics Company, Division of Matsushita Electric Corporation of America One Panasonic Way Secaucus, New Jersey 07094 Panasonic Sales Company, Division of Matsushita Electric of Puerto Rico, Inc., Ave. 65 de Infanteria, Km. 9.