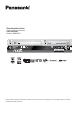
Operating Instructions DVD Recorder Model No. DMR-ES35V TM Please read the operating instructions, the safety notes and the notes on setting up the unit on page 3 before connecting, operating or setting up the unit.
Contents Safety precautions Page 3 Information on the unitt Licence information 4 4 Before you start Included accessories Inserting batteries 5 5 5 Remote Control 6-7 Front Panel On-screen displays 8 8 Rear Panel 9 Connections Connection with 21-pin Scart cable Connection with Audio/Video cable Connection with S VIDEO-cable Settings Country Auto-Setup Download from TV with Q Link TV Aspect Setting the date and time External units Connection of Set Top Box or satellite receiver Connecting a decod
Safety precautions Voltage: Only use power sources complying with the specifications for this device. AC mains lead protection: Ensure the AC mains lead is connected correctly and not damaged. Poor connection and lead damage can cause fire or electric shock. Service: Never attempt to repair this unit by yourself. If a problem occurs that is not described in these operating instructions, disconnect the power supply and contact your dealer or an authorised after sales service centre.
Information on the unit DivX-compatible DivX files can be played back from CD-R/CD-RW and DVD-R. Quick start You can record to DVD-RAM about one second after switching on the unit. COPYING With the push of a button, you can copy the content of a VHS cassette to a disc or vice versa. DV interface You can connect your digital camcorder directly to this unit via the DV IN connection. This way it’s easy to copy your movies.
Before you start Dear customer Thank you for your trust and your decision to purchase this top-quality device. Panasonic is one of the leading manufacturers of entertainment electronics devices. We are sure that you will be completely satisfied with this device. Matsushita Electric Industrial Co., Ltd. http://www.panasonic.co.
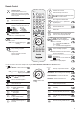
Remote Control Remote control signal sensor Point the remote control at the sensor of the unit. Avoid obstacles along the transmission path. The maximum reach of the remote control is 7 metres directly in front of the unit. Make sure that the transmission window and the sensor on the unit are clean. The process can be impaired by direct sunlight and glass cabinet doors. 7m Child protection 30° You can lock the buttons on the unit and the remote control.
Remote Control TV DVD/VHS DRIVE SELECT Standby/on switch Press to switch the unit from on to standby mode or vice versa. In standby mode, the unit is still consuming a small amount of power. Direct entry using the number buttons Selection of channels, title numbers, etc. 5: JPEG MP3 5: JPEG 5: 0 5 0 0 5 0 0 0 5 15: 15: 15: + DRIVE SELECT + CH = Select the programme position on the TV set. VOLUME = TV volume control.
Front Panel Display Cassette Compartment Disc Tray EXT-L VHS 2 9 10 3 4 5 2 6 7 11 8 12 1 Standby/On switch : Press to switch the unit from on to standby mode or vice versa. In standby mode, the unit is still consuming a small amount of power. Switching this unit into standby mode does not disconnect it from the mains. 1 2 Standby/On switch EJECT: Eject the cassette. 3 OPEN/CLOSE: Open and close the disc tray.
Rear Panel RF IN COMPONENTVIDEO OUT Y L PB S VIDEO OUT OPTICAL R VIDEO OUT PR RF OUT AUDIO OUT AC IN 2 3 1 1 3 AC IN~ = Power supply Connection for the power cable.
Connections 1 Aerial Connection with 21-pin Scart cable (not provided) Aerial infeed line RF IN Aerial input 21-pin Scart socket AV1 (TV) RF IN COMPONENTVIDEO OUT PB S VIDEO OUT OPTICAL R VIDEO OUT PR RF OUT DIGITALAUDIO OUT AUDIO OUT (PCM/BITSTREAM) Disconnect all units from the power supply system. Y L AC IN You need a fully wired 21-pin Scart cable for this optimal connection type.
Connections 1 Aerial Connection with S VIDEO-cable (not provided) Aerial infeed line AUDIO-output RF IN Aerial input S VIDEO-output Depending on the television, the connection with the S VIDEO cable results in a higher quality picture than the connection with an Audio/ Video cable. RF IN COMPONENTVIDEO OUT L Disconnect all units from the power supply system.
External units Connection of Set Top Box or satellite receiver External device Aerial infeed line 21-pin Scart socket If you receive your television programme via a Set Top Box (DVB-T) or a satellite receiver (digital/analogue), connect your DVD Recorder as a downstream unit. Disconnect all units from the power supply system. AC Mains lead 1 Connect the AV1 socket (21-pin Scart socket) of the DVD Recorder with the Scart input of the television unit.
External units For all connections described: Before you connect cables, make sure that all units are switched off. Switch on the units after you have connected the cables. Connecting an analogue amplifier or an analogue system component In order to enjoy stereo or Dolby Pro Logic, connect a corresponding amplifier or an analogue audio component. Amplifier (example) AUDIO IN L ! R L ! R DIGITALAUDIO OUT (PCM/BITSTREAM) AUDIO OUT Connect the AUDIO OUT (L/R) output e.g.
COMPONENT VIDEO OUT TV Audioinput L/R COMPONENT VIDEO IN Y PB PR Video cable Y - Green PB - Blue PR - Red Audio cable L - White R - Red COMPONENT VIDEO OUT socket The sockets can be used for INTERLACE or PROGRESSIVE output and deliver a clearer picture than the S VIDEO OUT socket. Connections via these sockets output the colour difference signals (PB/PR) and the brightness signal (Y) separately. Colours can be reproduced true to the original colour.
STATUS displays STATUS DVD-RAM PLAY LR Screen information ! ! Press STATUS. Press STATUS again. Depending on the function, e.g. PLAY, REC or REC PLAY, the display changes each time the button is pressed. Also press STATUS to exit the display. You can switch off the status displays in the Setup menu. 49 ! 1: 2: 3: 4: Current medium Current recording, playback mode and remaining time Current station Sound type: Stereo = a stereo transmission is currently being received.
DVD Disc formats Playback and recording discs DVD-RAM: DVD Video Recording format DVD-RAM RAM 4.7 GB 12 cm 9.4 GB 12 cm 2.8 GB 8 cm rewritable DVD-RAM The DVD-RAM can be compared with the hard disk and can be written to 100,000 times on average. The disc can only be played on DVD-RAM-compatible players. The recording occurs in DVD Video Recording format (VR). Movies and parts of movies can be edited and deleted. The deletion of movies frees previously used storage space.
DVD Disc formats Playback discs -RW(VR) DVD-RW (DVD-VR format) 12 cm/ 8 cm, playable only DVD-V DVD-Video 12 cm/ 8 cm, playable only -- A DVD-RW that was recorded on another DVD recorder is played back in DVD-VR format on this unit. Programmes limited on "one-time recording" can be played back if recorded to a CPRM-compatible disc. If you format the disc, you can record and play it in DVD-Video format with this unit. High-quality video and music discs.
DVD Playback Insert with label facing upwards. In the case of double-sided discs, the label of the side that you want to play should be facing upwards. Preparation ! Switch on your television and select the appropriate AV channel. ! Switch on the DVD Recorder. ! Press OPEN/CLOSE on the unit to open the disc tray. Insert a disc in the disc tray and close it. It may take some time to read the disc! ! PLAY ! Playback Press PLAY to start playback. Playback begins with the last title recorded.
DVD Playback PAUSE Pausing playback Press PAUSE to pause playback. Press PAUSE again to resume playback. ! ! STOP Stopping playback Press STOP . Playback stops and the television picture appears. ! ! During playback of DVD-A, DVD-V, VCD and CD press STOP television picture. twice to return to the Saving the playback position ! Press STOP during playback. The unit saves the position. ! Press PLAY to resume playback from the saved position. ! To cancel the function, press STOP several times.
DVD Playback TIME SLIP/ 0 min ! ! ! Stop Recording ! ! Press STOP to end playback. After 2 seconds, press STOP again to stop the recording. Cancel If a Timer recording is to be stopped, use with ENTER. SELECT ENTER CD RAM Delayed playback Playback can be started while the unit is still recording. You can watch the recording without stopping the current recording. Timer recording in progress. Stop this timer recording ? It will be cancelled if you stop.
VHS Playback Preparation ! Switch on the DVD Recorder and use DRIVE SELECT to select the VHS drive. ! Enter a recorded video cassette. PLAY ! The tape automatically rewinds when the end is reached. This function is not available during a timer recording. Playing a video cassette Press PLAY to start playback. Playback starts automatically if a video cassette was inserted and its writeprotection strip was removed. Repeat playback The video recorder repeats the recording until the end is reached.
VHS Playback S-VHS Quasi Playback (SQPB) It is possible to play cassettes that were recorded on an S-VHS unit. The picture quality is the same as a VHS recording. Depending on the video tape used, slight picture distortions may occur. An S-VHS recording is not possible with this unit. Manual tracking The unit sets tracking automatically. If a cassette was recorded on another unit, it may be necessary to set tracking manually. The picture shows interference or is blurred during playback.
DVD Recording Before recording Maximum number of recordable titles RAM -R -RW(V) -R DL +R +RW +R DL 99 49 You can record to DVD-RAM, DVD-R, DVD-RW, -R DL, +R DL, +R or +RW with this unit. DVD-R/-RW is the most common medium. DVD-Video format is used to record to discs. The format is compatible with most DVD-Video players and DVD-ROM drives in computers. Disc Protection Protect your recordings from accidental deletion or overwriting.
DVD Recording VHS You cannot record to DVD and VHS at the same time. DVD: Insert a disc. If you activated write protection, cancel it. RAM VHS: Insert a video cassette with an intact write-protection tab. Press FUNCTIONS. ! In the Setup menu, select the appropriate tape length under VHS. ! Confirm with ENTER. ! Press RETURN multiple times to return to the television picture. ! ! 51 Select the DVD or VHS drive with DRIVE SELECT. REC ! Record Press REC to start a recording.
DVD Recording VHS Specifying a time as the recording duration This function is not available for Timer Recordings. ! Press REC on the unit during recording. The recording time changes each time the button is pressed on the unit display: OFF 0:30 1:00 1:30 2:00 3:00 4:00 OFF ! Press STOP . The recording is paused and the time setting is deleted. The unit switches itself off at the end of the recording if no functions are being executed on another drive.
DVD FUNCTIONS You can access the main functions via FUNCTIONS. The illustrations show DVD-RAM menus. The menu entries may differ depending on the disc or the medium. ENTER NCTIONS FU DIRECT NAVIGAT G/CHECK PRO OR ! ! ! ! FUNCTIONS DVD-RAM VHS Disc Protection Off Schreibschutz Aus Press FUNCTIONS. During Recording or Timer Recording, some menus have a grey background and cannot be selected. Select a menu with and confirm with ENTER.
DVD FUNCTIONS VHS Entering text Programme Name TERRALUNA_ A Standard Characters B Other Characters 1 1 2 3 4 5 6 7 8 9 0 2 A B C a b c + - 3 D E F d e f / = * % 4 G H I g h i # $ & Delete Add to List List Names 5 J K L j k l O < [ > @ ] _ Set M N Q R S m n p q o P 8 T U V t u v s { } ) - 9 W X .
DVD FUNCTIONS FUNCTIONS Playback DIRECT NAVIGATOR Overview of DIRECT NAVIGATOR You can archive, edit or start playback after selecting a title in DIRECT NAVIGATOR. The DIRECT NAVIGATOR cannot be called if the VHS drive is selected. Title View DIRECT NAVIGATOR Title View DVD-RAM SUB MENU -- -- 07 S ZDF 6. 3. MON -- -- -Previous ENTER RETURN Chapter View Next Page 02/02 SUB MENU S Delete Properties Edit Select Previous Next Editing is not possible during recording.
DVD FUNCTIONS FUNCTIONS Playback DIRECT NAVIGATOR Editing titles in the SUB MENU Enter Name Set up Protection Cancel Protection Partial Delete Change Thumbnail Divide Title Delete Properties Edit Chapter View ! ! Select [Edit] with and confirm with ENTER. In the submenu, select the desired option with 03 Terra X PLAY Start End Next Exit -RW ( VR ) 27 99 RAM +R DL +R +RW and confirm with ENTER. Cancel Protection ! Select [Yes] with and confirm with ENTER.
FUNCTIONS DVD FUNCTIONS Playback DIRECT NAVIGATOR Editing chapters in the SUB MENU Delete Properties Edit Delete Chapter Create Chapter Combine Chapters Chapter View Title View ! ! ! ! ! ! ! ! DIRECT NAVIGATOR Chapter View Press FUNCTIONS. Confirm [Playback] with ENTER. Select the desired title with in the Title View menu. Press SUB MENU. Select [Chapter View] with and confirm with ENTER. Select the desired chapter with Press SUB MENU. Select the desired option with .
DVD FUNCTIONS DivX playback DivX Menu DVD(DivX) No. Folder1 : DivX - Inhalt Name of Title Tree 001 AdrianaEvans_7Days.avi 002 Madagascar - HD.avi 003 Transporter2.avi Page 001/001 Total Title : 003 ENTER RETURN DivX Menu DVD(DivX) Folder 26 Sep 2003 DivX - ... JPEG - ... MP3 - ... 0 1/ 1 -R CD DivX (Direct-Video-eXpress) is a format for saving compressed audio and video data and is developed by DivXNetworks. It is based on MPEG-4, but saves in a much more compact manner to approx.
DVD FUNCTIONS MP3 playback Menu Select file type. DivX MP3 JPEG ENTER G 1 T 1 TOTAL 1/ 12 Number 0 -- 9 Prev. Next SELECT ENTER RETURN CD In addition to MP3 data, the disc also contains JPEG and/or JPEG data: After a disc is inserted, a message appears regarding the preset playback mode. ! Confirm the message with ENTER. ! Press FUNCTIONS and confirm [Menu] with ENTER. ! Select the desired file type with and confirm with ENTER. RETURN No.
DVD FUNCTIONS JPEG/TIFF playback If TIFF still pictures are played back or if there are a lot of files, sessions and/or folders, it can take a relatively long time to display the data. Menu CD JPEG (Joint Photographic Experts Group), a system for compressing/decoding colour still pictures. Despite strong compression, there is only a slight loss of picture quality. TIFF (Tag Image File Format), a system for compressing/decoding colour still pictures.
DVD FUNCTIONS Recording FUNCTIONS Timer Recording Remain DVD 2:00 SP VHS --:-- -- Name Date Start Stop 12:40:46 24. 2. FRI VPS Drive Mode PDC --.--.--- --:-- --:-- --- --- SP Programme Name ENTER RETURN 0 Remain DVD 2:00 SP VHS --:-- -- Name Date Start Stop 3 Euros 11.03. SAT 14:00 16:00 Manual programming Make sure that there is a recordable disc or cassette in the selected drive. Otherwise, the timer recording will not run. ! ! ! ! Please set Channel.
DVD FUNCTIONS G/CHECK PRO VHS Checking or changing timer recordings Check the settings and correct them if necessary. ! Press PROG/CHECK. Checking or changing ! Select the desired timer programming with and press ENTER. ! Select the position that you want to change with and confirm with ENTER. Programmes that are currently being recorded cannot be changed. Timer Recording Remain DVD 2:00 SP VHS --:-- -- 12:40:46 24. 2. FRI VPS Drive No. Name Date Start Stop Drive Mode PDC space 01 ZDF 6. 3.
DVD FUNCTIONS Setup Tuning Disc Picture Sound Display Connection VHS Others Timer recording via external units AV2 Settings Video AV2 Input Ext AV2 Connection Ext Link Ext Link 2 Setting for external units (EXT LINK) You control the recording function via an external unit (e.g. a receiver) with EXT LINK. Connect the unit to the AV2 socket with a 21-pin Scart cable. Ext Link ! Ext Link 1 ! Ext Link 2 SELECT ENTER VHS RETURN ! ! ! ! Press FUNCTIONS, select [To Others] with and press ENTER.
FUNCTIONS DVD FUNCTIONS Delete Deleting titles and pictures NAVIGATOR LÖSCHEN DELETE Navigator TitleTitelansicht View You can delete titles or write-protect recordings so that they are not accidentally deleted or overwritten. DVD-RAM 02 01 03 ! ZDF 6. 3. MON -- ! -- -- ! ! Previous ENTER RETURN S Properties Edit SUB MENU Page 01/01 Next Select Set up Protection Cancel Protection ! Press FUNCTIONS. Select [Delete] with and confirm with ENTER.
DVD FUNCTIONS FUNCTIONS VHS Copy Copying with a copy list RAM +RW(V) -RW(VR) VHS Copy Cancel All 1 Copy Direction DVD VHS Source DVD Destination VHS 2 Copy Mode VIDEO SP 3 Create List 0 Start Copying 1 Copy Direction Select the copy direction Source DVD Destination VHS Press ENTER to change the setting. 2 Copy Mode VIDEO Format SP Recording Mode Press ENTER to change the setting. 3 Create List Destination Remaining: 1:59 Size: 0:24( 24%) No.
DVD FUNCTIONS FUNCTIONS Copy Time-triggered copying VHS S-VHS Copy DVD-V ! Cancel All 1 Copy Direction VHS DVD VHS Source VHS Destination DVD ! ! RAM -R -RW(V) -R DL +R +R DL VHS Press FUNCTIONS. Select [Copy] with and confirm with ENTER. Select the desired option with . 2 Copy Mode VHS-Video 3 Copy Time SP Off Start Copying 1 Copy Direction Select the copy direction. Source VHS Destination DVD Press ENTER to change the setting.
DVD COPYING On the front of the unit COPYING VHS COPYING You can copy the contents of a cassette to disc or the contents of a disc to cassette at the push of a button. COPYING of a disc starts with the first title and copies till the end of the disc. COPYING VHS to DVD starts at the selected position and copies till the end of the cassette. If you start COPYING from DVD to VHS during playback, the current title and all subsequent titles up to the end of the disc are copied.
DVD FUNCTIONS FUNCTIONS VHS ShowView Record To Others ShowView Record ShowView Record Remain DVD 0:02 SP VHS --:-- -- 12:40:46 24. 2. FRI Entering a ShowView number causes the data for programmes provided by broadcasters to be saved. The appropriate codes can be found in newspapers and TV guides. You can programme up to 16 programmes per month in advance. ! ! Input ShowView Number 0-9, and press ENTER.
DVD FUNCTIONS FUNCTIONS To Others Playlists Use this function to edit your movies/recordings made by a recorder or camcorder. You can remove unwanted scenes (e.g. commercials) or change the sequence. You can also divide your recordings (titles) into chapters. You can create a playlist with your favourite chapters and edit this later. Title 2 Chapter 1 Chapter 2 Chapter 3 Source Title: Title 1 Source Chapter: Chapter 1 Chapter 2 Chapter 3 Chapter 4 Chapter 1 of Title 2 DVD-RAM -- 01 -- ZDF 6. 3.
DVD FUNCTIONS FUNCTIONS Playlists To Others Launching the Playlists menu ! ! ! Press FUNCTIONS. Select [To Others] with Select [Playlists] with Playback ! Select a playlist with Delete Properties Edit Edit ! Select a playlist with ! Press SUB MENU. Chapter View RAM -RW(VR) and start playback with ENTER. RAM . Delete This procedure deletes the playlist and it cannot be restored. The source titles are retained. ! Confirm [Delete] with ENTER. ! Select [Delete] with and confirm with ENTER.
DVD FUNCTIONS FUNCTIONS Add Chapter Move Chapter Create Chapter Combine Chapters Delete Chapter Delete Properties Edit Chapter View Playlist View Playlists 02 11. 3. SAT 001 ! ! ! ! ! ! 3:27.01 ! 3:27 002 003 --- 004 0:01.45 0:01.30 --- DVD-RAM RAM Editing chapters in the SUB MENU Press FUNCTIONS. Use [To Others] with and confirm with ENTER. Select [Playlists] with and confirm with ENTER. Select a playlist in the Playlist View with . Press SUB MENU.
DVD FUNCTIONS FUNCTIONS Flexible Rec To Others Flexible Rec Record in FR mode. Maximum rec. time Set rec. time 7 Hour 51 Min. 7 Hour 51 Min. Start Cancel Flexible recording mode (FR) The unit calculates the best possible recording quality between XP and EP. It is adjusted for the space available on the disc. This function is not available during an EXT LINK recording. ! ! ! SELECT RETURN ! When a timer recording starts, recording in FR mode is cancelled.
FUNCTIONS DVD To Others FUNCTIONS Setup TAB SELECT RETURN ENTER Setup Setup menu overview ! Press FUNCTIONS. ! Select [To Others] with and confirm with ENTER. ! Select [Setup] with and confirm with ENTER. ! Select the desired sub menu with and switch to setup with . ! Select the desired setting with and confirm with ENTER. ! Select the desired option with and confirm with ENTER. Follow the menu guide. The unit saves your settings. ! Press RETURN multiple times to exit the menus.
FUNCTIONS DVD To Others FUNCTIONS Setup Auto-Setup Restart Yes Download from TV Download from TV Tuning Warning--all currently stored stations will be replaced by new ones !! Tuning Disc Picture Sound Display Connection VHS Others ENTER Download from TV (with Q Link or similar functions) ! Select [Yes] with and confirm with ENTER. Data transfer begins. ! To cancel the procedure, use to select [No] and confirm with ENTER or press RETURN. ! To prematurely end the data transfer, press RETURN.
FUNCTIONS DVD To Others FUNCTIONS Setup Tuning Disc Picture Sound Display Connection VHS Others Comb Filter Still Mode On Automatic VHS Setup Picture Comb Filter Setting ENTER Option ENTER [On] [Off] On: The picture is clear and contour-rich. The setting is always set to [On] if you selected [TV System - NTSC]. Off: If the picture to be recorded is distorted. TAB SELECT RETURN Still Mode [Automatic] [Field] [Frame] Select how the still picture should be displayed.
FUNCTIONS DVD To Others FUNCTIONS Setup Tuning Disc Picture Sound Display Connection VHS Others Dynamic Range Compression Off Bilingual Audio Selection M1 DigitalAudio Output Setup Sound Setting Dynamic Range Compression Audio Mode for DV Input Stereo 1 RETURN ENTER DVD-V Tuning Disc Picture Sound Display Connection VHS Others Off Dolby Digital Bitstream DTS Bitstream PCM MPEG SELECT Dolby Digital [M 1] [M 2] [PCM Down Conversion] [Dolby Digital] [DTS] [MPEG] Select the appropriat
FUNCTIONS DVD To Others FUNCTIONS Setup Tuning Disc Picture Sound Display Connection VHS Others 4:3 Off TV Aspect Progressive TV System PAL AV1 Output Video VHS Setup Setting Connection Option ENTER TV Aspect ENTER [16:9] [4:3] [Letterbox] Select the TV screen format of your television. Programmes in 16:9 format are recorded in 4:3 format. 16:9 format is used to record to RAM. Letterbox: Black bars appear on the upper and lower edges of the screen.
DVD FUNCTIONS To Others FUNCTIONS SETUP Setup Auto(E-240) Auto (E-240) Bandlänge Tape Length VHS Setup SoVHS VHS Einstellung Setting Option Option ENTER ENTER Automatisch Wiedergabe-System Playback Colour System Automatic Tuning Sendertabelle SQPB Disc Video Picture Audio Sound Display Anschluss Connection VHS Sonstige Others Automatisch Automatic [Auto (E-240)] [E-195] [E-260] [E-300] Tape Length Setting for the tape length of the cassette in use.
DVD FUNCTIONS To Others FUNCTIONS DVD Management If you activated write-protection, deactivate it. DVD Management Titles 1 Used 0:01 DVD-RAM Remain 0:59(LP) ! ! ! Disc Name Disc Protection Off ! ! RAM Press FUNCTIONS. Select [To Others] with and confirm with ENTER. Select [DVD Management] with and confirm with ENTER. Select the desired menu with and confirm with ENTER. Return to the FUNCTIONS menu with FUNCTIONS. Delete all titles SELECT ENTER Disc Name ! Enter the name.
DVD FUNCTIONS To Others FUNCTIONS DVD Management +R DL Titles 1 Used 0:01 Remain 0:59(LP) of the first layer Disc Name Auto-Play Select Top Menu Finalize -R -RW(V) +R -R DL +R DL +RW Auto-Play Select Before finalisation, you can select whether playback should start from the beginning of the disc or whether it should be lauched from a disc menu. ! Select [Top Menu] or [Title 1] with and confirm with ENTER. If [Top Menu] is selected, the disc menu appears first.
Picture and sound settings DVD DISPLAY menus contain information on the disc or the unit. With DVD-Videos, you can use the repeat function, change subtitles and the angle, change the picture and sound settings for DVD playback. Depending on the status of the unit (playback, STOP), there are some entries that cannot be selected or changed. Disc DISPLAY B ! ! Play Picture Press DISPLAY to launch the menu. Press DISPLAY again to exist the menu.
Picture and sound settings Play Setting Option Repeat Play DVD [On] [Off] The function is only available if the elapsed time is displayed. CD VCD Track All Off RAM -R -R DL -RW(V) +R +R DL +RW Title Chapter DVD-V -RW(VR) Off DVD-A MP3 Track Group Off During playback of a playlist PL (Playlists) Off RAM -RW(VR) If the Video-CD has playback control, select a track in STOP mode with the number buttons. Picture Setting Option Playback NR [On] [Off] Reduces screen interference.
If you need help Should problems occur, please try to resolve them by referring to the error sources described here. If this does not help, you should contact your dealer or customer service. CUSTOMER SERVICE Normal disc revolution sounds, atmospheric interference during reception, picture interference while fast-forwarding and limited reception of the satellite programs are not signs of a defective unit. If the disc cannot be played due to poor quality, try it again with a disc from Panasonic.
If you need help Page PICTURE î Check the connection to the TV, e.g. AV1. 10 No picture. î The PROGRESSIVE output is activated, but the connected TV is not progressive-capable. 14 There is picture interference. ! Press and hold STOP and PLAY on the unit at the same time for more than 5 seconds. The function is switched to half-picture (INTERLACE). 14 î The [TV System] setting does not match that on the disc. In STOP mode, press and hold STOP and OPEN/CLOSE on the unit for more than 5 seconds.
If you need help Page PLAYBACK î î î î Playback does not start. No disc or video cassette inserted. The disc is dirty or badly scratched. You inserted a disc that is not suitable for playback. You inserted a blank disc. 16 î Some DVD-Videos cannot be played if the security level has been changed. DVD-Video will not play. 47 No reaction when PLAY pressed. is î appears on the screen. The procedure is being prevented by the unit or the disc. î Child protection has been activated.
Specifications Power supply: AC 220V-240V 50 Hz Power consumption: 26 W (approx. 2 W in power save mode) approx. 430 mm (W) x 84 mm (H) x 351 mm (D) Dimensions: approx. 5.
Index AC IN Angle Audio Channel Audio Mode for DV Input Auto Finalise Auto-Play Auto-Setup Restart AV1 Output AV2 Connection AV2 Input AV-in NR AV-Link Page 9,10,11 54 20,54 49 18 53 47 9,50 50 50 55 50 Bilingual Audio Selection Bitstream 49 49 Camcorder 13,45 Cartridge Discs 17 Changing batteries 5 Chapter (DIRECT NAVIGATOR) 30 Chapter (Playlists) 44 Child protection 6 Code of remote control 6,51 Comb Filter 48 COMPONENT VIDEO OUT 9,14,50 Copy Direction 38,39 Copy Mode 38,39 Copy Time 39 COPYING 4,40 C