Basic Operating Instructions Digital Camera Model No. DMC-FP5 Before use, please read these instructions completely. More detailed instructions on the operation of this camera are contained in “Operating Instructions for Advanced Features (PDF format)” in the supplied CD-ROM. Install it on your PC to read it. Web Site: http://www.panasonic-europe.com Model number suffix “EB” denotes UK model. EB VQT3F15_DMC-FP5-EB_EN.
Dear Customer, We would like to take this opportunity to thank you for purchasing this Panasonic Digital Camera. Please read these Operating Instructions carefully and keep them handy for future reference. Please note that the actual controls and components, menu items, etc. of your Digital Camera may look somewhat different from those shown in the illustrations in these Operating Instructions. Carefully observe copyright laws.
Caution for AC Mains Lead For your safety, please read the following text carefully. This appliance is supplied with a moulded three pin mains plug for your safety and convenience. A 5-ampere fuse is fitted in this plug. Should the fuse need to be replaced please ensure that the replacement fuse has a rating of 5-ampere and that it is approved by ASTA or BSI to BS1362. Check for the ASTA mark or the BSI mark on the body of the fuse.
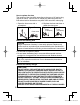
How to replace the fuse The location of the fuse differ according to the type of AC mains plug (figures A and B). Confirm the AC mains plug fitted and follow the instructions below. Illustrations may differ from actual AC mains plug. 1. Open the fuse cover with a screwdriver. Figure A Figure B Fuse cover 2. Replace the fuse and close or attach the fuse cover. Figure A Figure B Fuse (5 ampere) Fuse (5 ampere) About the battery pack CAUTION Danger of explosion if battery is incorrectly replaced.
• The battery charger is in the standby condition when the AC power supply cord is connected. The primary circuit is always “live” as long as the power cord is connected to an electrical outlet. Information for Users on Collection and Disposal of Old Equipment and used Batteries These symbols on the products, packaging, and/or accompanying documents mean that used electrical and electronic products and batteries should not be mixed with general household waste.
Cautions for Use • Do not use any other AV cables except the supplied one. • Do not use any other USB connection cables except the supplied one. Keep this unit as far away as possible from electromagnetic equipment (such as microwave ovens, TVs, video games etc.). • If you use this unit on top of or near a TV, the pictures and/or sound on this unit may be disrupted by electromagnetic wave radiation.
Contents Information for Your Safety....................................................................2 Standard Accessories...........................................................................8 Names of the Components .................................................................10 How to Use the Touch Panel...............................................................12 Charging the Battery ..........................................................................
Standard Accessories Check that all the accessories are included before using the camera. Product numbers are correct as of January 2011. These may be subject to change. 1 Battery Pack (Battery Pack is indicated as battery pack or battery in the text.) Charge the battery before 1 NCA-YN101H 2 DE-A92A use. 2 Battery Charger (Battery Charger is indicated as battery 3 K2CT3YY00034 4 K1HY08YY0019 charger or charger in the text.
Sales and Support Information Customer Care Centre • For customers within the UK: 0844 844 3852 • For customers within Ireland: 01 289 8333 • Visit our website for product information www.panasonic.co.uk • E-mail: customer.care@panasonic.co.
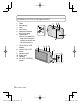
Names of the Components 1 2 3 4 5 6 Flash Microphone Lens Lens cover Self-timer Indicator AF Assist Lamp Strap eyelet • Be sure to attach the strap when using the camera to ensure that you will not drop it. 7 10 7 8 9 10 11 12 AV OUT/ DIGITAL Touch Panel / LCD Monitor 8 Camera ON / OFF switch 9 Shutter button 10 Zoom lever 11 Speaker 12 [AV OUT / DIGITAL] socket VQT3F15 (ENG) VQT3F15_DMC-FP5-EB_EN.
13 14 15 16 Tripod receptacle Card / Battery door Release lever DC coupler cover • When using an AC adaptor, ensure that the Panasonic DC coupler (DMWDCC10; optional) and AC adaptor (DMW-AC5E; optional) are used. • Always use a genuine Panasonic AC adaptor (DMW-AC5E; optional). • When using an AC adaptor, use the AC mains lead supplied with the AC adaptor.
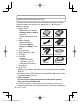
How to Use the Touch Panel This touch panel is a type that detects pressure. You can operate the camera by directly touching the icons or images on the LCD monitor (Touch Panel) with your finger or the supplied stylus pen. 12 Touch To touch and release the touch panel. Drag A movement without releasing the touch panel. Use this to select icons or images, or to set the items. • It may not operate properly when multiple icons are touched simultaneously, so try to touch the centre of the icon.
Note • If you use a commercially available liquid crystal protection sheet, please follow the instructions that accompany the sheet. (Depending on the material, visibility or operability may be impaired.) • Apply a little extra pressure when touching if you have a commercially available protection sheet affixed or if you feel it is not responding well. • Touch panel will not operate properly when the hand holding this unit is pressing on the touch panel.
Charging the Battery About batteries that you can use with this unit Supplied battery or dedicated optional batteries (DMW-BCK7E) can be used with this camera. It has been found that counterfeit battery packs which look very similar to the genuine product are made available to purchase in some markets. Some of these battery packs are not adequately protected with internal protection to meet the requirements of appropriate safety standards.
Connect the charger to the electrical outlet. • Charging starts when the [CHARGE] indicator A lights green. [CHARGE] indicator Lights on: Charging Lights off: Charging complete (Disconnect the charger from the electrical socket and detach the battery after charging is completed.) • When the [CHARGE] indicator flashes – The battery temperature is too high or too low. It is recommended to charge the battery again in an ambient temperature of between 10 °C to 30 °C.
Recording still pictures (By CIPA standard in Normal Picture Mode) Supplied battery Optional battery Capacity 660 mAh 680 mAh Number of recordable pictures Approx. 260 pictures Approx. 265 pictures Recording time Approx. 130 min Approx. 132 min Recording conditions by CIPA standard CIPA is an abbreviation of [Camera & Imaging Products Association]. • Temperature: 23 °C / Humidity: 50%RH when LCD monitor is on. • Using a Panasonic SD Memory Card (32 MB). • Using the supplied battery.
About the Built-in Memory / the Card Built-in Memory • Memory size: Approx. 70 MB • The built-in memory can be used as a temporary storage device when the card being used becomes full. • The access time for the built-in memory may be longer than the access time for a card. Card The following cards which conform to the SD video standard can be used with this unit. (These cards are indicated as card in the text.
Inserting and Removing the Card (optional) / the Battery • Check that this unit is turned off. • We recommend using a Panasonic card. Slide the release lever in the direction of the [OPEN] and open the card / battery door. • Always use genuine Panasonic batteries (NCA-YN101H; supplied or DMW-BCK7E; optional). • If you use other batteries, we cannot guarantee the quality of this product. Completely insert battery and card.
Setting Date / Time (Clock Set) • The clock is not set when the camera is shipped. Open the lens cover. • The camera is turned on. Touch the language select icon on the screen. Select the language. • The [Please set the clock] message appears. Touch [Clock Set]. Touch the items you wish to set (Year / Month / Day / Hours / Minutes), and set using [e] / [r]. Touch [Set]. Touch [Set]. Changing the clock setting Select [Clock Set] in the [Rec] or [Setup] menu.
Setting the Menu Using the menu, you can select your preferred recording or playback functions, or can make basic settings for the camera. This section describes the operation method using the example of how to set the [AF Mode] in the recording menu to [3] (Face Detection). Touch [MENU]. Touch the type of menu. • In Playback Mode, the playback menu can be selected instead of the recording menu. Touch the icon in the menu item. • Touching the icon for a few seconds will display the explanation.
Recording Sequence Open the lens cover. The camera is turned on in Recording Mode. (Recording is possible with this setting.) A Shutter button Select Recording Mode. 1 Touch [w1]. 2 Touch the mode icon. • The description is displayed after the first touch. • When operating from Playback Mode, touch [1] first to switch to Recording Mode, and then perform 1. List of [Rec] Modes 4 Intelligent Auto Mode The subjects are recorded using settings automatically selected by the camera.
[Rec] Mode: 4 Taking Pictures Using the Automatic Function (4: Intelligent Auto Mode) The camera will set the most appropriate settings to match the subject and the recording conditions so we recommend this mode for beginners or those who want to leave the settings to the camera and take pictures easily. A Shutter button Touch [w1] in Recording Mode. • When operating from Playback Mode, touch [1] first to switch to Recording Mode, and then touch [w1]. Touch [4].
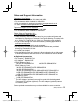
Scene Detection When the camera identifies the optimum scene, the icon of the scene concerned is displayed in blue for 2 seconds, after which its colour changes to the usual red. 4 3 [i-Portrait] 5 [i-Night Portrait] • Only when [w] is selected 4 [i-Scenery] 1 [i-Night Scenery] 2 [i-Macro] 7 [i-Sunset] • [4] is set if none of the scenes are applicable, and the standard settings are set.
[Rec] Mode: 6 Recording Motion Pictures This records motion pictures with sound. (Motion pictures cannot be recorded without audio.) Touch [w1] in Recording Mode. Touch [6]. Press the shutter button halfway to focus and then press it fully to start recording. A B A Available recording time B Recording state C C Elapsed recording time • After pressing the shutter button fully, release it straight away. • The focus and zoom are fixed to the setting when recording starts (the first frame).
[Playback] Mode: 5 Playing Back Pictures ([Normal Play]) If the card is inserted, pictures in the card are played back. If not, pictures in the built-in memory are played back. Touch [9] in Recording Mode. • Touching [9] in Recording Mode will automatically enter Normal Playback Mode. Forward or rewind the image by dragging the screen horizontally. Forward: drag from right to left Rewind: drag from left to right • To play back motion pictures [6], touch [5].
Reading the Operating Instructions (PDF format) More detailed instructions on the operation of this camera are contained in “Operating Instructions for Advanced Features (PDF format)” in the supplied CD-ROM. Install it on your PC to read it. [Windows] 1 2 3 Turn the PC on and insert the CD-ROM containing the Operating Instructions (supplied). Click the [Operating Instructions]. Select the desired language and then click [Operating Instructions] to install. A To return to the install menu.
When the Operating Instructions (PDF format) will not open You will need Adobe Acrobat Reader 5.0 or later or Adobe Reader 7.0 or later to browse or print the Operating Instructions (PDF format). Insert the CD-ROM containing the Operating Instructions (supplied), click [B] and then follow the messages on the screen to install.
Specifications Digital Camera: Information for your safety Power Source: DC 5.1 V Power Consumption: 1.1 W (When recording) 0.7 W (When playing back) Camera Effective pixels: 14,100,000 pixels Image sensor: 1/2.33˝ CCD Total pixels: 14,500,000 pixels Primary colour filter Lens: Optical 4 × zoom, f=6.3 to 25.2 mm [35 mm film camera equivalent: 35 to 140 mm] / F3.5 (Wide) to F5.9 (Tele) Digital zoom: Max. 4 × Extra optical zoom: Max. 8.4 × Focus range: Normal : 50 cm (1.
Shutter speed: Exposure (AE): Metering mode: LCD monitor: Flash: Microphone: Speaker: Recording media: 8 seconds to 1/1,600th of a second [Starry Sky] mode: 15 seconds, 30 seconds, 60 seconds Auto (Programme AE) Exposure compensation (1/3 EV Step, -2 EV to +2 EV) Multiple TFT LCD 3.0˝ (3:2) (Approx. 230,000 dots) (field of view ratio about 100%) Touch panel Flash range: Approx. 0.3 m (0.99 feet) to 4.9 m (16.
Dimensions: Mass: 30 Approx. 101.0 mm (W) × 58.9 mm (H) × 18.2 mm (D) (3.98˝ (W) × 2.32˝ (H) × 0.72˝ (D)) (excluding the projection part) Approx. 141 g/0.31 lb (with Memory Card and battery) Approx. 124 g/0.
(ENG) VQT3F15 VQT3F15_DMC-FP5-EB_EN.
• SDXC Logo is a trademark of SD-3C, LLC. • QuickTime and the QuickTime logo are trademarks or registered trademarks of Apple Inc., used under license therefrom. • This product uses “DynaFont” from DynaComware Corporation. DynaFont is a registered trademark of DynaComware Taiwan Inc. • Other names, company names, and product names printed in these instructions are trademarks or registered trademarks of the companies concerned.