
User guide


Connecting to other equipment
95
VQT0Y19
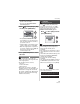
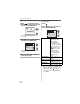
Printing the Pictures
By connecting the camera directly to a
printer supporting PictBridge via the USB
connection cable (supplied), you can select
the pictures to print and start printing on the
camera’s screen.
Set print settings such as the print quality
on the printer beforehand. (Read the printer
operating instructions.)
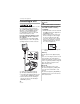
: USB connection cable (supplied)
: AC adaptor (DMW-AC5; optional)
• It may take time to print some pictures.
Use a battery with sufficient battery power
(P13) or the AC adaptor (DMW-AC5;
optional) when you connect to a printer.
• Turn the camera off before inserting or
removing the cable for the AC adaptor
(DMW-AC5; optional).
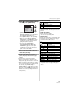
1 Turn on the camera and the
printer.
2 Set the mode dial to [ ].
3 Connect the camera to a printer
via the USB connection cable
(supplied).
• Connect the USB connection cable with
the [ ] mark facing the [] mark on
the [DIGITAL] socket.
• Hold the USB connection cable at
and insert straight in or take straight
out.
• Do not use any other USB connection
cables except the supplied one.
• If the mode dial is not set to [ ] when
the camera is connected to the PC,
disconnect the USB connection cable, set
the mode dial to [ ] and then connect
the USB connection cable again.
• To print the age in [BABY1]/[BABY2]
(P56) in scene mode or the departure
date for [TRAVEL DATE] (P57), use the
software [LUMIX Simple Viewer] in the
CD-ROM (supplied) and print from the
PC. For information about this, refer to the
separate operating instructions for PC
connection.
• To find out more about PictBridge
compliant printers, contact your local
dealer.
DIGITAL
AV OUT
DC IN