
User manual


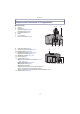
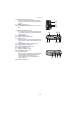


Table Of Contents
- CONTENTS
- Before Use
- Preparation
- Basic
- Selecting the Recording Mode
- Tips for taking good pictures
- Taking a Still picture
- Taking Pictures using the Automatic Function (Intelligent Auto Mode)
- Easily adjust and record (Intelligent Auto Plus Mode)
- Taking Pictures with Defocus Control Function
- Taking Pictures with Your Favorite Settings (Program AE Mode)
- Recording Motion Picture
- Playing Back Pictures/Motion Pictures
- Deleting Pictures
- Setting the Menu
- Setting the Quick Menu
- About the Setup Menu
- Recording
- Optical Image Stabilizer
- Taking Pictures with the Zoom
- Taking Pictures using the Flash
- Compensating the Exposure
- Taking Pictures using Burst Mode
- Taking Pictures using Auto Bracket
- Taking Pictures with the Self-timer
- Taking Pictures with Auto Focus
- Taking Pictures with Manual Focus
- Adjusting the White Balance
- Using the function button
- Taking Pictures by Specifying the Aperture/ Shutter Speed
- Taking Pictures that match the Scene being recorded (Scene Guide Mode)
- [Clear Portrait]
- [Silky Skin]
- [Backlit Softness]
- [Clear in Backlight]
- [Relaxing Tone]
- [Sweet Child's Face]
- [Distinct Scenery]
- [Bright Blue Sky]
- [Romantic Sunset Glow]
- [Vivid Sunset Glow]
- [Glistening Water]
- [Clear Nightscape]
- [Cool Night Sky]
- [Warm Glowing Nightscape]
- [Artistic Nightscape]
- [Glittering Illuminations]
- [Clear Night Portrait]
- [Soft Image of a Flower]
- [Appetizing Food]
- [Cute Dessert]
- [Freeze Animal Motion]
- [Clear Sports Shot]
- [Monochrome]
- Taking Pictures with different image effects (Creative Control Mode)
- Taking Pictures in Custom Set
- Taking a Picture with Face Recognition Function
- Entering Text
- Using the [Rec] Menu
- [Photo Style]
- [Aspect Ratio]
- [Picture Size]
- [Quality]
- [Sensitivity]
- [ISO Limit Set]
- [ISO Increments]
- [Extended ISO]
- [Face Recog.]
- [Profile Setup]
- [Focus Mode]
- [Quick AF]
- [Metering Mode]
- [Flash]
- [Red-Eye Removal]
- [i.Resolution]
- [i.Dynamic] (Intelligent dynamic range control)
- [Long Shtr NR]
- [Shading Comp.]
- [Ex. Tele Conv.]
- [Digital Zoom]
- [Burst Rate]
- [Auto Bracket]
- [Self Timer]
- [Color Space]
- [Stabilizer]
- [Recommended Filter]
- Using the [Motion Picture] Menu
- Using the [Custom] Menu
- Playback/Editing
- Connecting to other equipment
- Others

- 7 -
Before Use
Names and Functions of Components
∫ Camera body
1 Sensor
2Flash (P79)
3 Self-timer indicator (P88)/
AF Assist Lamp (P156)
4 Lens fitting mark (P14)
5 Mount
6 Lens lock pin
7 Lens release button (P13)
8 Flash open button (P79)
9 Touch screen/LCD monitor (P10)
10 Playback button (P51, 55)
11 [Q.MENU/Fn1] button (P65, 103)/
Delete/Return button (P58, 62)
12 [MENU/SET] button (P11, 60)
13 Control dial (P11)
14 Cursor buttons (P11)
3/Exposure Compensation button (P41, 83,
108, 109, 110)
1/WB (White Balance) (P99)
2/AF Mode button (P90)
4/[Drive Mode] button
This button in picture record mode will allow the
user to select between the following options.
Single (P34)/Burst (P84)/Auto bracket (P86)/Self-timer (P88)
15 [DISP.] button (P36, 54)
1
2 3
4567
8
910 1511
1213 14