DMC-GX8A&GX8H&GX8K_EB-SQT0787_eng.book 1 ページ 2015年7月6日 月曜日 午後1時50分 Basic Operating Instructions Digital Camera/ Lens Kit/Body Model No. DMC-GX8A/DMC-GX8H DMC-GX8K/DMC-GX8 Please read these instructions carefully before using this product, and save this manual for future use. More detailed instructions on the operation of this camera are contained in “Operating Instructions for advanced features (PDF format)” in the supplied DVD. Web Site: http://www.panasonic.
DMC-GX8A&GX8H&GX8K_EB-SQT0787_eng.book 2 ページ 2015年7月6日 月曜日 午後1時50分 Dear Customer, We would like to take this opportunity to thank you for purchasing this Panasonic Digital Camera. Please read these Operating Instructions carefully and keep them handy for future reference. Please note that the actual controls and components, menu items, etc. of your Digital Camera may look somewhat different from those shown in the illustrations in these Operating Instructions. Carefully observe copyright laws.
DMC-GX8A&GX8H&GX8K_EB-SQT0787_eng.book 3 ページ 2015年7月6日 月曜日 午後1時50分 Declaration of Conformity (DoC) Hereby, “Panasonic Corporation” declares that this product is in compliance with the essential requirements and other relevant provisions of Directive 1999/5/EC. Customers can download a copy of the original DoC to our R&TTE products from our DoC server: http://www.doc.panasonic.
DMC-GX8A&GX8H&GX8K_EB-SQT0787_eng.book 4 ページ 2015年7月6日 月曜日 午後1時50分 Cautions for Use • Do not use any other USB connection cables except the supplied one or a genuine Panasonic USB connection cable (DMW-USBC1: optional). • Use a “High Speed HDMI micro cable” with the HDMI logo. Cables that do not comply with the HDMI standards will not work. “High Speed HDMI micro cable” (Type D– Type A plug, up to 2 m (6.6 feet) long) • Always use a genuine Panasonic AV cable (DMW-AVC1: optional).
DMC-GX8A&GX8H&GX8K_EB-SQT0787_eng.book 5 ページ 2015年7月6日 月曜日 午後1時50分 • Before cleaning the camera, remove the battery or the DC coupler (DMW-DCC8: optional), or disconnect the power plug from the outlet. • Do not press the monitor with excessive force. • Do not press the lens with excessive force. • Do not spray the camera with insecticides or volatile chemicals. • Do not keep rubber or plastic products in contact with the camera for a long period of time.
DMC-GX8A&GX8H&GX8K_EB-SQT0787_eng.book 6 ページ Contents Information for Your Safety .................2 • Cautions for Use ..............................4 Preparation/Basic Care of the camera ...............................8 Standard Accessories ..........................9 Names and Functions of Components........................................10 Preparation..........................................13 • Attaching the Shoulder Strap .........13 • Charging the Battery ......................
DMC-GX8A&GX8H&GX8K_EB-SQT0787_eng.book 7 ページ 2015年7月6日 月曜日 午後1時50分 Playback Others Playing Back Pictures........................ 39 Playing Back Motion Pictures........... 39 Deleting Pictures................................ 40 Using the [Playback] Menu ............... 41 • [RAW Processing] ......................... 41 About the supplied software .............49 Monitor Display/ Viewfinder Display..............................50 Menu list ..............................................
DMC-GX8A&GX8H&GX8K_EB-SQT0787_eng.book 8 ページ 2015年7月6日 月曜日 午後1時50分 Preparation/Basic Care of the camera To avoid damaging your camera and to experience the maximum enjoyment you should exercise the following precautions. • The lens, monitor and the camera body can sustain damage if the camera body is dropped or subjected to excessive temperature, moisture, water or dust. • The monitor can be damaged if excessive pressure is applied to the screen surface, during actual use or while cleaning.
DMC-GX8A&GX8H&GX8K_EB-SQT0787_eng.book 9 ページ 2015年7月6日 月曜日 午後1時50分 Preparation/Basic Standard Accessories Check that all the accessories are supplied before using the camera. Product numbers correct as of July 2015. These may be subject to change. Digital Camera Body (This is referred to as camera body in these operating instructions.
DMC-GX8A&GX8H&GX8K_EB-SQT0787_eng.book 10 ページ 2015年7月6日 月曜日 午後1時50分 Preparation/Basic Names and Functions of Components ∫ Camera body 1 2 5 11 12 13 14 15 6 7 8 9 16 17 10 18 19 3 4 19 25 1 Status indicator (P17)/ Wi-Fi® connection lamp • The lamp lights green when the camera is turned on, and lights blue when it is connected to Wi-Fi. 24 23 22 21 14 Stereo microphone • Be careful not to cover the microphone with your finger. Doing so may make sound difficult to record.
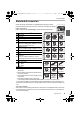
DMC-GX8A&GX8H&GX8K_EB-SQT0787_eng.book 11 ページ 2015年7月6日 月曜日 午後1時50分 Preparation/Basic 27 28 29 34 35 36 33 30 31 32 37 26 38 41 42 39 40 46 45 44 43 26 Touch screen (P22)/monitor (P50) 39 [MENU/SET] button (P23) 27 Viewfinder (P22) 40 NFC antenna [ 41 [Fn] button (Fn4) (P24) Eyecup 28 • Keep the Eyecup out of reach of children to prevent swallowing. 29 Eye sensor (P22) [Q.MENU] button (P24)/ 30 Function button (Fn2) (P24) 31 [(] (Playback) button (P39) [DISP.
DMC-GX8A&GX8H&GX8K_EB-SQT0787_eng.book 12 ページ 2015年7月6日 月曜日 午後1時50分 Preparation/Basic ∫ Lens H-FS14140 H-HS12035 1 2 3 4 5 6 7 H-FS1442A 1 2 3 4 5 7 1 8 8 1 2 3 4 5 6 7 8 9 2 34 5 6 Lens surface Tele Focus ring (P30) Zoom ring Wide [O.I.S.] switch (P34) Contact point Lens fitting mark (P16) Lens mount rubber ∫ Removing the Hot Shoe Cover The camera comes with a hot shoe cover attached to the hot shoe.
DMC-GX8A&GX8H&GX8K_EB-SQT0787_eng.book 13 ページ 2015年7月6日 月曜日 午後1時50分 Preparation/Basic Preparation • Check that the camera is turned off. Attaching the Shoulder Strap • We recommend attaching the shoulder strap when using the camera to prevent it from dropping. • Perform steps 1 to 8 and then attach the other side of the shoulder strap. • Use the shoulder strap around your shoulder. – Do not wrap the strap around your neck. – It may result in injury or accident.
DMC-GX8A&GX8H&GX8K_EB-SQT0787_eng.book 14 ページ 2015年7月6日 月曜日 午後1時50分 Preparation/Basic ∫ Charging time Charging time Approx. 140 min • The indicated charging time is for when the battery has been discharged completely. The charging time may vary depending on how the battery has been used. The charging time for the battery in hot/cold environments or a battery that has not been used for a long time may be longer than normal.
DMC-GX8A&GX8H&GX8K_EB-SQT0787_eng.book 15 ページ 2015年7月6日 月曜日 午後1時50分 Preparation/Basic ∫ About cards that can be used with this unit • SDHC Memory Cards and SDXC Memory Cards can be SD Memory Card (512 MB to 2 GB) used only with their compatible devices. • Check that the PC and other equipment are compatible when using the SDXC Memory Cards. http://panasonic.net/avc/sdcard/information/SDXC.html • This unit is compatible with UHS-I UHS Speed Class 3 standard SDHC/SDXC memory cards.
DMC-GX8A&GX8H&GX8K_EB-SQT0787_eng.book 16 ページ 2015年7月6日 月曜日 午後1時50分 Preparation/Basic Attaching/Removing the Lens • Change lenses where there is not a lot of dirt or dust. • Do not press the lens release button A when you attach a lens. ∫ Detaching the lens 1 2 Attach the lens cap. While pressing on the lens release button B, rotate the lens toward the arrow until it stops and then remove. Opening the Monitor At the time when this camera is purchased, the monitor is stowed in the camera body.
DMC-GX8A&GX8H&GX8K_EB-SQT0787_eng.book 17 ページ 2015年7月6日 月曜日 午後1時50分 Preparation/Basic Setting Date/Time (Clock Set) • The clock is not set when the camera is shipped. 1 Turn the camera on. • When the camera is turned on, the status indicator 1 lights up green. 2 3 Press [MENU/SET]. Press 2/1 to select the items (year, month, day, hour, minute), and press 3/4 to set. 4 5 6 7 Press [MENU/SET] to set. When [The clock setting has been completed.] is displayed, press [MENU/SET].
DMC-GX8A&GX8H&GX8K_EB-SQT0787_eng.book 18 ページ 2015年7月6日 月曜日 午後1時50分 Preparation/Basic Basic Operations Using the Viewfinder Adjusting the angle of the viewfinder You can record images from a variety of angles by adjusting the angle of the viewfinder. Taking pictures at a low angle • Be careful not to catch your finger, etc. in the viewfinder. • When adjusting the angle of the viewfinder, be careful not to apply too much force, as this may cause malfunction.
DMC-GX8A&GX8H&GX8K_EB-SQT0787_eng.book 19 ページ 2015年7月6日 月曜日 午後1時50分 Preparation/Basic Shutter button (Taking pictures) The shutter button works in two steps. To take a picture, press it. Press the shutter button halfway to focus. A Aperture value B Shutter speed C Focus indication • Aperture value and shutter speed are displayed. C (It will flash in red if the correct exposure is not achieved, except when set to flash.) • Once the subject is in focus, the focus indication is displayed.
DMC-GX8A&GX8H&GX8K_EB-SQT0787_eng.book 20 ページ 2015年7月6日 月曜日 午後1時50分 Preparation/Basic Mode dial (Selecting a Recording Mode) Select the mode by rotating the mode dial. • Rotate the mode dial slowly to select the desired mode. Intelligent Auto Mode (P25) The subjects are recorded using settings automatically selected by the camera. Intelligent Auto Plus Mode (P25) Allows you to adjust the brightness (Exposure) and colour hue when in Intelligent Auto Mode.
DMC-GX8A&GX8H&GX8K_EB-SQT0787_eng.book 21 ページ 2015年7月6日 月曜日 午後1時50分 Preparation/Basic Front Dial/Rear Dial Rotating: Selection of items or setting of values is performed during the various settings. • These operating instructions describe operations of the front dial/rear dial as follows: e.g.: When rotating the front dial to the left or right e.g.: When rotating the rear dial to the left or right Allows you to set the aperture, shutter speed, and other settings when in modes.
DMC-GX8A&GX8H&GX8K_EB-SQT0787_eng.book 22 ページ 2015年7月6日 月曜日 午後1時50分 Preparation/Basic [LVF] button (Switching the Monitor/Viewfinder) Press [LVF] to switch between the Monitor and Viewfinder. A [LVF] button B Eye sensor Press [LVF]. • The monitor/viewfinder will switch as follows: Automatic viewfinder/ monitor switching¢ Viewfinder display¢ Monitor display ¢ If [Eye Sensor AF] in the [Custom] menu is set to [ON], the camera automatically adjusts the focus as the eye sensor is activated.
DMC-GX8A&GX8H&GX8K_EB-SQT0787_eng.book 23 ページ 2015年7月6日 月曜日 午後1時50分 Preparation/Basic Setting menu items 1 2 3 Press [MENU/SET]. Press 3/4 of the cursor button to select the menu item and press [MENU/SET]. Press 3/4 of the cursor button to select the setting and press [MENU/SET]. • Depending on the menu item, its setting may not appear or it may be displayed in a different way. ∫ Switching to other menus e.g.: Switching to the [Setup] menu from [Rec] menu. 1 2 Press 2.
DMC-GX8A&GX8H&GX8K_EB-SQT0787_eng.book 24 ページ 2015年7月6日 月曜日 午後1時50分 Preparation/Basic Calling frequently-used menus instantly (Quick Menu) By using the Quick Menu, some of the menu settings can be easily found. • The features that can be adjusted using Quick Menu are determined by the mode or a display style the camera is in. 1 2 Press [Q.MENU] to display the Quick Menu. Rotate the front dial to select the menu item. 50p 3.5 60 3 4 4:3 L 0 AFS AUTO Rotate the rear dial to select the setting.
DMC-GX8A&GX8H&GX8K_EB-SQT0787_eng.book 25 ページ 2015年7月6日 月曜日 午後1時50分 Recording Taking Pictures using the Automatic Function (Intelligent Auto Mode) Recording Mode: In this mode, the camera makes the optimal settings for the subject and scene, so we recommend it when you wish to leave the settings to the camera and record without thinking about them. 1 Set the mode dial to [¦]. • The camera will switch to either the most recently used of Intelligent Auto Mode or Intelligent Auto Plus Mode.
DMC-GX8A&GX8H&GX8K_EB-SQT0787_eng.book 26 ページ 2015年7月6日 月曜日 午後1時50分 Recording Combining pictures into a single picture with rich gradation ([iHDR]) When [iHDR] is set to [ON] and there is, for example, strong contrast between the background and the subject, multiple still pictures are recorded with differing exposures and combined to create a single still picture rich in gradation. [iHDR] works automatically as needed. When it does, [ ] is displayed on the screen.
DMC-GX8A&GX8H&GX8K_EB-SQT0787_eng.book 27 ページ 2015年7月6日 月曜日 午後1時50分 Recording Recording motion pictures with manually set aperture value/shutter speed (Creative Video Mode) Recording Mode: It is possible to manually change the aperture and shutter speed and record motion pictures. 1 2 Set the mode dial to [ ]. Select the menu. (P23) MENU > [Motion Picture] > [Exposure Mode] 3 Press 3/4 to select [P], [A], [S] or [M], and then press [MENU/SET]. 4 Start recording.
DMC-GX8A&GX8H&GX8K_EB-SQT0787_eng.book 28 ページ 2015年7月6日 月曜日 午後1時50分 Recording Setting the Picture Quality and Size Setting the aspect ratio of pictures Applicable modes: This allows you to select the aspect ratio of the pictures to suit printing or the playback method. MENU > [Rec] > [Aspect Ratio] [4:3] [Aspect Ratio] of a 4:3 TV [3:2] [Aspect Ratio] of a 35 mm film camera [16:9] [Aspect Ratio] of a high-definition TV, etc.
DMC-GX8A&GX8H&GX8K_EB-SQT0787_eng.book 29 ページ 2015年7月6日 月曜日 午後1時50分 Recording Setting the compression rate of pictures ([Quality]) Applicable modes: Set the compression rate at which the pictures are to be stored. > MENU [Rec] > [Quality] Settings File format [A] JPEG [›] [ ] [ ] [ Description of settings A JPEG image in which image quality was given priority. ] RAWiJPEG RAW A standard image quality JPEG image.
DMC-GX8A&GX8H&GX8K_EB-SQT0787_eng.book 30 ページ 2015年7月6日 月曜日 午後1時50分 Recording Adjusting Focus Manually Applicable modes: Use this function when you want to fix the focus or when the distance between the lens and the subject is determined and you do not want to activate Auto Focus. When using an interchangeable lens (H-FS14140/H-HS12035/ H-FS1442A) with a focus ring Rotate to A side: Focuses on nearby subject Rotate to B side: Focuses on faraway subject 1 2 3 A B Set the focus mode lever to [MF].
DMC-GX8A&GX8H&GX8K_EB-SQT0787_eng.book 31 ページ 2015年7月6日 月曜日 午後1時50分 Recording Select a Drive Mode Applicable modes: You can change what the camera will do when you press the shutter button. 1 2 Press 4 ( ). Press 2/1 to select the drive mode, and then press [MENU/SET]. 1 2 3 4 5 H 31/3 A Drive mode A 1 [Single] When the shutter button is pressed, only one picture is recorded. 2 [Burst] Recordings are made in succession while the shutter button is pressed.
DMC-GX8A&GX8H&GX8K_EB-SQT0787_eng.book 32 ページ 2015年7月6日 月曜日 午後1時50分 Recording Recording 4K Photos Applicable modes: Press the shutter button to record a 4K photo. You can select the desired moment from a burst of pictures taken at 30 frames/second and save that moment as a picture of 8 million pixels (approx.). 1 Record a 4K photo. 2 Select and save pictures. 3 The picture is complete. • Use a UHS Speed Class 3 card to record 4K photos.
DMC-GX8A&GX8H&GX8K_EB-SQT0787_eng.book 33 ページ 2015年7月6日 月曜日 午後1時50分 Recording [ ] [4K Pre-Burst] For recording as needed whenever a photo opportunity arises Burst recording is performed for approximately 1 second before and after the moment that the shutter button is pressed. F Approximately 1 second G Recording is performed When the drive mode is set to [ ] ([4K Pre-Burst]), the battery drains faster and the camera temperature rises. Select [ ] ([4K Pre-Burst]) only when recording.
DMC-GX8A&GX8H&GX8K_EB-SQT0787_eng.book 34 ページ 2015年7月6日 月曜日 午後1時50分 Recording Image Stabiliser The camera can activate either the In-Lens Image Stabiliser or In-Body Image Stabiliser, or it can activate both of them and reduce jitter even more effectively. (Dual I.S.) For motion picture recording, the 5-Axis Hybrid Image Stabiliser is available. It uses both the optical stabiliser of the lens and the electronic stabiliser of the camera’s sensor.
DMC-GX8A&GX8H&GX8K_EB-SQT0787_eng.book 35 ページ 2015年7月6日 月曜日 午後1時50分 Recording 2 Press 3/4 to select the item and then press [MENU/SET]. [ ] ([Normal]) [Operation Mode] Vertical and horizontal shake are compensated for. Camera shake is corrected for up/down movements. [ ] This mode is ideal for panning (a method of taking pictures ([Panning]) which involves turning the camera to track the movements of a subject which continues to move in a fixed direction). [OFF] [Stabilizer] does not work.
DMC-GX8A&GX8H&GX8K_EB-SQT0787_eng.book 36 ページ 2015年7月6日 月曜日 午後1時50分 Recording Recording Motion Picture Applicable modes: This camera can record full high definition motion pictures compatible with the AVCHD format or motion pictures recorded in MP4. In addition, the camera can record 4K motion pictures in MP4. (P38) Audio will be recorded in stereo. 1 Start recording by pressing the motion picture button.
DMC-GX8A&GX8H&GX8K_EB-SQT0787_eng.book 37 ページ 2015年7月6日 月曜日 午後1時50分 Recording • When the ambient temperature is high or motion picture is recorded continuously, the camera may display [ ] and stop the recording to protect itself. Wait until the camera cools down. • It is recommended to use a fully charged battery or AC adaptor (DMW-AC10E: optional) when recording motion pictures.
DMC-GX8A&GX8H&GX8K_EB-SQT0787_eng.
DMC-GX8A&GX8H&GX8K_EB-SQT0787_eng.book 39 ページ 2015年7月6日 月曜日 午後1時50分 Playback Playing Back Pictures 1 2 Press [(]. Press 2/1. 2: Play back the previous picture 1: Play back the next picture Sending an image to a web service If you press 4 when displaying images one by one, you can easily send an image to a web service. • For details, refer to the “Operating Instructions for advanced features (PDF format)”.
DMC-GX8A&GX8H&GX8K_EB-SQT0787_eng.book 40 ページ 2015年7月6日 月曜日 午後1時50分 Playback Deleting Pictures Once deleted, pictures cannot be recovered. To delete a single picture 1 In Playback Mode, select the picture to delete and then press [ ]. • The same operation can be performed by touching [ 2 ]. Press 3 to select [Delete Single] and then press [MENU/SET]. 'HOHWH 6LQJOH • Confirmation screen is displayed. 'HOHWH 0XOWL Picture is deleted by selecting [Yes].
DMC-GX8A&GX8H&GX8K_EB-SQT0787_eng.book 41 ページ 2015年7月6日 月曜日 午後1時50分 Playback Using the [Playback] Menu [RAW Processing] You can process the pictures taken in RAW format. The processed pictures will be saved in JPEG format. You can check how effects are applied to each picture while processing it. 1 Select the menu. (P23) MENU 2 3 4 5 6 > [Playback] > [RAW Processing] Select RAW images with 2/1, and then press [MENU/ SET]. Press 3/4 to select an item. [White Balance] [Highlight] [i.
DMC-GX8A&GX8H&GX8K_EB-SQT0787_eng.book 42 ページ 2015年7月6日 月曜日 午後1時50分 Playback ∫ How to set each item When you select an item, the setting screen will be displayed. Button operation 2/1 / Touch operation Description of operation Dragging Selects a setting. 3 [WB K Set] 4 [Adjust.] [DISP.] [DISP.] [MENU/SET] [Set] DISP. Displays the screen that lets you set the colour temperature. (only when [White Balance] is set to [ ]) Displays the screen that lets you fine-adjust the White Balance.
DMC-GX8A&GX8H&GX8K_EB-SQT0787_eng.book 43 ページ 2015年7月6日 月曜日 午後1時50分 Wi-Fi/NFC What you can do with the Wi-FiR function • The camera cannot be used to connect to a public wireless LAN connection.
DMC-GX8A&GX8H&GX8K_EB-SQT0787_eng.book 44 ページ 2015年7月6日 月曜日 午後1時50分 Wi-Fi/NFC 1 2 3 4 Connect the smartphone to a network. (Android) Select “Google PlayTM Store”. (iOS) Select “App StoreSM”. Enter “Panasonic Image App” or “LUMIX” into the search box. Select “Panasonic Image App” and install it. • Use the latest version. • Supported OSs are current as of July 2015 and are subject to change. • Read the [Help] in the “Image App” menu for further details on how to operate.
DMC-GX8A&GX8H&GX8K_EB-SQT0787_eng.book 45 ページ 2015年7月6日 月曜日 午後1時50分 Wi-Fi/NFC • When [Wi-Fi Password] is set to the default setting [OFF], third parties may intercept Wi-Fi radio waves and collect the content of communications. Set [Wi-Fi Password] to [ON] to enable the password. • For details, refer to the “Operating Instructions for advanced features (PDF format)”.
DMC-GX8A&GX8H&GX8K_EB-SQT0787_eng.book 46 ページ 2015年7月6日 月曜日 午後1時50分 Wi-Fi/NFC For both iOS devices (iPhone/iPod touch/iPad) and Android devices Terminating the connection After use, terminate the connection to the smartphone. 1 Select the camera’s menu items to terminate the Wi-Fi connection. MENU > [Setup] > [Wi-Fi] > [Wi-Fi Function] • Confirmation screen is displayed. It is ended when [Yes] is selected. • You can also terminate the connection by pressing [Wi-Fi] on the camera.
DMC-GX8A&GX8H&GX8K_EB-SQT0787_eng.book 47 ページ 2015年7月6日 月曜日 午後1時50分 Wi-Fi/NFC Saving images stored in the camera 1 2 Connect to a smartphone. (P44) Operate the smartphone. 1 Select [ ]. 2 Touch and hold an image, and drag it to save it. • The function can be assigned to the top, bottom, left or right according to your preference. • Pictures in RAW format, AVCHD motion pictures, MP4 motion pictures with a [Rec Quality] size of [4K], and 4K burst files cannot be saved.
DMC-GX8A&GX8H&GX8K_EB-SQT0787_eng.book 48 ページ 2015年7月6日 月曜日 午後1時50分 Wi-Fi/NFC Adding location information to images stored in the camera from a smartphone/tablet You can send location information acquired with a smartphone to the camera. After sending the information, you can also write it on images stored in the camera.
DMC-GX8A&GX8H&GX8K_EB-SQT0787_eng.book 49 ページ 2015年7月6日 月曜日 午後1時50分 Others About the supplied software The supplied DVD includes the following software. Install the software on to your computer before use. • PHOTOfunSTUDIO 9.7 PE (Windows Vista/Windows 7/Windows 8/Windows 8.1) • SILKYPIX Developer Studio 4.3 SE (Windows Vista/Windows 7/Windows 8/Windows 8.1, Mac OS X v10.6 to v10.
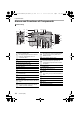
DMC-GX8A&GX8H&GX8K_EB-SQT0787_eng.book 50 ページ 2015年7月6日 月曜日 午後1時50分 Others Monitor Display/Viewfinder Display • The following images are examples of when the display screen is set to [ ] (monitor style) in the monitor. In recording 50p 4:3 L AFS ラュン Fn8 Fn9 × F MINI Fn10 SS Fn11 AEL 3.5 60 0 200 BKT AWB 98 1 Fn12 STD.
DMC-GX8A&GX8H&GX8K_EB-SQT0787_eng.book 51 ページ 2015年7月6日 月曜日 午後1時50分 Others 4 2 A› Quality (P29) AF area AFS AFF AFC MF š Ø Focus Mode Spot metering target AFL Centre marker display AF Mode Self-timer¢4 Pull Focus Mic level display Face Recognition Silent Mode AF Lock External Microphone Burst AEL 4K Photo (P32) AE Lock AE Auto Bracket Metering Mode Programme Shift Self-timer 3.
DMC-GX8A&GX8H&GX8K_EB-SQT0787_eng.
DMC-GX8A&GX8H&GX8K_EB-SQT0787_eng.book 53 ページ 2015年7月6日 月曜日 午後1時50分 Others In recording On-monitor recording information 3 F 3.5 ISO AUTO 1/60 Single (P31) Burst 0 0 0 4:3 AFS L 4K Photo (P32) Wi-Fi Fn 98 AWB 1 C1 EXPS Recording Mode (P20) Auto Bracket Self-timer AFS AFF AFC MF Focus Mode (P30) š Ø AF Mode Quality (P29) A› 4:3 F3.
DMC-GX8A&GX8H&GX8K_EB-SQT0787_eng.book 54 ページ 2015年7月6日 月曜日 午後1時50分 Others Menu list To display explanations of the menu items. A When [Menu Information] in the [Setup] menu is set to [ON], explanations of the menu items and settings are displayed on the menu screen. A Explanations of the menu • [Photo Style], [Filter Settings], [AFS/AFF], [Metering Mode], [Highlight Shadow], [i.Dynamic], [i.
DMC-GX8A&GX8H&GX8K_EB-SQT0787_eng.book 55 ページ 2015年7月6日 月曜日 午後1時50分 Others [Custom] Operation of the unit, such as displaying of the screen and button operations, can be set up according to your preferences. Also, it is possible to register the modified settings. [Cust.Set Mem.] [MF Assist Display] [Remaining Disp.] [Silent Mode] [MF Guide] [Auto Review] [AF/AE Lock] [Peaking] [Fn Button Set] [AF/AE Lock Hold] [Histogram] [Q.MENU] [Shutter AF] [Guide Line] [Dial Set.
DMC-GX8A&GX8H&GX8K_EB-SQT0787_eng.book 56 ページ 2015年7月6日 月曜日 午後1時50分 Others Troubleshooting First, try out the following procedures. If the problem is not resolved, it may be improved by selecting [Reset] on the [Setup] menu. • Please also refer to the “Operating Instructions for advanced features (PDF format)”, which describes more detailed information. The camera cannot be operated even when it is turned on. The camera turns off immediately after it is turned on. • The battery is exhausted.
DMC-GX8A&GX8H&GX8K_EB-SQT0787_eng.book 57 ページ 2015年7月6日 月曜日 午後1時50分 Others The subject appears distorted on the picture. • If you record a moving subject when using the electronic shutter or recording motion picture or a 4K photo, the subject may appear distorted on the picture. This is characteristic of MOS sensors which serve as the camera’s pickup sensors. This is not a malfunction. Striping or flicker may appear under lighting such as fluorescent lighting and LED lighting fixture.
DMC-GX8A&GX8H&GX8K_EB-SQT0787_eng.book 58 ページ 2015年7月6日 月曜日 午後1時50分 Others The flash is not activated. • When the electronic shutter is used, the flash is not activated. > Set [Electronic Shutter] to [OFF]. • When [Silent Mode] is set to [ON], the flash is not activated. > Set [Silent Mode] to [OFF]. The flash is activated 2 times. • (Except for when [Firing Mode] in [Flash] is set to [MANUAL]) The flash is activated 2 times.
DMC-GX8A&GX8H&GX8K_EB-SQT0787_eng.book 59 ページ 2015年7月6日 月曜日 午後1時50分 Others A Wi-Fi connection cannot be established. Radio waves get disconnected. Wireless access point is not displayed. ∫ General tips for using a Wi-Fi connection • Use within the communication range of the device to be connected. • Is any device, such as microwave oven, cordless phone, etc., that uses 2.4 GHz frequency operated nearby? > Radio waves may get interrupted when used simultaneously.
DMC-GX8A&GX8H&GX8K_EB-SQT0787_eng.book 60 ページ 2015年7月6日 月曜日 午後1時50分 Others Images cannot be transmitted to a PC. • When the firewall of the OS, security software, etc. is enabled, connecting to the PC may not be possible. When I try to set up a Wi-Fi connection with a Windows 8 PC, my user name and password are not recognised, so I cannot connect to the PC. • Some OS versions, including Windows 8, use two types of accounts: a local account and a Microsoft account.
DMC-GX8A&GX8H&GX8K_EB-SQT0787_eng.book 61 ページ 2015年7月6日 月曜日 午後1時50分 Others The motion pictures cannot be played back on a TV. • Are you trying to play back the motion pictures by directly inserting the card in the card slot of the TV? > Connect the camera to the TV with the AV cable (optional), or with the HDMI micro cable, and then play back the motion pictures on the camera. VIERA Link does not work.
DMC-GX8A&GX8H&GX8K_EB-SQT0787_eng.book 62 ページ 2015年7月6日 月曜日 午後1時50分 Others Specifications Specifications are subject to change without notice. Digital Camera Body (DMC-GX8): Information for your safety 8.4 V) Power Source: DC 8.4 V ( Power Consumption: 2.8 W (When recording with Monitor) [When the Interchangeable lens (H-FS14140) is used] 2.8 W (When recording with Monitor) [When the Interchangeable lens (H-HS12035) is used] 2.
DMC-GX8A&GX8H&GX8K_EB-SQT0787_eng.book 63 ページ 2015年7月6日 月曜日 午後1時50分 Others Burst recording Burst speed Number of recordable pictures Mechanical shutter 8 pictures/second (High speed, AFS), 6 pictures/second (High speed, AFC), 5.
DMC-GX8A&GX8H&GX8K_EB-SQT0787_eng.book 64 ページ 2015年7月6日 月曜日 午後1時50分 Others Exposure (AE) Programme AE (P)/Aperture-priority AE (A)/Shutter-priority AE (S)/Manual exposure (M)/AUTO Exposure Compensation (1/3 EV Step, j5 EV to i5 EV) Light metering system, Light metering mode 1728-zone multi-pattern sensing system, Multiple/Centre weighted/Spot Monitor 3.0q OLED Monitor (3:2) (Approx. 1,040,000 dots) (field of view ratio about 100%) Touch screen Viewfinder OLED Live Viewfinder (4:3) (Approx.
DMC-GX8A&GX8H&GX8K_EB-SQT0787_eng.
DMC-GX8A&GX8H&GX8K_EB-SQT0787_eng.book 66 ページ 2015年7月6日 月曜日 午後1時50分 Others Terminal [REMOTE/MIC] ‰ 2.5 mm jack [AV OUT/DIGITAL] Dedicated jack (8 pin) [HDMI] micro HDMI Type D Dimensions Approx. 133.2 mm (W)k77.9 mm (H)k63.1 mm (D) [5.24q (W)k3.07q(H)k2.48q (D)] (excluding the projecting parts) Mass Approx. 487 g/1.07 lb [with the card and battery] Approx. 435 g/0.96 lb (camera body) Approx. 752 g/1.66 lb [with the Interchangeable lens (H-FS14140), card and battery] Approx. 790 g/1.
DMC-GX8A&GX8H&GX8K_EB-SQT0787_eng.book 67 ページ 2015年7月6日 月曜日 午後1時50分 Others Interchangeable Lens H-FS14140 “LUMIX G VARIO 14 – 140 mm/F3.5 – 5.6 ASPH./POWER O.I.S.” Focal length f=14 mm to 140 mm (35 mm film camera equivalent: 28 mm to 280 mm) Aperture type 7 diaphragm blades/circular aperture diaphragm Aperture range F3.5 (Wide) to F5.
DMC-GX8A&GX8H&GX8K_EB-SQT0787_eng.book 68 ページ 2015年7月6日 月曜日 午後1時50分 Others Interchangeable Lens H-HS12035 “LUMIX G X VARIO 12 – 35 mm/F2.8 ASPH./ POWER O.I.S.” H-FS1442A “LUMIX G VARIO 14 – 42 mm/ F3.5 – 5.6 II ASPH./MEGA O.I.S.
DMC-GX8A&GX8H&GX8K_EB-SQT0787_eng.
DMC-GX8A&GX8H&GX8K_EB-SQT0787_eng.book 70 ページ 2015年7月6日 月曜日 午後1時50分 Others Reading the Operating Instructions (PDF format) More detailed instructions on the operation of this camera are contained in “Operating Instructions for advanced features (PDF format)” in the supplied DVD. ∫ For Windows 1 Turn the PC on and insert the DVD containing the Operating Instructions (supplied). • If the automatic playback screen is displayed, you can display the menu by selecting and executing [Launcher.exe].
DMC-GX8A&GX8H&GX8K_EB-SQT0787_eng.
DMC-GX8A&GX8H&GX8K_EB-SQT0787_eng.book 72 ページ 2015年7月6日 月曜日 午後1時50分 • Android and Google Play are trademarks or registered trademarks of Google Inc. • The Wi-Fi CERTIFIED™ Logo is a certification mark of Wi-Fi AllianceR. • The Wi-Fi Protected Setup™ Identifier mark is a certification mark of Wi-Fi AllianceR. • “Wi-FiR” and “Wi-Fi DirectR” are registered trademarks of Wi-Fi AllianceR. • “Wi-Fi Protected Setup™”, “WPA™”, and “WPA2™” are trademarks of Wi-Fi AllianceR.