
Manual


Basic
Taking Pictures
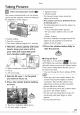
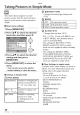
[] Select normal mode [O].
picture
The camera automatically sets the shutter
speed and the aperture value according to
the brightness of the subject.
CA)Shutter button
@Turn the camera on.
(ohThe status indicator lights for 1 second.
1 Hold the camera gently with both
hands, keep your arms still at
your side and stand with your
feet shoulder-width apart.
®
@: When holding the camera vertically
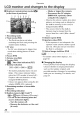
CEh:Flash
(_: AF assist lamp
(Y):Aperture value
Ca):Shutter speed
• The camera beeps twice when the
subject is focused.
• The camera can focus between 50 cm
(1.64 feet) and co
• The following indicate that the subject is
out of focus.
- Focus indication blinks (green).
- AF area turns white to red or no AF
area.
- Beeps 4 times.
• The focus indicator may light even if the
subject is not properly focused if the
subject is out of range.
4 Press the shutter button fully to
take the picture.
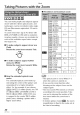
[] Using the flash
If the flash is set to AUTO [_]_m] or
AUTO/Red-eye reduction [_], the flash
will work when you press the shutter button
if the camera determines that the area to
be shot is too dark.
• You can change the flash settings (P40).
3 Press the shutter button halfway
to focus.
® ®
2 Aim the AF area (0) to the point • When you press the shutter button, the
you want to focus on.
screen may become bright or dark for
a moment. This function allows easy
adjustment of focus and the recorded
picture will not be affected.
• Be careful not to move the camera when
you press the shutter button.
• Do not cover the photo flash or the AF
assist lamp with your finger or other
objects.
• Do not touch the lens.
.0
¢_h:The focus indication lights green.
@: AF area: white --' green
25
VQT1C63