Operating Instructions Digital Camera DMC-LX1EB Model No. Before use, please read these instructions completely. Web Site: http://www.panasonic-europe.
Before Use Dear Customer, We would like to take this opportunity to thank you for purchasing this Panasonic Digital Camera. Please read these Operating Instructions carefully and keep them handy for future reference. Information for Your Safety WARNING TO REDUCE THE RISK OF FIRE OR SHOCK HAZARD AND ANNOYING INTERFERENCE, USE ONLY THE RECOMMENDED ACCESSORIES AND DO NOT EXPOSE THIS EQUIPMENT TO RAIN OR MOISTURE. DO NOT REMOVE THE COVER (OR BACK); THERE ARE NO USER SERVICEABLE PARTS INSIDE.
Before Use Digital Camera The rating plate is on the underside of the Digital Camera. Caution for AC mains lead For your safety, please read the following text carefully. This appliance is supplied with a moulded three-pin mains plug for your safety and convenience. A 5-ampere fuse is fitted in this plug. Should the fuse need to be replaced, please ensure that the replacement fuse has a rating of 5-amperes and it is approved by ASTA or BSI to BS1362.
Before Use n Care for the camera • Do not shake or cause impact to the camera. The camera may not be operated normally or recording of pictures may be disabled, or the lens may be damaged. • Sand or dust may cause a malfunction of the camera. When you use the camera on a beach etc., take care so that sand or dust does not get into the camera. • When you use the camera on a rainy day or on a beach, take care so that water does not get into the camera.
Before Use n If you will not be using the camera for a long time • Store the battery in a cool and dry place with a relatively stable temperature. [Recommended temperature: 15°C to 25°C, Recommended humidity: 40% to 60%] • Be sure to remove the battery and the card from the camera. • When the battery is left inserted in the camera for a long time, discharge takes place even if the camera is turned off.
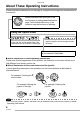
Before Use About These Operating Instructions Please note that the description on this page is a sample and all pages are not described in this manner. Modes indicated here allow you to use the functions or settings described on this page. Set the Mode dial to any of the modes to use the functions or settings. Using the Optical Zoom You can make people and subjects appear closer with the 4 times optical zoom, and landscapes can be recorded in wide angle.
Contents Before Use Information for Your Safety . . . . . . . . . . .2 About These Operating Instructions . . . . .6 Preparation Accessories . . . . . . . . . . . . . . . . . . . . . . .9 Names of the Components . . . . . . . . . .10 Quick Guide . . . . . . . . . . . . . . . . . . . . . .12 Charging the Battery with the Charger . .13 About the Battery . . . . . . . . . . . . . . . . . .14 Inserting/Removing the Battery . . . . . . .15 Inserting/Removing the Card . . . . . . . . .16 About the Card . . . . .
Shooting with the extra optical zoom . . . 88 Playback (advanced) Playing Back Pictures with Audio/Motion pictures . . . . . . . . . . . . . . . . . . . . . . . 89 Using the [PLAY] mode menu . . . . . . . . 90 • Playing Back with Slide Show [SLIDE SHOW] . . . . . . . . . . . . . . . . 91 • Favorites setting [FAVORITE] . . . . . 92 • Displaying pictures in a direction at the time of recording [ROTATE DISP.] . . . . . . . . . . . . . . . 93 • Rotating the Picture [ROTATE] . . . .
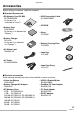
Preparation Accessories Before using your camera, check the contents.
Preparation Names of the Components 1 2 4 7 12 1 Lens part 2 Self-timer Indicator (P44) AF Assist Lamp (P77) 3 Flash (P32, 40) 3 8 5 6 9 10 11 4 Joystick (P34, 49, 83) 5 AF/AE Lock Button (P85) 6 Cursor buttons w/Self-timer Button (P44) r/[REV] Button (P37) q/Flash Mode Button (P40) e/Backlight Compensation in Auto Mode (P36)/Exposure Compensation (P45)/Auto Bracket (P46)/White Balance Fine Adjustment (P72) Button 7 LCD Monitor (P27, 112) 8 Status Indicator 9 [MENU] Button (P23, 61, 90) 10 [DISP
Preparation 14 17 18 19 20 15 16 21 23 24 25 26 22 14 15 16 17 18 19 20 21 22 Aspect ratio switch (P87) Zoom Lever (P37, 38, 50, 51) Optical Image Stabilizer Button (P47) Flash Open Switch (P40) Speaker (P89) Microphone (P59, 75) Mode Dial (P30) Shutter Button (P31) Camera Switch (P23) 23 Lens Cap/Strap Eyelet (P21) 24 [DIGITAL/AV OUT] Socket (P104, 106, 108) 25 [DC IN] Socket (P106, 108) • Please be sure to use genuine Panasonic AC adaptor (DMW-AC5; optional).
Preparation Quick Guide This is the overview of the procedure to record pictures with this camera. For each operation, be sure to refer to the corresponding pages. 3 Turn the camera on to take pictures. • Set the clock. (P22) 1 Charge the battery. (P13) 1 • When the camera is shipped, the battery is not charged. Charge the battery before use. 3 2 2 Insert the battery and the card. (P15, 16) 1 Set the mode dial to [L]. 2 Open the flash.
Preparation Charging the Battery with the Charger When the camera is shipped, the battery is not charged. Charge the battery before use. 3 Detach the battery. 1 Attach the battery with attention to the direction of the battery. 2 Connect the AC mains lead. • After charging is completed, be sure to disconnect the AC mains lead from the electrical outlet. • The battery becomes warm after use/ charge or during charge. The camera also becomes warm during use.
Preparation About the Battery n Battery indication The remaining battery power appears on the screen. [It does not appear when you use the camera along with the AC adaptor (DMW-AC5; optional).] The indication turns red and blinks: Recharge or replace the battery. n The lifetime of the battery The number of recordable pictures by CIPA standards (In Programme AE mode) • CIPA is an abbreviation of [Camera & Imaging Products Association]. Number of recordable pictures Approx. 240 pictures (Approx. 120 min.
Preparation Inserting/Removing the Battery • Check that the camera is turned off and that the lens is retracted. • Close the flash. 1 Slide the card/battery door to 3 1 Close the card/battery door. 2 Slide the card/battery door to the end and then close it firmly. open it. 2 1 • Please be sure to use genuine Panasonic batteries (CGA-S005E). 2 Insert: Insert the charged battery paying attention to the direction of the battery. Remove: Slide the lock 1 to remove the battery.
Preparation Inserting/Removing the Card • Check that the camera is turned off and that the lens is retracted. • Close the flash. 1 Slide the card/battery door to 3 1 Close the card/battery door. 2 Slide the card/battery door to the end and then close it firmly. open it. 2 1 2 Insert: • If the card/battery door cannot be completely closed, remove the card and insert it again. Insert the card with the label side facing the back of the camera until it clicks.
Preparation About the Card n Access to the card When pictures are being recorded onto the card, the card access indication 1 lights red. 19 1 When the card access indication lights, pictures are being read or deleted, or the card is cleaned up (P103) or formatted, do not: • turn the camera off. • remove the battery or the card. • shake or impact the camera. The card and the data may be damaged and the camera may not operate normally. n About handling a card Store precious data to your PC (P106).
Preparation Approximate number of recordable pictures and the size Aspect ratio Picture size Quality 16 MB 32 MB 64 MB 128 MB 256 MB 512 MB 1 GB 2 GB j 8M (3840×2160 pixels) 5.
Preparation Aspect ratio Picture size 4.5M EZ (2560×1712 pixels) Quality TIFF G H TIFF G H 16 MB 32 MB 64 MB 128 MB 256 MB 512 MB 1 GB 2 GB 1 2 4 8 17 34 69 140 6 13 28 57 110 220 440 890 12 27 55 110 210 430 860 1700 1 3 6 14 27 54 105 210 10 21 44 89 170 340 680 1360 19 41 84 170 330 650 1310 2560 Aspect ratio 2.
Preparation Aspect ratio Picture size Quality 16 MB 32 MB 64 MB 128 MB 256 MB 512 MB 1 GB 2 GB h 3M EZ (2048×1536 pixels) 2M EZ (1600×1200 pixels) TIFF G H TIFF G H 1 3 6 12 24 48 96 195 9 19 39 79 150 300 610 1220 17 37 75 150 290 590 1180 2360 2 4 10 20 39 78 155 310 14 30 62 125 240 480 970 1920 28 59 120 240 470 940 1880 3610 Aspect ratio h Picture size Quality 1M EZ (1280×960 pixels) TIFF G H 16 MB 32 MB 64 MB 128 MB 256 MB 512 MB 1 GB 2 GB 3 7 15 31 61 120 240 490 22 46 94 190
Preparation Attaching the Lens Cap/Strap n Lens Cap n Strap 1 Pass the string through the hole 1 Pass the strap through the hole at on the lens cap. the Strap Eyelet. 2 Pass the string through the hole on the camera. • Check that the strap is firmly attached to the camera. 3 Attach the lens cap. • When you turn the camera off, carry the camera or play back the pictures, attach the lens cap to protect the surface of the lens. • Detach the lens cap before turning on the camera in the recording mode.
Preparation Setting Date/Time (Clock Set) n Initial setting The clock is not set when the camera is shipped. When you turn the camera on, the following screen appears. 2 Select [D/M/Y], [M/D/Y] or [Y/M/D]. CLOCK SET 10 : 00 20. DEC. 2005 DM Y SELECT • Take the lens cap off before setting the date and time. • Press the [MENU] button, the screen shown in step 1 appears. • The setting screen disappears in about 5 seconds. Switch the unit back on to show the above screen again.
Preparation Setup Menu Change the settings if necessary. (See pages 24 to 26 for details about the settings.) 1 Remove the lens cap and turn the camera on. A 3 Select the [SETUP] Menu. REC SETUP 14 MONITOR AUTO REVIEW POWER SAVE MF ASSIST BEEP SELECT EXIT MENU • When rotating the zoom lever A toward T, the page of the menu screen can be forwarded. (vice versa) 4 Select the desired item. SETUP • The menu items depend on the mode selected with the mode dial (P30).
Preparation For setting, see page 23. Menu x MONITOR Functions Adjust the brightness of the LCD monitor in 7 steps. P AUTO REVIEW [OFF]: The recorded picture does not automatically appear. [1 SEC.]:The recorded picture automatically appears on the screen for about 1 second. [3 SEC.]:The recorded picture automatically appears on the screen for about 3 seconds. [ZOOM]: The recorded picture automatically appears on the screen for about 1 second. Then it is enlarged 4 times and appears for about 1 second.
Preparation For setting, see page 23. Menu Functions 6 BEEP Set to select the volume of operational sound. [7 ]: No operational sound [8 ]: Soft operational sound [9]: Loud operational sound B SHUTTER Set to select the volume of shutter sound. [C]: No shutter sound [E]: Soft shutter sound [D]: Loud shutter sound 9 VOLUME The volume of speakers can be adjusted in 7 steps. (LEVEL6 to 0) • When you connect the camera to a TV, the volume of the speakers of the TV is not changed.
Preparation For setting, see page 23. Menu X VIDEO OUT (Playback mode only) Functions [NTSC]: Video output is set to NTSC system. [PAL]: Video output is set to PAL system. (P104) TV ASPECT (Playback mode only) [j]: Select if your television has a 16:9 aspect ratio. • This mode is best for showing [j] aspect ratio images on a 16:9 aspect ratio television. Pictures shot in the [h] aspect ratio have black bands added to either side. [h]: Select if your television has a 4:3 aspect ratio.
Preparation About the LCD Monitor n Selecting the screen to be used In recording mode (P30) B C * E D A DISPLAY/PWR LCD A LCD monitor (LCD) Press the [DISPLAY/PWR LCD] button to switch to the screen to be used. • When the menu screen appears, the [DISPLAY] button is not activated. During multi playback (P50) or playback zoom (P51), the indications on the screen can be turned on and off.
Preparation n To view the LCD monitor outdoors on a bright sunny day (Power LCD function) When you press and hold the [DISPLAY/ PWR LCD] button for 1 second, the power LCD function is activated, the LCD monitor becomes brighter than usual and easier to see outdoors.
Preparation n Histogram • A histogram is a graph that displays brightness along the horizontal axis (black to white) and the number of pixels at each brightness level on the vertical axis. • It allows the camera user to easily check the way a picture is being exposed. • When the values are concentrated to the left A, the picture is under exposed. Pictures that are mostly black, such as night scenery, forms this type of histogram.
Recording pictures (basic) Taking Pictures n The Mode Dial This camera has a mode dial to suit for recording of many kinds of scenes. Select the desired mode and enjoy the variety of recording. Rotate the mode dial slowly and securely. L : Programme AE mode (P31) The exposure is automatically adjusted by the camera. M : Aperture-priority AE (P54) The shutter speed is automatically determined by the aperture value you set.
Recording pictures (basic) n Programme AE 2 Aim the AF area 1 to the point The camera automatically sets the shutter speed and the aperture value according to the brightness of the subject. you want to focus and then press the shutter button halfway. 1 2 1 1 Remove the lens cap. 2 Turn the camera on. 3 Set the mode dial to programme AE mode [L]. 4 Slide the focus switch to [AF]. F2.8 1/25 2 A 3 4 • A : Press the shutter button halfway to focus.
Recording pictures (basic) n Correct posture for taking good pictures To take pictures without blurring: • Hold the camera gently with both hands, keep arms stationary at your side and stand with your feet slightly apart. • Be careful not to move the camera when you press the shutter button. • Do not cover the microphone or the AF assist lamp with your finger or other objects. • Do not touch the lens part. • Do not cover the photo flash with your finger or other objects.
Recording pictures (basic) n Jitter (camera shake) • Be careful of jittering when pressing the shutter button. • The jitter alert 1 appears when the shutter speed is slow and the chances of blurring are greater. 1 F2.8 1/8 • When the jitter alert appears, take special care with the shooting methods described on P32, or use a tripod for best results. By combining the use of a tripod with the self-timer (P44), you can avoid blurring caused when you press the shutter button.
Recording pictures (basic) n Programme shift In Programme AE mode, you can change the preset aperture value and the shutter speed under the same exposure. This is called Programme shift. By this function, you can make the background more blurred (by decreasing the aperture value) or record the moving subject more dynamically (by setting to slow shutter speed) in Programme AE mode. • While the aperture and shutter speed are shown on the LCD (about 10 seconds), move the joystick to activate Programme shift.
Recording pictures (basic) Taking Pictures in Auto Mode Auto mode makes it easy for inexperienced users. It displays only simple menu settings and allows you to take pictures without error. 1 Select the desired item and set the desired value. REC PICT.SIZE QUALITY D.ZOOM SELECT SET 8M 5.5 M EZ 2 M EZ EXIT MENU MENU MENU n Other Settings in Auto mode In Auto mode, other settings are fixed as follows. For details, refer to the pages corresponding to each item.
Recording pictures (basic) n The Backlight Compensation Backlight is a situation where light comes from behind the subject. Subjects such as people become dark when pictures are recorded in the backlight. If you press e, [0] (compensating backlight ON indication) appears and the backlight compensation function is activated. This function compensates the backlight by brightening the whole of the picture.
Recording pictures (basic) Checking the Recorded Picture (Review) 2 Enlarge and shift the picture. 1 Press r. REVIEW 4X REVIEW A 1X EXIT 4X 8X DELETE DELETE • The last recorded picture appears for about 10 seconds. • Press r again to cancel the review. • You can check the previous or following picture with w/q. • When the recorded pictures are too bright or dim, compensate the exposure.
Recording pictures (basic) Using the Optical Zoom You can make people and subjects appear closer with the 4 times optical zoom, and landscapes can be recorded in wide angle. n To make subjects appear further away use (Wide) 19 1X T 1X 2X 3X n To make subjects appear closer use (Tele) 19 4X T 4X n To further increase the zoom • Use the extra optical zoom. (P88) • Use the digital zoom (P78).
Recording pictures (basic) • The optical zoom is set to Wide (1×) when the camera is turned on. • If you use the zoom function after focusing on the subject, focus on the subject again. • The lens barrel (P10) is ejected or retracted according to the zoom position. • Take care not to interrupt the motion of the lens while the zoom lever is rotated. • When you record motion pictures [i], the zoom magnification is fixed to the value set at the start of recording.
Recording pictures (basic) Taking Pictures using the Built-in Flash When you set the flash, you can take pictures using the built-in flash according to the recording condition. n Switching to the appropriate flash setting Set the flash setting of the built-in flash according to the scene to be recorded. n To open the flash Slide the [< OPEN] switch A. A B Photo flash • Do not cover the photo flash with your fingers or any other items. n To close the flash Press the flash until it clicks.
Recording pictures (basic) r : AUTO The flash is automatically activated according to the recording condition. s : AUTO/Red-eye reduction The flash is automatically activated according to the recording condition. It reduces the red-eye phenomenon (eyes of the subject appear red in photo flash) by triggering the flash before actually recording the picture. After that, the flash is activated for actual recording again.
Recording pictures (basic) n Available flash settings by recording mode The available flash settings depend on the recording mode. (e : Available, —: Not available) *Not available in backlight compensation n The available flash range to take pictures ISO sensitivity AUTO ISO80 ISO100 ISO200 ISO400 Available flash control range 60 cm to 4.1 m (Wide) 30 cm to 2.3 m (Tele) 60 cm to 1.8 m (Wide) 30 cm to 1.0 m (Tele) 60 cm to 2.0 m (Wide) 30 cm to 1.1 m (Tele) 60 cm to 2.9 m (Wide) 30 cm to 1.
Recording pictures (basic) n Shutter speed for each flash mode Flash mode r : AUTO s : AUTO/Red-eye reduction t : Forced ON q : Forced ON/Red-eye reduction u : Slow sync./Red-eye reduction v : Forced OFF • The settings may be different from those shown here if you are using scene modes. – [NIGHT SCENERY] : 8 to 1/2000 (sec.) – [STARRY SKY] : 15, 30 or 60 (sec.) • Do not stare at the photo flash from close proximity.
Recording pictures (basic) Taking Pictures with the Self-timer 1 Switch the self-timer setting. 19 4 : Self-timer set to 10 seconds L 5 : Self-timer set to 2 seconds L No display (cancelled) 2 Focus on the subject to take the picture. 19 CANCEL MENU • The self-timer indicator 1 1 blinks and the shutter is activated after 10 seconds (or 2 seconds). • If you press the [MENU] button when the self-timer is set, the selftimer setting is cancelled.
Recording pictures (basic) Compensating the Exposure Use this function when you cannot achieve appropriate exposure due to the difference of brightness between the subject and the background. 1 Press e several times until [CEXPOSURE] appears and then compensate the exposure. EXPOSURE Over exposed SELECT Compensate the exposure toward negative. Properly Exposed Under exposed EXIT • You can compensate from –2 EV to +2 EV in steps of 1/3 EV.
Recording pictures (basic) Taking Pictures using Auto Bracket In this mode, 3 pictures are automatically recorded by each press of the shutter button according to the compensation range of the exposure. You can select the desired exposure among the 3 types of pictures. 1 Press e several times until [BAUTO BRACKET] appears and then set the compensation range of the exposure. AUTO BRACKET SELECT EXIT • You can select the exposure from –1 EV to +1 EV in steps of 1/3 EV.
Recording pictures (basic) Optical Image Stabilizer [STABILIZER] This mode recognizes and compensates jitter. You can reduce blurring caused by jitter especially when you take pictures with the optical zoom set to Tele or when you take pictures indoors where the shutter speed is slowed down. A A Optical Image Stabilizer button 1 Keep pressing the stabilizer button until [STABILIZER] appears and then select the stabilizer function mode. STABILIZER OFF MODE1 MODE2 SELECT MODE1 (7) DEMO.
Recording pictures (basic) Taking Pictures using Burst Mode 1 Press the Single/Burst Mode Button to switch the burst mode setting and then take pictures. 19 D: High speed E: Low speed F: Unlimited No display (cancelled) • Hold down the shutter button fully to activate the burst mode. n Number of pictures recorded in burst mode Burst speed (pictures/ second) D 3* E 2* F 2 Number of recordable pictures (pictures) G H max. 5 max. 9 max. 5 max.
Playback (basic) Playing Back Pictures 1 Select the picture. 100-0001 1/19 10:00 20.DEC.2005 or • w : Play back the previous picture. • q : Play back the next picture. • The picture following the last one is the first picture. • When [ROTATE DISP.] (P93) is set to [ON], pictures recorded by holding the camera vertically are played back vertically. n Fast forwarding/Fast rewinding When you keep pressing w/q during playback, the file number and the page number are updated.
Playback (basic) 9/16/25 Pictures Multi Playback n 16/25 pictures multi screen 1 Switch to multi screen. For example: When you have chosen to show 9 pictures 20.DEC.2005 5/25 CANCEL C 20.DEC.2005 20.DEC.200 4/18 CANCEL CANCEL • B 16 pictures • C 25 pictures MENU 1 pictureJ9 picturesJ 16 picturesJ25 pictures • When you select multi playback, the scroll bar A appears so you can check the position of the selected picture in the total pictures. 2 Select the pictures. 20.DEC.
Playback (basic) Using the Playback Zoom 2 Shift the picture. 1 Enlarge the picture. 2X 2X 4X 4X CANCEL A CANCEL DELETE DELETE 1×J2×J4×J 8×J16× • When you rotate the zoom lever towards W after the picture is enlarged, the magnification becomes lower. • When you change the magnification, the zoom position indication A appears for about 1 second to check the position of the section enlarged. • When you press the [MENU] button, the magnification reverts to 1×.
Playback (basic) Deleting Pictures n To delete multiple pictures n To delete a single picture 1 Select the picture to be deleted. 100-0001 1/19 1 Select [MULTI DELETE]. MULTI/ALL DELETE MULTI DELETE ALL DELETE SELECT CANCEL 10:00 20.DEC.2005 2 times • w: Play back the previous picture. • q: Play back the next picture. 2 Delete the picture. 2 Select the pictures to be deleted.
Playback (basic) n To delete all pictures 3 Delete the pictures. 1 Select [ALL DELETE]. MULTI DELETE MULTI/ALL DELETE DELETE THE PICTURES YOU MARKED? NO YES SELECT SET • It is possible to delete up to 50 pictures all at once. MULTI DELETE ALL DELETE SELECT CANCEL 2 times 2 Delete all of the pictures. ALL DELETE DELETE ALL PICTURES? NO YES SELECT SET • Once deleted, pictures cannot be recovered. Please double-check before deleting pictures. • Do not turn off the camera while deleting.
Recording pictures (advanced) Using the Mode Dial M Aperture-priority AE When you want the background to be in sharp focus, set the aperture value to a higher number. The higher the aperture value is the smaller the aperture opening will be. For a soft focus background, set the aperture value to a lower number which corresponds to a larger aperture opening. 1 Set the aperture value and take the picture. ISO100 00 19 F2.
Recording pictures (advanced) N Shutter-priority AE When you want to take a sharp picture of a fast moving subject, set to a faster shutter speed. When you want to create a trail effect, set to a slower shutter speed. 1 Set the shutter speed and take the picture. 19 A 1/30 • Refer to P58 for the available range of the aperture value and the shutter speed. • The brightness of the screen may differ from that of the actual pictures. Check it using review function or setting to the playback mode.
Recording pictures (advanced) O 3 Take the picture. Manual exposure Decide the exposure by setting the aperture value and the shutter speed manually. 1 Set the aperture value and the shutter speed. F5.6 1/125 19 F2.8 1/30 A B • e/r: Set the aperture value A and the shutter speed B. • w/q: Select the aperture value and the shutter speed. 2 Press the shutter button halfway. F4.0 1/125 • Indication for the condition of exposure C (manual exposure assistance) appears for about 10 seconds.
Recording pictures (advanced) • Refer to P58 for the available range of the aperture value and the shutter speed. • You cannot set the following items in manual exposure. –Slow sync./Red-eye reduction [u] (P41) –[AUTO] in ISO sensitivity (P73) (When the recording mode is switched to Manual exposure, the ISO sensitivity is automatically set to [ISO100] even though it was set to [AUTO] beforehand.
Recording pictures (advanced) n Aperture Value and Shutter Speed Aperture-priority AE Available Aperture Value (Per 1/3 EV) F8.0 F7.1 F6.3 F5.6 F4.9 F4.5 F4.0 F3.6 F3.2 F2.8 Shutter Speed (Sec.) 8 to 1/2000 8 to 1/1600 8 to 1/1300 8 to 1/1000 Shutter-priority AE Available Shutter Speed (Sec.) (Per 1/3 EV) 8 6 5 4 3.2 2.5 2 1.6 1.3 1 1/1.3 1/1.6 1/2 1/2.5 1/3.
Recording pictures (advanced) i • fps (frame per second); This refers to the number of frames used in 1 second. Motion picture mode You can record motion pictures with audio. 2 Press the shutter button halfway. 1 1 Select [PICT.MODE]. REC 1 2 W.BALANCE 30fps PICT.MODE 16:9 METERING MODE 10fps16:9 AF MODE C-AF CONT.AF SELECT SET EXIT MENU MENU • When the subject is focused, the focus indication 1 lights.
Recording pictures (advanced) n Available recording time (seconds) Motion rate SD Memory Card 30fps 10fps 30fps 10fps 30fps Capacity VGA VGA QVGA QVGA 16:9 16 MB 6 26 26 83 5 32 MB 17 59 59 175 14 64 MB 39 120 120 360 33 128 MB 83 250 250 740 71 256 MB 165 490 490 1440 140 512 MB 330 980 980 2870 280 1 GB 660 1970 1970 5700 560 2 GB 1350 4020 4020 11700 1160 10fps 16:9 22 50 106 215 420 840 1690 3450 • The recordable time is an approximation.
Recording pictures (advanced) RS T : [PORTRAIT] (P62) Scene mode U : [SPORTS] (P62) SCN1 SCN2 Set the mode dial to [R] or [S] to display the [SCENE MODE] menu. When [SCENE MENU] (P26) is set to [OFF] in the [SETUP] menu, press the [MENU] button to display the [SCENE MODE] menu.
Recording pictures (advanced) T Portrait mode U This mode allows you to make the subject stand out from an unfocused background and adjust the exposure and the hue to achieve a healthy complexion on the subject. Sports mode This mode allows you to take pictures of a fast moving subject. (e.g. When taking pictures of outdoor sports.) 19 19 n Technique for Portrait mode To make this mode more effective: 1 Rotate the zoom lever to Tele as far as possible. 2 Be close to the subject.
Recording pictures (advanced) f Food mode V Use this mode to take pictures of food in restaurants, irrespective of the lighting, so that the natural colours of the subject come out. Scenery mode This mode allows you to take a picture of a wide landscape. The camera focuses on a distant subject preferentially. 19 19 • The ISO sensitivity is automatically adjusted to the optimal value. • The focus range is 5 m to Z. • The ISO sensitivity is automatically adjusted to the optimal value.
Recording pictures (advanced) X Night portrait mode W This mode allows you to take pictures against a night landscape. The subject can be recorded with brightness in real life by using the flash and the slow shutter speed. 19 n Technique for Night portrait mode • Open the flash. (P40) • Due to the slow shutter speed, use a tripod and the self-timer (P44) for best results. • Keep the subject still for about 1 second after taking a picture.
Recording pictures (advanced) h Baby mode This mode adjusts the exposure and tone to bring out the healthy colour of your baby’s skin. The flash will be weaker than normal if you choose to use it. 19 1 month 10days 10:00 20.DEC.2005 • You can also enter your baby’s age so that it appears when you are showing the picture later. • You can also use the [LUMIX Simple Viewer] or [PHOTOfunSTUDIO] software on the included CD-ROM to print your baby’s age.
Recording pictures (advanced) e Soft skin mode g This mode helps you take pictures that make the skin of your subject appear smoother. Use this mode when taking portraits from the chest up. Candle light mode Use this mode to get the most from the mood created by candlelight. 19 19 n Technique for Soft skin mode To make this mode more effective: 1 Rotate the zoom lever to Tele as far as possible. 2 Be close to the subject. 3 Select a background which is far from the camera.
Recording pictures (advanced) a Party mode Z Select this mode when you want to take pictures at wedding receptions, indoor parties, etc. Both the people and the background can be recorded with brightness in real life by using the flash and slowing down the shutter speed. Fireworks mode This mode allows you to take beautiful pictures of fireworks exploding in the night sky. The shutter speed or the exposure is automatically adjusted for taking pictures of fireworks.
Recording pictures (advanced) b n Setting the shutter speed Snow mode This mode allows you to take a picture in locations such as skiing resorts and locations near snowy mountains. The exposure and the white balance are adjusted to make the white colour of the snow stand out. STARRY SKY 15 SEC. 30 SEC. 60 SEC. SELECT SET MENU MENU CANCEL MENU 19 15 • The ISO sensitivity is automatically adjusted to the optimal value.
Recording pictures (advanced) c Self portrait mode This mode allows you to take a picture of yourself. 2 19 n Technique for Self-portrait mode • When you are focused by pressing the shutter button halfway, the self-timer indicator lights up. Fix the camera firmly and then press the shutter button fully. • The available focus range is 30 cm to 70 cm. • You can take a picture of yourself with audio (P75). In this time, the self-timer indicator lights up while recording the audio.
Recording pictures (advanced) Using the [REC] mode menu SCN1 SCN2 Setting the hue, picture quality adjustment, etc. allows you to create wide variations on taking pictures. • Set the mode dial to the desired recording mode. Z : [PICT.SIZE] (P73) R : [AUDIO REC.] (P75) 13 W.BALANCE SENSITIVITY PICT.SIZE QUALITY AUDIO REC. SELECT J : [SENSITIVITY] (P73) Q : [QUALITY] (P74) Menu items REC K : [W.BALANCE] (P71) SET R : [METERING MODE] (P75) M : [AF MODE] (P76) : [CONT.
Recording pictures (advanced) For setting, see page 70. K White Balance [W.BALANCE] This function allows you to reproduce a white colour closer to the tone in real life on the pictures recorded under sunlight, halogen lighting, etc. in which the white colour may appear reddish or bluish.
Recording pictures (advanced) n Setting the White Balance manually (White set p) Use this mode when you want to set the white balance manually. 1 Set to [p] (White Set) and then press q. 2 Select [:] (White set 1) or [;] (White set 2) and then press q. 3 Aim the camera at a sheet of white paper or a similar white object so that the frame on the centre of the screen turns white and then press q.
Recording pictures (advanced) For setting, see page 70. J For setting, see page 70. ISO Sensitivity [SENSITIVITY] Z Picture Size [PICT.SIZE] SCN1 SCN2 ISO sensitivity represents the sensitivity to light in values. If you set the ISO sensitivity higher, the camera becomes more suitable for recording in dark places. • When setting to [AUTO], the ISO sensitivity is automatically adjusted from [ISO80] to [ISO200] according to the brightness.
Recording pictures (advanced) For setting, see page 70. Q Quality [QUALITY] SCN1 SCN2 You can select 4 types of quality (compression rate) according to the usage of the picture. TIFF TIFF (Uncompressed): This type is suitable when editing and processing pictures with retouch software. G Fine (Low compression): This type gives priority to picture quality. Picture quality will be high.
Recording pictures (advanced) For setting, see page 70. R Audio Recording [AUDIO REC.] SCN1 SCN2 You can take a picture with audio. • When you set [AUDIO REC.] to [ON], [I] appears on the screen. • When you start recording by focusing on the subject and pressing the shutter button, the audio recording will be automatically stopped in 5 seconds. There is no need to keep pressing the shutter button. • Audio is recorded from the built-in microphone of the camera.
Recording pictures (advanced) For setting, see page 70. M AF Mode [AF MODE] U Spot-focusing: The camera focuses on the limited and narrow area in the screen. SCN1 SCN2 T 9-area-focusing: The camera focuses on any of 9 focus areas. You can record a picture in free composition without limiting the position of the subject. V 3-area-focusing (high speed): The camera focuses on any of the left, centre and right of the screen.
Recording pictures (advanced) For setting, see page 70. Continuous AF [CONT.AF] For setting, see page 70. N SCN1 SCN2 This mode allows you to compose a picture more easily by always focusing on the subject. When the AF mode is set to 1-areafocusing, 1-area-focusing (high speed) or spot-focusing, the time required for focusing when pressing the shutter button halfway will be reduced. • When it is set to [ON], the [ ] indication appears. • The battery may be consumed faster than usual.
Recording pictures (advanced) For setting, see page 70. O For setting, see page 70. Digital Zoom [D.ZOOM] T Colour Effect [COL.EFFECT] SCN1 SCN2 It is possible to further magnify a subject already magnified 4 times with the optical zoom 4 more times with the digital zoom, thereby reaching a maximum of 16 times. (You can still use the extra optical zoom.) For details about the extra optical zoom, see page 88.
Recording pictures (advanced) For setting, see page 70. U Picture Adjustment [PICT.ADJ.] For setting, see page 70. M Flip Animation [FLIP ANIM.] SCN1 SCN2 Use this function according to the recording situation and the atmosphere of the picture. CONTRAST HIGH Increases the difference between the brightness and the darkness in the picture. LOW Decreases the difference between the brightness and the darkness in the picture. SHARPNESS HIGH The picture is sharply defined. LOW The picture is softly focused.
Recording pictures (advanced) 1 Select [FLIP ANIM.]. REC 3 Capture pictures for flip animation. 33 D.ZOOM COL.EFFECT PICT.ADJ. FLIP ANIM. SELECT 8 REMAIN 92 EXIT MENU EXIT MENU • A motion picture file is created by putting pictures recorded in [PICTURE CAPTURE] together by [CREATE MOTION PICTURE]. • Audio cannot be recorded. • You cannot record audio using the audio dubbing. (P98) 2 Select [PICTURE CAPTURE]. FLIP ANIM.
Recording pictures (advanced) 5 Select [FRAME RATE] and set the number of frames. CREATE MOTION PICTURE FRAME RATE 5fps 10fps CREATE MOTION PICTURE SELECT 5fps 10fps SET EXIT MENU 5 frames/sec. 10 frames/sec. (The motion pictures become smoother.) 6 Select [CREATE MOTION PICTURE] and create a flip animation. CREATE MOTION PICTURE FRAME RATE n Deleting all still pictures used to create flip animation When selecting [DELETE STILL PICTURES] in [FLIP ANIM.] menu, a confirmation screen appears.
Recording pictures (advanced) Using the Quick setting SCN1 SCN2 You can change the following with the joystick when recording. • [W.BALANCE] (P71) • [SENSITIVITY] (P73) • [PICT.SIZE] (P73) • [QUALITY] (P74) • [PICT.MODE] (P59) 1 Press and hold the joystick to show the shortcut menu in recording mode. AUTO AUTO 8M AUTO SELECT 2 EXIT • The Quick setting menu appears. 2 Select the menu and press to enter.
Recording pictures (advanced) Taking Pictures with Manual Focus 1 Slide the focus switch to [MF]. 2 Move the joystick w/q to select [MF], then move the joystick e/r to focus. ft. 15 6 3 D 1.5 F2.8 1/30 MF AC B • AF: Auto focus • AFw: Macro mode • MF: Manual focus • A : MF indication • B : Focal distance • e : Further • r : Closer • The manual focusing assistant C appears. • The MF assistant disappears 2 seconds after you stop operating the joystick.
Recording pictures (advanced) n MF assistance Move the joystick e/r while [MF ASSIST] is set to [MF1] or [MF2] to enlarge the picture to help focusing. (P24) • [MF1]: The centre area of the picture is enlarged. You can focus while considering the overall composition of the picture. ft. 15 6 n Technique for Manual focus 1 Move the joystick e/r. 2 Even if the subject is focused, move it a little more. 3 Return to the centre to make fine adjustments. 3 1.5 F2.
Recording pictures (advanced) AF/AE Lock (AF: Auto focus/AE: Auto exposure) Locking the focus is useful when the subject is outside of the AF area of the shot you want to take. Locking the exposure is useful if there is extreme contrast in the shot and you cannot get the best exposure. 1 Select [AF/AE LOCK] from the [REC] menu to select [AF] , [AE] or [AF/AE]. REC 2 3 n AF Lock 1 Aim the AF area at the subject. 2 Press the [AF/AE LOCK] button to fix the focus.
Recording pictures (advanced) AF Macro mode This mode allows you to take close-up pictures of the subject, e.g. When taking pictures of flowers. You can take pictures approaching the subject at a distance up to 5 cm from the lens by rotating the zoom lever upmost to Wide (1×). n Focus range • Normal 1.2 m T 50 cm W 1 Select [AF w] with the focus switch.
Recording pictures (advanced) Setting the aspect ratio Aspect ratio is the ratio of the width and the height of the picture. This camera gives you three aspect ratios to choose from. •j • •h • You cannot shoot motion pictures in the [ ] aspect ratio. • Depending on the aspect ratio setting, the edges of the picture may be cut off when printing. Try the following to see whether you can print without cutting the edges off. –Some photography shops can handle pictures shot in the [j] aspect ratio.
Recording pictures (advanced) Shooting with the extra optical zoom The camera’s optical zoom can normally give you a telephoto zoom of 4 times, but by choosing a resolution that has an EZ suffix, for example 5.5M EZ , the extra optical zoom starts functioning and zoom extends as follows. (The example uses [j] aspect ratio.) • Set the resolution.
Playback (advanced) Playing Back Pictures with Audio/Motion pictures n Pictures with audio Select the picture with audio icon [A] A and play back the audio. A PLAY AUDIO IO 100-0001 1/19 10 00 20.DEC.2005 10:00 20 DEC 2005 n Motion pictures Select the picture with the motion picture icon B and play back the motion pictures. B 30 fps 16:9 PLAY MOTION PICTURE 103-0003 16/16 n Fast forwarding/Fast rewinding During motion picture playback, keep pressing w/q.
Playback (advanced) Using the [PLAY] mode menu a : [SLIDE SHOW] (P91) The play mode menu offers you various ways to play and edit your pictures. j : [ROTATE DISP.] (P93) Menu items PLAY b : [ROTATE] (P94) 13 SLIDE SHOW FAVORITE ROTATE DISP. ROTATE DPOF PRINT SELECT : [FAVORITE] (P92) l : [DPOF PRINT] (P95) g: [PROTECT] (P97) EXIT MENU MENU • When rotating the zoom lever toward T, the page of the menu screen can be forwarded.
Playback (advanced) For menu operations, see page 90. a Playing Back with Slide Show [SLIDE SHOW] ALL SLIDE SHOW START 1 Select [ALL] or [ ]. PLAY DURATION AUDIO 13 SLIDE SHOW FAVORITE ROTATE DISP. ROTATE DPOF PRINT SELECT ALL 3 Select [START]. SELECT EXIT MENU EXIT MENU For playing back all pictures For showing pictures in your favorites list • See page 92 for instructions on how to add pictures to your favorites list. • Start from step 2 if [FAVORITE] is set to [OFF].
Playback (advanced) For menu operations, see page 90. Favorites setting [FAVORITE] 1 Select [ON] to set it. PLAY SET 1 During playback, select [ALL DELETE EXCEPT 13 ]. MULTI/ALL DELETE SLIDE SHOW FAVORITE ROTATE DISP. ROTATE DPOF PRINT SELECT n To delete all pictures except those in your favorites list MULTI DELETE ALL DELETE ALL DELETE EXCEPT EXIT MENU SELECT CANCEL MENU 2 Press e during playback to place the picture in your favorites list.
Playback (advanced) For menu operations, see page 90. • You can place up to 999 pictures in your favorites list. • Once deleted, pictures cannot be recovered. Please double-check before deleting pictures. • Do not turn off the camera while deleting. • Pictures that are protected (P97) or that do not conform to DCF standards (P49) will not be deleted. • When you delete pictures, use a battery with sufficient battery power (P14) or use with the AC adaptor (DMW-AC5; optional).
Playback (advanced) For menu operations, see page 90. b Rotating the Picture [ROTATE] You can rotate and display the recorded pictures in increments of 90°. 2 Select the direction to rotate the picture. ROTATE n Example When rotating clockwise (a) Original picture SELECT SET EXIT MENU MENU 1 Select the picture to be rotated and set it. a The picture rotates clockwise in increments of 90°.
Playback (advanced) For menu operations, see page 90. l Setting the Picture to be Printed and the Number of Prints [DPOF PRINT] DPOF (Digital Print Order Format) is a system that allows the user to select which pictures are to be printed on compatible photo printers. DPOF also allows the user to set how many copies of each picture will be printed. Many commercial photo printing services now use DPOF. n Single setting Select the picture and set the number of prints.
Playback (advanced) n To cancel all settings Select [YES] to cancel all settings. CANCEL ALL DPOF CANCEL ALL DPOF PRINT SETTINGS? NO YES SELECT SET MENU n To print the date You can set/cancel the printing with the recorded date each press of the [DISPLAY] button when setting the number of prints. DPOF SET THIS 1 COUNT SELECT 111 100 _ 0001 1/19 DATE DISPLAY EXIT MENU • The date print icon [L] appears.
Playback (advanced) For menu operations, see page 90. g Preventing Accidental Erasure of the Picture [PROTECT] You can set the protection to the pictures which you do not want to delete for preventing them from accidental erasure. 1 Select [SINGLE], [MULTI] or [CANCEL]. PLAY 23 PROTECT AUDIO DUB. RESIZE TRIMMING ASPECT CONV. SELECT EXIT n Multi setting/To cancel all settings Perform the same operation as in [Setting the Picture to be Printed and the Number of Prints [DPOF PRINT]].
Playback (advanced) For menu operations, see page 90. R Adding Audio to Recorded Pictures [AUDIO DUB.] You can record the audio after taking a picture. 1 Select the picture and start audio recording. AUDIO DUB. SELECT START 100 _ 0001 1/19 EXIT MENU • When audio has already been recorded, the confirmation screen appears. Press r to select [YES], and press q to start audio recording. (The original audio is overwritten.) 2 Stop audio recording. AUDIO DUB.
Playback (advanced) For menu operations, see page 90. e Resizing the Pictures [RESIZE] 2 Select the size and set it. This function is useful if you want to reduce the file size of the picture in cases when it needs to be attached to an e-mail or uploaded to a website. RESIZE 1 Select the picture and set it. RESIZE 100 _ 0001 1/19 SELECT RESIZE EXIT MENU 100 _ 0001 1/19 • Sizes smaller than the recorded picture are displayed.
Playback (advanced) 3 Select [YES] or [NO] and set it. For menu operations, see page 90. f RESIZE Trimming the Pictures [TRIMMING] Use this function when you trim unnecessary parts of the recorded picture. DELETE ORIGINAL PICTURE? NO YES SELECT SET CANCEL MENU MENU 2 times • When you select [YES], the picture is overwritten. When resized pictures are overwritten, they cannot be restored. • When the original picture is protected, you cannot overwrite the resized picture.
Playback (advanced) 2 Enlarge or decrease the picture. TRIMMING 4 Select [YES] or [NO] and set it. TRIMMING 100 _ 0001 1/19 DELETE ORIGINAL PICTURE? NO YES ZOOM EXIT MENU SELECT SET CANCEL MENU MENU 2 times 3 Shift the picture and press the shutter button fully to set. TRIMMING ZOOM TRIM:SHUTTER 100 _ 0001 1/19 EXIT MENU • When you select [YES], the picture is overwritten. When trimmed pictures are overwritten, they cannot be restored.
Playback (advanced) For menu operations, see page 90. i Changing the Aspect Ratio [ASPECT CONV.] 3 Move the frame to trim the picture. Resize pictures taken in 16:9 aspect ratio for printing to 3:2 or 4:3. 1 Select [ ] or [h] and set it. PLAY 23 ADJUST. SET:SHUTTER PROTECT AUDIO DUB. RESIZE TRIMMING ASPECT CONV. SELECT EXIT MENU EXIT MENU 4 Select [YES] or [NO] and set it. ASPECT CONV. 2 Select the picture. ASPECTT CONV.
Playback (advanced) For menu operations, see page 90. < Clean up the Card [CLEAN UP] Use this to speed up you SD card’s transfer speed if it becomes noticeably slower. This normally happens after shooting and erasing repeatedly. Reduced transfer speed can especially effect the recording of motion pictures, where recording can be interrupted. Clean up the card beforehand for best results. 1 Select [YES] to clean up. For menu operations, see page 90.
Playback (advanced) Playing Back Pictures with a TV Screen 4 Turn the camera on and then set the mode dial to playback mode [Q]. n Playing back pictures with the supplied cable • Turn the camera and the TV off. • Set the [TV ASPECT]. (P26) B 2 • You can display pictures on a TV only when the mode dial is set to playback mode [Q]. 1 A 1 Connect the AV cable A (supplied) to the [AV OUT] socket of the camera. • Connect the AV cable with the [f] mark facing the [w] mark on the [AV OUT] socket.
Connecting to a PC or Printer Before Connecting with USB Connection Cable [4 : USB MODE] Select the USB system before connecting a computer or printer to the camera with the USB connection cable (supplied). Set the items on [USB MODE] in the [SETUP] menu. (P25) 1 Select [USB MODE]. 34 SETUP USB MODE HIGHLIGHT VIDEO OUT TV ASPECT MF m/ft SELECT EXIT • When [PC] is selected, the camera is connected via USB Mass Storage communication system.
Connecting to a PC or Printer Connecting to a PC • By connecting the camera to a computer, you can upload your pictures, then use the software on the included CD-ROM ([LUMIX Simple Viewer] and [PHOTOfunSTUDIO] for Windows®) to print or send your images by e-mail. • If you use Windows 98/98SE, install the USB driver and then connect it to the computer. • For details about [LUMIX Simple Viewer] and installation, refer to the separate operating instructions for PC connection.
Connecting to a PC or Printer n Folder Composition Folders appear as follows. SD Memory Card DCIM 100_PANA 100_PANA MultiMedia Card 1 P1000001.JPG 2 3 P1000002.JPG P1000999.JPG 101_PANA 999_PANA MISC PRIVATE1 1 Folder number 2 File number 3 JPG : Pictures MOV : Motion pictures The contents of each folder are: DCIM 100_PANA MISC PRIVATE1 100_PANA to 999_PANA Pictures/Motion pictures File with DPOF or favorite setting Flip animation files • This unit stores up to 999 picture files in each folder.
Connecting to a PC or Printer Connecting to a PictBridge-compliant Printer By connecting the camera directly to a printer supporting PictBridge via the USB connection cable (supplied), you can select the pictures to be printed or start printing on the LCD monitor. Make the necessary settings on your printer beforehand. (Read your printer’s operating instructions.) 3 Connect the camera to a printer via the USB connection cable A (supplied).
Connecting to a PC or Printer n Single picture n [PRINT WITH DATE] 1 Select a picture to be printed. F PictBridge 100 _ 0001 1/19 PLEASE SELECT THE PICTURE TO PRINT SELECT PRINT • A message displays for about 2 seconds. 2 Set the print settings. SELECT SET • If the printer does not support date printing, the date cannot be printed on the picture. n [NUM. OF PRINTS] Set the number of prints. n [PAPER SIZE] (Possible paper sizes on the camera) The items are listed on 1/2 and 2/2.
Connecting to a PC or Printer n [PAGE LAYOUT] (Possible layouts on the camera) F Settings on the printer are prioritized. G 1 page with no frame print H 1 page with frame print I 2 pages print J 4 pages print n DPOF picture • Set the DPOF print with this camera in advance. (P95) 1 Select [DPOF PICTURE]. PictBridge SINGLE PICTURE DPOF PICTURE 3 Select [PRINT START] and then print out the picture. SELECT SET SINGLE PICTURE PRINT START PRINT WITH DATE NUM.
Connecting to a PC or Printer n Setting the date printing with the DPOF print in advance When the printer supports the date printing by DPOF setting, we recommend setting the date printing with the DPOF print in advance. (P96) The recording date can be printed by selecting [DPOF PICTURE] to start printing. • Do not disconnect the USB connection cable when the cable disconnection warning icon [K] is indicated.
Others Screen Display 1 2 3 4 56 7 8 34 33 9 19 32 31 30 29 28 27 26 25 24 23 10 11 12 13 14 15 F2.8 1/25 22 21 MF 16 20 19 18 17 n In recording 1 2 3 4 5 6 Recording mode (P30) Flash (P40) White balance (P71) ISO sensitivity (P73) Focus indication (P31) Continuous AF (P77) 19 Current date and time • It is displayed for about 5 seconds when turning the camera on, setting the clock and after switching from the playback mode to the recording mode.
Others 1 2 3 4 1 6 7 100 _ 0001 1/19 17 16 5 PLAY AUDIO 15 14 8 9 10 P F2.8 1/25 11 10:00 20.DEC.
Others Cautions for Use n Optimal Use of the Camera When carrying the camera, take care not to drop or cause impact to it. • The lens or the outer case may be destroyed by the strong shock, and it causes a malfunction of the camera. Keep the camera away from magnetised equipment (such as a microwave oven, TV, video game equipment, etc.). • If you use the camera on or near a TV, pictures and sounds may be disrupted due to electromagnetic wave radiation.
Others n Card Do not leave the card in places where there is high temperature or direct sunlight, or where electromagnetic waves or static electricity are easily generated. Do not bend or drop the card. • The card may be damaged or the recorded content may be damaged or erased. • Store the card in the card case or the storage bag after use and when you store or carry the card. • Do not allow dirt, dust or water to enter the terminals on the back of the card and do not touch the terminals with your fingers.
Others Message Display [THIS MEMORY CARD IS PROTECTED] Cancel the card lock. [NO VALID PICTURE TO PLAY] Play back after recording or after inserting a card with a recorded picture. [THIS PICTURE IS PROTECTED] After cancelling the protect setting, you can delete or overwrite the picture. [THIS PICTURE CANNOT BE DELETED]/ [SOME PICTURES CANNOT BE DELETED] The pictures not based on the DCF standard cannot be deleted.
Others [MOTION RECORDING WAS CANCELLED DUE TO THE LIMITATION OF THE WRITING SPEED OF THE CARD] When you set the [PICT.MODE] to [30fpsVGA] or [30fps16:9], use cards that have a speed of 10 MB/second or better (shown on the card packaging) for best results. Shooting may stop unexpectedly with some types of card or if you use a card whose memory has been fragmented by repeated shooting and erasure. Clean up the card with this unit beforehand for best results (P103).
Others Troubleshooting If you put the menu back to the settings at the time of purchase, the conditions may be improved. Carry out the [RESET] in the setup menu. (P25) n Battery and power supply Conditions Causes The camera will not turn Is the battery inserted correctly? Check the direction of the on. battery. Is the battery sufficiently charged? Use a battery that has been sufficiently charged. The camera turns off The battery is out of charge. Recharge the battery or use one soon after turning it on.
Others n LCD Conditions The picture is not displayed on the LCD monitor. Causes Is the power save mode (P24) activated? Press the shutter button halfway to disactive these modes. Is the battery charge insufficient to operate the camera? Use a battery that has been sufficiently charged. The brightness of the This phenomenon appears when pressing the shutter button screen becomes dark or halfway to set the aperture value and does not affect the bright for a moment. recorded pictures.
Others n Flash Conditions Flash is not activated. The flash is activated 2 times. 120 VQT0S34 Causes Make sure the flash is open. Slide the [< OPEN] switch. (P40) The flash is not activated when motion picture mode [i], [SCENERY], [NIGHT SCENERY], [FIREWORKS] or [STARRY SKY] in scene mode (P61) is selected. With AUTO/Red-eye reduction [s], Forced ON/Red-eye reduction [q], and Slow-sync./Red-eye reduction [u], the first flash is preparatory in order to reduce the redeye effect.
Others n Playback Conditions Causes The picture is not played Is the card inserted? back. Is there a picture in the card? Is the mode dial set to playback [Q]? One of the features of this unit can automatically detect when Pictures rotate unexpectedly. you have turned the camera side on to take a picture, then rotate that picture for you when you play it back. In some cases, the unit may detect that you have turned the camera side on, when in fact you are facing it up or down. • Set [ROTATE DISP.
Others n Connecting to a TV, computer or printer Conditions The picture does not appear on the television. The TV screen is disturbed or displayed in monochrome. Cannot play motion pictures on a television. Causes Is the camera connected to the TV correctly? Check it. Set the TV to video input mode. You cannot play motion pictures if you have inserted the card into a card slot on a television. Connect the camera to the television with the included AV cable and play the pictures on this unit.
Others n Others Conditions Unreadable language was selected by mistake. When the shutter button is pressed halfway, a red lamp turns on sometimes. The AF assist lamp does not turn on. The clock setting is reset. The lens clicks. The camera gets hot. Strange colours appear around the edge of the image. Cannot change the auto review setting. File numbers are not created in order. Causes Select [{] icon on the [SETUP] menu to set the desired language.
Others Specifications Digital Camera: Power Source: Power Consumption: Camera Effective pixels: Image sensor: Lens: Digital zoom: Extra optical zoom: Focus: Focus range: Shutter system: Shutter speed: Burst recording Burst speed (max.): Number of recordable pictures (max.): Information for your safety DC 5.1 V 2.1 W (When recording) 1.0 W (When playing back) 8,400,000 pixels 1/1.65″ CCD, total pixel number 8,610,000 pixels Primary colour filter Optical 4× zoom, f=6.3 to 25.
Others Microphone: Speaker: Recording media: Picture size: Still picture: Motion picture: Quality: Recording file format Still Picture: Picture with audio: Motion pictures: Interface Digital: Analog video/audio: Terminal AV OUT/DIGITAL: DC IN: Dimensions: Weight: Operating Temperature: Operating Humidity: Battery Charger (Panasonic DE-A12A): Input: Output: Monaural Monaural SD Memory Card/MultiMediaCard Aspect ratio [j]: 3840×2160 pixels, 3072×1728 pixels, 1920×1080 pixels Aspect ratio [ ]: 3248×2160 pi
Others MEMO 126 VQT0S34
Others MEMO 127 VQT0S34
QuickTime and the QuickTime logo are trademarks or registered trademarks of Apple Computer, Inc., used under license. B VQT0S34 H0705MH0 ( 2000 A ) C Matsushita Electric Industrial Co., Ltd. Web Site: http://www.panasonic.co.