Owner’s Manual for advanced features Digital Camera Model No. DMC-LX7 Before connecting, operating or adjusting this product, please read the instructions completely. Register online at www.panasonic.com/register (U.S.
Contents Using the [Setup] menu....................... 27 Preparations Before use............................................... 6 Standard Accessories............................ 8 Names and Functions of Main Parts..... 9 Attaching the lens cap and shoulder strap...................................... 13 Charging battery................................... 14 Remaining battery........................................15 Guidelines for number of recordable pictures and operating time..........................
Contents Application (Record) Sequence of operations....................... 45 About recording modes....................... 48 Taking pictures with automatic settings [Intelligent Auto] Mode......................... 49 Taking pictures by changing the picture effect [Creative Control] Mode....................... 64 [Expressive]..................................................66 [Retro]..........................................................66 [High Key]..................................................
Contents Using Zoom........................................... 92 Optical Zoom................................................93 Extended optical zoom.................................93 [i.Zoom]........................................................94 [Digital Zoom]...............................................94 [Step Zoom]..................................................95 Taking pictures with Auto Focus........ 96 Recording with the Face Recognition function [Face Recog.]........................
Contents Application (View) Others Viewing your pictures [Normal Play]...................................... 152 Zooming in and viewing “Playback zoom”........................................153 Viewing a list of pictures “Multi Playback”..........................................154 Viewing pictures by their recording date “Calendar Playback”...................................155 Playing back pictures recorded in burst and interval recording.................................156 About panorama playback...
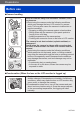
Preparations Before use ■■Camera handling Keep the camera away from excessive vibration, force, or pressure. ●●Avoid using the camera under the following conditions, which may damage the lens, LCD monitor, or camera body. This may also cause the camera to malfunction or prevent recording.
Preparations Before use ■■Always take a test shot first Before important events when you will use the camera (at weddings, for example), always take a test shot to make sure that pictures and sound record correctly. ■■No compensation for missed shots We cannot compensate for missed shots if technical problems with the camera or card prevent recording.
Preparations Standard Accessories Check that all the accessories are supplied before using the camera. ●●The accessories and their shape will differ depending on the country or area where the camera was purchased. For details on the accessories, refer to Basic Owner’s Manual. ●●Battery Pack is indicated as battery pack or battery in the text. ●●Battery Charger is indicated as battery charger or charger in the text. ●●SD Memory Card, SDHC Memory Card and SDXC Memory Card are indicated as card in the text.
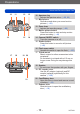
Preparations Names and Functions of Main Parts 1 2 9 8 3 7 4 6 5 1 Self-timer indicator / AF Assist Lamp Illuminates when the self-timer is set or when the Auto Focus is operated in dark locations. (→116, 143) 2 Mode dial Switches the recording mode. (→48) 3 Hot shoe (Hot shoe cover) The hot shoe cover is already attached to the hot shoe at the time of purchase. 4 Built-in flash (flash) Use the flash open switch to open the flash.
Preparations Names and Functions of Main Parts 10 11 16 17 18 12 13 15 14 19 20 21 10 Aperture ring Adjusts the aperture value. (→60, 62) 11 Microphone Records sound when you record motion pictures. (→82) 12 Zoom lever Adjusts the recording range. (→92) 13 Motion picture button Press this button to start and stop motion picture recording. (→46) 14 Camera ON/OFF switch Turns the camera on or off. 15 Shutter button Press this button to record a still picture.
Preparations Names and Functions of Main Parts 22 23 28 26 27 24 22 LCD monitor (→206) 23 [ND/FOCUS] lever To operate the lever, move it left or right or push it in. Use this lever for Manual Focus adjustment or for turning the built-in ND filter on/off, etc. (→104, 123) 24 Rear dial To operate the dial, rotate it left or right or push it in. Use this dial for operations such as adjusting the shutter speed or selecting an operation item.
Preparations Names and Functions of Main Parts 37 29 36 30 35 31 34 32 33 29 Playback button Switches between recording mode and playback mode. (→152) 30 [MENU/SET] Mainly used to display menu screens or to set menu items. (→25) 31 [WB] button / Right cursor button ( ) Displays the White Balance setting screen. This button is also used to move the cursor on the menu screens and for other functions. (→25, 111) 32 [DISP.] button Switches the displayed screens.
Preparations Attaching the lens cap and shoulder strap Cover the lens with the lens cap to protect it when you are not taking pictures. We recommend attaching the lens cap to the camera using the lens cap string to prevent loss of the lens cap. We also recommend attaching the shoulder strap to prevent the camera from being dropped. Use the supplied string to attach the lens cap to the camera Attach the lens cap To attach and remove the lens cap, press the areas shown by arrows in the illustration.
Preparations Charging battery Always charge before first use! (battery shipped uncharged) ■■About batteries that you can use with this unit It has been found that counterfeit battery packs which look very similar to the genuine products are made available to purchase in some markets. Some of these battery packs are not adequately protected with internal protection to meet the requirements of appropriate safety standards. There is a possibility that these battery packs may lead to fire or explosion.
Preparations Charging battery ■■Notes on charging time Charging time Approx. 155 min ••The charging time indicated above is the time required for charging in case when the battery is completely used up. The time required for charging differs depending on conditions of battery usage. Charging takes longer in cases when temperatures are either high or low and when the battery has not been used for a long period of time. ●●Always use genuine Panasonic batteries.
Preparations Charging battery Guidelines for number of recordable pictures and operating time The number of recordable pictures or available operating time may vary according to surrounding environment and usage conditions. Figures may be reduced if flash, zoom, or other functions are used frequently, or in colder climates. ■■Recording still pictures Number of recordable pictures Approx. 330 pictures Recording time Approx.
Preparations Charging battery ■■Recording motion pictures [Rec Mode] [AVCHD] [MP4] [Rec Quality] [PSH] [FSH] [FHD] Available recording time Approx. 90 min Approx. 100 min Approx. 110 min Actual available recording time Approx. 50 min Approx. 55 min Approx. 60 min ●●Recording conditions ••Temperature 23 °C (73.4 °F), humidity 50%RH ••The time you can actually record when repeatedly turning the power on and off, starting and stopping recording and using zoom.
Preparations Inserting and removing the battery or SD memory card (optional) ••Set the camera ON/OFF switch to [OFF].
Preparations Inserting and removing the battery or SD memory card (optional) ■■To remove ••To remove battery: Move lever in direction of arrow. ••To remove card: Press down in center. Lever ●●Remove battery from camera after use. ●●Keep the Memory Card out of reach of children to prevent swallowing. ●●To remove the card or battery, turn the camera off and wait until the LUMIX logo display on the LCD monitor and the status indicator go out.
Preparations Saving your pictures (cards and built-in memory) Pictures will be saved to a card if one is inserted, or to the built-in memory if not. ■■Built-in memory (approx. 70 MB) ••Pictures may be copied between cards and the built-in memory. (→182) ••The access time for the built-in memory may be longer than the access time for a card.
Preparations Saving your pictures (cards and built-in memory) Recording capacity guidelines (pictures/recording time) The number of pictures you can take and the recording time vary in proportion to card capacity (and depending on recording conditions and type of card). Displayed when no card is inserted (pictures will be saved to built-in memory) Estimated remaining pictures or recording time capacity (The display switches depending on the settings.
Preparations Saving your pictures (cards and built-in memory) ■■Recording time capacity (motion pictures) ([h], [m] and [s] indicate “hour”, “minute” and “second”.
Preparations Setting the clock The clock is not set when the camera is shipped. Preparation: B efore using the camera, remove the lens cap. Turn on the power The power is turned on. If the language select screen is not displayed, proceed to step . Press [MENU/SET] while the message is displayed Press to select the language and press [MENU/SET] The [Please set the clock] message appears.
Preparations Setting the clock Changing time settings Select [Clock Set] from the [Setup] menu or [Rec] menu to change the current time settings. ••Clock settings will be saved for approx. 3 months even after battery is removed, provided a fully-charged battery was installed in the camera for 24 hours beforehand. Select [Clock Set] from the [Setup] menu or [Rec] menu ••For details about how to set the menu (→25) Set the date and time (Perform steps - 24 - - .
Preparations Setting the menu You can use the menu to set camera and recording functions, operate playback functions, and perform other operations. Zoom lever Press [MENU/SET] to bring up the menu Each item’s background color changes when it is selected Select the menu type (→26) Press to select the menu item and press Page (Zoom lever can be used to switch to next page.
Preparations Setting the menu ■■Menu type ●●In recording mode [Rec] menu [Motion Picture] menu [Playback Mode] menu [Playback] menu [Setup] menu ●●In playback mode You can adjust settings such as number of pixels and flash. You can adjust settings such as recording method and picture quality. You can adjust settings for playback methods such as [Slide Show] and [Filtering Play]. You can adjust settings for recorded pictures, such as picture protection and cropping and print settings.
Preparations Using the [Setup] menu [Clock Set], [Economy] and [Auto Review] are important for clock setting and battery life. Please check these before use. ••For the setting procedures of the menu. (→25) ●●In [Intelligent Auto] Mode, only [Clock Set], [World Time], [Beep] and [Stabilizer Demo.] are set. [Clock Set] Set time, date, and display format. For details (→24). [World Time] Set the recording date and time with the local time at your destination.
Preparations Using the [Setup] menu ■■To set summer time Press in step . (Press again to release the setting) ••When summer time is set, the current time is advanced by 1 hour. If the setting is canceled, the time automatically returns to the current time. ■■When you come back from your travel destination Select [Home] in step and press [MENU/SET]. ●●If you cannot find your destination in the area displayed on the screen, set based on difference with home time.
Preparations Using the [Setup] menu ●●The travel date is calculated from the set departure date and the date set in the camera’s clock. When destination is set in [World Time], days elapsed are calculated based on local destination time. ●●When [Travel Setup] is set to [OFF], the number of days elapsed is not recorded. It is not displayed even if [Travel Setup] is set to [SET] after recording. ●●If settings are made before departure date, number of days to departure are not recorded.
Preparations Using the [Setup] menu ••For the setting procedures of the menu. (→25) [Volume] Adjust volume of sound from speakers (7 levels). ■■Settings: [0] / [1] / [2] / [3] / [4] / [5] / [6] ●●Cannot be used to adjust TV speaker volume when connected to TV. [Cust.Set Mem.] Register the current camera settings. For details (→90). [Fn Button Set] Register frequently used functions from the [Rec] menu, [Setup] menu or other menus to the [Fn] button for faster operation.
Preparations Using the [Setup] menu ••For the setting procedures of the menu. (→25) [LCD Display] / [Viewfinder] Adjust the brightness and coloring of the LCD monitor. When the display is switched to Live View Finder (optional), the brightness and coloring of the viewfinder are adjusted. Press to select the setting item, and press adjustments to make Press [MENU/SET] ●●Some subjects may look different from their actual appearance, but the recorded picture will not be affected.
Preparations Using the [Setup] menu ••For the setting procedures of the menu. (→25) [LVF Disp.Style] / [LCD Disp.Style] [LVF Disp.Style]: Set the Live View Finder (optional) display. [LCD Disp.Style]: Set the display of the LCD monitor.
Preparations Using the [Setup] menu ••For the setting procedures of the menu. (→25) [Histogram] Displays distribution of brightness in picture – e.g. if the graph peaks at the right, this means there are several bright areas in the picture (Guide). A peak in the center represents correct brightness (correct exposure). This can be used as a reference for exposure correction, etc.
Preparations Using the [Setup] menu ••For the setting procedures of the menu. (→25) [Video Rec Area] Enables verification of the recordable area for a motion picture before recording. ■■Settings: [ON] / [OFF] ●●Recordable area displayed for motion pictures should be interpreted as a guideline. ●●When using Extended optical zoom, the recordable area may not always be displayed for certain zoom ratios. [Remaining Disp.
Preparations Using the [Setup] menu ••For the setting procedures of the menu. (→25) [Expo.Meter] You can set whether to display the exposure meter when operations such as shutter speed and aperture value adjustments or Exposure Compensation are performed. ■■Settings: [ON] / [OFF] ●●If the exposure meter is not displayed, press the [DISP.] button to switch the display of the LCD monitor. ●●The exposure meter will turn off if no operation is performed for approximately 4 seconds.
Preparations Using the [Setup] menu ••For the setting procedures of the menu. (→25) [Economy] Turn off the power or make the LCD monitor go dark while not using the camera to minimize battery consumption. [Sleep Mode] ■■Settings: [10MIN.] / [5MIN.] / [2MIN.] / [1 MIN.] / [OFF] Automatically shut off power when no operation is performed for a preset period of time. ••To restore → Press the shutter button halfway, or turn on the power again.
Preparations Using the [Setup] menu ••For the setting procedures of the menu. (→25) [Play on LCD] Set the LCD monitor to be displayed automatically when operation is switched to playback mode while the Live View Finder (optional) is attached. ■■Settings: [ON] / [OFF] [Auto Review] Automatically display still pictures immediately after taking them. ■■Settings [HOLD]: Auto review screen remains until a button (other than the [DISP.] button) is pressed [2SEC.] / [1SEC.
Preparations Using the [Setup] menu ••For the setting procedures of the menu. (→25) [Start Mode] Set whether the camera is activated in recording mode or playback mode when it is turned on. ■■Settings : When the camera is turned on, recording mode is activated. : When the camera is turned on, playback mode is activated. ●●Even when [ ] is set, if the camera is turned on while pressing the playback button, the camera is activated in playback mode. [No.
Preparations Using the [Setup] menu ••For the setting procedures of the menu. (→25) [Reset] Return the [Rec] menu and [Setup] menu settings to the default settings. ■■Settings: [Reset Rec. settings?] / [Reset setup parameters?] ●●Information registered in [Face Recog.] is reset if recording settings are reset. ●●Resetting the setup parameters will also reset the following: Age in years/months and names in [Baby] and [Pet] Scene Modes ●●Folder numbers and clock settings will not be reset.
Preparations Using the [Setup] menu ••For the setting procedures of the menu. (→25) [VIERA Link] Enable automatic linking with other VIERA Link-compatible devices, and operability with a VIERA remote control when connecting via an HDMI mini cable (optional) (→185). ■■Settings [ON]: Operations may be performed via the remote control of the VIERA Linkcompatible device. (Not all operations will be available.) Operability of the camera’s own buttons will be limited.
Preparations Using the [Setup] menu ••For the setting procedures of the menu. (→25) [Scene Menu] Set whether or not to display the selection screen for Scene Mode when the camera is switched to Scene Mode. ■■Settings [AUTO]: Displays the selection screen. [OFF]: Displays the currently selected Scene Mode recording screen. [Menu Resume] Save the last operated menu position. ■■Settings: [ON] / [OFF] [User’s Name Rec] Record a user name on a picture while recording.
Preparations Using the [Setup] menu ••For the setting procedures of the menu. (→25) [Version Disp.] Check the camera firmware version or display software information. ●●When you press [MENU/SET] while the version is displayed, software information such as the license is displayed. [Format] Use when [Built-In Memory Error] or [Memory Card Error] appears, or when formatting the built-in memory or card. When a card/built-in memory is formatted, the data cannot be restored.
Preparations Using the [Setup] menu ••For the setting procedures of the menu. (→25) [Language] Change display language. Set the language displayed on the screen. [Demo Mode] [Stabilizer Demo.]: Extent of jitter is shown on graph (Guide) Extent of jitter Extent of jitter after correction ●●During demo screen display, the Optical Image Stabilizer switches ON and OFF every time [MENU/SET] is pressed. ●●Cannot display during playback mode.
Preparations Entering Text Use the cursor button to enter names with the Face Recognition function and in Scene Modes [Baby] and [Pet], or to register locations in [Travel Date] etc. Use cursor button to select characters Press [MENU/SET] until the desired character is displayed Text is inserted at the cursor position. ••To change the character type → Select , and press [MENU/SET]. Cursor position ■■Editing text Use cursor button to select and press [MENU/SET].
Application (Record) Sequence of operations Before using the camera, remove the lens cap. Turn on the power Status indicator illuminated for approx. 1 second. Rotate the mode dial to select the recording mode Align the mode dial correctly to the mode that you want to use.
Application (Record) Sequence of operations Take pictures ■■Taking still pictures (Shutter button) Press halfway (Press lightly to focus) Jitter alert display Press fully (Press the button all the way to record) ■■Recording motion pictures (Motion picture button) Press (Start recording) Press (End recording) ●●If a warning is displayed about jitter, use [Stabilizer], a tripod, or [Self Timer]. In some cases, jitter can be reduced by using a higher setting for [Sensitivity].
Application (Record) Sequence of operations ■■Holding the camera AF Assist Lamp Microphone Shoulder strap ••To avoid camera shake, hold it with both hands keeping your arms close to your body while standing with your feet slightly apart. ••Do not touch the lens. ••Do not block the microphone when recording motion pictures. ••Do not block the flash or the lamp. Do not look at it from close range. ••Make sure that the camera does not move at the moment the shutter button is pressed.
Application (Record) About recording modes You can rotate the mode dial to switch recording modes. Set to the desired recording mode Align the mode dial correctly to the → mode that you want to use. [Intelligent Auto] Mode [Program AE] Mode [Aperture-Priority] Mode [Shutter-Priority] Mode [Manual Exposure] Mode [Creative Video Mode] [Custom] Mode Take pictures with automatic settings. (→49) Take pictures with automatic shutter speed and aperture value settings.
Application (Record) Taking pictures with automatic settings [Intelligent Auto] Mode Optimum settings are made automatically from information such as “face”, “movement”, “brightness”, and “distance” just by pointing the camera at the subject, meaning that clear pictures can be taken without the need to make settings manually. ••About recording modes (→48) Automatic Scene Detection Camera reads scene when pointed at subject, and makes optimum settings automatically.
Application (Record) Taking pictures with automatic settings [Intelligent Auto] Mode Defocusing the background You can also use [Intelligent Auto] Mode to adjust background defocusing easily, as with in [Aperture-Priority] mode. Press the rear dial Press Rotate the rear dial to adjust the background defocusing condition [ ] button ••You can also press to make adjustments.
Application (Record) Taking pictures with automatic settings [Intelligent Auto] Mode Defocuses the background. Focuses the background as well. The yellow range shown in the left figure is the range for which the image is sharp. ••The range for which the image is sharp changes based on the distance to the focused subject and the zoom condition, etc.
Application (Record) Taking pictures with automatic settings [Intelligent Auto] Mode About flash Open the flash to use the built-in flash. (→106) Open the built-in flash ■■Closing the built-in flash When you do not want to use the flash or after using the flash, press down to retract the flash until it clicks. ●●Set to [ ●●When [ ●●When [ ], [ ], [ ] or [ ] depending on the subject and brightness. ] or [ ] is selected, the red-eye reduction function is activated.
Application (Record) Taking pictures with automatic settings [Intelligent Auto] Mode [Color Mode] When you change the [Color Mode] setting in the [Rec] menu, you can change the color of still pictures and motion pictures to be recorded. ••For the setting procedures of the menu. (→25) Setting Description [STANDARD] Records pictures with colors close to the actual colors. [Happy] Records pictures with sharp and vivid colors. [B&W] Records pictures in black and white monotones.
Application (Record) Taking pictures with automatic settings [Intelligent Auto] Mode [iHDR] When [iHDR] is set to [ON] and there is, for example, strong contrast between the background and the subject, multiple still pictures are recorded with differing exposures and combined to create a single still picture rich in gradation. ••For the setting procedures of the menu. (→25) ●●This function is automatically activated only when (→49) is displayed on the LCD monitor.
Application (Record) Taking pictures with automatic settings [Intelligent Auto] Mode AF Tracking In [Intelligent Auto] Mode, you can select [AF Tracking] in [AF Mode] in a single operation. When [AF Tracking] mode is used, the camera can continuously focus on a subject and adjust the exposure of the subject even when the subject is moving. Press to set [AF Tracking] ••To cancel AF Tracking → Press again.
Application (Record) Taking pictures with automatic settings [Intelligent Auto] Mode [Intelligent Auto Plus] Mode When [Intelligent Auto Plus] mode is selected, you can easily adjust the brightness and coloring, in addition to the background defocusing, without compromising the user-friendly operation of the [Intelligent Auto] Mode. ■■Switching to [Intelligent Auto Plus] Mode Use the [Intelligent Auto] menu to switch the mode. ••For the setting procedures of the menu.
Application (Record) Taking pictures with automatic settings [Intelligent Auto] Mode ●●When you record motion pictures, the camera performs aperture control within the appropriate exposure range, and the background defocusing may not change for some subject brightness levels. About setting items Only the menu items which are displayed in the [Intelligent Auto] Mode can be set.
Application (Record) Taking pictures with your own settings [Program AE] Mode You can take pictures with your own settings by changing the color tone, ISO Sensitivity and other settings under the [Rec] menu and other menus. ••About recording modes (→48) ●●If aperture and shutter speed are shown in red, you do not have appropriate exposure. You should either use the flash, change [Sensitivity] settings or set [Min. Shtr Speed] to a slower speed.
Application (Record) Taking pictures with your own settings [Program AE] Mode ■■Example of Program Shift 0 1 2 3 4 5 6 7 8 9 10 11 12 13 (Ev) (Aperture value) 1.4 14 2.0 15 2.8 16 4.0 17 5.6 18 8.0 19 11 20 1 1/2 1/4 1/8 1/15 1/30 1/60 1/250 1/1000 1/4000 (Shutter speed) 1/125 1/500 1/2000 Program Shift amount Program Shift diagram Program Shift limit [Program Diagram] You can change the Program diagram.
Application (Record) Taking pictures by setting the aperture value [Aperture-Priority] Mode When recording, you can control the aperture value to meet your recording purposes. Shutter speed is automatically adjusted to be appropriate for the set aperture value. ••About recording modes (→48) Rotate the aperture ring to select the aperture value You can set the aperture values between [1.4] and [8] in 1/3-stop increments. (Set the aperture ring where it clicks.
Application (Record) Taking pictures by setting the shutter speed [Shutter-Priority] Mode When recording, you can control the shutter speed to meet your recording purposes. Aperture is automatically adjusted to be appropriate for the set shutter speed. ••About recording modes (→48) Rotate the rear dial to select shutter speed About the exposure meter Set shutter speed Aperture value (Automatic adjustment) Exposure meter ••At faster shutter speeds, movements by the subject show as if they are still.
Application (Record) Taking pictures by setting the aperture value and shutter speed [Manual Exposure] Mode You can use this recording mode to set the desired shutter speed and aperture value when you want to take pictures using the same exposure (same combination of shutter speed and aperture value) or when you cannot obtain pictures at the desired brightness even after compensating the exposure.
Application (Record) Taking pictures by setting the aperture value and shutter speed [Manual Exposure] Mode ■■Manual exposure assist (estimate) Shows pictures with standard brightness. Shows brighter pictures. For standard brightness, either use a faster shutter speed or increase aperture value. Shows darker pictures. For standard brightness, either use a slower shutter speed or reduce aperture value. ●●The aperture ring rotates only within the range of the printed indicators.
Application (Record) Taking pictures by changing the picture effect [Creative Control] Mode You can select your own settings from various effects and take pictures while confirming these effects on the LCD monitor. ••About recording modes (→48) Press to select the effect and press [MENU/SET] Preview screen ••When you press [DISP.] button, a description of the selected effect is displayed. ••When you select [ ] by rotating the mode dial, the menu appears automatically.
Application (Record) Taking pictures by changing the picture effect [Creative Control] Mode ■■Adjusting the brightness, background defocusing condition, setting conditions of a selected effect, etc. Press the rear dial Press to select an item to adjust Adjusts the brightness. Adjusts background defocusing. Adjusts the setting conditions of the selected effect, etc. (The settings to be adjusted vary depending on the selected effect.) ••[AUTO] is displayed in the icon during automatic adjustment.
Application (Record) Taking pictures by changing the picture effect [Creative Control] Mode For the [Creative Control] menu setting procedures. (→64) [Expressive] This picture effect creates a pop art style picture that enhances the color.
Application (Record) Taking pictures by changing the picture effect [Creative Control] Mode For the [Creative Control] menu setting procedures. (→64) [High Key] This picture effect creates a brighter and lighter toned appearance for the entire picture.
Application (Record) Taking pictures by changing the picture effect [Creative Control] Mode For the [Creative Control] menu setting procedures. (→64) [Sepia] This picture effect creates a picture with sepia tone.
Application (Record) Taking pictures by changing the picture effect [Creative Control] Mode For the [Creative Control] menu setting procedures. (→64) [Impressive Art] This picture effect creates a picture with a higher contrast and surreal appearance.
Application (Record) Taking pictures by changing the picture effect [Creative Control] Mode For the [Creative Control] menu setting procedures. (→64) [Cross Process] This picture effect allows you to play with color effects.
Application (Record) Taking pictures by changing the picture effect [Creative Control] Mode For the [Creative Control] menu setting procedures. (→64) [Miniature Effect] This picture effect creates a diorama-like picture by intentionally defocusing all but one section of the picture.
Application (Record) Taking pictures by changing the picture effect [Creative Control] Mode For the [Creative Control] menu setting procedures. (→64) [Soft Focus] This picture effect creates a soft appearance by intentionally blurring the entire picture.
Application (Record) Taking pictures by changing the picture effect [Creative Control] Mode For the [Creative Control] menu setting procedures. (→64) [One Point Color] This picture effect creates a monochromatic picture by retaining the color you select only.
Application (Record) Taking pictures by changing the picture effect [Creative Control] Mode For the [Creative Control] menu setting procedures. (→64) [Radial Defocus] This picture effect defocuses the entire picture by retaining a sharper focus on the main subjects than with [Soft Focus] by operating focus when the shutter is open (exposure time) during recording.
Application (Record) Taking pictures according to the scene [Scene Mode] Using [Scene Mode] enables you to take pictures with optimum settings (exposure, coloring, etc.) for given scenes. ••About recording modes (→48) Use cursor button to select the scene and press [MENU/SET] ••When you select [ ] by rotating the mode dial, the menu appears automatically. (When [Scene Menu] in the [Setup] menu is [AUTO]) ••You can display the [Scene Mode] menu by pressing [MENU/SET].
Application (Record) Taking pictures according to the scene [Scene Mode] ••How to select a scene (→75) Improves the skin tone of subjects for a healthier appearance in bright daylight conditions. [Portrait] Tips •• The more the zoom is drawn towards T side and the closer the camera is brought to the subject, the greater the effect will be. Smooths skin colors in bright, outdoor daylight conditions (portraits from chest upwards).
Application (Record) Taking pictures according to the scene [Scene Mode] ••How to select a scene (→75) Tips •• Pan the camera in the recording direction as steadily as possible. If the camera shakes too much, it may not be able to take pictures or may end up creating a narrow (small) panorama picture. Pan the camera to a point slightly ahead of the point that you want to take. (However, the last frame is not recorded to the end.
Application (Record) Taking pictures according to the scene [Scene Mode] ••How to select a scene (→75) Takes pictures of scenes with fast movement, e.g. sports. Tips •• Stand at least 5 m (16 feet) away. [Sports] Notes •• Sports mode requires adequate lighting, to enable the higher shutter speed to be used. This mode may not product acceptable results when shooting indoors, under limited lighting. •• Shutter speed may slow down up to 1 second.
Application (Record) Taking pictures according to the scene [Scene Mode] ••How to select a scene (→75) The camera can combine several still pictures taken with different exposures into a single properly exposed picture with rich gradation. Tips •• After the shutter button has been pressed, do not move the camera during the burst operation. [HDR] Notes •• Since a burst of still pictures are combined after they have been recorded, it will be a few moments before you will be able to record another picture.
Application (Record) Taking pictures according to the scene [Scene Mode] ••How to select a scene (→75) Takes clear pictures of scenes such as sunsets. [Sunset] Most suitable for taking pictures such as a landscapes through the transparent glass of a train/vehicle or building. [Glass Through] Notes •• If there are stains such as dust or a reflection on the glass, the camera may focus on the glass instead of a subject. •• The color of pictures may appear unnatural due to the color of the glass.
Application (Record) Taking pictures according to the scene [Scene Mode] ••How to select a scene (→75) Pictures are recorded continuously while moving the camera horizontally, and two pictures selected automatically are combined to make a single 3D picture. To view 3D pictures, a television that supports 3D is required (This unit will play back in 2D). ■■Recording procedure Press the shutter button fully to start recording, and then move the camera horizontally from left to right in a straight line.
Application (Record) Recording motion pictures You can record motion pictures with audio (stereo). Do not block the microphone when recording motion pictures. Press the motion picture button to start recording [Rec Mode] (→150)/[Rec Quality] (→150) Elapsed recording time Remaining recording time (approx.) ●●Immediately release the motion picture button after pressing it.
Application (Record) Recording motion pictures ●●You can record motion pictures to the built-in memory only in [VGA] mode. (→150) ●●Use a sufficiently charged battery. ●●The available recording time displayed on the screen may not decrease regularly. ●●[Sensitivity] is set automatically while a motion picture is being recorded. Also [ISO Limit Set] is disabled. ●●The following functions are not available: Extended optical zoom, flash, [Face Recog.], [Rotate Disp.] for pictures taken vertically.
Application (Record) Recording motion pictures ■■About the recording format for recording motion pictures This unit can record motion pictures in either AVCHD or MP4 formats. AVCHD: You can record high definition quality images with this format. It is suitable for viewing motion pictures on a high-resolution TV or for saving them to a disc.
Application (Record) Recording motion pictures ■■About recording modes The camera automatically detects the scene to record motion pictures with optimal settings. When scene does not correspond to any on the right. ••In mode, focus and exposure will be set according to the face detected. •• will be selected for nightscapes and other dark scenes. ••If the camera does not select your desired Scene Mode, choosing an appropriate mode manually is recommended.
Application (Record) Recording motion pictures Taking still pictures while a motion picture is being recorded Still pictures can be recorded even while a motion picture is being recorded. Press the shutter button fully during the motion picture recording Still pictures are recorded with aspect ratio setting of [16:9] and [Picture Size] setting of 3.5 M. (Max. 20 pictures) Motion picture recording continues unchanged. ••The clicking sound made when the shutter button is operated may be recorded.
Application (Record) Recording motion pictures with manual operation [Creative Video Mode] You can set the desired shutter speed and aperture value to record motion pictures. ••About recording modes (→48) Press to select the setting and press [MENU/SET] ••When you select [ ] by rotating the mode dial, the menu appears automatically. ••You can display the [Creative Video] menu by pressing [MENU/SET]. For the setting procedures of the menu.
Application (Record) Recording motion pictures with manual operation [Creative Video Mode] ●●About aperture value To record motion pictures with a sharp focus on both subject and background, set the aperture value to a higher number. To record motion pictures with a defocused background, set a lower number. ●●About the shutter speed To record a sharp motion picture of a fast-moving subject, set a faster shutter speed.
Application (Record) Recording motion pictures with manual operation [Creative Video Mode] [High Speed Video] You can record at high speed moving subjects during sporting events or other active scenes to record movements that cannot be seen with the naked eye. Press to select [HS] and press [MENU/SET] ••When you select [ ] by rotating the mode dial, the menu appears automatically. ••You can display the [Creative Video] menu by pressing [MENU/SET]. For the setting procedures of the menu.
Application (Record) Registering your own settings and recording [Custom] Mode Registering your preferred recording mode, [Rec] menu settings, etc. to [Cust.Set Mem.] and setting the mode dial to / allows you to switch quickly to those settings. [Cust.Set Mem.] Up to 4 current camera settings can be registered. Select the recording mode you wish to register and set the [Rec] menu, [Motion Picture] menu, [Setup] menu, etc. Select [Cust.Set Mem.
Application (Record) Registering your own settings and recording [Custom] Mode [Custom] Settings registered in [Cust.Set Mem.] can be quickly called up by setting the mode dial to / . Set mode dial to / ([Custom] mode) ••When set to → The camera switches to the recording mode and settings registered in . ••When set to → Use cursor button to select custom set and press [MENU/SET] to switch to the recording mode and settings registered in .
Application (Record) Using Zoom You can adjust the area of a picture to be taken using zoom. Zoom In/Out Capture a wider area (wide-angle) When Extended optical zoom is set Enlarge the subject (telephoto) Focus range Zoom ratio Optical Zoom range Digital Zoom range i.Zoom range ●●Adjust the focus after adjusting the zoom. ●●Do not touch the lens barrel during zooming. ●●The zoom ratio and the zoom bar displayed on the screen are estimates.
Application (Record) Using Zoom Optical Zoom Zooming in up to 3.8x is possible if pictures without Size] on the [Rec] menu. (→135) have been selected by [Picture ●●Optical Zoom cannot be used in the following cases: ••Scene Modes ([Panorama Shot] [3D Photo Mode]) Extended optical zoom Zooming in up to 6.7x is possible when pictures with have been selected by [Picture Size] on the [Rec] menu (→135). EZ is short for “Extended optical zoom”.
Application (Record) Using Zoom [i.Zoom] You can use the camera’s Intelligent Resolution technology to increase the zoom ratio up to 2x higher than the original zoom ratio with limited deterioration of picture quality. Set the [i.Zoom] in the [Rec] menu to [ON]. (→141) ●●The camera’s Intelligent Resolution technology is applied to a picture in the zoom range of [i.Zoom]. ●●[i.Zoom] does not function in the following cases.
Application (Record) Using Zoom [Step Zoom] You can set the zoom operation to allow easy visualization of the angle of view (picture angle) for the focal length of a regular fixed focal length lens (as with a 35 mm film camera). When using the Step Zoom, you can operate the zoom ratio as easily as changing the camera lens. Preparation: Set [Step Zoom] for the [Rec] menu to [ON]. ••For the setting procedures of the menu.
Application (Record) Taking pictures with Auto Focus When Auto Focus is enabled, press the shutter button halfway to focus. Focusing methods differ depending on [Rec] mode and [AF Mode] setting. Switch the focus selector switch to [ ] or [ ] Auto Focus is activated. Align with the indicator ●●Subjects/environments which may make focusing difficult: ••Fast-moving or extremely bright objects, or objects with no color contrast. ••Taking pictures through glass or near objects emitting light.
Application (Record) Taking pictures with Auto Focus ■■Switching [AF Mode] Select [AF Mode] from the [Rec] menu ••For the setting procedures of the menu.
Application (Record) Taking pictures with Auto Focus Automatically locking the focus on a moving subject Align the subject with the AF Tracking frame and press [AF/AE LOCK] button AF Tracking frame When the subject is recognized, the AF Tracking frame changes from white to yellow, and the subject is automatically kept in focus. If AF Lock fails, a red frame flashes. ••To release AF Tracking → Press [AF/AE LOCK] button.
Application (Record) Taking pictures with Auto Focus Determined position for focus Focuses on AF area in center of picture. (Recommended when focus is difficult to align) ••You can adjust the position of the AF area.
Application (Record) Taking pictures with Auto Focus ■■Changing the position and size of the AF area When [AF Mode] is set to AF area at the center. (1-area-focusing), you can move the position or size of the Select [AF Mode] from the [Rec] menu ••For the setting procedures of the menu.
Application (Record) Taking pictures with Auto Focus Using Manual Focus together with Auto Focus After adjusting the focus using Auto Focus, you can make fine adjustments for the focus position using the Manual Focus.
Application (Record) Taking close-up pictures When you want to enlarge the subject, setting to [ ] enables you to take pictures at an even closer distance than the normal focus range (up to 1 cm (0.033 feet) for max. Wide). Switch the focus selector switch to [ ] Enables close-up focusing on a subject. (Auto Focus functions.) Align with the indicator ■■Shortest recording distance The shortest recording distance is the distance from the lens front to the subject.
Application (Record) Taking pictures by locking the exposure and/or focus It is convenient to use the [AF/AE LOCK] button when you want to adjust the composition after the subject has been focused and the exposure is set.
Application (Record) Taking pictures with Manual Focus Manual Focus is convenient when you want to lock the focus to take pictures or when it is difficult to adjust focus using Auto Focus. Switch the focus selector switch to [ ] Align with the indicator Focus manually on a subject.
Application (Record) Taking pictures with Manual Focus ●●You can adjust the focus using the [ND/FOCUS] lever even during motion picture recording. Note, however, that indications such as MF assist and focus range are not displayed. ●●After zoom operation, readjust the focus. ●●The focus range displayed by Manual Focus is a reference value. Confirm the focus on the screen ([MF Assist] screen). ●●After canceling [Sleep Mode], be sure to readjust the focus.
Application (Record) Taking pictures with the built-in flash You can use the built-in flash to take pictures in dark locations or light up a subject to adjust the contrast of an entire picture when the background is bright. Open the built-in flash ■■Closing the built-in flash When you do not want to use the flash or after using the flash, press down to retract the flash until it clicks. ●●Be careful not to catch a finger or any other part of your body or any object when you close the flash.
Application (Record) Taking pictures with the built-in flash Changing the setting of the flash Select [Flash] in the [Rec] menu ••For the setting procedures of the menu.
Application (Record) Taking pictures with the built-in flash ■■Available types in each mode (○: Available, –: Not available, [Scene Mode] ∗1 ○∗2 – – – ○ ○ ○ ○ ○ ○ ○ – – – – ○ : Default setting) ○ ○ ○ – ○ ○ ○ – ○ – ○ – – – – ○ ○ – ○ – ○ ○ ○ – ○ – ○ – ∗1 [Smooth Defocus] and [Radial Defocus] only ∗2 Set to [ ], [ ], [ ] or [ ] depending on the subject and brightness. ●●The flash cannot be used in the following cases.
Application (Record) Setting the ISO Sensitivity Set ISO Sensitivity (sensitivity to lighting) manually. We recommend higher settings to take clear pictures in darker locations. Press [ISO] button Press to select ISO Sensitivity and press [MENU/SET] ■■Settings [AUTO] ISO Sensitivity is automatically set in a range up to 1600 depending on the brightness of a subject. ISO Sensitivity is automatically set in a range up to 1600 depending on the movement and brightness of a subject.
Application (Record) Setting the ISO Sensitivity ■■About extended ISO When [Extended ISO] in the [Rec] menu is set to [ON], you can also set the following ISO Sensitivity values. H.8000* / H.10000* / H.12800 * When [ISO Increments] is [1/3EV] ●●When you record a picture using [Extended ISO], the maximum number of recorded pixels is reduced. Aspect ratio Maximum number of recordable pixels 1:1 2.5 M 4:3 3M 3:2 3M 16:9 2.5 M ●●You cannot record pictures using [ [Extended ISO] is set.
Application (Record) Setting coloring (White Balance) Adjust the color depending on the light source to ensure natural color. Press [WB] button Press to select the white balance and press [MENU/SET] ■■Settings: [AWB] ([Auto White Balance]) / ([Daylight]) / ([Cloudy]) / ([Shade]) / ([Flash]) / ([Incandescent]) / ([White Set 1] [White Set 2]) / ([Color Temperature]) ●●When [AWB] (Automatic White Balance) is set, the coloring is adjusted in accordance with the light source.
Application (Record) Setting coloring (White Balance) ■■[AWB] operational range: 10000K 9000K Blue sky 8000K 7000K 6000K 5000K 4000K 3000K 2000K Cloudy sky (rain) Shade Sunlight White fluorescent lighting Incandescent lighting Sunset/sunrise Candlelight K=Kelvin Color Temperature Setting the White Balance manually Take a picture of a white object under the target light source to adjust colors.
Application (Record) Setting coloring (White Balance) Setting the White Balance using color temperature You can set the White Balance using color temperature. Color temperature is a numeric value that expresses the color of light (unit: K*). A picture becomes bluish when the color temperature value is higher, and reddish when the temperature value is lower.
Application (Record) Setting coloring (White Balance) ●●When you perform fine adjustments of the White Balance toward the A (amber) or B (blue) side, the color of the White Balance icon displayed on the screen will change to the fine-tuned color. ●●When you perform fine adjustments of the White Balance toward the G+ (green) or M- (magenta) side, [+] (green) or [-] (magenta) will be displayed in the White Balance icon on the screen.
Application (Record) Setting coloring (White Balance) ●●When [WB Bracket] is set, [BKT] appears on the White Balance icon. ●●The position of the bracket cannot exceed the edge (limit value) of the White Balance fine adjustments. ●●When White Balance fine adjustments are performed after the bracket is set, the bracket is used to take pictures with the changed adjustment value as the center value. ●●When the camera is turned off, the White Balance Bracket setting is canceled.
Application (Record) Taking pictures with self-timer We recommend using a tripod. This is also effective for correcting jitter when pressing the shutter button, by setting the self-timer to 2 seconds. Press [ ] button Press to select [Self Timer] and press Press to select the selftimer operation setting and press [MENU/SET] The shutter is activated after 10 seconds. The shutter is activated after 10 seconds and three pictures are taken at intervals of approximately 2 seconds.
Application (Record) Taking pictures with self-timer Self-timer indicator (Flashes for set duration) Take a picture Press the shutter button fully to start recording after the preset time. ••To cancel while in operation → Press [MENU/SET] ■■To cancel Select [ ] ([Single]) in step . ●●Focus will be automatically adjusted immediately before recording if the shutter button is pressed fully. ●●After Self-timer indicator stops flashing, it may then be lit for AF Assist Lamp.
Application (Record) Setting the burst function A burst of still pictures can be recorded while the shutter button is pressed fully.
Application (Record) Setting the burst function Setting ∗3 Speed No. of pictures Approx. 2 pictures/sec. 100∗1 Approx. 2 pictures/sec. 100∗1 Approx. 5 pictures/sec. 100∗1 Approx. 5 pictures/sec. 100∗1 Focus, exposure, White Balance Only the focus is fixed to the settings of the first picture taken.∗2 Adjusted within the possible range. Only the focus is fixed to the settings of the first picture taken.∗2 Adjusted within the possible range. Approx. 11 pictures/sec.
Application (Record) Setting the burst function ●●When [ ] is set, the recording range will be narrower. ●●Pictures taken with the [ ] or [ ] setting are recorded together as a group (group display). (→156) ●●Depending on changes in the brightness of the subject, the second and subsequent pictures may be recorded brighter or darker when using the burst function at the [ ], [ ], [ ] or [ ] setting.
Application (Record) Changing the aspect ratio of the still pictures You can easily switch the aspect ratio of still pictures using the aspect ratio selector switch. Switching the aspect ratio selector switch ●●Edges may be cut off when printing - be sure to check in advance.
Application (Record) Changing the aspect ratio of the still pictures Automatically changing the aspect ratio while taking pictures [Aspect Bracket] When you press the shutter button once, the camera automatically takes four pictures with four types of aspect ratios (4:3, 3:2, 16:9, and 1:1). (The shutter sounds only once.) Select [Aspect Bracket] from [Rec] menu ••For the setting procedures of the menu.
Application (Record) Using the built-in ND filter When you want to take pictures using the maximum aperture in a bright outdoor location or at a slow shutter speed, you can use the built-in ND filter to reduce the amount of light that passes through the lens. Press the [ND/FOCUS] lever to activate the ND filter Press When using the built-in ND filter ••To deactivate the built-in ND filter → Press the lever again.
Application (Record) Compensating the exposure Corrects the exposure when there is a backlight or when the subject is too dark or too bright. Press the rear dial to select the Exposure Compensation display Press Selected (yellow) Select the Exposure Compensation value About the exposure meter Shutter speed Exposure Compensation value (+3 - –3) Exposure meter Aperture value ••If the picture is too dark, adjust the exposure to the “+” direction.
Application (Record) Compensating the exposure [Auto Bracket] The Auto Bracket function takes a burst of still pictures while automatically changing the exposure. When Exposure Compensation is set, the camera takes pictures automatically based on the Exposure Compensation value, using one-stop lower and one-stop higher exposures.
Application (Record) Compensating the exposure ●●Cannot be used with flash.
Application (Record) Switching the display of recording information, etc. You can also turn off the recording information (such as icons for various settings) and the level gauge (→128). Press [DISP.] button to switch the display Every time you press the button, the display will be switched.
Application (Record) Using the level gauge If you want to make sure that the camera is not slanted or tilted, for example, when you take a picture of a landscape, use the level gauge indication as a reference. Press [DISP.] button to switch the display Press the button to switch the display. Press the button until the level gauge is displayed. Correct camera angle ■■Using the level gauge The yellow line indicates the current angle (horizontal line).
Application (Record) Using Quick menu In recording mode, you can quickly change the main settings of a still picture or a motion picture. Press [Q.MENU] button to display the Quick menu Select a menu item ■■Using the rear dial Press Settings Menu items ■■Using the cursor button Change the setting ■■Using the rear dial Menu items Press ■■Using the cursor button Press [Q.
Application (Record) Recording with the Face Recognition function [Face Recog.] Default [Face Recog.] setting is [OFF]. When the face pictures are registered, the setting will be [ON] automatically. ■■How the Face Recognition function works During recording (When [AF Mode] is (Face Detection)) ••The camera recognizes a registered face and adjusts focus and exposure. ••When registered faces that have set names are recognized, the names are displayed (max. 3 people).
Application (Record) Recording with the Face Recognition function [Face Recog.] Registering face pictures Up to 6 people’s face pictures can be registered along with such information as name and birthdate. You can facilitate Face Recognition by the way you register faces: for example, register multiple face pictures of the same person (up to 3 pictures in one registration). Select [Face Recog.] from the [Rec] menu ••For the setting procedures of the menu.
Application (Record) Recording with the Face Recognition function [Face Recog.] Press [Name] to select the item for editing and press elect [SET] with cursor button, and press [MENU/SET] S Enter the name (Entering text (→44)) [Age] Set the birthdate. Select [SET] with cursor button, and press [MENU/SET] Press to select year, month and day, set with , and press [MENU/SET] [Focus Icon] Change the icon that is displayed when the subject is in focus.
Application (Record) Recording with the Face Recognition function [Face Recog.] Editing or deleting information about registered persons Information about registered people can be edited or deleted. Select [Face Recog.] from the [Rec] menu ••For the setting procedures of the menu.
Application (Record) Using the [Rec] menu You can perform settings such as Picture size and flash. ••For the setting procedures of the menu. (→25) [Photo Style] You can adjust the colors and picture quality according to the concept of the picture that you want to create. ■■Settings [Standard] Standard setting. [Vivid] Setting with slightly high contrast and saturation. [Natural] Setting with slightly low contrast.
Application (Record) Using the [Rec] menu ••For the setting procedures of the menu. (→25) [Picture Size] Set the size (number of pixels) of still pictures. Number of pictures which can be recorded depends on this setting and on [Quality]. ■■Settings Aspect ratio Setting and picture size 4:3 3:2 16:9 1:1 10M 3648×2736 9.5M 3776×2520 9M 3968×2232 7.5M 2736×2736 7M * 3072×2304 6.5M * 3168×2112 6M * 3328×1872 5.5M * 2304×2304 5M 2560×1920 4.5M 2656×1768 4.5M 2784×1568 3.
Application (Record) Using the [Rec] menu ••For the setting procedures of the menu. (→25) [Quality] Set the compression rate for still picture data. ■■Settings [Fine] [Standard] [RAW+Fine] Gives priority to picture quality and saves pictures in JPEG file format. Saves pictures in JPEG file format using standard picture quality. [RAW+Standard] Saves pictures in JPEG file format in addition to the RAW file format.*1 [RAW] Saves pictures in the RAW file format.
Application (Record) Using the [Rec] menu ••For the setting procedures of the menu. (→25) [ISO Limit Set] You can set the upper limit of ISO Sensitivity when [Sensitivity] is set to [AUTO] or [ ]. ■■Settings: [AUTO] / [200] / [400] / [800] / [1600] / [3200] ●●This function is disabled during motion picture recording. (Except [Creative Video Mode]) [ISO Increments] You can change the setting to increase ISO Sensitivity by 1 EV or 1/3 EV.
Application (Record) Using the [Rec] menu ••For the setting procedures of the menu. (→25) [Quick AF] The focus is automatically adjusted when camera blurring is small even when the shutter button is not pressed. (Increases battery consumption) ■■Settings: [ON] / [OFF] ●●Focus alignment may take time if zoom is suddenly changed from max. Wide to max. Tele, or if suddenly moving closer to subject. ●●Press shutter button halfway if focus is difficult to align.
Application (Record) Using the [Rec] menu ••For the setting procedures of the menu. (→25) [Metering Mode] You can change the position for measuring brightness when correcting exposure. ■■Settings [Metering Mode] Brightness measurement position Conditions Whole screen Normal usage (produces balanced pictures) [Center Weighted] Center and surrounding area Subject in center [Spot] Center and close surrounding area Great difference between brightness of subject and background (e.g.
Application (Record) Using the [Rec] menu ••For the setting procedures of the menu. (→25) [Multi Expo.] You can combine two or three still pictures into a single picture. ■■Settings [Start] Start taking pictures. Decide on your composition and take the first picture Press to select [Next] and then press [MENU/SET] •• [Retake]: Delete the result of the last shot and take another picture. •• [Exit]: Exit Multi Exposure and save the picture that was taken.
Application (Record) Using the [Rec] menu ••For the setting procedures of the menu. (→25) [Min. Shtr Speed] Sets the minimum value for the shutter speed. We recommend using slower shutter speeds to take brighter pictures in dark locations. ■■Settings: [AUTO] [1/250] [1/125] [1/60] [1/30] [1/15] [1/8] [1/4] [1/2] [1] ●●Slower shutter speeds allow for brighter pictures but increase risk of jitter, so we recommend using a tripod and the self-timer.
Application (Record) Using the [Rec] menu ••For the setting procedures of the menu. (→25) [Step Zoom] For details (→95). [Stabilizer] Automatically detects and prevents jitter. ■■Settings: [ON] / [OFF] ●●This setting is fixed to [ON] in [Handheld Night Shot] in [Scene Mode]. ●●The setting is fixed to [OFF] in [Panorama Shot] and [3D Photo Mode] Scene Mode and [High Speed Video] in [Creative Video Mode].
Application (Record) Using the [Rec] menu ••For the setting procedures of the menu. (→25) [AF Assist Lamp] You can set the camera to automatically turn on the AF Assist Lamp in dark locations to make focusing easier. ■■Settings [ON]: Lamp illuminated with halfway press of shutter button ( appears) [OFF]: Lamp off (taking pictures of animals in the dark, etc.) AF Assist Lamp ●●The AF Assist Lamp has an effective distance of 1.5 m (4.9 feet).
Application (Record) Using the [Rec] menu ••For the setting procedures of the menu. (→25) [Flash Synchro] You can set the timing for firing the flash depending on the picture that you want to create. ■■Settings: [1ST] / [2ND] Flash firing timing chart [1ST] is set Elapsed time The picture is taken (shutter is open). [2ND] is set ●●Normally, set to [1ST]. ●●If you set to [2ND], [2nd] will be displayed in the flash icon on the screen.
Application (Record) Using the [Rec] menu ••For the setting procedures of the menu. (→25) [Flash Adjust.] You can adjust the intensity of the flash when you take a picture of a small subject, or when the flash reflectance is extremely high or low. ■■Settings: -2 EV to +2 EV (unit: 1/3 EV) When you do not want to adjust the intensity of the flash, select [0 EV]. ●●When the intensity of the flash is adjusted, [+] or [-] is displayed on the flash icon.
Application (Record) Using the [Rec] menu ••For the setting procedures of the menu. (→25) [Color Mode] For details (→53). [Motion Deblur] For details (→53). [iHandheld Nite Shot] For details (→53). [iHDR] For details (→54). [Opt. Viewfinder] You can set the LCD monitor display when the optional External Viewfinder is attached. ■■Settings: [ON] / [OFF] [Aspect Bracket] For details (→122).
Application (Record) Using the [Rec] menu ••For the setting procedures of the menu. (→25) [Time Lapse Shot] You can preset data such as recording start time and time lapse to take still pictures automatically. This setting is convenient for taking pictures at constant intervals for landscape scenes, observation of the gradual changes in animals/ plants, and other applications. ■■Settings [Shooting Interval]: Set the time lapse.
Application (Record) Using the [Rec] menu ●●Pictures taken using interval recording cannot be stored in the built-in memory. ●●The interval recording function is not intended for application-specific systems (monitoring cameras). ●●If you leave the camera unattended during interval recording, make sure that the camera is not stolen.
Application (Record) Using the [Rec] menu ••For the setting procedures of the menu. (→25) [Date Stamp] Still pictures can be taken with the recording date and time stamped on the still picture. ■■Settings: [W/O TIME] / [WITH TIME] / [OFF] ●●Date stamps on still pictures cannot be erased. ●●The date cannot be stamped when [Auto Bracket], [WB Bracket], [Aspect Bracket] or [Burst Shooting] is set, or when the [Panorama Shot] or [3D Photo Mode] Scene Mode is set.
Application (Record) Using the [Motion Picture] menu Items on the [Rec] menu and [Motion Picture] menu with the same names have the same functions. If a setting in one menu is changed, the setting with the same name in other menu will also be changed automatically. ••See the corresponding [Rec] menu item for details. ••For the setting procedures of the menu. (→25) [Rec Mode] Sets the data format of the motion picture that is recorded.
Application (Record) Using the [Motion Picture] menu ••For the setting procedures of the menu. (→25) [Continuous AF] Either allow the focus to be constantly adjusted during motion picture recording, or fix the focus position at the start of recording. ■■Settings [ON] [OFF]: Fix focus position at the start of motion picture recording. [Wind Cut] Automatically detects wind sounds (wind noise) captured by the microphone and suppresses the sound if the wind is blowing too strongly.
Application (View) Viewing your pictures [Normal Play] When a card is in the camera, pictures are played back from the card. Without a card, pictures are played back from the built-in memory. Press the playback button The camera switches to the playback mode. Press to select a picture to be displayed ••When you press and hold the button, the pictures are displayed one after another. ••You can also rotate the rear dial to select a picture. ■■To end playback Press the playback button again.
Application (View) Viewing your pictures [Normal Play] Zooming in and viewing “Playback zoom” Turn the zoom lever toward the T side to enlarge the picture Current zoom position (Appears for 1 second) [ND/FOCUS] lever Rear dial Each time you turn the zoom lever toward the T side, the camera magnifies the selected area by 2x, 4x, 8x, and 16x in succession. (The picture quality displayed becomes successively lower.
Application (View) Viewing your pictures [Normal Play] Viewing a list of pictures “Multi Playback” Turn the zoom lever toward the W side to display pictures in a list Picture no./Total no. Motion pictures Panorama pictures (→76) ••Move the zoom lever further toward the W side and you can switch the display methods in the following order: 12-picture screen → 30-picture screen → Calendar playback. (Turn the lever to the T side to return.
Application (View) Viewing your pictures [Normal Play] Viewing pictures by their recording date “Calendar Playback” Turn the zoom lever toward the W side to display the calendar screen while displaying a 30-picture screen Selected date ••When you select a recording date using the cursor button and press [MENU/SET], the display method changes to the 12-picture screen. ●●Only months when pictures were taken are shown on the calendar screen.
Application (View) Viewing your pictures [Normal Play] Playing back pictures recorded in burst and interval recording Still pictures taken in a sequence using the [ ] or [ ] burst setting or pictures taken using interval recording are grouped together when they are displayed.
Application (View) Viewing your pictures [Normal Play] ●●When pictures set to [Favorite] are played back using [Slide Show] or [Filtering Play], the pictures cannot be displayed in a group. ●●The following operation cannot be performed while a representative first burst picture is being displayed.
Application (View) Viewing your pictures [Normal Play] About panorama playback Still pictures recorded with [Panorama Shot] Scene Mode are displayed in small size on a normal playback screen because the entire picture is displayed on the screen. ■■Enlarged display You can use the Playback zoom function to enlarge a picture.
Application (View) Viewing motion pictures This unit was designed to play motion pictures using the AVCHD, MP4 and QuickTime Motion JPEG formats. Select a picture with the motion picture icon ([ etc.), and press ], [ ] Playback now starts. Motion picture recording time When playback starts, the elapsed playback time is displayed in the top right of the screen.
Application (View) Capturing still pictures from motion pictures Save a scene from a motion picture as a still picture. Display the picture that you want to capture as a still picture by pausing a motion picture during playback Press [MENU/SET] ••A confirmation screen is displayed. Use cursor button to select [Yes] to save a still picture. [Rec Quality] of the original motion picture [Picture Size] Aspect ratio 2M 16:9 0.
Application (View) Splitting up motion pictures A single motion picture can be split into 2 parts. This is convenient when you want to keep just the necessary scenes, or if you wish to delete unnecessary scenes to increase free space on your card, such as when traveling. Select [Video Divide] from [Playback] menu ••For the setting procedures of the menu.
Application (View) Changing the picture information display, etc. You can disable the display of picture information (file number, etc.) and recording information (settings used for recording, etc.) when a picture is played back. Press [DISP.] button to switch the display Every time you press the button, the display will be switched.
Application (View) Deleting pictures Pictures will be deleted from the card if the card is inserted, or from the built-in memory if the card is not inserted. (Deleted pictures cannot be recovered.) Press [ ] button to delete displayed picture ••A confirmation screen is displayed. Select [Yes] with cursor button, and press [MENU/SET]. ●●Do not turn off the power during deletion. ●●Use a sufficiently charged battery or an AC adaptor (optional) and DC coupler (optional).
Application (View) Deleting pictures To delete multiple (up to 100)/To delete all pictures When you select a representative picture of a still picture group recorded using burst or interval recording, the group is deleted as a single picture. (All the pictures in the selected group are deleted.) Press [ ] button to delete displayed picture Press to select [Delete Multi]/ [Delete All] and press [MENU/SET] ●●[Delete Multi] Use cursor button to select picture and press [DISP.
Application (View) Different playback methods [Playback Mode] Recorded pictures can be played back in a variety of ways. ••For the setting procedures of the menu. (→25) [2D/3D Settings] Switches the output format between 2D and 3D pictures. (Only available during HDMI output.) [Normal Play] Plays back all pictures. [Slide Show] Automatically plays back recorded pictures, one after another. [Filtering Play] Plays back the pictures after narrowing them down according to various conditions.
Application (View) Different playback methods [Playback Mode] ••For the setting procedures of the menu. (→25) [Slide Show] Automatically play pictures in order and to music. Recommended when viewing on TV screen. Use cursor button to select the playback method and press [MENU/SET] [All] Play all. [Picture Only] Plays back still pictures. [Video Only] Plays back motion pictures. [3D Play] Plays back 3D still pictures recorded using [3D Photo Mode] Scene Mode only.
Application (View) Different playback methods [Playback Mode] Use cursor button to select [Start] and press [MENU/SET] ■■Operations during Slide Show The operation guide appears on the bottom right of the LCD monitor. Pause/play Previous* Next* Volume down Volume up Stop * Only while the camera is paused when playing back still pictures ●●When [URBAN] has been selected, the picture may appear in black and white as a screen effect.
Application (View) Different playback methods [Playback Mode] ••For the setting procedures of the menu. (→25) [Filtering Play] You can select and display pictures that you want to play back, for example, pictures in any category or your favorite pictures. Press to select the playback method and press [MENU/SET] [Picture Only] Play back still pictures. [Video Only] Play back motion pictures. [3D Play] Play back only pictures that were recorded using [3D Photo Mode] Scene Mode.
Application (View) Retouching pictures [Auto Retouch] You can adjust the color and brightness of a still picture to bring them into balance. ••New pictures are created after editing pictures with [Auto Retouch]. Before starting to edit, make sure that there is enough free space in the built-in memory or on the memory card.
Application (View) Retouching pictures [Creative Retouch] You can retouch recorded still pictures by selecting the effect that you want to apply. ••New pictures are created after editing pictures with [Creative Retouch]. Before starting to edit, make sure that there is enough free space in the built-in memory or memory card.
Application (View) Using the [Playback] menu You can set the recorded picture to upload to the image-sharing websites, edit the picture (for example, trimming), and set a protection setting in the picture. ••For the setting procedures of the menu. (→25) ●●New pictures are created after editing pictures with tools such as [Text Stamp] and [Resize]. Before starting to edit, make sure that there is enough free space in the built-in memory or memory card.
Application (View) Using the [Playback] menu ■■Uploading to image-sharing websites When setting [Upload Set], the built-in uploading tool automatically makes copies on the card inside the camera. Connect the camera to your computer (→191) before performing uploading operations. For more details, refer to (→194). ■■To clear all Select [Cancel] in step and select [Yes]. ●●Not available on cards with less than 512 MB. ••For the setting procedures of the menu. (→25) [Title Edit] You can give titles, etc.
Application (View) Using the [Playback] menu ••For the setting procedures of the menu. (→25) [Text Stamp] The recording date and time and the text registered in the [Baby], [Pet] Scene Modes, [Travel Date] and [Title Edit] are stamped on the still picture.
Application (View) Using the [Playback] menu ■■Items that can be stamped [Shooting Date] [Name] [W/O TIME]: Stamp recording date [WITH TIME]: Stamp recording date and time : Stamp name registered in Face Recognition : Stamp name registered in [Baby] or [Pet] [Location] Stamp location registered in [Setup] menu’s [Travel Date] [Travel Date] Stamp Travel Date set in [Setup] menu’s [Travel Date] [Title] Stamp text registered in [Title Edit] ••Items set to [OFF] are not stamped.
Application (View) Using the [Playback] menu ••For the setting procedures of the menu. (→25) [Resize] Picture size can be reduced to facilitate e-mail attachment and use in web pages, etc. (Still pictures recorded at the smallest recording pixel level of each picture aspect ratio such as [0.3M] cannot be reduced further.
Application (View) Using the [Playback] menu ••For the setting procedures of the menu. (→25) [Cropping] Enlarge your still pictures and crop unwanted areas. Use cursor button to select a still picture and press [MENU/SET] Use the zoom lever to enlarge the portion of a still picture to be cropped and press [MENU/SET] Expand Change position ••Confirmation screen is displayed. If you select [Yes], the operation is executed. ●●Picture quality is reduced after cropping.
Application (View) Using the [Playback] menu ••For the setting procedures of the menu. (→25) [Leveling] Slight slanting in the still picture can be corrected. Use cursor button to select a still picture and press [MENU/SET] Press to adjust the skewed angle of view and then press [MENU/SET] ••Confirmation screen is displayed. If you select [Yes], the operation is executed. ●●Picture quality is reduced when leveling is performed.
Application (View) Using the [Playback] menu ••For the setting procedures of the menu. (→25) [Favorite] By labeling your favorite pictures with a star ( ), you can play back your favorite pictures only, or you can delete all pictures except your favorites. Use cursor button to select [Single] or [Multi] and press [MENU/SET] Use cursor button to select picture and press [MENU/SET] ●●[Single] Favorite picture setting ●●[Multi] Favorite picture setting ••To cancel → Press [MENU/SET] again.
Application (View) Using the [Playback] menu ••For the setting procedures of the menu. (→25) [Print Set] Picture/picture no./date printing settings can be made for when printing with DPOF printcompatible shops or printers. (Ask at the shop to check for compatibility.) For more information visit: http://panasonic.jp/dc/dpof_110/white_e.
Application (View) Using the [Playback] menu ••For the setting procedures of the menu. (→25) [Protect] Set protection to disable picture deletion. Prevents deletion of important pictures. Use cursor button to select [Single] or [Multi] and press [MENU/SET] Use cursor button to select picture and press [MENU/SET] ●●[Single] ●●[Multi] Picture protected Picture protected ••To cancel → Press [MENU/SET] again. ■■To clear all Select [Cancel] in step and select [Yes].
Application (View) Using the [Playback] menu ••For the setting procedures of the menu. (→25) [Face Rec Edit] Edit or delete the recognition information for pictures with mistaken Face Recognition. Use cursor button to select [REPLACE] or [DELETE] and press [MENU/SET] Use cursor button to select the picture and press [MENU/SET] Use cursor button to select a person and press [MENU/SET] ••If [DELETE], go to step . ••People whose Face Recognition information has not been registered cannot be selected.
Application (View) Using the [Playback] menu ••For the setting procedures of the menu. (→25) [Copy] You can copy pictures between built-in memory and memory card. ■■Copy all pictures from built-in memory to card Use cursor button to select [ ] and press [MENU/SET] ••Confirmation screen is displayed. If you select [Yes], the operation is executed.
Others Viewing on TV screen You can view pictures on a TV screen by connecting your camera to your TV with the HDMI mini cable (optional) or AV cable (optional). ●●Also consult TV operating manual. Preparation: ••Set [TV Aspect] to connect your camera to a TV using the AV cable (optional) (→39) ••Turn off both camera and TV. Connect camera to TV ■■To connect with an HDMI mini cable (optional) An HDMI mini cable (optional) can be used to enable viewing of still and motion pictures in high resolution.
Others Viewing on TV screen ■■To connect with an HDMI mini cable (optional) ●●Always use a genuine Panasonic HDMI mini cable (optional). ●●There are restrictions on some playback functions. ●●Bars may appear at the sides or at the top and bottom of the screen, depending on the aspect ratio setting. ●●When an HDMI mini cable is connected, pictures are not displayed on the LCD monitor. ●●HDMI output will be canceled if a USB connection cable is connected simultaneously.
Others Viewing on TV screen VIERA Link (HDMI) (HDAVI Control™) What is VIERA Link (HDMI)? ●●VIERA Link™ is a new name for EZ Sync™. ●●VIERA Link is a function that automatically links this camera to VIERA Linkcompatible devices by connecting HDMI mini cables (optional) for enabling easy operation with the VIERA remote control. (Some operations are not available.
Others Viewing on TV screen Preparation: Set [VIERA Link] to [ON] (→40). Connect the camera to a VIERA Link (HDMI)-compatible Panasonic television (VIERA) with an HDMI mini cable (optional) (→183) Turn on the camera Press the playback button Proceed with the operation while referring to what is displayed on the TV screen ••When operating, refer to the VIERA Link operating panel.
Others Viewing on TV screen Viewing 3D still pictures If you connect this camera to a 3D-capable TV, and play back still pictures that you recorded in 3D, you can enjoy impressive 3D still pictures on the TV. If a 3D-capable TV has an SD card slot, you can play back 3D still pictures that you recorded by inserting the card into the slot. For the latest information about devices that can play back 3D still pictures recorded with this camera, please refer to the following support website. http://panasonic.
Others Viewing on TV screen ●●When an image is not suitable for 3D viewing (due to excessive parallax, etc.) ••During Slide Show playback: The image is displayed in 2D. ••During [Filtering Play]: A message appears confirming whether to display the image in 3D or not. ●●When a 3D image is played back on a TV that is not 3D-capable, 2 pictures may appear side-by-side on the screen. ●●On the LCD monitor of this camera, 3D still pictures will be played back in 2D (conventional pictures).
Others Storing recorded still pictures and motion pictures The methods for copying still and motion pictures recorded with this camera to other devices vary according to the file format (JPEG, RAW, MPO, AVCHD, MP4). Follow the correct method for your device. Copying by inserting the SD card into the recorder You can copy pictures using Panasonic equipment (such as Blu-ray disc recorders) with support for each file format.
Others Storing recorded still pictures and motion pictures Using “PHOTOfunSTUDIO” to copy to your computer Using the “PHOTOfunSTUDIO” software on the supplied CD‑ROM, you can save still pictures and motion pictures recorded with this camera in all file formats to a computer. Install “PHOTOfunSTUDIO” on your computer ••For details about the software on the supplied CD‑ROM, operation environment and installation, refer to Basic Owner’s Manual.
Others Using with your PC Still/motion pictures can be copied from the camera to your computer by connecting the two together. ••Some computers can read directly from the camera’s memory card. For details, see the manual for your computer. ••If your computer does not support SDXC Memory Cards a message will be displayed requesting you to format the card. (Do not format the card. This will erase recorded pictures.) If the card is not recognized, refer to the following support website. http://panasonic.
Others Using with your PC Copying still pictures and motion pictures recorded in [MP4] (except AVCHD motion pictures) Preparation: ••Charge the battery sufficiently. Or, connect the AC adaptor (optional) and DC coupler (optional). ••When importing pictures from the built-in memory, remove any memory cards. ••Turn on the camera and computer. Check the plug direction and insert it straight in.
Others Using with your PC ■■Folder and file names on computer ●●Windows Drives are displayed in “My Computer” or “Computer” folder. ●●Mac Drives are displayed on the desktop. (Displayed as “LUMIX”, “NO_NAME”, or “Untitled”.) DCIM (Still/motion pictures) 100_PANA (Up to 999 pictures/folder) P1000001.JPG .JPG: Still pictures : .RW2: Still pictures recorded in P1000999.JPG RAW file 101_PANA .MP4: [MP4] Motion Pictures ∗1 : .
Others Using with your PC Uploading pictures to image-sharing websites Using the uploading tool ([LUMIX Image Uploader]), you can upload still pictures and motion pictures to image-sharing websites (Facebook or YouTube). There is no need to copy pictures to your computer or install specialized software. Uploading pictures from the camera is easy with a computer connected to a network, even when you are away from your regular computing environment.
Others Printing You can connect directly to a PictBridge-compatible printer for printing. Preparation: ••Charge the battery sufficiently. Or, connect the AC adaptor (optional) and DC coupler (optional). ••When printing pictures from the built-in memory, remove any memory cards. ••Adjust the print quality or other settings on your printer, as needed. ••Turn on the camera and printer. Check the plug direction and insert it straight in.
Others Printing ●●Do not use any other USB connection cables except the supplied one or a genuine Panasonic USB connection cable (optional). ●●Disconnect USB connection cable after printing. ●●Turn off power before inserting or removing memory cards. ●●Use a sufficiently charged battery or an AC adaptor (optional) and DC coupler (optional). When the battery begins to run out while the camera is connected to the printer, the status indicator flashes and a warning beep sounds.
Others Printing Printing multiple pictures Press to select [Multi Print] in step (→195) Use cursor button to select item and press [MENU/SET] ••[Multi Select]: croll between pictures with cursor button, select pictures to S print with the [DISP.] button. (Press [DISP.] button again to release selection.) Press [MENU/SET] when selection is complete. ••[Select All]: Print all pictures. ••[Print Set (DPOF)]: Print pictures selected in [Print Set].
Others Printing Making print settings on the camera Setting options include the number of printed pictures and their size. Make settings before selecting [Print start]. Use cursor button to select the item and press [MENU/SET] Item Settings [Print with Date] [ON] / [OFF] [Num.of prints] Set number of pictures (up to 999 pictures) [Paper Size] When [Page Layout] is selected, the printer settings take priority.
Others Digital Camera Accessory System Using the Live View Finder (optional) When the Live View Finder (DMW-LVF2: optional) is used, you can view the recording screen even when taking pictures at a low camera angle, for example. Preparation: ••Turn the camera ON/OFF switch to [OFF]. ••Remove the hot shoe cover attached to the camera.
Others Digital Camera Accessory System Using the External Viewfinder (optional) When the External Viewfinder (DMW-VF1: optional) is attached, you can use it to view the recording screen when taking wide-angle pictures. Preparation: ••Turn the camera ON/OFF switch to [OFF]. ••Remove the hot shoe cover attached to the camera.
Others Digital Camera Accessory System Using the external flash (optional) When you use an external flash (DMW-FL220, DMW-FL360, DMW-FL500; optional), it provides a wider effective flash range than the built-in flash. Preparation: ••Set the camera ON/OFF switch to [OFF] and close the built-in flash. ••Remove the hot shoe cover attached to the camera. (→9) Attach the flash to the hot shoe and turn on the camera and flash Select [Flash] from the [Rec] menu ••For the setting procedures of the menu.
Others Digital Camera Accessory System ●●The external flash cannot be used together with the Live View Finder (optional) or External Viewfinder (optional). ●●You can set the aperture value, shutter speed and ISO Sensitivity on the camera even when the external flash is attached. ●●Some commercially available external flashes have synchro terminals with high- voltage or reversed polarity. If such flashes are used, they could cause a malfunction or hinder normal operation of the camera.
Others Digital Camera Accessory System Using the filter (optional) When you use a filter adaptor kit (optional: DMW-FA1), you can use the following filters. (As of July 2012) PL filter DMW-LPLA37* The PL filter helps suppress light reflected from a metal or non-spherical surface (flat non-metallic surfaces, water vapor or invisible fine particles in the air) and enables you to take still pictures with enhanced contrast.
Others Digital Camera Accessory System ●●When you take pictures using the built-in flash with the filter adaptor installed, the light from the flash is sometimes blocked by the filter adaptor. ●●When installing or removing the filter adaptor, take care not to damage the lens or get it dirty. ●●When installing or removing the thread protector or filter adaptor etc., turn it slowly and carefully. (If you tighten it too firmly, you may be unable to remove it.
Others Digital Camera Accessory System Using the AC adaptor (optional) and DC coupler (optional) instead of the battery By using the AC adaptor (optional) and DC coupler (optional), you can record and play back without worrying about the remaining battery charge. The optional DC coupler can only be used with the designated Panasonic AC adaptor.
Others List of LCD monitor displays Screens shown here are only examples. The actual display may vary. ••Press the [DISP.] button to change display.
Others List of LCD monitor displays Screens shown here are only examples. The actual display may vary. ••Press the [DISP.] button to change display.
Others List of LCD monitor displays ■■In recording (During a zoom operation, for example) When Extended optical zoom is set Focus range Zoom ratio Optical Zoom range Digital Zoom range i.
Others List of LCD monitor displays Screens shown here are only examples. The actual display may vary. ••Press the [DISP.] button to change display. ■■In playback 1 2 3 4 5 6 7 8 9 10 11 12 13 1 Playback Mode (→165) 8 Battery capacity (→15) 2 Protected picture (→180) 9 Built-in memory (→20) 3 Favorites (→178) 10 Picture No./Total number of pictures 4 Date/text stamped display (→149, 173) 11 Flash (→106) 5 Folder/File No.
Others List of LCD monitor displays Screens shown here are only examples. The actual display may vary. ••Press the [DISP.] button to change display.
Others Message displays Meanings of and required responses to major messages displayed on LCD monitor. [This memory card cannot be used] ●●A MultiMediaCard was inserted. → Not compatible with the camera. Use a compatible card. [Some pictures cannot be deleted] [This picture cannot be deleted] ●●Non-DCF pictures (→152) cannot be deleted. → Save needed data on a computer or other device, and then use [Format] on the camera.
Others Message displays [Memory card parameter error] ●●Card is not of SD standard. ●●When cards in capacities of 4 GB or more are used, only SDHC or SDXC Memory Cards are supported. [Read Error] / [Write Error] [Please check the card] ●●Data read has failed. → Check whether card has been inserted correctly (→18). ●●Data write has failed. → Turn off the camera and remove the card. Reinsert the card and turn the camera on again. ●●Card may possibly be damaged. ●●Try with a different card.
Others Q&A Troubleshooting Before asking for repairs, check and try the following procedures. A message is displayed on the camera (→211) Battery-and power supply-related problems (→214) Recording-related problems LCD monitor-related problems Playback-related problems Other problems (→214) (→217) (→218) (→219) If the problem persists, performing [Reset] in the [Setup] menu may resolve the issue (→39).
Others Q&A Troubleshooting Battery, power Camera does not work even if power is turned on. ●●Battery is not inserted correctly (→18), or needs recharging. LCD monitor shuts off even if power is turned on. Camera switches off as soon as power is turned on. ●●[Opt. Viewfinder] is set to [ON]. → Press [DISP.] button to switch to the LCD monitor display. ●●The Live View Finder (optional) display is selected.
Others Q&A Troubleshooting Recording (continued) Cannot use [WB Bracket]. ●●Built-in memory/card is full. → Free space by deleting unwanted pictures (→163). Recorded pictures appear coarse, or there is interference. ●●ISO Sensitivity is high, or shutter speed is low. (Default [Sensitivity] setting is [AUTO] – interference may appear with indoor pictures.) → Lower [Sensitivity] (→109). → Take pictures in brighter locations.
Others Q&A Troubleshooting Recording (continued) The subject appears distorted. ●●An MOS is used as the imaging device for this unit, so if the subject passes quickly in front of the lens, it will appear slightly distorted. Note, however, that this does not indicate a malfunction. An unusual noise, such as a clicking or buzzing noise, is recorded on a motion picture. The audio level is extremely low.
Others Q&A Troubleshooting LCD monitor No picture is displayed on the LCD monitor. ●●[Opt. Viewfinder] is set to [ON]. → Press [DISP.] button to switch to the LCD monitor display. ●●The Live View Finder (optional) display is selected. → Press the [LVF/LCD] button of the Live View Finder (optional) to switch to the LCD monitor display. Brightness is unstable. ●●Aperture value is set while shutter button is pressed halfway. (Does not affect recorded picture.
Others Q&A Troubleshooting Playback Pictures have been rotated. ●●[Rotate Disp.] is activated (→40) Cannot view pictures. There are no recorded pictures. ●●No pictures in built-in memory or card (pictures played from card if inserted, from built-in memory if not). ●●Has the file name of the picture been changed on a computer? If so, it cannot be played back on the camera. ●●The [Playback Mode] has been changed. → Set [Playback Mode] to [Normal Play] (→152). Folder/file number displayed as [-].
Others Q&A Troubleshooting TV, computer, printer No image appears on TV. Image blurred or not colored. ●●Not connected correctly (→183). ●●The television has not been switched to auxiliary input. TV screen display different to LCD monitor. ●●Aspect ratio may be incorrect or edges may be cut off with certain televisions. Cannot play motion pictures on TV. ●●Card is inserted into TV. → Connect with AV cable (optional) or HDMI mini cable (optional) and play on camera (→183).
Others Q&A Troubleshooting TV, computer, printer (continued) Cannot communicate with the computer. ●●Not connected correctly (→191). ●●Check whether computer has recognized camera. → Set [USB Mode] to [PC] (→39). → Turn the camera off and then on again. Computer does not recognize card (only reads built-in memory). ●●Disconnect USB connection cable and reconnect with card in place. Computer does not recognize card.
Others Q&A Troubleshooting Others Menu not displayed in desired language. ●●Change [Language] setting (→43). Camera rattles if shaken. ●●This sound is made by the lens movement and is not a fault. Red lamp illuminated when pressing shutter button halfway in dark locations. ●●[AF Assist Lamp] is set to [ON] (→143). AF Assist Lamp is not illuminated. ●●[AF Assist Lamp] is set to [OFF]. ●●Not illuminated in bright locations. Camera is hot.
Others Usage cautions and notes When in use ●●Camera may become warm if used for long periods of time, but this is not a fault. ●●Keep this unit as far away as possible from electromagnetic equipment (such as microwave ovens, TVs, video games etc.). ••If you use this unit on top of or near a TV, the pictures and/or sound on this unit may be disrupted by electromagnetic wave radiation.
Others Usage cautions and notes When not using for a while ●●Turn off camera power before removing battery and card (ensure that battery is removed to prevent damage through over-discharge). ●●Do not leave in contact with rubber or plastic bags. ●●Store together with a drying agent (silica gel) if leaving in drawer, etc. Store batteries in cool (15 °C to 25 °C (59 °F to 77 °F)) places with low humidity (40%RH to 60%RH) and no major temperature changes.
Others Usage cautions and notes Charging the battery ●●The time required for charging varies depending on conditions of battery usage. Charging takes longer at high or low temperatures and when the battery has not been used in some time. ●●Battery will be warm during charging and for some time thereafter. ●●Battery will run out if not used for long periods of time, even after being charged. ●●Do not leave any metal items (such as clips) near the contact areas of the power plug.
Others Usage cautions and notes 3D viewing ●●Anyone who is hypersensitive to light, suffers from heart disease or is otherwise unwell should avoid viewing 3D pictures. ••Viewing 3D pictures may have an adverse effect to the individual. ●●If you feel tired, uncomfortable or otherwise strange when viewing 3D pictures, stop viewing at once. ••Continuing to view may cause illness. ••After stopping viewing, please rest appropriately.
••HDMI, the HDMI Logo, and High-Definition Multimedia Interface are trademarks or registered trademarks of HDMI Licensing LLC in the United States and other countries. ••HDAVI Control™ is a trademark of Panasonic Corporation. ••“AVCHD Progressive”, “AVCHD”, the “AVCHD Progressive” Logo and the “AVCHD” Logo are trademarks of Panasonic Corporation and Sony Corporation. ••Manufactured under license from Dolby Laboratories. Dolby and the double-D symbol are trademarks of Dolby Laboratories.