Basic Owner’s Manual Digital Camera Model No. DMC-LX7 Before connecting, operating or adjusting this product, please read the instructions completely. More detailed instructions on the operation of this camera are contained in “Owner’s Manual for advanced features (PDF format)” in the supplied CD-ROM. Install it on your PC to read it. Register online at www.panasonic.com/register (U.S.
Dear Customer, Thank you for choosing Panasonic! You have purchased one of the most sophisticated and reliable products on the market today. Used properly, we’re sure it will bring you and your family years of enjoyment. Please take time to fill in the information below. The serial number is on the tag located on the underside of your camera. Be sure to retain this manual as your convenient camera information source. Date of Purchase Dealer Phone No. Dealer Purchased From Model No.
Information for Your Safety WARNING: To reduce the risk of fire, electric shock or product damage, ••Do not expose this unit to rain, moisture, dripping or splashing. ••Use only the recommended accessories. ••Do not remove covers. ••Do not repair this unit by yourself. Refer servicing to qualified service personnel. The socket outlet shall be installed near the equipment and shall be easily accessible.
FCC Note: This equipment has been tested and found to comply with the limits for a Class B digital device, pursuant to Part 15 of the FCC Rules. These limits are designed to provide reasonable protection against harmful interference in a residential installation. This equipment generates, uses, and can radiate radio frequency energy and, if not installed and used in accordance with the instructions, may cause harmful interference to radio communications.
■■About the battery pack CAUTION Battery pack (Lithium ion battery pack) •• Use the specified unit to recharge the battery pack. •• Do not use the battery pack with equipment other than the specified unit. •• Do not get dirt, sand, liquids, or other foreign matter on he terminals. •• Do not touch the plug terminals (+ and −) with metal objects. •• Do not disassemble, remodel, heat or throw into fire. If any electrolyte should come into contact with your hands or clothes, wash it off thoroughly with water.
■■About the battery charger CAUTION! To reduce the risk of fire, electric shock or product damage, •• Do not install or place this unit in a bookcase, built-in cabinet or in another confined space. Ensure this unit is well ventilated. Battery charger This battery charger operates on AC between 110V and 240V. But ••In the U.S.A. and Canada, the battery charger must be connected to a 120V AC power supply only. ••When connecting to an AC supply outside of the U.S.A.
■■Cautions for Use •• Do not use any other USB connection cables except the supplied one or a genuine Panasonic USB connection cable (DMW-USBC1: optional). •• Always use a genuine Panasonic HDMI mini cable (RP-CDHM15, RP-CDHM30: optional). Part numbers: RP-CDHM15 (1.5 m) (4.9 feet), RP-CDHM30 (3.0 m) (9.8 feet) •• Always use a genuine Panasonic AV cable (DMW-AVC1: optional). Keep this unit as far away as possible from electromagnetic equipment (such as microwave ovens, TVs, video games etc.).
Contents Information for Your Safety..... 3 Before use................................. 8 Standard accessories.............. 9 Names and Functions of Main Parts............................... 11 Attaching the lens cap and shoulder strap........................ 14 Charging the battery.............. 15 Inserting and removing the battery or SD memory card (optional)................................. 16 Setting the clock..................... 17 Taking pictures.......................
Standard accessories Check that all the accessories are supplied before using the camera. Part numbers are as of July 2012. These may be subject to change. Battery pack DMW-BCJ13PP ••Charge the battery before use. Battery pack is indicated as battery pack or battery in the text. Battery charger DE-A81B Battery charger is indicated as battery charger or charger in the text. Shoulder strap VFC4901 USB connection cable K1HY08YY0025 CD-ROM ••Software: Use it to install the software on your PC.
Standard accessories ••SD Memory Card, SDHC Memory Card and SDXC Memory Card are indicated as card in the text. ••Cards are optional. You can record or play back pictures on the built-in memory when you are not using a card. ••For information about optional accessories, refer to the “Digital Camera Accessory System”. ••If any accessories are lost, customers should contact Panasonic’s parts department at 1 800 833-9626 for further information about obtaining replacement parts.
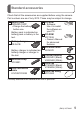
Names and Functions of Main Parts Camera ON/OFF switch Built-in flash (flash) Self-timer indicator/ AF Assist Lamp Shoulder strap eyelet ••Attach the supplied shoulder strap and lens cap string to this eyelet.
Names and Functions of Main Parts Flash open switch Hot shoe (Hot shoe cover) LCD monitor [ND/FOCUS] lever Rear dial Status indicator Cursor buttons [MENU/SET] ] [Q.MENU]/[ (Delete/Cancel) button [DISP.] button [AF/AE LOCK] button Playback button ••Switches between recording mode and playback mode. [HDMI] socket [AV OUT/ DIGITAL] socket Tripod mount* ••Ensure that the tripod is stable. Card/Battery door Release lever DC coupler cover Speaker * Do not attach to a tripod with a 5.5 mm or longer screw.
■■[ND/FOCUS] lever To operate this lever, move it left or right, or push it in. Manual Focus adjustment, etc. ■■Rear dial Turning the built-in ND filter on/off, etc. When the built-in ND filter is turned on, you can use even slower shutter speeds or a wider aperture. Press To operate the dial, rotate it left or right, or push it in. Shutter speed adjustment, etc. Selecting and setting operation items, etc. Press ■■Aperture ring Rotate the ring to adjust the aperture value. Align with the indicator.
Attaching the lens cap and shoulder strap Cover the lens with the lens cap to protect it when you are not taking pictures. We also recommend attaching the shoulder strap to prevent the camera from being dropped. Use the supplied string to attach the lens cap to the camera Attach the lens cap When taking pictures, remove the lens cap and turn on the camera. To attach and remove the lens cap, press the areas shown by arrows in the illustration.
Charging the battery Position the battery contacts to meet the charger, then insert the battery into the charger Ensure [LUMIX] faces outwards. Plug the charger into the AC power Charging light ([CHARGE]) On: C harging in progress (approx. 155 min. if fully depleted) Off: Charging complete ■■About batteries that you can use with this unit The DMW-BCJ13PP is the only battery that can be used in this camera. ••Use the dedicated charger and battery.
Inserting and removing the battery or SD memory card (optional) Check that this unit is turned off. Slide the release lever ( ) to the [OPEN] position and open the card/battery door [OPEN] [LOCK] Insert the battery and card, making sure that their orientation is correct ••Battery: Insert the battery all the way firmly until a locking sound is heard, and check that it is locked by lever ( ). ••Card: Insert the card all the way firmly until it clicks.
Setting the clock The clock is not set when the camera is shipped. Before using the camera, remove the lens cap. Turn the camera on ( ) Press [MENU/SET] ( ) Press to select the items (year, month, day, hour, minute, display order or time display format), and press to set Press [MENU/SET] Press [MENU/SET] to set ••To return to the previous screen, press [ ■■Changing time settings ] button.
Taking pictures Before using the camera, remove the lens cap. Turn the camera on ( ) Motion picture button Shutter button Rotate the mode dial to select the recording mode ( ) ■■Recording mode [Intelligent Auto] Mode Take pictures with automatic settings. [Program AE] Mode Take pictures with automatic shutter speed and aperture value settings. [Aperture-Priority] Mode The shutter speed is automatically determined for the aperture value you set.
Taking pictures ■■Taking still pictures ■■Recording motion pictures (Shutter button) Press halfway (press lightly and focus) (Motion picture button) Press fully (press the button all the way to record) Press (Start recording) Press (End recording) ■■Use the zoom lever to adjust the range of the picture to be captured Capture a wider area (wide-angle) Enlarge the subject (telephoto) ■■Select the combination of shutter speed and aperture value (Mode dial: ) Press the shutter button halfway to mea
Taking pictures ■■About recording motion pictures ●●We recommend you use a battery with sufficient battery power or the AC adaptor when recording motion pictures. ●●If the power supply is cut off due to a power cut or the AC adaptor being disconnected, the motion picture being recorded using the AC adaptor will not be recorded. ●●You can continuously record a motion picture in [MP4] for up to 29 minutes 59 seconds or approx. 4 GB.
Viewing your pictures [Normal Play] Press the Playback button ( ) Press to select a picture to be displayed ••You can also rotate the rear dial to select a picture. ●●To play back a motion picture, select a picture with or , and then press to start playback. ●●To switch to recording mode, press the playback button again or press the shutter button during playback. Deleting pictures Deleted pictures cannot be recovered.
Setting the menu Refer to the following procedures to operate the menus. Example: Setting [AF Mode] from to in the [Program AE] Mode Press [MENU/SET] to display the menu Press to select [AF Mode] and then press Press to select and then press [MENU/SET] to set Press [MENU/SET] to close the menu Switching to other menus Press [MENU/SET] to display the menu Press Press to select a menu icon Press ●●Depending on the item, its setting may not appear or it may be displayed in a different way.
Reading the Owner’s Manual (PDF format) More detailed instructions on the operation of this camera are contained in “Owner’s Manual for advanced features (PDF format)” in the supplied CD‑ROM. Install it on your PC to read it.
Supplied software The supplied CD‑ROM contains the following software. Install the software on your computer to use. ■■PHOTOfunSTUDIO 8.3 PE This software allows you to acquire pictures to the PC, and also categorize these acquired pictures by their recording date or the model name of the camera used.
■■LoiLoScope 30-day full-trial version (Windows XP/Vista/7) This software allows you to make full use of your computer and edit motion pictures easily. ••This will only install a shortcut to the trial version download site. Installing supplied software Preparations: ••Check the environment of your PC. ••Before inserting the CD‑ROM, close all running applications. ■■For Windows Insert the CD‑ROM with the supplied software ••When you insert the supplied CD‑ROM, the install menu will start.
Specifications Specifications are subject to change without notice. Digital Camera: Information for Your Safety Power Source Power Consumption Camera effective pixels Image sensor DC 5.1 V When recording: 1.6 W When playing back: 1.1 W 10,100,000 pixels 1/1.7” MOS sensor, total pixel number 12,800,000 pixels Primary color filter Lens Optical 3.8x zoom [NANO SURFACE f=4.7 mm to 17.7 mm (35 mm film camera equivalent: 24 mm to 90 mm) / COATING] F1.4 (Max. Wide) to F2.3 (Max.
LCD monitor Microphone Speaker Recording media 3.0” TFT LCD (3:2) (Approx. 921,600 dots) Stereo Monaural Built-in Memory (Approx. 70 MB) SD Memory Card / SDHC Memory Card / SDXC Memory Card Recording file format Still picture RAW / JPEG (based on Design rule for Camera File system, based on Exif 2.3 standard / DPOF corresponding) / MPO Motion pictures AVCHD / MP4 Audio AVCHD: Dolby® Digital (2 ch) MP4: AAC (2 ch) compression format Interface Digital USB 2.
Specifications Operating temperature Operating humidity Language select 0 °C to 40 °C (32 °F to 104 °F) 10%RH to 80%RH [ENGLISH] / [ESPAÑOL] Battery charger (Panasonic DE-A81B): Information for Your Safety Input Output ~ 110 V to 240 V, 50/60 Hz, 0.2 A 4.2 V, 0.65 A Equipment mobility: Movable Battery pack (lithium-ion) (Panasonic DMW-BCJ13PP): Information for Your Safety Voltage / capacity 3.
Digital Camera Accessory System Description Battery pack DC coupler* Accessory# DMW-BCJ13 DMW-DCC7 AC adaptor* DMW-AC5 Live view finder DMW-LVF2 External viewfinder DMW-VF1 Flash DMW-FL220 DMW-FL360 DMW-FL500 Filter adaptor kit DMW-FA1 PL filter DMW-LPLA37 MC protector DMW-LMCH37 ND filter DMW-LND37 AV cable DMW-AVC1 HDMI mini cable RP-CDHM15, RP-CDHM30 USB connection cable DMW-USBC1 Class 10 64 GB SDXC Memory Card Class 10 32 GB SDHC Memory Card Class 10 16 GB SDHC Memory Card Clas
Digital Camera Accessory Order Form Please photocopy this form when placing an order. 1. Digital Camera Model # 2. Items Ordered Accessory # Description Price Each Quantity Shipping & Handling Subtotal Your State & Local Sales Tax Total Total Price $6.95 3. Method of payment (check one) American Express VISA Credit Card # MasterCard Expiration Date Discover Customer Signature (Please do not send cash) 4.
Limited Warranty (ONLY FOR U.S.A.
Mail-In Service For assistance in the U.S.A. and Puerto Rico in obtaining repairs, please ship the product prepaid to: Panasonic Exchange Center 4900 George McVay Drive Suite B McAllen, TX 78503 panacare@us.panasonic.com When shipping the unit, carefully pack, include all supplied accessories listed in the Owner’s Manual, and send it prepaid, adequately insured and packed well in a carton box. When shipping Lithium Ion batteries please visit our Web Site at www.panasonic.
THERE ARE NO EXPRESS WARRANTIES EXCEPT AS LISTED UNDER “LIMITED WARRANTY COVERAGE”. THE WARRANTOR IS NOT LIABLE FOR INCIDENTAL OR CONSEQUENTIAL DAMAGES RESULTING FROM THE USE OF THIS PRODUCT, OR ARISING OUT OF ANY BREACH OF THIS WARRANTY. (As examples, this excludes damages for lost time, travel to and from the servicer, loss of or damage to media or images, data or other memory or recorded content. The items listed are not exclusive, but for illustration only.
Customer Services Directory (United States and Puerto Rico) Obtain Product Information and Operating Assistance; locate your nearest Dealer or Service Center; purchase Parts and Accessories; or make Customer Service and Literature requests by visiting our Web Site at: http://www.panasonic.com/help or, contact us via the web at: http://www.panasonic.
(ENG) VQT4H90 35
•• HDMI, the HDMI Logo, and High-Definition Multimedia Interface are trademarks or registered trademarks of HDMI Licensing LLC in the United States and other countries. •• HDAVI Control™ is a trademark of Panasonic Corporation. •• VIERA Link™ is a trademark of Panasonic Corporation. •• EZ Sync™ is a trademark of Panasonic Corporation. •• “AVCHD Progressive”, “AVCHD”, the “AVCHD Progressive” Logo and the “AVCHD” Logo are trademarks of Panasonic Corporation and Sony Corporation.