
Owners manual


Getting started
7
VQT3V50
Control reference guide
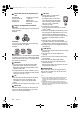
1 Standby/on switch (Í/I) (> 11)
Press to switch the unit from on to standby
mode or vice versa. In standby mode, the unit
is still consuming a small amount of power.
5 CALL LED
The LED will light up when this unit receives
incoming call etc. of the video
communication. (> 19)
6 Remote control signal sensor
Distance: Within approx. 7 m
Angle: Approx. 20e up and down, 30e left and
right
7 Display
Rear panel terminals (> 8–10)
モヶュリヰチ
ヤモワヤユロ
1
2
3
5
4
6
7
19
9
8
20
18
22
21
15
14
16
17
13
12
11
10
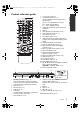
1 Turn the unit on and off
2 TV operation buttons (> 13)
You can operate the TV through the unit’s
remote control.
[Í TV] : Turn the television on and off
[AV] : Switch the input select
[ijVOL] : Adjust the volume
3 Select title numbers, etc./Enter numbers or
characters
4 Cancel
5 Basic playback control buttons (> 16)
6 Show status messages (> 17)
7 Show Top menu (> 17)
8 Show Option menu (> 23)
9 Coloured buttons (red, green, yellow, blue)
Used for various purposes depending on the
display
10 Transmit the remote control signal
11 Open or close the disc tray (> 14)
12 Show the Home screen of the VIERA
Connect (> 19)
13 Start up a video communication (> 19)
14 Set up 3D effects (> 25)
15 Switch on/off Secondary Video
(Picture-in-picture) (> 23)
16 Switch on/off Secondary Audio (> 23)
17 Select audio (> 16)
18 Exit the menu screen
19 Show Pop-up menu (> 17)
20 Show HOME menu (> 14)
21 [3, 4, 2, 1] :
Move the highlight for selection
[OK] : Confirm the selection
(2;)(;1) : Frame-by-frame (> 16)
22 Return to previous screen
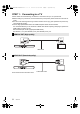
SD CARD
CALL
1
2 3 4 7 89
10
6
5
Pull to flip down the
front panel.
2 Disc tray (> 14)
3 SD card slot (> 14)
4 USB port (> 14)
8 Stop (> 16)
9 Start play (> 16)
10 Open or close the disc tray (> 14)
DMP-BDT220EG-VQT3V50.book 7 ページ 2012年1月10日 火曜日 午後1時14分