
Datasheet


DP-100
14
14 mm 0.551 in
spanner
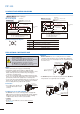
PRECAUTIONS FOR PROPER USE
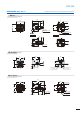
①Decide the direction of this product to mount with the sensor.
②Mount this product with the M3 female threads of the sensor by
using the attached M3 (length 8 mm 0.315 in) screws. The
tightening torque should be 0.5 N·m or less.
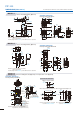
③Mount this product with the mounting surface by using the
attached M4 (length 20 mm 0.787 in) screws. The tightening
torque should be 1.2 N·m or less.
Note: It is not possible to mount this product such
that the pressure port faces upward.
Note: Take care that if the cable with connector is sticking out of the side
groove of this product when mounting, the cable may disconnected.
Note: Do not tighten the pressure port by holding the product with the
spanner. It may cause the product breakage.
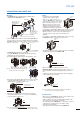
PipingMounting
If connecting a commercially-available
coupling to the pressure port, attach a
12 mm 0.472 in spanner (14 mm 0.551 in
spanner for DP-100-E type) to the hexagonal
section of the pressure port to secure it, and
tighten at a torque of 9.8 N·m or less. If it is
tightened using excessive torque, it may
damage the coupling or the pressure port.
In addition, wrap sealing tape around the
coupling when connecting it to prevent leaks.
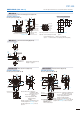
The MS-DP1-4 panel mounting bracket is available when
switching from the DP2 / DP3 series.
An conversion bushing is available for when using the DP-10Ƒ-M short
pressure port type. It can be used to switch between this model and the
DP2 / DP3 series. When connecting to the pressure port, use a tightening
torque of 1.0 N·m or less.
The MS-DP1-FƑ flat attachment is available.
If using the MS-DP1-FƑ flat attachment (optional), install by
following the procedures given below.
12 mm 0.472 in
spanner
Flat attachment
Make sure to mount MS-DP1-FƑ with the sensor properly. If it is
not mounted properly, air leakage may occur.
Take care that the excessive mounting and dismounting of this
product may cause deterioration of the O-ring.
If you touch the O-ring of MS-DP1-FƑ, or any scratch or dust, etc.
is attached to it, air leakage may occur and the sensing
performance may deteriorate.
Take sufficient care when using and storing MS-DP1-FƑ.
The tightening torque should be 1 N·m or less when connecting a
coupling to the pressure port of MS-DP1-FM.
If connecting a commercially-available joint to the pressure port of
the DP-10Ƒ-M, hold the main unit in your hand to steady it, and
tighten to a torque of 1.0 N·m or less. If it is tightened to an
excessive torque, the joint or the main unit may become
damaged.
If connecting a commercially-available joint to the pressure port of
the MS-DP1-7, tighten to a torque of 9.8 N·m or less.
When connecting the coupling to the pressure port of
MS-DP1-FR/FE/FN, hold the pressure port with a 14 mm 0.551 in
spanner and make sure that the tightening torque is 9.8 N·m or
less.
In addition, in order to prevent any leakage, wind a sealing tape
on the coupling when connecting.
Pressure port
faces downward
Pressure port
faces leftward
Pressure port
faces rightward
Pressure port
faces upward
M3 (length 8 mm 0.315 in)
screw (Accessory)
M3 female thread
M3 female thread
Connector attached cable
Groove
M4 (length 20 mm 0.787 in)
screw (Accessory)
Coupling (Purchase separately.)
Pressure port
14 mm 0.551 in
spanner
DP2-20
ñ101
.
3k
P
a
O
U
T2
OU
T
1
MODE
$'-
Front protective cover
DPX-04 (Optional)
can be installed on
MS-DP1-4.
DP2 / DP3
DP-100
Insert
Remove
Remove
Panel mounting bracket MS-DP1-4
Conversion bushing MS-DP1-7
M5 female thread Rc
1
8
female thread
Mounting holes
for DP2 / DP3 series
can be used as is.