
Manual


-
10
-
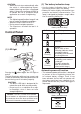
NOTE:
• All 3 bars on the battery indication lamp
will flash when the automatic power-off
function is activated.
•
When the battery indication lamp begins
flashing, the battery pack should be
charged (or replaced with a fresh unit)
immediately.
•
Be sure to fully charge the battery pack
in question after activation of the auto-
matic power-off function. Failure to do
so may prevent the automatic power-off
function from being properly deactivated.
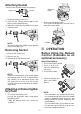
(3) The torque control function
• The torque control function calculates the
load from the motor’s rotational angle during
the hammer impact and determines that the
bolt has been properly seated when a pre-
set load value is exceeded. Driving is then
automatically stopped after a preset number
of impacts have been delivered to the bolt.
CAUTION:
•
Always check the tool’s tightening torque
before use. Improper tool operation may
result in excessive or inadequate tight-
ening.
CAUTION:
•
Always operate the tool with the switch
fully engaged. The torque control func-
tion will not operate when the switch is
not sufficiently engaged, preventing the
tool from stopping automatically.
•
In work where a heavy load comes to
bear during tightening, the load may be
interpreted as the seating of the bolt,
preventing the bolt from being com-
pletely tightened.
•
Repeated tightening of the same bolt
may break the bolt or deform the mate-
rial into which the bolt is being driven as
a result of excessive tightening.
•
The tightening torque value and preci-
sion vary with factors such as the mate-
rial into which the bolt is being driven
and the condition of the socket being
used. Adjust the torque as necessary
for the work being performed. Bolt tight-
ening torque varies due to the factors
described below.
1) Bolt
•
Bolt diameter: Tightening torque gener-
ally increases with bolt diameter.
•
Torque coefficient (indicated by the bolt
manufacturer), grade, length, etc.
2
) Other
• Bit and socket condition: Material,
amount of play, etc.
•
Use of a universal joint or socket
adapter
•
User: Manner in which the tool is
applied to the bolt, strength with which
the tool is held, manner in which the
tool’s switch is engaged
•
Condition of object being tightened: Ma-
terial, seating surface finish
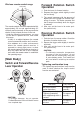
Setting the tool to configuration mode
1.
Turn off the control panel.
• If the control panel is on, remove and
then reinsert the battery pack.
2.
Engage the switch while pushing the
button and then release both the
but-
ton and the switch.
•
After all the LED lamps have turned off,
the control panel will flash and change
to configuration mode.
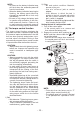
NOTE:
• Tools ship from the factory set to “F”
mode (torque control function off).
•
The control panel will turn off if the tool
is not operated for a period of 5 min-
utes.