
Manual


-
7
-
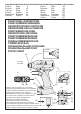
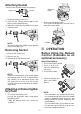
Attaching Socket
• Remove the socket’s rubber ring and pin.
rubber
ring
pin
groove
1 Attach the socket to the tool.
2 Insert
the pin. (Taking care to align the pin
holes on the socket and tool.)
3 A
ttach the rubber ring by sliding it into place
over the groove.
NOTE:
Be sure to attach the rubber ring to prevent
the pin from falling out.
Removing Socket
1 Remove the rubber ring.
2 Remove the pin.
3 R
emove the socket from the tool.
NOTE:
Keep the temperature of the tool above
the
freezing point (0°C/32°F) when attach-
ing sockets to or detaching them from
the square drive on the tool. Do not use
excessive
force when attaching or detach-
ing sockets.
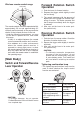
Attaching or Removing Bat-
tery Pack
1. To connect the battery pack:
Line up the alignment marks and attach
the battery pack.
•
Slide the battery pack until it locks into
position.
Alignment
marks
2. To remove the battery pack:
Push up on the button from the front to re-
lease the battery pack.
Button
IV
. OPERATION
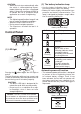
Before Using the Remote
Control (Available as an
optional accessory)
Insert the battery
1. Pull out the battery holder.
1 P
ush in on the fas-
tener as indicated by
the arrow.
2 Pull out the holder
.
2. Insert the battery and
push the holder
back in.
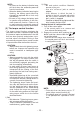
NOTE:
•
If the tool does not respond to the wire-
less remote control even when the remote
control is operated close to the tool, the
battery (CR2025) is dead. Replace it with
a fresh battery.
•
The included battery is provided for sam-
ple use and may not last as long as com-
mercially available batteries.