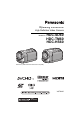
Operating Instructions High Definition Video Camera Model No. HDC-SD60 HDC-TM60 HDC-HS60 Before use, please read these instructions completely.
Information for Your Safety WARNING: TO REDUCE THE RISK OF FIRE, ELECTRIC SHOCK OR PRODUCT DAMAGE, ≥ DO NOT EXPOSE THIS APPARATUS TO RAIN, MOISTURE, DRIPPING OR SPLASHING AND THAT NO OBJECTS FILLED WITH LIQUIDS, SUCH AS VASES, SHALL BE PLACED ON THE APPARATUS. ≥ USE ONLY THE RECOMMENDED ACCESSORIES. ≥ DO NOT REMOVE THE COVER (OR BACK); THERE ARE NO USER SERVICEABLE PARTS INSIDE. REFER SERVICING TO QUALIFIED SERVICE PERSONNEL.
∫ Information for Users on Collection and Disposal of Old Equipment and used Batteries These symbols on the products, packaging, and/ or accompanying documents mean that used electrical and electronic products and batteries should not be mixed with general household waste. For proper treatment, recovery and recycling of old products and used batteries, please take them to applicable collection points, in accordance with your national legislation and the Directives 2002/96/EC and 2006/66/EC.
∫ Handling of built-in memory [HDC-TM60] This unit is equipped with the built-in 16 GB memory. When using this component, pay attention to the following points. Back up data periodically. The built-in memory is temporary storage. In order to avoid erasing data due to static electricity, electromagnetic waves, breakage, and failures, back up the data to a PC or DVD disc.
∫ Cards that you can use with this unit SD Memory Card, SDHC Memory Card and SDXC Memory Card ≥ 4 GB or more Memory Cards that do not have the SDHC logo or 48 GB or more Memory Cards that do not have the SDXC logo are not based on SD Memory Card Specifications. ≥ Refer to page 20 for more details on SD cards. ∫ For the purposes of these operating instructions ≥ SD Memory Card, SDHC Memory Card and SDXC Memory Card are referred to as the “SD card”.
Contents Information for Your Safety.................... 2 Accessories............................................. 8 Preparation Before using [1] Parts identification and handling ........................................ 9 [HDC-SD60]/[HDC-TM60] .............. 9 [HDC-HS60] ................................. 12 Setup [1] Power supply.............................. 15 Inserting/removing the battery ..... 16 Charging the battery .................... 17 Charging and recording time........
Editing With this unit/other products [1] Copying between SD card and Built-in Memory/HDD [HDC-TM60/HDC-HS60] ............. 95 Copying ........................................ 95 [2] Connecting a DVD burner to copy to/play back a disc............ 97 Preparing for copying/ playing back ................................. 97 Copying to discs........................... 99 Playing back the copied disc...... 102 Managing the copied disc .......... 103 [3] Dubbing images onto other video device ...................
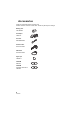
Accessories Check the accessories before using this unit. Product numbers correct as of Feb. 2010. These may be subject to change.
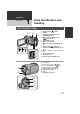
Preparation 1 Before using Parts identification and handling [HDC-SD60]/[HDC-TM60] 1 2 34 5 6 AV MULTI 7 8 10 9 11 12 1 2 3 Power button [ ] (l 22) Speaker Intelligent auto/Manual button [iA/MANUAL] (l 32) 4 Optical image stabilizer button [ /O.I.S.] (l 46) 5 Mode switch (l 23) 6 Battery holder (l 16) 7 HDMI mini connector [HDMI] (l 89, 93) 8 USB terminal [ ] (l 98, 113) 9 AV multi connector [AV MULTI] (l 89, 104) ≥ Use the AV multi cable (only the supplied cable).
18 19 18 LCD monitor (Touch screen) (l 24) ≥ It can open up to 90o. 20 21 22 23 24 ≥ It can rotate up to 180o A towards the lens or 90o B towards the opposite direction. Due to limitations in LCD production technology, there may be some tiny bright or dark spots on the LCD monitor screen. However, this is not a malfunction and does not affect the recorded picture.
27 Status indicator (l 22) 28 Photoshot button [ ] (l 30) 29 Zoom lever [W/T] (In motion picture recording mode or still picture recording mode) (l 45) Thumbnail display switch [ / ]/ Volume lever [sVOLr] (In playback mode) (l 36) 30 DC input terminal (l 17) 27 28 29 ≥ Do not use any other AC adaptors except the supplied one. 31 Grip belt 31 30 1 Flip the belt. 2 Adjust the length. 3 Replace the belt.
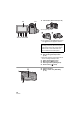
[HDC-HS60] 1 2 34 5 AV MULTI 7 8 9 6 10 11 12 14 15 16 17 VQT2N35 Power button [ ] (l 22) Speaker Intelligent auto/Manual button [iA/MANUAL] (l 32) 4 Optical image stabilizer button [ /O.I.S.] (l 46) 5 Mode switch (l 23) 6 Battery holder (l 16) 7 HDMI mini connector [HDMI] (l 89, 93) 8 USB terminal [ ] (l 98, 113) 9 AV multi connector [AV MULTI] (l 89, 104) ≥ Use the AV multi cable (only the supplied cable).
18 LCD monitor (Touch screen) (l 24) 18 19 ≥ It can open up to 90o. 20 21 22 2324 ≥ It can rotate up to 180o A towards the lens or 90o B towards the opposite direction. Due to limitations in LCD production technology, there may be some tiny bright or dark spots on the LCD monitor screen. However, this is not a malfunction and does not affect the recorded picture.
27 Status indicator (l 22) 28 Photoshot button [ ] (l 30) 29 Zoom lever [W/T] (In motion picture recording mode or still picture recording mode) (l 45) Thumbnail display switch [ / ]/ Volume lever [sVOLr] (In playback mode) (l 36) 30 HDD access lamp [ACCESS HDD] 31 DC input terminal (l 17) 27 28 29 30 ≥ Do not use any other AC adaptors except the supplied one. 32 Grip belt 32 31 14 VQT2N35 1 Flip the belt. 2 Adjust the length. 3 Replace the belt.
Preparation Setup 1 Power supply ∫ About batteries that you can use with this unit The battery that can be used with this unit is VW-VBK180/VW-VBK360. ≥ This unit has a function to distinguish the batteries that can be used, and the batteries (VW-VBK180/VW-VBK360) are compatible with this function. (The batteries that are not compatible to this function cannot be used.
Inserting/removing the battery ≥ Press the power button to turn off the power. (l 22) Install the battery by inserting it in the direction shown in the figure. Removing the battery Be sure to hold down the power button until the status indicator goes off. Then remove the battery while supporting the unit to prevent it dropping. Move the battery release lever in the direction indicated by the arrow and remove the battery when unlocked. A Insert the battery until it clicks and locks.
Charging the battery When this unit is purchased, the battery is not charged. Charge the battery fully before using this unit. The unit is in the standby condition when the AC adaptor is connected. The primary circuit is always “live” as long as the AC adaptor is connected to an electrical outlet. Important: ≥ Use the supplied AC adaptor. Do not use the AC adaptor of another device. ≥ Do not use the AC cable with any other equipment as it is designed only for this unit.
Charging and recording time ∫ Charging/Recording time ≥ Temperature: 25 oC/humidity: 60% HDC-SD60 Battery model number [Voltage/Capacity (minimum)] Charging time Maximum continuously recordable time Actual recordable time Supplied battery/ VW-VBK180 (optional) [3.6 V/1790 mAh] 2 h 50 min 1 h 55 min 1h VW-VBK360 (optional) [3.
HDC-HS60 Battery model number [Voltage/ Capacity (minimum)] Supplied battery/ VW-VBK180 (optional) [3.6 V/ 1790 mAh] VW-VBK360 (optional) [3.
Preparation Setup 2 Recording to a card The unit can record still pictures or motion pictures to an SD card, built-in memory or HDD. To record to an SD card, read the following. This unit (an SDXC compatible device) is compatible with SD Memory Cards, SDHC Memory Cards and SDXC Memory Cards. When using an SDHC memory card/SDXC memory card with other equipment, check the equipment is compatible with these memory cards.
Inserting/removing an SD card When using an SD card not from Panasonic, or one previously used on other equipment, for the first time on this unit, format the SD card. (l 42) When the SD card is formatted, all of the recorded data is deleted. Once the data is deleted, it cannot be restored. Caution: Check that the access lamp has gone off. Access lamp [ACCESS] A ≥ When this unit is accessing the SD card or built-in memory, the access lamp lights up. 1 2 Open the LCD monitor.
Preparation Setup 3 Turning the unit on/off You can turn the power on and off using the power button or by opening and closing the LCD monitor. Turning the power on and off with the power button Press the power button to turn on the power. To turn off the power Hold down the power button until the status indicator goes off. A The status indicator lights. Turning the power on and off with the LCD monitor Power is turned on when the LCD monitor is opened, and power is turned off when it is closed.
Preparation Setup 4 Selecting a mode Change the mode to recording or playback. Operate the mode switch to change the mode to , or .
Preparation Setup 5 Adjusting LCD monitor How to use the touch screen You can operate by directly touching the LCD monitor (touch screen) with your finger. It is easier to use the stylus pen (supplied) for detailed operation or if it is hard to operate with your fingers. ∫ Touch Touch and release the touch screen to select icon or picture. ≥ Touch the centre of the icon. ≥ Touching the touch screen will not operate while you are touching another part of the touch screen.
Preparation Setup 6 Setting date and time When the unit is turned on for the first time, a message asking you to set the date and time will appear. Select [YES] and perform steps 2 to 3 below to set the date and time. ¬ Change the mode to 1 . Select the menu. MENU 2 or : [SETUP] # [CLOCK SET] Touch the date or time to be set, then set the desired value using / . ≥ The date and time function is driven by a built-in lithium battery. ≥ When this unit is purchased, the clock is set.
Basic Recording/ Playback 1 Before recording ∫ Basic camera positioning 1 Hold the unit with both hands. 2 Put your hand through the grip belt. 3 It is convenient to use sub recording start/stop button A when holding the unit around your waist. ≥ When recording, make sure your footing is stable and there is no danger of colliding with another person or object. ≥ When you are outdoors, record pictures with the sunlight behind you. If the subject is backlit, it will become dark in the recording.
Basic Recording/ Playback 2 Selecting a media to record [HDC-TM60/HDC-HS60] The card, built-in memory, and HDD media can be selected separately to record motion pictures or still pictures. 1 2 Change the mode to . Select the menu. MENU 3 or : [MEDIA SELECT] Touch the media to record motion pictures or still pictures.
Basic Recording/ Playback 1 2 3 3 Change the mode to Recording motion pictures . Open the LCD monitor. Press the recording start/stop button to start recording. A When you begin recording, ; changes to ¥. 4 Press the recording start/stop button again to pause recording. ≥ Still pictures can be recorded while recording the motion picture. (l 31) ≥ The images recorded between pressing the recording start/stop button to start recording and pressing it again to pause recording become one scene.
∫ Screen indications in the motion picture recording mode 0h00m00s HG R 1h20m A Recording mode B Remaining time left for recording (When the remaining time is less than 1 minute, [R 0h00m] flashes red.) C Recording time elapsed Each time the unit is put into recording pause, the counter display will be reset to “0h00m00s”. About the compatibility of the recorded motion pictures ≥ They are not compatible with devices other than those that support AVCHD.
Basic Recording/ Playback 4 1 2 3 Change the mode to 4 Press the Recording still pictures . Open the LCD monitor. Press the button halfway. (For auto focus only) button fully. Focus indication: A Focus indication ± (The white lamp flashes.): Focusing ¥ (The green lamp lights up.): When in focus No mark: When focusing is unsuccessful.
∫ About the screen indications in still picture recording MEGA 5M : ß: ßj: : MEGA : : : 5M : R3000: : R3000 Still picture operation indicator (l 119) Flash (l 52) Flash level (l 52) Red eye reduction (l 52) MEGA optical image stabilizer (l 30) Optical image stabilizer (l 46) Quality of still pictures (l 66) Size of still pictures (l 65) Remaining number of still pictures (Flashes in red when [0] appears.
Basic 5 Recording/ Playback Intelligent auto mode The following modes appropriate for the condition are set just by pointing the unit to what you want to record. /MANUAL Intelligent auto/Manual button Press this button to switch Intelligent auto mode/Manual mode. ≥ Please refer to page 69 about manual mode. Mode Scene Effect Portrait When the object is a person Faces are detected and focused automatically, and the brightness is adjusted so it is recorded clearly.
∫ Intelligent auto mode Auto focus When switching to intelligent auto mode, the auto white balance and auto focus operate and automatically adjust the colour balance and focusing. Depending on the brightness of the subject etc., the aperture and shutter speed are automatically adjusted for an optimum brightness. ≥ Colour balance and focus may not be adjusted automatically depending on light sources or scenes. If so, manually adjust these settings. (l 70, 72) The unit focuses automatically.
Basic Recording/ Playback 1 2 3 6 Motion picture/Still picture playback Change the mode to . Touch the play mode select icon A. Touch the desired media to be played back motion pictures or still pictures.
4 Touch the scene or the still picture to be played back. ≥ Next (previous) page can be displayed by touching / . 5 Select the playback operation by touching the operation icon. A Operation icon 0h00m00s ≥ Touch icon. F / F to display/not-display the operation F Motion picture playback 1/;: 6: 5: ∫: 1: Playback/Pause Rewind playback Fast forward playback Stops the playback and shows the thumbnails. Displays the direct playback bar.
∫ Change the thumbnail display ∫ Speaker volume adjustment While the thumbnail is displayed, the thumbnail display changes in the following order if the zoom lever or adjust zoom buttons are operated to side or side. 20 scenes () 9 scenes () 1 scene () Highlight&Time frame index* (l 75) Operate the volume lever or the adjust zoom buttons to adjust the speaker volume during motion picture playback.
Basic Setup 1 Using the menu screen MENU 1 2 Press the MENU button. MENU Touch the top menu A. 5 Touch [EXIT] or press the MENU button to exit the menu setting. ∫ About 3 Touch the submenu B. guide display After touching , touching the submenus and items will cause function descriptions and settings confirmation messages to appear. ≥ After the messages have been displayed, the guide display is cancelled. ≥ Next (previous) page can be displayed by touching / .
Basic 2 Setup Using the Setup Menu ≥ The items displayed differ depending on the position or settings of the mode switch. Select the menu. MENU : [SETUP] # desired setting [DISPLAY] [OFF]/[ON] The screen indications are selected as shown in the illustration. [OFF] [ON] 1h30m A R 1h20m 15. 11. 2010 [EXT. DISPLAY] 15. 11. 2010 [OFF]/[SIMPLE]/[DETAIL] Please refer to page 91. [CLOCK SET] Please refer to page 25.
4 (Only when setting the region of your travel destination) Touch [DESTINATION]. ≥ Touch [ENTER]. ≥ When the home region is set for the first time, the screen for selecting home/travel destination appears after setting the home region successively. If the home region has already been set once, execute the menu operation for Step 1. 5 (Only when setting the region of your travel destination) Touch / to select your travel destination and touch [ENTER].
[QUICK POWER ON] [OFF]/[ON] The unit is put into recording pause approx. 1 second when the power is turned on with the mode set to or . ≥ Depending on the recording conditions, start time may be longer than 1 second in still picture recording mode. ≥ In the quick power on mode, the zoom magnification becomes 1k. [QUICK START] [OFF]/[ON] This unit will resume recording pause mode about 0.6 seconds after the LCD monitor is reopened. ≥ Start time will not shorten if there is no SD card inserted.
[ALERT SOUND] [OFF]/ / Touch screen operation, start and stop of recording and power on/off can be confirmed with this sound. (Volume low)/ (Volume high) 2 Beeps for 4 times When an error occurs. Check the sentence displayed on the screen. (l 121) [POWER LCD] +2 / +1 / 0 / -1 / A This makes it easier to view the LCD monitor in bright places including outdoors. ≥ These settings will not affect the images actually recorded.
[TV ASPECT] [16:9]/[4:3] Please refer to page 91. [INITIAL SET] Set to [YES] for changing the menu settings back to the default condition. ≥ Settings for [MEDIA SELECT]*, [CLOCK SET] and [LANGUAGE] will not be changed. * For users who have , this menu is not displayed. [FORMAT CARD] Please be aware that if a medium is formatted, then all the data recorded on the medium will be erased and cannot be restored. Back up important data on a PC, DVD disc etc.
Use this unit to format media. Formatting built-in memory or HDD is only available with this unit. Do not format an SD card using any other equipment such as a PC. The card may not be used on this unit. [CARD STATUS] The amount of space left on the SD card can be checked. (Only when the mode is at the ) ≥ Touch [EXIT] or press the MENU button to close the indication. / [MEDIA STATUS] The amount of space left on the SD card, the built-in memory and HDD can be checked.
[DEMO MODE] [OFF]/[ON] This item is used to start the unit demonstration. (Only when the mode is at the or position) If [DEMO MODE] is switched to [ON] when there is no SD card inserted, the demonstration automatically starts. / If [DEMO MODE] is switched to [ON] when there is no SD card inserted and while this unit is connected to the AC adaptor, the demonstration automatically starts. If any operation takes place, the demonstration is cancelled. However if no operations take place for approx.
Advanced Recording (Advanced) 1 Zoom in/out function The maximum optical zoom ratio is 25k. The default setting of the [ZOOM MODE] is [i.Zoom 35k]. It can be extended to a maximum of 35k during motion picture recording mode. (l 56) ¬ Change the mode to or . ヷヰロ W ヷヰロ T ヸ Zoom lever/Adjust zoom buttons ヵ T side: Close-up recording (zoom in) W side: Wide-angle recording (zoom out) ≥ The zoom speed varies depending on the range over which the zoom lever is moved.
Advanced Recording (Advanced) 2 Optical image stabilizer function Optical image stabilizer can stabilize the image without decreasing the image quality as much. ¬ Change the mode to or . Optical image stabilizer button Pressing the button changes the optical image stabilizer setting. (Motion picture recording mode) # # OFF (Still picture recording mode) / # / # OFF ≥ Switch to manual mode before setting the Optical Image Stabilizer function to off.
Advanced Recording (Advanced) 3 AF/AE tracking It is possible to set the focus and exposure to the subject specified on the touch screen. The focus and exposure will keep following the subject automatically even if it moves. (Dynamic tracking) ¬ Change the mode to 1 Touch or . . ≥ will be displayed on the screen. ≥ When [FACE RECOG.] (l 57) is [ON] and a registered face is detected, the target is automatically locked. 2 Touch the object and lock the target.
Advanced Recording (Advanced) 4 Recording with the video light The video light enables brightening of the images taken in a dimly-lit place. ¬ Change the mode to or . Video light button Each time the button is pressed, the indication changes by one setting in the following order. # / # Setting cancelled : Always on. / : Turns on/off automatically according to brightness of the surroundings. ≥ When set to / , the video light turns on in Low light mode in Intelligent auto mode.
Advanced Recording (Advanced) 5 Recording functions of operation icons Select the operation icons to add different effects to the images to be recorded. ¬ Change the mode to 1 or . Touch F to display the operation icons on the screen. F A ≥ Touch 1 at the bottom right of the screen to change the page and touch F / F to display/not-display the operation icon. 2 (e.g. Backlight compensation) Select an operation icon. F A ≥ Select the operation icon again to cancel the function.
Fade When you start recording, the image/audio gradually appears. (Fade in) When you pause recording, the image/audio gradually disappears. (Fade out) ≥ The fade setting is cancelled when the recording stops. (Fade in) ∫ To select the colour for fade in/out MENU : [RECORD SETUP] # [FADE COLOUR] # [WHITE] or [BLACK] (Fade out) ≥ The thumbnails of scenes recorded using fade in become black (or white).
PRE-REC PRE-REC This prevents you from missing a shot. This allows recording of the pictures and sound to start approximately 3 seconds before the recording start/stop button is pressed. ≥ PRE-REC appears on the screen. ≥ Aim the unit at the subject beforehand. ≥ There is no beep sound. ≥ PRE-REC is cancelled in the following cases. j If you change the mode. j If you remove the SD card while [MEDIA SELECT] is set to [VIDEO/SD CARD]. j If you press the MENU button. j If you turn the unit off.
Built-in flash When the button is pressed, the flash is activated and the picture will be recorded. Use the built-in flash in order to record still pictures in dark places. Each time the ß icon is selected, the indication changes by one setting in the following order: ß ([ON]) # ßA ([AUTO]) # ([OFF]) ≥ When the button is pressed halfway, the flash indicator will appear. ≥ The unit automatically determines if the flash is necessary even when it has been set to by detecting the ambient brightness.
Self-timer This is for recording still pictures using the timer. Each time the icon is selected, the indication changes by one setting in the following order: Ø10 (Records after 10 seconds) # Ø2 (Records after 2 seconds) # setting cancelled ≥ When you press the button, Ø10 or Ø2 flashes for the set period before a still picture is recorded. After recording, the self-timer is cancelled.
Tele macro A more impressive image can be obtained by focusing on the object only in close-up and shading off the background. ≥ The unit can focus on the subject at a distance of approx. 70 cm. ≥ If the magnification is 25k or less, then it is automatically set to 25k. ≥ The tele macro function is cancelled when the zoom magnification becomes lower than 25k. Guideline You can check if the image is level while recording or playing back motion pictures and still pictures.
Advanced Recording (Advanced) 6 Recording functions of menus [SCENE MODE] When you record images in different situations, this mode automatically sets optimum shutter speeds and apertures. ≥ Change the mode to or .
[ZOOM MODE] Set the maximum zoom ratio for the motion picture recording mode. ≥ Change the mode to . MENU : [RECORD SETUP] # [ZOOM MODE] # desired setting [Opt.Zoom 25k]: Optical zoom (Up to 25k) [i.Zoom 35k]: This zoom function allows you to maintain high-definition picture quality. (Up to 35k) [D.Zoom 60k]: Digital zoom (Up to 60k) [D.Zoom 1500k]: Digital zoom (Up to 1500k) ≥ The larger the digital zoom magnification, the more the image quality is degraded.
[RELAY REC] It is possible to continuously record motion picture to an SD card when there is no space available in the built-in memory. (It allows you to record only to SD card from built-in memory.) ≥ Change the mode to . MENU : [RECORD SETUP] # [RELAY REC] # [ON] is displayed on the screen. will disappear when space in the built-in memory is gone and the recording to the SD card starts. ≥ Relay recording can only be performed once.
∫ Registering a face for face recognition [RECORD SETUP] # [FACE RECOG.] # [SET] # [SAVE] ≥ Up to a maximum of 6 people can be registered. 1 Align the person’s face with the guide. ≥ Take a picture of the persons face from the front, ensuring that their hair does not hide the outline of their face, their eyes or their eyebrows. 2 Touch [REC] or press the button fully. ≥ Touch [ENTER]. ≥ It may not be possible to register a face depending on the recording conditions.
∫ Changing the information of a registered person 1 Select the menu. [RECORD SETUP] # [FACE RECOG.] # [SET] # [EDIT] 2 Touch the desired item to enter the setting. ≥ Up to 3 face shots can be registered. To additionally register or to change/delete the registered face shots, touch or the face shot. [SET NAME]: Change the name. [PRIORITY]: Focus and exposure will be set in priority according to the registration order setting from the first person.
[NAME DISPLAY] When a registered person is detected by face recognition during recording, the name registered for that person is displayed. ≥ Change the mode to or . MENU : [RECORD SETUP] # [NAME DISPLAY] # desired number [OFF]/[1]/[2]/[3] ≥ Displayed name will disappear after a while. ≥ It is displayed according to the registration order setting from the first person. ≥ This function is not displayed during recording of yourself or playback mode. [FACE FRAMING] Detected faces appear with frames.
[AGS] If the unit continues to be tilted upside down from the normal horizontal position while recording motion pictures, it is automatically put into recording pause. ≥ Change the mode to . MENU : [RECORD SETUP] # [AGS] # [ON] ≥ The AGS function may activate and cause the unit to pause the recording if you are recording a subject right above or right below you. [AUTO SLOW SHTR] You can record bright pictures even in dark places by slowing the shutter speed. ≥ Change the mode to .
[SHOOTING GUIDE] Message is displayed when this unit is moved rapidly. ≥ Change the mode to . MENU : [RECORD SETUP] # [SHOOTING GUIDE] # [ON] When “CAMERA PANNING IS TOO FAST.” appears, move the unit slowly while recording. ≥ Message will not appear while pausing the recording. (Message will appear even if it is pausing the recording if [DEMO MODE] is set to [ON]) ≥ In some recording conditions, messages may not appear.
[MIC LEVEL] When recording, the input level from the built-in microphones can be adjusted. ≥ Change the mode to . ≥ Switch to manual mode. (l 69) 1 Select the menu. MENU : [RECORD SETUP] # [MIC LEVEL] # desired setting [AUTO]: [SETr 2 Touch level. AGC is activated, and the recording level is adjusted automatically. ]/[SET]: / The desired recording level can be set. to adjust the microphone input ≥ Touch to activate/disactivate AGC.
[PICTURE ADJUST] Adjust the quality of the image while recording. Adjust by outputting to a TV while adjusting the quality of the image. ≥ Change the mode to or . ≥ Switch to manual mode. (l 69) 1 Select the menu. MENU 2 : [RECORD SETUP] # [PICTURE ADJUST] Touch the desired setting items. [SHARPNESS]: Sharpness of the edge [COLOUR]: Depth of the colour of the image [EXPOSURE]: Brightness of the image [WB ADJUST]: Picture colour balance 3 4 Touch / to adjust settings. Touch [ENTER].
[PICTURE SIZE] The higher the number of pixels, the higher the clarity of the picture when printing. ≥ Change the mode to . MENU : [PICTURE] # [PICTURE SIZE] # desired setting ≥ The number of recording pixels that can be set changes depending on selected screen aspect ratio. (l 66) ∫ Picture size and Maximum zoom ratio ∫ Picture size in motion picture recording mode ≥ Change the mode to Aspect ratio 4:3 3:2 16:9 Picture size Extra optical zoom (l 45) 5M 2592k1944 –* 1.9M 1600k1200 27.5k 0.
[QUALITY] Selecting the picture quality. ≥ Change the mode to or MENU : : . : [PICTURE] # [QUALITY] # desired setting Still pictures with a high picture quality are recorded. Priority is given to the number of still pictures recorded. Still pictures are recorded in normal picture quality. [ASPECT RATIO] This allows you to select the aspect ratio of the pictures to suit printing or the playback method. ≥ Change the mode to .
[HI-SPEED BURST] Recording is done continuously at the rate of 25 or 50 still pictures per second. Use this function to record an object with fast movement. ≥ Change the mode to . 1 Select the menu. 4 (Only when [Record] is selected in step 3) 2 [REC ALL]: All pictures are stored. [SELECT]: Pictures are stored by specifying range. [OFF]: Cancel the setting. [25 Frames/sec]: 90 still pictures are recorded continuously at the rate of 25 per second. The picture size is 2.1 M (1920k1080).
[AF ASSIST LAMP] When the recording environment is dark and focusing is difficult, the video light turns on to make focusing easier. ≥ Change the mode to . ≥ Switch to manual mode. (l 69) MENU : [PICTURE] # [AF ASSIST LAMP] # [AUTO] ≥ Set the video light to / or OFF. (l 48) ≥ When switching to Intelligent auto mode, the setting is fixed to [AUTO] and cannot be changed. [SHTR SOUND] You can add a shutter sound when recording still pictures. ≥ Change the mode to .
Advanced Recording (Advanced) 7 ¬ Change the mode to Manual recording or . Press the iA/MANUAL button to switch to manual mode. ≥ MNL appears on the screen. /MANUAL F FOCUS WB SHTR IRIS FOCUS WB SHTR IRIS Focus (l 72) White balance (l 70) Manual shutter speed (l 71) Aperture adjustment (l 71) Perform the setting by touching the desired item to be set. ≥ Touch 1 to change the page and the manual icon appears or disappears each time is touched.
White balance The automatic white balance function may not reproduce natural colours depending on the scenes or lighting conditions. If so, you can adjust the white balance manually. ≥ Press the iA/MANUAL button to switch to manual mode. (l 69) 1 2 Touch [WB]. Touch / to select white balance mode. ∫ To set the white balance manually 1 2 Select , fill the screen with a white subject. Touch and set the blinking .
Manual shutter speed/iris adjustment Shutter Speed: Adjust it when recording fast-moving subjects. Iris: Adjust it when the screen is too bright or too dark. ≥ Press the iA/MANUAL button to switch to manual mode. (l 69) 1 2 Touch [SHTR] or [IRIS]. Touch / settings. to adjust SHTR Shutter speed: 1/50 to 1/8000 ≥ If [AUTO SLOW SHTR] is set to [ON], the shutter speed will be set between 1/25 and 1/8000. ≥ The shutter speed closer to 1/8000 is faster.
Manual focus adjustment If auto focusing is difficult due to the conditions, then use manual focus. ≥ Change the mode to or . ≥ Press the iA/MANUAL button to switch to manual mode. (l 69) 1 (When MF assist function is used) Select the menu. MENU : [RECORD SETUP] # [MF ASSIST] # [ON] 2 3 Touch [FOCUS]. Touch [MF] to change to manual focus. ≥ MF appears on the screen. 4 Adjust the focus by touching MF / MF . MF MF MF MF F FOCUS WB SHTR IRIS The in-focus area is displayed in blue.
Advanced Playback (Advanced) 1 Playback Operations Motion picture playback using operation icon For details on the basic playback operations, refer to page 34. Playback operation Fast forward/ rewind playback Slow-motion playback Frame-by-frame playback The motion picture is advanced one frame at a time. Playback display During Playback During Pause ≥ When the operation icon disappears, touch the screen to display the icon again Operating steps Touch 5 during playback to fast forward.
Playback operation Playback display Operating steps 1) During Playback Direct playback Touch 1 to display the direct playback bar A. 2) Touch the direct playback bar. ≥ The playback is paused and the image is skipped until the position you touched. ≥ Playback starts again when you release the touch screen. ≥ Touch 2 to display the operation icon. Creating still picture from motion picture A single frame from the recorded motion picture can be saved as a still picture.
Highlight&Time frame index An image of one scene is displayed as a thumbnail at set search condition. Scene can be played back from any midway point of the scene you wish to see. ≥ Operate the zoom lever or the adjust zoom buttons to side and change over the thumbnail display to Highlight&Time frame index. (l 36) 1 Touch selected search condition. ≥ Next (previous) scene can be displayed by touching / . 2 Touch the desired search condition.
Repeat playback Playback of the first scene starts after playback of the last scene finishes. MENU : [VIDEO SETUP] # [REPEAT PLAY] # [ON] The indication appears on the full screen views. ≥ All the scenes are played back repeatedly. (When playing back motion pictures by date, all the scenes on the selected date are played back repeatedly.) Resuming the previous playback If playback of a scene was stopped halfway, the playback can be resumed from where it was stopped.
Advanced Playback (Advanced) 2 Various playback functions Playing back motion pictures/still pictures by date The scenes or the still pictures recorded on the same day can be played back in succession. 1 Touch the date select icon. A Date select icon 2 Touch the playback date. The scenes or the still pictures recorded on the date selected are displayed as thumbnails. 3 Touch the scene or the still picture to be played back.
Face highlight playback/Highlight playback/Intelligent scene selection A part can be extracted and played back even when not set to normal playback. 1 Touch 2 Touch the desired playback mode. . [FACE HIGHLIGHT]: Part that was recognised as clearly recorded is extracted from a detected face, and it can be played back in short time with music added. [HIGHLIGHT]: Part that was recognised as clearly recorded is extracted from a long recording, and it can be played back in short time with music added.
≥ Playing back of all the scenes returns if the power is turned off or the mode is changed. (Intelligent scene selection) ≥ Up to 9 sections can be skipped for a single scene. ≥ When motion pictures are skipped, the image stops momentarily. ≥ Divided scene will not be skipped. ≥ For data that are edited with the editing function of HD Writer AE 2.0, the intelligent scene selection is disabled. ∫ Scene setting 1 2 Touch [SELECT SCENES] or [SELECT DATE].
∫ Date setting Touch the playback date. ∫ Music setting 1 Touch your favourite music. ≥ When [NO MUSIC] is selected, the audio recorded at the time of shooting is played back. ≥ To adjust the volume of music during playback or audio testing, operate the volume lever or the adjust zoom buttons. (l 36) 2 Touch [ENTER]. To test the music audio Touch [START]. ≥ Touch the other music option to change the music to be tested. ≥ When you touch [STOP], the music playback stops.
Changing the playback setting and playing back the slide show 1 Touch 2 Touch the desired item. . [DATE SETUP]: Select the date to be played back. [SLIDES INTERVAL]: Selects the interval between still pictures at playback. [MUSIC SELECT]: Select the music to be played on playback 3 (When [DATE SETUP] is selected) Touch the playback date. (When [SLIDES INTERVAL] is selected) Touch the interval of playback for the slide show. [SHORT]: Approx. 1 second [NORMAL]: Approx.
Advanced Editing 1 Deleting scenes/still pictures Deleted scenes/still pictures cannot be restored, so perform appropriate confirmation of the contents before proceeding with deletion. ¬ Change the mode to . To delete by confirming images being played back 0h00m00s Press the button while scenes or still pictures to be deleted are being played back. F ∫ Deleting multiple scenes/still pictures from the thumbnail display 1 2 Press the button while the thumbnail view screen is displayed.
When you stop deleting halfway Touch [CANCEL] or press the MENU button while deleting. ≥ The scenes or still pictures that have already been deleted when the deletion is cancelled cannot be restored. To complete editing Press the MENU button. ≥ You can also delete scenes by pressing the MENU button, selecting [EDIT SCENE] # [DELETE] # [ALL SCENES] or [SELECT]. ≥ You can also delete still pictures by pressing the MENU button, selecting [PHOTO SETUP] # [DELETE] # [ALL SCENES] or [SELECT].
Dividing a scene to partially delete To delete an unnecessary portion of a scene, first divide the scene and then delete the unnecessary portion. ≥ Change the mode to and touch the play mode select icon to select desired media to divide a scene. (l 34) 1 Select the menu. MENU 2 3 : [EDIT SCENE] # [DIVIDE] # [SET] Touch the scene to be divided. Touch to set the dividing point.
Deleting personal information Deletes face recognition information from scenes in which faces were recognised. ≥ Change the mode to . 1 Select the menu. MENU 2 : [VIDEO SETUP] # [DELETE PERSONAL INFO] Touch the desired scenes to be deleted personal information. appears at scenes for which faces were recognised. Touch one of the scenes at which appears. ≥ will change to (red) when touched. Touch the (red) again to cancel the operation. ≥ Up to 99 scenes can be selected in succession.
Advanced 2 Editing DPOF setting You can write the data selecting still pictures to be printed and the number of prints (DPOF data) onto the SD card. (Copy still pictures recorded to the built-in memory or HDD to the SD card before setting DPOF.) ¬ Change the mode to and touch the play mode select icon to select [PICTURE/SD CARD].
Advanced Editing 3 Relay scene combining [HDC-TM60] You can combine the relayed scene (l 57) in the built-in memory and the continued scene in the SD card to be one into the SD card. Relay recorded scene Relay scene combining A Built-in memory B SD card C Range of relay recording ≥ Change the mode to and touch the play mode select icon to select desired media. (l 34) 1 2 Insert the SD card that was used for relay recording. Select the menu.
To cancel relay information [EDIT SCENE] # [RELAY INFO CANCEL] ≥ When the relay information is cancelled, combining of the relayed scenes will not be possible anymore. Combining of the relay scene cannot be performed if the available space on the SD card is less than the volume of the relayed scene in the built-in memory. It is recommended to combine the relay scene using a DVD burner or the HD Writer AE 2.0.
Advanced With a TV 1 Watching Video/Pictures on your TV Confirm the terminals on your TV and use a cable compatible with the terminals. Image quality may vary with the connected terminals. 1 2 3 4 High quality HDMI terminal Component terminal Video terminal ≥ Use the supplied AV multi cable. Check the output settings when connecting the component terminal or the video terminal with the AV multi cable.
≥ Check that the plugs are inserted as far as they go. ≥ Do not use any other cables except a genuine Panasonic HDMI mini cable (RP-CDHM15, RP-CDHM30; optional). ≥ Do not use any other AV multi cables except the supplied one. ≥ When connecting to the component terminal of the TV, the yellow plug of the AV multi cable is not required. ≥ When connecting to the AV terminal of the TV, the component plug of the AV multi cable is not required. 2 Select the video input on the TV.
∫ To watch images on a regular TV (4:3) or when both sides of the images do not appear on the screen Change the menu setting to display the images correctly. (Check the TV setting.) MENU : [SETUP] # [TV ASPECT] # [4:3] Example of images with a 16:9 aspect ratio on a regular TV (4:3) [TV ASPECT] setting [16:9] [4:3] ≥ If a wide-screen TV is connected, adjust the aspect setting on the TV. (Refer to the operating instructions of the TV for details.
Connecting with the AV multi cable AV multi connector output setting can be changed. MENU : [SETUP] # [AV MULTI] # desired setting [COMPONENT]: When connecting to the component terminal [AV OUT]: When connecting to the video terminal Changing the component output setting MENU : [SETUP] # [COMPONENT OUT] # desired setting [576i]: When connecting to the component terminal on the TV compatible with 576i. (Playback is in standard quality.
Advanced With a TV 2 Playback using VIERA Link (HDAVI Control™) What is the VIERA Link? ≥ This function allows you to use your remote control for the Panasonic TV for easy operations when this unit has been connected to a VIERA Link compatible device using a HDMI mini cable (optional) for automatic linked operations. (Not all operations are possible.) ≥ VIERA Link is a unique Panasonic function built on a HDMI control function using the standard HDMI CEC (Consumer Electronics Control) specification.
3 Operate with the remote control for the TV. 1) 2) 1) Press the button up, down, left or right to select a scene or still picture to be played back, and then press the button in the centre to set it. 2) Activate the operation icons that are displayed on TV screen with the remote control for the TV. A Operation icons B Display operation icons C Cancel operation icons D Display/Cancel operation icons ≥ The following operations are available by pressing the colour buttons on the remote control.
Copy/Dubbing With this unit/other products 1 Copying between SD card and Built-in Memory/HDD [HDC-TM60/HDC-HS60] Motion pictures or still pictures recorded with this unit can be copied between an SD card inserted in this unit and a built-in memory/HDD. ∫ Confirming remaining capacity on the copy destination [MEDIA STATUS] (l 43) allows you to confirm how much capacity remains on the SD card, built-in memory or HDD.
3 Touch desired items following the screen display. ≥ It will return to the previous step by touching . ≥ (When [SELECT SCENES] is selected) When touched, the scene/still picture is selected and the indication appears on the thumbnail. Touch the scene/still picture again to cancel the operation. ≥ (When [SELECT DATE] is selected) When touched, the date is selected and surrounded by red. Touch the date again to cancel the operation. ≥ Up to 99 scenes/still pictures or 99 dates can be set in succession.
Copy/Dubbing With this unit/other products 2 Connecting a DVD burner to copy to/play back a disc Motion pictures or still pictures recorded with this unit can be copied to a DVD disc by connecting a DVD burner (optional) to this unit using a Mini AB USB Connection Cable (supplied with DVD burner). The copied DVD disc can also be played back. ≥ Please read the operating instructions of the DVD burner for how to use it.
1 Connect the AC adaptor (supplied with DVD burner) to the DVD burner. ≥ You cannot supply power to the DVD burner from this unit. 2 3 Connect this unit to the AC adaptor and change the mode to Connect this unit to the DVD burner with the Mini AB USB Connection Cable (supplied with DVD burner). A Mini AB USB Connection Cable (supplied with DVD burner) B DVD burner (optional) ≥ Insert the plugs as far as they will go. 4 Insert the disc in the DVD burner.
Copying to discs ≥ You cannot copy from multiple SD cards to 1 disc. (You can additionally copy only to a DVD-RAM.) ≥ You cannot copy motion pictures together with still pictures or high-definition images together with standard images to the same disc. ≥ When copying a scene in the built-in memory to the disc that includes a scene that was relay recorded, the continued scene that is on the SD card will be copied together to the disc. 1 2 Connect this unit to the DVD burner to prepare for copying.
Important Notice ≥ When connecting an optional DVD burner and this unit for copying a disc, do not insert a disc with recorded motion pictures in high definition picture quality into devices that do not support the AVCHD format. In some cases the disc may get stuck in the device. The disc will not play back on devices that do not support the AVCHD format. ≥ When inserting a disc containing recorded motion/still pictures into other devices, a message prompting you to format the disc may be displayed.
≥ The disc that was copied to can be played back by connecting this unit and a DVD burner. (l 102) ≥ Do not turn off this unit or the DVD burner or disconnect the Mini AB USB Connection Cable while copying. Also, do not shake this unit or the DVD burner. ≥ It is impossible to stop copying halfway. ≥ The order in which the scenes were copied cannot be changed. ≥ Data that has been recorded on another device may not be copied.
Playing back the copied disc ≥ Only discs that have been copied by connecting this unit to the DVD burner or created with HD Writer AE 2.0 can be played back. A Mini AB USB Connection Cable (supplied with DVD burner) 1 Connect this unit to the DVD burner to prepare for playback. (l 98) ≥ When playing back on a TV, connect this unit to the TV. (l 89) 2 Touch the scene or still picture to be played back and then play it back.
Managing the copied disc ≥ Connect this unit to the DVD burner and then touch [PLAY DISC]. (l 98) ∫ Formatting discs This is for initializing DVD-RAM, DVD-RW and +RW discs. Please be aware that if a disc is formatted, then all the data recorded on the disc will be erased. Back up important data on a PC etc. MENU : [DISC SETUP] # [FORMAT DISC] ≥ When formatting is complete, touch [EXIT] to exit the message screen. ≥ Connect this unit and the DVD burner to format discs.
Copy/Dubbing With this unit/other products 3 Dubbing images onto other video device Images played back on this unit can be dubbed onto a DVD recorder or video device. ≥ Images are dubbed in standard quality. ≥ Use the AC adaptor to free you from worrying about the battery running down. Change the video input on the video device and TV that this unit is connected to. AV MULTI ≥ The channel set will differ depending on the terminal to which the unit is connected.
With a PC Before using 1 What you can do with a PC HD Writer AE 2.0 You can copy the motion/still picture data to the HDD of PCs or write to media like Blu-ray discs (BD) DVD discs or SD cards using HD Writer AE 2.0, the software installed in the supplied CD-ROM. Refer to the operating instructions of HD Writer AE 2.0 (PDF file) for details on how to use it. ∫ Smart wizard The Smart wizard screen is automatically displayed when you connect this unit to a PC with HD Writer AE 2.0 installed.
Available function Data type Playing back on a PC Still picture Copying still pictures to a PC (l 115) Software required HD Writer AE 2.0 or Standard Windows picture viewer or a commercially available picture viewer Windows Explorer Refer to page 117 if using a Mac. Important Notice ≥ When using an SDXC Memory Card, check the following support site. http://panasonic.net/avc/sdcard/information/SDXC.html ≥ Do not insert a disc recorded in AVCHD format with HD Writer AE 2.
End User License Agreement Before opening the CD-ROM package, please read the following. You (“Licensee”) are granted a license for the Software defined in this End User License Agreement (“Agreement”) on condition that you agree to the terms and conditions of this Agreement. If Licensee does not agree to the terms and conditions of this Agreement, promptly return the Software to Panasonic Corporation (“Panasonic”), its distributors or dealers from which you made the purchase.
With a PC Before using 2 Operating environment ≥ Even if the system requirements mentioned in these operating instructions are fulfilled, some PCs cannot be used. ≥ A CD-ROM drive is necessary to install the supplied software applications. (A compatible BD/DVD writer drive and media are necessary for writing to a BD/DVD.) ≥ Operation is not guaranteed in the following cases. j When 2 or more USB devices are connected to a PC, or when devices are connected through USB hubs or by using extension cables.
Free hard disk drive space Ultra DMA — 100 or more 450 MB or more (for installing the software) ≥ When writing to a DVD/BD/SD, more than double the amount of free space as the disc being created is necessary. Sound DirectSound Support Interface USB port [Hi-Speed USB (USB 2.0)] Other requirements Mouse or equivalent pointing device Internet connection ≥ Supplied CD-ROM is available for Windows only. ≥ Input is not supported in languages other than English, German, French and Simplified Chinese.
∫ Operating environment for the card reader function (mass storage) PC IBM PC/AT compatible PC OS Microsoft Windows XP Home Edition Service Pack 2/Service Pack 3 Microsoft Windows XP Professional Service Pack 2/Service Pack 3 Microsoft Windows Vista Home Basic Service Pack 1/Service Pack 2 Microsoft Windows Vista Home Premium Service Pack 1/Service Pack 2 Microsoft Windows Vista Business Service Pack 1/Service Pack 2 Microsoft Windows Vista Ultimate Service Pack 1/Service Pack 2 Microsoft Windows Vista E
With a PC Setup 1 Installation When installing the software, log on to your computer as the Administrator or with a user name with equivalent authorization. (If you do not have authorization to do this, consult your manager.) ≥ Before starting the installation, close all applications that are running. ≥ Do not perform any other operations on your PC while the software is being installed. ≥ Explanation of operations and screens is based on Windows Vista. 1 Insert the CD-ROM into the PC.
7 8 When installation is complete, some notes will appear. Check the contents, then close the window. Select [Yes, I want to restart my computer now.], then click [Finish]. The PC must be rebooted for the application to work. ∫ Uninstalling HD Writer AE 2.0 Follow the steps below to uninstall any software applications that you no longer require. 1 Select [Start] # [Control Panel] # [Uninstall a Program]. 2 Select [HD Writer AE 2.0], then click [Uninstall].
With a PC Setup 2 Connecting to a PC ≥ Connect this unit to the PC after the software applications are installed. ≥ Remove the supplied CD-ROM from your PC. A USB cable (supplied) 1 Connect this unit to the AC adaptor. ≥ It is possible to use it connected to the PC with the batteries only. ≥ Connect with the AC adaptor when using the Conversion assist function. 2 Turn on the unit. ≥ This function is available in all modes. 3 Connect this unit to a PC.
≥ When the unit is connected to a PC its power cannot be turned off. Disconnect the USB cable, before turning this unit off. ≥ Do not disconnect the USB cable or the AC adaptor while the access lamp is on or card access icon ( ) appears on the unit screen. ≥ Do not disconnect the USB cable or the AC adaptor while the access lamp is on or built-in memory access icon ( ) appears on the unit screen.
About the PC display When the unit is connected to a PC, it is recognised as an external drive. ≥ Removable disk (Example: ) is displayed in [Computer]. We recommend using HD Writer AE 2.0 to copy motion picture data. Using Windows Explorer or other programmes on the PC to copy, move or rename files and folders recorded with this unit will result in them being unusable with HD Writer AE 2.0. It is impossible to write data to the built-in memory or HDD on this unit from a PC.
With a PC Using with a PC 1 Starting HD Writer AE 2.0 ≥ When using HD Writer AE 2.0 on Windows XP, log on to your computer as Administrator (or with a login name equally authorized). If you log on with a login name other than Administrator, you cannot use the applications. ≥ When using HD Writer AE 2.0 on Windows Vista/Windows 7, log on to your computer as Administrator (or with a login name equally authorized) or with the user name for a standard user account.
With a PC Using with a PC 2 If using Mac ≥ HD Writer AE 2.0 is not available for Mac. ≥ iMovie’09 supported. For details about iMovie’09, please contact Apple Inc. ∫ Operating environment PC Mac OS Mac OS X 10.5.8 Mac OS X 10.6 CPU Intel Core Duo Intel Core 2 Duo RAM 1 GB or more Interface USB port ≥ Even if the system requirements mentioned in these operating instructions are fulfilled, some PCs cannot be used. ≥ The USB equipment operates with the driver installed as standard in the OS.
Others 1 Indications *1 *2 Indications only only Built-in memory recording possible status*1 ∫ Recording indications HDD recording possible status*2 Motion picture recording mode 0h00m00s A MF HG1920 R 1h20m PRE-REC 1/100 OPEN 0dB 12:34 15. 11.
Relay recording (l 57)*1 / / Video light (l 48) Picture adjustment (l 64) High-speed burst shooting (l 67) Digital cinema colour (l 61) 5 M / 1.9M / 0.3M / 4.8M / 1.9M / 4.5 M / 2.1 M / 0.9 M Number of recording pixels for still pictures (l 31, 65, 67, 74) The picture size is not displayed for still pictures recorded with other products that have different picture sizes from the sizes shown above.
∫ Playback indications 1/;/5/ ;1/2; /6/ /7/8/D/E/ ∫ Indication of connection to other devices Accessing the card (l 114) Display during playback (l 34, 73) F / F Accessing the built-in memory (l 114)*1 Operation icon is displayed/not displayed. (l 34) Accessing the HDD (l 114)*2 0h00m00s Playback time (l 34) ∫ Confirmatory indications No.10 Scene number –– (Time The built-in battery is low.
Others Indications 2 Messages Major confirmation/error messages to be indicated on the screen in text. *1 only *2 only RECOMMEND DATA BACK UP PERIODICALLY.*1, 2 We recommend backing up important recorded motion pictures and still pictures periodically to a PC, DVD disc etc. to protect it. (l 97, 105) This message does not indicate that there is a problem with this unit. HDD BACKUP RECOMMENDED.*2 There is a possible problem with the HDD.
PLEASE CHECK EXTERNAL DRIVE OR DISC. A disc that cannot be used when connecting the unit to the DVD burner has been inserted, or the DVD burner is not recognised properly. Connect the Mini AB USB Connection Cable again and insert a disc to copy the data. (l 97) About recovery If faulty management information is found, the messages may appear and a repair is performed. (Repairing may take time depending on the error.) SOME SCENES NEED REPAIRING. PLAY SCENES TO BE REPAIRED.
Others Troubleshooting Problem This unit cannot be turned on. This unit does not stay on long enough. Battery runs down quickly. Check points ≥ Charge the battery again to ensure it is sufficiently charged. (l 17) ≥ In cold places, the battery using time becomes shorter. ≥ The battery has a limited life. If the operating time is still too short even after the battery is fully charged, the battery has worn out and needs to be replaced. This unit is turned off automatically.
Problem This unit cannot be operated though it is turned on. This unit does not operate normally. Check points ≥ Remove the battery or AC adaptor, wait about 1 minute and then reconnect the battery or AC adaptor. Then about 1 minute later, turn on the power again. (Conducting the above operation while the media is being accessed may damage the data on the media.) ≥ If normal operation is still not restored, detach the power connected, and consult the dealer who you purchased this unit from.
Problem Check points Colour balance of images is strange when recording in a place such as a gymnasium. ≥ In a place with multiple light sources, such as a gymnasium or a hall, set the white balance setting to (Indoor mode2). If you cannot record clearly with the (Indoor mode2), set it to (Manual adjustment mode). (l 70) Any scenes/still pictures cannot be played back. ≥ Any scenes/still pictures where the thumbnails are displayed as cannot be played back.
Problem Check points Colour or brightness of the image changes, or you may see horizontal bars in the image. ≥ Colour or brightness of the image may change, or you may see horizontal bars in the image when the object is recorded under fluorescent light, mercury light or sodium light, etc., but this is not a malfunction. ≥ In motion picture recording mode, record in intelligent auto mode or set the shutter speed to 1/100 in areas where the power supply frequency is 50 Hz, or 1/125 in areas of 60 Hz.
Problem VIERA Link does not work. Check points [Setting on this unit] ≥ Connect with a HDMI mini cable (optional). (l 93) ≥ Press the MENU button, then touch [SETUP] # [VIERA Link] # [ON]. (l 93) ≥ Turn the power to the unit off and then back on again. [Setting on other devices] ≥ If the TV input does not switch automatically, switch the input using the TV remote control. ≥ Check the VIERA Link setting on the connected device. ≥ Please refer to the operating instructions of the connected device.
∫ If scenes do not change smoothly when played back on another device The images may be still for several seconds at the joins between the scenes if the following operations are performed when multiple scenes have been continuously played back using another unit. ≥ Just how smoothly the scenes will be played back depends on the playback unit. Depending on the unit used, the images may stop moving and become still for a moment even when none of the following conditions are applicable.
Others Cautions for use About this unit The unit and the SD card become warm during use. This is not a malfunction. Keep the High Definition Video Camera as far away as possible from electromagnetic equipment (such as microwave ovens, TVs, video games etc.). ≥ If you use the High Definition Video Camera on top of or near a TV, the pictures and sound on the High Definition Video Camera may be disrupted by electromagnetic wave radiation.
Do not use the unit for surveillance purposes or other business uses. ≥ This unit was designed for consumer intermittent use. It was not intended for continuous use, or for any industrial or commercial application resulting in prolonged use. ≥ In certain situations, continuous use could cause the unit to overheat and cause a malfunction. Such use is strongly discouraged.
About the battery The battery used in this unit is a rechargeable lithium-ion battery. It is susceptible to humidity and temperature and the effect increases the more the temperature rises or falls. In cold areas, the full charge indication may not appear or the low battery indication may appear about 5 minutes after starting use. At high temperatures, the protection function may be triggered, making it impossible to use the unit. Be sure to detach the battery after use.
About the AC adaptor ≥ If the temperature of the battery is extremely high or extremely low, charging may take time or the battery may not be charged. ≥ If the charging lamp keeps flashing, make sure that the terminals of the battery or the AC adaptor are not exposed to dirt, foreign objects or dust, then reconnect them properly. Disconnect the AC cable from the AC outlet when you remove dirt, foreign objects or dust on the terminals of the battery or the AC adaptor.
About the SD card When disposing of or giving away the SD card, note that: ≥ Formatting and deletion of this unit or computer only changes the file management information and does not completely delete the data in the SD card. ≥ It is recommended that the SD card is physically destroyed or the SD card is physically formatted using this unit when disposing of or giving away the SD card.
About personal information After you have set up the face recognition function, personal information will be held in this unit and included in recorded images. ≥ When the unit is serviced, or given away/ disposed of, the personal information should be deleted in the interests of protecting personal information. (l 85) Indemnity ≥ Information, including personal information, may be changed or lost as a result of mistaken operation, static electricity effects, accident, breakage, repair or other handling.
Others Optional accessories Product numbers correct as of Feb. 2010. These may be subject to change. Some optional accessories may not be available in some countries. Battery charger (VW-BC10E) Battery pack (lithium/VW-VBK180) Battery pack (lithium/VW-VBK360) HDMI mini cable (RP-CDHM15, RP-CDHM30) Video DC light (VW-LDC103E)* Light bulb for video DC light (VZ-LL10E) Shoe adaptor (VW-SK12E) DVD burner (VW-BN2) Accessory kit (VW-ACK180E) * The shoe adaptor VW-SK12E (optional) is necessary.
Others About copyright ∫ Carefully observe copyright laws Recording of pre-recorded tapes or discs or other published or broadcast material for purposes other than your own private use may infringe copyright laws. Even for the purpose of private use, recording of certain material may be restricted. ∫ Licenses ≥ SDXC Logo is a trademark of SD-3C, LLC. ≥ “AVCHD” and the “AVCHD” Logo are trademarks of Panasonic Corporation and Sony Corporation. ≥ Manufactured under license from Dolby Laboratories.
Others Recording modes/approximate recordable time ≥ SD cards are only mentioned with their main memory size.
Others Number of recordable pictures ≥ SD cards are only mentioned with their main memory size. Aspect ratio 4:3 1.9M 5M Picture size 2592k1944 1600k1200 0.
Aspect ratio 16:9 4.5 M Picture size 2816k1584 2.
Others Specifications High Definition Video Camera Information for your safety Power source: DC 5.0 V (When using AC adaptor) DC 3.6 V (When using battery) Power consumption: Recording: Charging: 4.4 W 7.7 W 4.4 W 7.7 W 4.7 W 7.7 W Signal system 1080/50i Recording format AVCHD format compliant Image sensor 1/4.1z 1MOS image sensor Total: 3320 K Effective pixels: Motion picture: 2110 K (16:9) Still picture: 2320 K (4:3), 2280 K (3:2), 2110 K (16:9) Lens Auto Iris, F1.8 to F3.
White balance adjustment Auto tracking white balance system Standard illumination 1,400 lx Minimum required illumination Approx. 4 lx (1/25 in low light mode) Approx. 1 lx with the colour night view function AV multi connector video output level AV video output level: 1.0 Vp-p, 75 h, PAL system Component video output level: Y: 1.0 Vp-p, 75 h Pb: 0.7 Vp-p, 75 h Pr: 0.7 Vp-p, 75 h HDMI mini connector video output level HDMI™ (x.v.
Approx. 299 g [with battery (supplied) and an SD card (optional)] Mass in operation Approx. 300 g [with battery (supplied)] Approx. 369 g [with battery (supplied)] Operating temperature 0 oC to 40 oC Operating humidity 10% to 80% Battery operation time See page 18 Motion pictures Recording media SD card SD Memory Card (FAT12 and FAT16 system compliant) SDHC Memory Card (FAT32 system compliant) SDXC Memory Card (exFAT system compliant) Refer to page 20 for details on SD cards usable in this unit.
Still pictures Recording media SD card SD Memory Card (FAT12 and FAT16 system compliant) SDHC Memory Card (FAT32 system compliant) SDXC Memory Card (exFAT system compliant) Refer to page 20 for details on SD cards usable in this unit. Built-in memory 16 GB HDD 120 GB Compression JPEG (Design rule for Camera File system, based on Exif 2.
EU Panasonic Corporation Web site: http://panasonic.