TCD430AL(E).book Page 1 Tuesday, March 30, 2004 5:27 PM Digital Cordless Phone Operating Instructions Model No. KX-TCD430AL This unit is Caller ID compatible. To display the caller’s phone number, you must subscribe to Caller ID service. Charge the batteries for about 7 hours before initial use. Please read these Operating Instructions before using the unit and save them for future reference.
TCD430AL(E).book Page 2 Tuesday, March 30, 2004 5:27 PM Table of Contents Preparation Accessory information . . . . . . . . . . . . . . . 3 Important information . . . . . . . . . . . . . . . . 4 Location of controls . . . . . . . . . . . . . . . . . 7 Connections . . . . . . . . . . . . . . . . . . . . . . . 8 Battery installation . . . . . . . . . . . . . . . . . . 8 Battery charge . . . . . . . . . . . . . . . . . . . . . 8 Battery replacement . . . . . . . . . . . . . . . . .
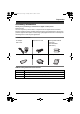
TCD430AL(E).book Page 3 Tuesday, March 30, 2004 5:27 PM Preparation Preparation Accessory information Thank you for purchasing a new Panasonic digital cordless phone. Dear Purchaser, You have acquired a product made in compliance with the digital enhanced cordless telecommunications (DECT) standard. DECT technology is characterized by high-security protection against interceptions as well as high-quality digital transmission. This telephone was designed for a wide range of applications.
TCD430AL(E).book Page 4 Tuesday, March 30, 2004 5:27 PM Preparation Important information General L Use only the power supply included with this product, noted on page 3. L Do not connect the AC adaptor to any AC outlet other than a standard 220–240 V AC outlet. L This product is unable to make calls when: − The portable handset batteries need recharging or have failed. − There is a power failure. − The key lock feature is turned on.
TCD430AL(E).book Page 5 Tuesday, March 30, 2004 5:27 PM Preparation Instructions to customer Installation Attached to this telephone is an approval label. This label is evidence that it is a “Permitted Attachment” which has been authorised to be connected to your telephone service. Conditions relating to connection and operation of this Permitted Attachment are contained in Telecommunications General By-Law 220 (5).
TCD430AL(E).book Page 6 Tuesday, March 30, 2004 5:27 PM Preparation If you are satisfied with the operation of your telephone service after plugging in your Permitted Attachment, your installation is completed. You will be unable to connect this Permitted Attachment if your telephone service consists only of a wall phone or an old style telephone which is not connected by means of a modern plug and socket. In such cases a new socket will need to be installed.
TCD430AL(E).
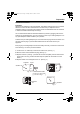
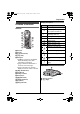
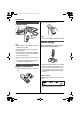
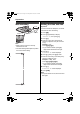
TCD430AL(E).book Page 8 Tuesday, March 30, 2004 5:27 PM Preparation 2 Close the battery cover. Connections Hooks LINE (220–240 V, 50 Hz) Note: L Use only rechargeable batteries (page 3). Battery charge Note: L If the handset is not charged, you cannot make or answer calls. L Never install telephone wiring during a lightning storm. L The AC adaptor must remain connected at all times. (It is normal for the adaptor to feel warm during use.) L Use only the AC adaptor, noted on page 3.
TCD430AL(E).book Page 9 Tuesday, March 30, 2004 5:27 PM Preparation 054 flashes. Battery icons Battery strength 5 High 6 Medium 7 Low 074 Needs to be charged Note: L If the handset is turned off, it will be turned on automatically when it is placed on the base unit. noted on page 3. L Use only rechargeable batteries. If you install non-rechargeable batteries and start charging, the batteries may leak electrolyte. L Do not mix old and new batteries.
TCD430AL(E).book Page 10 Tuesday, March 30, 2004 5:27 PM Preparation Wall mounting Setting the time and date 8 cm Screws Hooks Hook Important: L Confirm that the AC adaptor is connected. L Ensure that w is not flashing. 1 Press {j}. 2 Press {v} repeatedly to display “SETTING BS”, then press {>}. 3 Press {*}. 4 Enter the current hour and minute by Note: L Make sure the screws are securely fastened to the wall. L Use the following wall template to position the screws before drilling.
TCD430AL(E).book Page 11 Tuesday, March 30, 2004 5:27 PM Telephone Telephone Making calls 1 Lift the handset and dial the phone number. L To correct a digit, press {C}, then enter the correct number. 2 Press {C}. 3 When finished talking, press {ih} or place the handset on the base unit. To adjust the receiver volume You can select the desired receiver volume from level 1 to 3. While talking, press {e} or {v}. Redial feature To redial the last number dialled Press {C}, then press {R}.
TCD430AL(E).book Page 12 Tuesday, March 30, 2004 5:27 PM Telephone displayed. To turn off key lock, press {j} for about 2 seconds. Note: L Emergency calls cannot be made until key lock is turned off. L Key lock is turned off when the handset is turned off. R button (to use the recall feature) {R} is used to access optional telephone services. Contact your service provider for details.
TCD430AL(E).book Page 13 Tuesday, March 30, 2004 5:27 PM Telephone L If there is no space to store new entries, “MEMORY FULL” will be displayed. Erase unnecessary entries. Phonebook Storing phone numbers and names To edit/correct a mistake 1 Press {<} or {>} to move the cursor to Up to 20 phone numbers can be stored in the phonebook for quick access. 1 Press {j} 2 times. 2 Enter a phone number (24 digits max.). L Each number stored in the phonebook will be given an index number (01–20).
TCD430AL(E).book Page 14 Tuesday, March 30, 2004 5:27 PM Telephone Making calls using the phonebook Before using this feature, store the desired phone numbers and names into the phonebook (page 13). 1 Press {k}. 2 Press {e} or {v} repeatedly to display the desired entry. 3 Press {C}. 2 Press {>}. 3 Press {v} repeatedly to display “YES”, then press {>}. 4 Press {ih}. Note: L The number erased from a hot key will not be deleted from the phonebook. To erase from the phonebook, see page 13.
TCD430AL(E).book Page 15 Tuesday, March 30, 2004 5:27 PM Telephone Caller ID service Important: L This unit is Caller ID compatible. To display the caller’s phone number, you must subscribe to Caller ID service. After subscribing to Caller ID, this unit will display caller information. How Caller ID is displayed The unit will display the calling party’s phone number after the first ring. You can view the caller information of the last 50 different callers.
TCD430AL(E).book Page 16 Tuesday, March 30, 2004 5:27 PM Telephone 4 Press {ih}. Example: *1 Storing caller information into the phonebook 1 Press {e} or {v} repeatedly to display the desired entry, then press {>}. *1 Shown when this call has already been viewed or answered. 3 Press {C} to call back the displayed party. Note: L When no calls have been received, the display will show “NO ITEM”.
TCD430AL(E).book Page 17 Tuesday, March 30, 2004 5:27 PM Useful Telephone Settings Useful Telephone Settings Guide to handset settings For your reference, a chart of all items which can be customised for the handset is printed below. Details of each item can be found on the corresponding pages. To enter the 2nd menu, first press {>}. Press {v} repeatedly to display “SETTING HS”, then press {>}.
TCD430AL(E).book Page 18 Tuesday, March 30, 2004 5:27 PM Useful Telephone Settings Handset settings ALARM”, then press {>}. 4 Press {v} repeatedly to display “SET ALARM”, then press {>}. Time alarm 5 Press {v} repeatedly to select the An alarm will sound for 3 minutes at the set time once or daily. “ONCE”: The alarm will ring only once. “REPEAT DAILY”: The alarm will ring at the set time everyday. “OFF”: Turns this feature off. Set the time and date beforehand (page 10). 6 Press {ih}.
TCD430AL(E).book Page 19 Tuesday, March 30, 2004 5:27 PM Useful Telephone Settings 4 Press {v} repeatedly to display the desired item, then press {>}. 5 Press {v} repeatedly to select the desired setting from “RING TYPE 1” to “RING TYPE 20”, then press {>}. 6 Press {ih}. Note: L If you select one of the melody ringer types, the ringer will continue to sound for several seconds if the caller hangs up before you answer. You may hear a dial tone or no one on the line when you answer a call.
TCD430AL(E).book Page 20 Tuesday, March 30, 2004 5:27 PM Useful Telephone Settings 2 Press {v} repeatedly to display “SETTING HS”, then press {>}. 3 Press {v} repeatedly to display “DISPLAY OPT”, then press {>}. 4 Press {v} repeatedly to display “TALK MODE”, then press {>}. 5 Press {v} repeatedly to select the desired setting, then press {>}. 6 Press {ih}. BAR”, then press {>}. 5 Enter “0000” (default handset PIN). L If you changed PIN, enter it (page 21).
TCD430AL(E).book Page 21 Tuesday, March 30, 2004 5:27 PM Useful Telephone Settings 3 Press {v} repeatedly to display “CALL OPT”, then press {>}. 4 Press {v} repeatedly to display “SET DIRECT”, then press {>}. 5 Press {v} repeatedly to select “ON” or “OFF”, then press {>}. 6 Press {ih}. Other options Changing the handset PIN (Personal Identification Number) The handset’s default PIN is “0000”. Important: L If you change the PIN, please write down your new PIN as the unit will not reveal the PIN to you.
TCD430AL(E).book Page 22 Tuesday, March 30, 2004 5:27 PM Useful Telephone Settings Guide to base unit settings For your reference, a chart of all items which can be customised for the base unit is printed below. Details of each item can be found on the corresponding pages. Code No.
TCD430AL(E).book Page 23 Tuesday, March 30, 2004 5:27 PM Useful Telephone Settings 7 Select the desired setting by pressing {1} for 700 ms or {2} for 100 ms. 8 Press {>}, then press {ih}. Setting pause length 1 Press {j}. 2 Press {v} repeatedly to display “SETTING BS”, then press {>}. 3 Press {3}. 4 Enter “0000” (default base unit PIN). L If you changed PIN, enter it (page 22). 5 Press {3}. 6 Select the desired setting by pressing {1} for 3 seconds or {2} for 5 seconds.
TCD430AL(E).book Page 24 Tuesday, March 30, 2004 5:27 PM Useful Telephone Settings 6 Press {C}. 7 Press {>}, then press {ih}. 8 Press {>}. 9 Press {ih}. Storing emergency numbers Resetting the base unit to its default settings This feature determines which phone numbers may be dialled while the call bar feature is turned on. A total of 4 emergency numbers (memory locations 1–4) can be stored. 1 Press {j}. 2 Press {v} repeatedly to display “SETTING BS”, then press {>}. 3 Press {6}.
TCD430AL(E).book Page 25 Tuesday, March 30, 2004 5:27 PM Multi-unit Operation Multi-unit Operation Operating additional units Additional handsets Up to 6 handsets can be registered to a single base unit. Additional handsets will give you the freedom to, for example, have an intercom call with another handset while a third handset is on an outside call. See page 3 for information on ordering additional handsets.
TCD430AL(E).book Page 26 Tuesday, March 30, 2004 5:27 PM Multi-unit Operation L If you changed PIN, enter it (page 22). 8 Press {>}. L When the handset has been registered successfully, a confirmation tone will sound, and w will stop flashing. Note: L If all registered handsets start ringing in step 5, press {x} to stop, then start again from step 1. Selecting a base unit When “AUTO” is selected, the handset will automatically use any available base unit it is registered to.
TCD430AL(E).book Page 27 Tuesday, March 30, 2004 5:27 PM Multi-unit Operation Setting all or selected handsets to ring You can select one of 3 methods to determine how the handsets ring for incoming calls. − “1”: All handsets will ring. − “2”: Selected handset(s) will ring. − “3”: Selected handset(s) will ring, then all handsets will ring. Setting all handsets to ring 1 Press {j}. 2 Press {v} repeatedly to display “SETTING BS”, then press {>}. 3 Press {1}. 4 Enter “0000” (default base unit PIN).
TCD430AL(E).book Page 28 Tuesday, March 30, 2004 5:27 PM Multi-unit Operation Intercom between handsets You can make intercom calls between 2 handsets in the same radio cell. Example: When handset 1 calls handset 2 1 Handset 1: Press {INT} and {2} (desired handset number). 2 Handset 2: Press {C} to answer. 3 When finished talking, press {ih}. Note: L Intercom calls can be made between handsets in the same radio cell, but not between handsets in different radio cells.
TCD430AL(E).book Page 29 Tuesday, March 30, 2004 5:27 PM Useful Information Useful Information Troubleshooting If you still have difficulties after following the instructions in this section, disconnect the AC adaptor and turn off the handset, then reconnect the AC adaptor and turn on the handset. 0w4 is flashing. L The handset is not registered to the base unit. Register it (page 25). L The handset is too far from the base unit. Move closer. L The AC adaptor is not connected. Check the connections.
TCD430AL(E).book Page 30 Tuesday, March 30, 2004 5:27 PM Useful Information redialled. Redial the number manually. The handset beeps intermittently and/or 074 flashes. L Fully charge the batteries (page 8). I fully charged the batteries, but 074 still flashes. L Clean the charge contacts and charge again (page 8). L It is time to replace the batteries (page 9). 7 disappears and the unit stops charging when the handset is on the base unit.
TCD430AL(E).
TCD430AL(E).book Page 32 Tuesday, March 30, 2004 5:27 PM For your future reference Attach or keep original receipt to assist with any repair under warranty. Serial No. (found on the bottom of the unit) Date of purchase Name and address of dealer Note: L In the event of problems, you should contact your equipment supplier in the first instance. Customer Support Centre Tel. No.: 132600 N52 Sales Department: Panasonic Australia Pty.