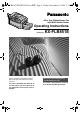
FLB851E-PFQX2329ZA-en.PDF Page 1 Friday, December 16, 2005 3:12 PM All in One Flatbed Laser Fax with Multi-Action Sorter Operating Instructions Model No. Please read these operating instructions before using the unit and save for future reference. This unit is compatible with Caller ID. To use this feature, you must subscribe to the appropriate service of your service provider. KX-FLB851E Be sure to use the telephone line cord included in this unit.
FLB851E-PFQX2329ZA-en.book Page i Friday, December 16, 2005 3:12 PM Location of Controls How to use the operating instructions When following operating instructions, always keep the front cover page (next page) open for easy reference to the buttons.
FLB851E-PFQX2329ZA-en.book Page ii Friday, December 16, 2005 3:12 PM Location of controls Please keep this page open when following operating instructions. For a description of each button, see page 13.
FLB851E-PFQX2329ZA-en.book Page 2 Friday, December 16, 2005 3:12 PM Thank you for purchasing a Panasonic fax machine. Attach your sales receipt here. For your future reference Date of purchase Serial number (found on the rear of the unit) Dealer’s name and address Dealer’s telephone number Caution: L Do not rub or use an eraser on the printed side of recording paper, as the print may smear. L In the event of problems, you should contact your equipment supplier in the first instance.
FLB851E-PFQX2329ZA-en.book Page 3 Friday, December 16, 2005 3:12 PM Important Information Important Safety Instructions Information Important safety instructions When using this unit, basic safety precautions should always be followed to reduce the risk of fire, electric shock, or personal injury. 1. Read and understand all instructions. 2. Follow all warnings and instructions marked on this unit. 3. Turn the power switch OFF before cleaning. Do not use liquid or aerosol cleaners. 4.
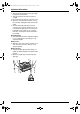
FLB851E-PFQX2329ZA-en.book Page 4 Friday, December 16, 2005 3:12 PM Important Information Laser radiation L The printer of this unit utilises a laser. Use of controls or adjustments or performance of procedures other than those specified herein may result in hazardous radiation exposure. Fuser unit L The fuser unit (1) gets hot. Do not touch it. L During or immediately after printing, the area near the recording paper exit (2) also gets warm. This is normal.
FLB851E-PFQX2329ZA-en.book Page 5 Friday, December 16, 2005 3:12 PM Important Information Information on Disposal for Users of Waste Electrical & Electronic Equipment (private households) This symbol on the products and/or accompanying documents means that used electrical and electronic products should not be mixed with general household waste. For proper treatment, recovery and recycling, please take these products to designated collection points, where they will be accepted on a free of charge basis.
FLB851E-PFQX2329ZA-en.book Page 6 Friday, December 16, 2005 3:12 PM Important Information L The unit should be kept free from dust, high temperature and vibration. L The unit should not be exposed to direct sunlight. L Do not place heavy objects on top of the unit. L When you leave the unit unused for a long period of time, unplug this unit from the power outlet. L The unit should be kept away from heat sources such as heaters, kitchen stoves, etc.
FLB851E-PFQX2329ZA-en.book Page 7 Friday, December 16, 2005 3:12 PM Important Information Important Information The connection to the telecommunication systems must not be hard wired and must be unplugged before the earth is disconnected. Method of connection This apparatus is connected to the exchange line or PABX/PMBX extension by the new standard British Telecom plug and socket. Arrangements for provision of this type of termination can be made through the nearest British Telecom Sales Office.
FLB851E-PFQX2329ZA-en.book Page 8 Friday, December 16, 2005 3:12 PM Important Information For your safety This appliance is supplied with a moulded three pin mains plug for your safety and convenience. A 13 amp fuse is fitted in this plug. Should the fuse need to be replaced please ensure that the replacement fuse has a rating of 13 amps and that it is approved by ASTA or BSI to BS1362. Check for ASTA mark mark or the BSI on the body of the fuse.
FLB851E-PFQX2329ZA-en.book Page 9 Friday, December 16, 2005 3:12 PM Table of Contents 1. Introduction and Installation 1. Table of Contents Accessories 1.1 Included accessories........................11 1.2 Accessory information ......................12 1.3 Extension telephone adaptor for UK. 12 Finding the Controls 1.4 Description of buttons....................... 13 1.5 Overview .......................................... 14 Installation 1.6 Toner cartridge and drum unit .......... 15 1.
FLB851E-PFQX2329ZA-en.book Page 10 Friday, December 16, 2005 3:12 PM Table of Contents Replacement 8.4 Replacing the toner cartridge and the drum unit ..........................................81 Jams 8.5 Recording paper jam ........................ 84 8.6 Document jams (Auto document feeder) ..............................................87 Cleaning 8.7 Cleaning the white plate and glasses ............................................. 88 8.8 Cleaning the document feeder rollers.............................
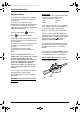
FLB851E-PFQX2329ZA-en.book Page 11 Friday, December 16, 2005 3:12 PM 1. Introduction and Installation 1 Introduction and Installation 1.1 Included accessories Item Part number*1 Quantity 1 Mains lead PFJA03A008Y 1 ---------- 2 Telephone line cord PFJA04B012Y 1 ---------- 3 Output tray PFKS1126Z 3 ---------- 4 Document tray PFKS1117Y1 1 ---------- 5 Drum unit KX-FA86X 1 See page 96.
FLB851E-PFQX2329ZA-en.book Page 12 Friday, December 16, 2005 3:12 PM 1. Introduction and Installation 1.2 Accessory information 1.2.1 Sales and Support Information Customer Care Centre L For customers within the UK: 08701 580560 L For customers within the Republic of Ireland: 01 289 8333 L Visit our website for product information L E-mail: customer.care@panasonic.co.
FLB851E-PFQX2329ZA-en.book Page 13 Friday, December 16, 2005 3:12 PM 1. Introduction and Installation Finding the Controls 1.4 Description of buttons L Keep the front cover page open for button locations. A Station keys L To use the one-touch dial feature (page 32, 34). B {BROADCAST} L To send a document to multiple parties (page 35, 36). C {CALLER ID} L To use Caller ID service (page 43, 44). L To change the display of the caller information (page 43).
FLB851E-PFQX2329ZA-en.book Page 14 Friday, December 16, 2005 3:12 PM 1. Introduction and Installation 1.5.2 Rear view 1.5 Overview 1 2 3 4 1.5.
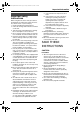
FLB851E-PFQX2329ZA-en.book Page 15 Friday, December 16, 2005 3:12 PM 1. Introduction and Installation 3 Installation 1.6 Toner cartridge and drum unit Place the toner cartridge (1) into the drum unit (2). 1 The included toner cartridge is a starter toner cartridge. It will print about 800 A4-sized pages with a 5 % image area (page 95). L To replace the toner cartridge and the drum unit, see page 81. Caution: L Read the following instructions before you begin installation.
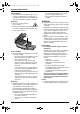
FLB851E-PFQX2329ZA-en.book Page 16 Friday, December 16, 2005 3:12 PM 1. Introduction and Installation 7 Lift the cover release lever (1) and open the top cover (2). Important: L Close the multi-purpose input tray (3) before opening the top cover. 9 Close the top cover, holding the cover release lever (1). Then push down the right centre edge, until locked. 2 1 1 Caution: L To prevent injuries, be careful not to put your hands under the top cover.
FLB851E-PFQX2329ZA-en.book Page 17 Friday, December 16, 2005 3:12 PM 1. Introduction and Installation 1.7 Document tray 1.8 Output tray Insert the document tray (1) into the slot (2) on the unit. This unit has 3 pieces of output tray. As a default setting, printed paper is stacked on the output tray as follows. – Upper output tray (“#1”): Printed document by using the computer and copied document. – Lower output tray (“#3”): Received fax document.
FLB851E-PFQX2329ZA-en.book Page 18 Friday, December 16, 2005 3:12 PM 1. Introduction and Installation 1.8.2 Installing the output tray Insert the output tray (1) into the slots (2), then push the tray down until it latches into place. L Repeat this step to install other output trays. 2 1 1.9 Recording paper 1.9.1 Using the paper input tray A4 or letter size recording paper can be used. The paper input tray unit can hold: – Up to 250 sheets of 60 g/m2 to 75 g/m2 paper.
FLB851E-PFQX2329ZA-en.book Page 19 Friday, December 16, 2005 3:12 PM 1. Introduction and Installation 3 Before loading a stack of paper, fan the paper to prevent paper jams. 4 Load the paper, print-side up (1). Important: L Push and lock the plate (2) in the paper input tray, if it is lifted. 1 6 Close the paper input tray. Note: L If the paper is not loaded correctly, re-adjust the paper guides, or the paper may jam.
FLB851E-PFQX2329ZA-en.book Page 20 Friday, December 16, 2005 3:12 PM 1. Introduction and Installation Using the optional input tray You can add the optional input tray (Model No. KX-FA101X). See page 12 for accessory information. A4, letter or legal size recording paper can be used. The optional input tray can hold: – Up to 500 sheets of 60 g/m2 to 75 g/m2 paper. – Up to 460 sheets of 80 g/m2 paper. – Up to 400 sheets of 90 g/m2 paper. L The unit is set for A4 size paper by default.
FLB851E-PFQX2329ZA-en.book Page 21 Friday, December 16, 2005 3:12 PM 1. Introduction and Installation 2 Before inserting a stack of paper, fan the paper to prevent paper jams. 1.9.3 Checking the amount of remaining recording paper The paper level indicator (green) will allow you to check the amount of remaining paper. L The paper is full (1). L The paper is empty (2). 3 Insert the paper, print-side down (1). 1 2 1 4 Adjust the width of the guides (1) to the size of the recording paper.
FLB851E-PFQX2329ZA-en.book Page 22 Friday, December 16, 2005 3:12 PM 2. Preparation 2 Preparationand Setup Connections 2.1 Connections Plug in the mains lead and the telephone line cord. (Switch on AC mains outlet.) Caution: L The mains lead must remain connected at all times. L Never install telephone wiring during a lightning storm. L When you operate this product, the power outlet should be near the product and easily accessible. L Be sure to use the telephone line cord included in this unit.
FLB851E-PFQX2329ZA-en.book Page 23 Friday, December 16, 2005 3:12 PM 2. Preparation 2.2 Turning the power switch ON Turn the power switch to the ON position (1). 2.3 Selecting the operation mode (Fax/Copy/Scan) This unit has three operation modes. You can select the desired mode by pressing the one of the following buttons. – {COPY}: Select this mode when using the unit as a copy machine (page 45). – {FAX}: Select this mode when using the unit as a fax machine (page 29).
FLB851E-PFQX2329ZA-en.book Page 24 Friday, December 16, 2005 3:12 PM 2. Preparation Help Button 2.4 Help function 2.5 Adjusting volume The unit contains helpful information which can be printed for quick reference. – “BASIC SETTINGS”: How to set the date, time, your logo and fax number. – “FEATURE LIST”: How to program the features. – “DIRECTORY”: How to store names and numbers in the directory and how to dial them. – “FAX RECEIVING”: Help with problems to receive faxes.
FLB851E-PFQX2329ZA-en.book Page 25 Friday, December 16, 2005 3:12 PM 2. Preparation send according to your unit’s date and time setting. L The accuracy of the clock is approximately ±60 seconds a month. L After setting the date and time, if the unit is in the copy mode, change to the fax mode by pressing {FAX}. You can check your unit’s date and time setting on the display. 2.6 Date and time You must set the date and time.
FLB851E-PFQX2329ZA-en.book Page 26 Friday, December 16, 2005 3:12 PM 2. Preparation Keypad Characters 2.7 Your logo {6} M N O m n o 6 The logo can be your name or the name of your company. {7} P Q R S p q r {8} T U V t v 8 {9} W X Y Z w x {0} 0 {ZOOM}/{QUICK SCAN} {CLEAR} {MENU} ( ) % & ¥ {SET} {R} {<}{>}{V}{^} 1 Press {MENU}. SYSTEM SETUP PRESS [( )] 2 7 y z 9 ! " # $ @ @ ^ ’ → u < > {#} To change uppercase or lowercase letter.
FLB851E-PFQX2329ZA-en.book Page 27 Friday, December 16, 2005 3:12 PM 2. Preparation 3. Press {#}. LOGO=B| i 4. Press {5} 3 times. LOGO=Bi| l To correct a mistake Press {<} or {>} to move the cursor to the incorrect character, and make the correction. To delete a character Press {<} or {>} to move the cursor to the character you want to delete and press {CLEAR}. L To erase all characters, press and hold {CLEAR}. To insert a character 1.
FLB851E-PFQX2329ZA-en.book Page 28 Friday, December 16, 2005 3:12 PM 2. Preparation 2.8 Your fax number {MENU} {CLEAR} {SET} {R} {<}{>} 1 Press {MENU}. SYSTEM SETUP PRESS [( )] 2 Press {#}, then {1}{0}{3}. YOUR FAX NO. PRESS SET 3 Press {SET}. L The cursor (|) will appear on the display. NO.=| 4 Enter your fax number, up to 20 digits. Example: NO.=1234567| L To enter a “+”, press {*}. L To enter a space, press {#}. L To enter a hyphen, press {R}. 5 Press {SET}.
FLB851E-PFQX2329ZA-en.book Page 29 Friday, December 16, 2005 3:12 PM 3. Fax 3 Fax Sending Faxes 3.1 Using the unit as a fax machine 3.1.1 Entering the fax mode 1 If the {FAX} light is OFF, turn it ON by pressing {FAX}. 2 Adjust the width of the document guides (1) to fit the actual size of the document. 3 Insert the document (up to 50 pages) FACE UP into the feeder until a single beep is heard. L If the document guides are not adjusted to fit the document, re-adjust them.
FLB851E-PFQX2329ZA-en.book Page 30 Friday, December 16, 2005 3:12 PM 3. Fax L To make lighter, press {V}. L To make darker, press {^}. Note: L You can save the previous contrast setting in feature #462 (page 64). To redial the last number 1. Press {REDIAL}. 2. Press {START}. L If the line is busy, the unit will automatically redial the number up to 5 times. L To cancel redialling, press {STOP}, then press {SET}. To predial a fax number You can dial the fax number first before inserting the document.
FLB851E-PFQX2329ZA-en.book Page 31 Friday, December 16, 2005 3:12 PM 3. Fax L To send a single page, skip to step 10. L To send multiple pages, go to the next step. 7 Effective scanning area L Shaded area will be scanned. Press {QUICK SCAN} to scan the document into memory. Example: PAGES=01 STANDARD 4 mm 01% u SCAN:PRESS SET SEND:PRESS START 8 9 4 mm 4 mm 4 mm Place the next page on the scanner glass. 208 mm Press {SET}. L To send more pages, repeat steps 8 and 9. 216 mm 10 Press {START}.
FLB851E-PFQX2329ZA-en.book Page 32 Friday, December 16, 2005 3:12 PM 3. Fax a copy of the document using the scanner glass and set the copy instead.) – Chemically treated paper such as carbon or carbonless duplicating paper – Electrostatically charged paper – Badly curled, creased or torn paper – Paper with a coated surface – Paper with printing on the opposite side that can be seen through the other side, such as newsprint 3.
FLB851E-PFQX2329ZA-en.book Page 33 Friday, December 16, 2005 3:12 PM 3. Fax Helpful hints: L You can confirm the stored items by printing the telephone number list (page 93). Note: L A hyphen or a space entered in a telephone number counts as 2 digits. To correct a mistake Press {<} or {>} to move the cursor to the incorrect character/number, and then make the correction. L To erase all characters/numbers, press and hold {CLEAR}. 3.4.3 Editing a stored item 1 2 Press {DIRECTORY}.
FLB851E-PFQX2329ZA-en.book Page 34 Friday, December 16, 2005 3:12 PM 3. Fax 3.5 Sending a fax using one-touch dial feature and navigator directory Before using this feature, store the desired names and telephone numbers into one-touch dial feature and navigator directory (page 32). L Keep the front cover page open for button locations. L Make sure that the {FAX} light is ON. 1 Adjust the width of the document guides to fit the actual size of the document.
FLB851E-PFQX2329ZA-en.book Page 35 Friday, December 16, 2005 3:12 PM 3. Fax 3.6 Broadcast transmission By storing one-touch dial and navigator directory items (page 32) into the broadcast memory, you can send the same document to multiple parties (up to 20). Your programmed items will remain in the broadcast memory, allowing frequent re-use. L The broadcast function utilises stations 1–3. The one-touch dial function will be cancelled. L Keep the front cover page open for button locations.
FLB851E-PFQX2329ZA-en.book Page 36 Friday, December 16, 2005 3:12 PM 3. Fax 8 Press {STOP} to exit. 3.6.4 Sending the same document to pre-programmed parties L Make sure that the {FAX} light is ON. 1 Insert the document FACE UP into the feeder. L Confirm that there are no documents on the scanner glass. 2 If necessary, change to the desired resolution (page 29) and the desired contrast (page 29). 3 Press the desired {BROADCAST} (1-2) or {MANUAL BROAD}.
FLB851E-PFQX2329ZA-en.book Page 37 Friday, December 16, 2005 3:12 PM 3. Fax 3.7 Receiving a fax automatically – Auto answer ON 3.8 Receiving a fax manually – Auto answer OFF 3.7.1 Activating FAX ONLY mode Use these modes with an extension telephone or the optional handset unit. Press {FAX AUTO ANSWER} repeatedly to display the following. 3.8.1 Activating TEL mode FAX ONLY MODE L The {FAX AUTO ANSWER} indicator is ON. 1 Make sure feature #404 is set to “TEL” beforehand (page 65).
FLB851E-PFQX2329ZA-en.book Page 38 Friday, December 16, 2005 3:12 PM 3. Fax Note: L To receive fax documents using the extension telephone, make sure remote fax activation is turned ON (feature #434 on page 66) beforehand. The default setting is ON. How to receive faxes with the optional handset unit 1. Lift the handset to answer the call. 2. When: – document reception is required, – a fax calling tone (slow beep) is heard, or – no sound is heard, press {START}. L The unit will start fax reception. 3.8.
FLB851E-PFQX2329ZA-en.book Page 39 Friday, December 16, 2005 3:12 PM 3. Fax L Callers will hear a ring back tone different from the one generated by the telephone company. L An extension telephone (if connected to the same line) will not ring at this time. To answer the call with the extension telephone, lift the handset and press {*}{0} (default auto disconnection code) while the fax machine is ringing. B If you do not answer the call, the unit will activate the fax function.
FLB851E-PFQX2329ZA-en.book Page 40 Friday, December 16, 2005 3:12 PM 3. Fax 6 Check all or part of the following are not the same: – the remote access code of the answering machine – the fax activation code (feature #434 on page 66) Receiving a voice message and fax document in one call The caller can leave a voice message and send a fax document during the same call. Inform the caller of the following procedure beforehand. 1. The caller calls your unit. L The answering device will answer the call. 2.
FLB851E-PFQX2329ZA-en.book Page 41 Friday, December 16, 2005 3:12 PM 3. Fax To display the junk fax prohibitor list 1. Press {MENU} repeatedly to display “JUNK FAX PROH.”. 2. Press {>} repeatedly to display “JUNK LIST DISP.”. 3. Press {SET}. 4. Press {V} or {^} to display the items on the list. 5. Press {MENU} to exit the program. To print the junk fax prohibitor list 1. Press {MENU} repeatedly to display “JUNK FAX PROH.”. 2. Press {>} repeatedly to display “JUNK LIST PRINT”. 3. Press {SET}. 4.
FLB851E-PFQX2329ZA-en.book Page 42 Friday, December 16, 2005 3:12 PM 4. Caller ID 4 Caller Caller IDID 4.1 Caller ID service This unit is compatible with the Caller ID service offered by your local telephone company. To use this unit’s Caller ID features, you must subscribe to Caller ID service.
FLB851E-PFQX2329ZA-en.book Page 43 Friday, December 16, 2005 3:12 PM 4. Caller ID 4.2 Viewing and calling back using caller information You can easily view caller information and call back. When calling back, we recommend you use the optional handset unit. Important: L Calling back will not be possible in the following cases: – The telephone number includes data other than numbers (i.e., * or #). – The caller information does not include a telephone number.
FLB851E-PFQX2329ZA-en.book Page 44 Friday, December 16, 2005 3:12 PM 4. Caller ID 4.2.2 Erasing all caller information 2. Press {SET}. 1 Press {MENU} repeatedly to display “CALLER SETUP”. For stations 4–9: 2 Press {SET}. L “CALL LIST ERASE” will be displayed. 3 4 5 For navigator directory: Press {STOP} to exit. 1. Press {<} or {>}. Press {CALLER ID}. Press {V} or {^} repeatedly to display the desired item. 4 Press {SET}. L To erase other items, repeat steps 2 to 4. 5 Press {STOP} to exit.
FLB851E-PFQX2329ZA-en.book Page 45 Friday, December 16, 2005 3:12 PM 5. Copy 5 Copy Copying 5.1 Using the unit as a copy machine 1 If the {COPY} light is OFF, turn it ON by pressing {COPY}. 2 Set the original. 1. Adjust the width of the document guides (1) to fit the actual size of the document. 5.1.1 Entering the copy mode 2. Insert the document (up to 50 pages) FACE UP into the feeder until a single beep is heard. Before copying, set the operation mode to the copy mode.
FLB851E-PFQX2329ZA-en.book Page 46 Friday, December 16, 2005 3:12 PM 5. Copy 2. Press {V} or {^} repeatedly to select the desired contrast. L To make lighter, press {V}. L To make darker, press {^}. 5.2.2 Using the scanner glass L Confirm that there are no documents in the auto document feeder. Note: L You can save the previous contrast setting in feature #462 (page 64). 1 To select the input tray and paper size 1. Press {PAPER TRAY}. 2. Press {V} or {^} repeatedly to select the desired input tray.
FLB851E-PFQX2329ZA-en.book Page 47 Friday, December 16, 2005 3:12 PM 5. Copy page 69), after every 3 sets of copies the unit will display the following and stop copying. 5.3 More copying features TO CONTINUE COPY PRESS START L Keep the front cover page open for button locations. L Make sure that the {COPY} light is ON. 5.3.1 To sort multiple copies (Auto document feeder only) 5.3.2 To enlarge a document The unit can sort multiple copies in the same order as the original document pages.
FLB851E-PFQX2329ZA-en.book Page 48 Friday, December 16, 2005 3:12 PM 5. Copy 5.3.3 To reduce a document 1 2 3 4 5 Set the original. Press {ZOOM}. Press {V} repeatedly to select from “95%” to “50%” by changing the reduction rate 5% at a time. Press {START}. After you finish copying, press {STOP} to reset this feature.
FLB851E-PFQX2329ZA-en.book Page 49 Friday, December 16, 2005 3:12 PM 6. Multi-Function Station software 6 Multi-Function Station software Setup 6.1 Connecting to a computer 1 USB cable L USB cable is not included. Please purchase a shielded Type-A male/ TypeB male USB cable maximum length 2 metres.
FLB851E-PFQX2329ZA-en.book Page 50 Friday, December 16, 2005 3:12 PM 6. Multi-Function Station software installation guide by clicking on the link in the Multi-Function help file. 1 2 Start Windows and exit all other applications. L For Windows XP and Windows 2000 users, you must be logged in as an administrator in order to install MultiFunction Station. L Install Multi-Function Station before connecting the unit to a computer.
FLB851E-PFQX2329ZA-en.book Page 51 Friday, December 16, 2005 3:12 PM 6. Multi-Function Station software To uninstall the software For Windows XP and Windows 2000 users, you must be logged in as an administrator in order to uninstall Multi-Function Station. 1. Click [Start], then select [All Programs] or [Programs] → [Panasonic] → [KXFLB800_FLM650 Series] → [Uninstall or Modify]. 2. Select [Uninstall] and click [Next], then follow the on-screen instructions.
FLB851E-PFQX2329ZA-en.book Page 52 Friday, December 16, 2005 3:12 PM 6. Multi-Function Station software For details about the [Print] dialogue box, click [?], then click the desired item. Output: Pages per sheet, output tray, etc. Quality: Graphics mode, resolution, toner save feature, etc. Note: L To select [Envelope] for paper type on the [Paper] tab, you need to select [Envelope #10] or [Envelope DL] for paper size. L You can select the output tray for each printing on the [Output] tab.
FLB851E-PFQX2329ZA-en.book Page 53 Friday, December 16, 2005 3:12 PM 6. Multi-Function Station software – Any sheet of labels that has spaces in it where some of the labels have been removed. – Labels that do not completely cover the backing sheet as follows. 6.4.4 Envelopes Use envelopes designed for laser printing.
FLB851E-PFQX2329ZA-en.book Page 54 Friday, December 16, 2005 3:12 PM 6. Multi-Function Station software Scanning Do not attempt to print on any of the following types of envelopes (these may cause damage to the unit): L Envelopes with clasps, snaps or tie strings L Envelopes with transparent windows L Envelopes that use encapsulated types of adhesive that do not require moistening but rely on pressure to seal them 6.5 Using the unit as a scanner L Keep the front cover page open for button locations. 6.
FLB851E-PFQX2329ZA-en.book Page 55 Friday, December 16, 2005 3:12 PM 6. Multi-Function Station software L To save the scanned image, select [Save As...] from the [File] menu. L To cancel scanning while the document is being scanned, click [Cancel]. Note: L You can display the images which support TIFF, JPEG, PCX, DCX and BMP formats. L You can save the images in TIFF, JPEG, PCX, DCX, BMP or PDF formats. L You can move, copy and delete a file or page. L You cannot change the scanning settings on the unit.
FLB851E-PFQX2329ZA-en.book Page 56 Friday, December 16, 2005 3:12 PM 6. Multi-Function Station software – Storing the Caller ID list as the computer file 1 2 Start Multi-Function Station. Select [Remote Control]. L The [Multi-Function Remote Control] window will appear. PC Fax 6.7 Fax sending/receiving using Multi-Function Station L Keep the front cover page open for button locations. 6.7.
FLB851E-PFQX2329ZA-en.book Page 57 Friday, December 16, 2005 3:12 PM 6. Multi-Function Station software L For details, see the help file by selecting [Usage Tips] from Multi-Function Station. 6.7.2 Receiving a fax into your computer You can receive a fax document on your computer. The received fax document is saved as an image file (TIFF-G4 format). To receive a fax document using your computer, make sure the following features are set beforehand. – PC fax reception (feature #442 on page 68) 2.
FLB851E-PFQX2329ZA-en.book Page 58 Friday, December 16, 2005 3:12 PM 6. Multi-Function Station software L For Windows XP and Windows 2000 users, click [Printing Preferences...] on the [General] tab. L The printer properties window will appear. For Windows XP Home: Click [Control Panel], [Printers and Other Hardware], then click [Printers and Faxes]. 3 Select [Panasonic KX-FLB851E] (default name). 4 Select [Properties] from the [File] menu. L The printer properties window will appear.
FLB851E-PFQX2329ZA-en.book Page 59 Friday, December 16, 2005 3:12 PM 7. Programmable Features 7 Programmable Features Summary Features 7.1 Programming {MENU} L This step may be slightly different depending on the feature. 6. Press {SET}. L The setting you selected is set, and the next feature will be displayed. 7. Press {MENU} to exit. {SET} {<}{>}{V}{^} {STOP} 1 2 Press {MENU}. Press {#} and the 3-digit code (page 63 to page 70). 3 Press the desired selection to display the desired setting.
FLB851E-PFQX2329ZA-en.book Page 60 Friday, December 16, 2005 3:12 PM 7. Programmable Features 7.2 Direct command chart For more details on the features, see page 63 to page 70. Note: L The following feature will be displayed only when the optional input tray is installed. Feature code: {#}{3}{8}{2} L The following features will be displayed only when the optional LAN board is installed.
FLB851E-PFQX2329ZA-en.book Page 61 Friday, December 16, 2005 3:12 PM 7.
FLB851E-PFQX2329ZA-en.book Page 62 Friday, December 16, 2005 3:12 PM 7.
FLB851E-PFQX2329ZA-en.book Page 63 Friday, December 16, 2005 3:12 PM 7. Programmable Features {#}{1}{6}{1} Setting the ringer pattern 7.3 Basic features {#}{1}{0}{1} Setting the date and time SET DATE & TIME PRESS SET Enter the date and time using the dial keypad. See page 25 for details. {#}{1}{0}{2} Setting your logo YOUR LOGO PRESS SET Enter your logo using the dial keypad. See page 26 for details. {#}{1}{0}{3} Setting your fax number YOUR FAX NO. PRESS SET Enter your fax number using the dial keypad.
FLB851E-PFQX2329ZA-en.book Page 64 Friday, December 16, 2005 3:12 PM 7. Programmable Features 1. Press {MENU}. 2. Press {#}, then {3}{2}{2}. 3. Press {1} to select “ON”. 4. Press {SET}. {#}{4}{0}{3} Setting power save feature POWER SAVE =15min [V^] 7. Press {MENU}. To set the length of time before the unit enters the power save mode.
FLB851E-PFQX2329ZA-en.book Page 65 Friday, December 16, 2005 3:12 PM 7. Programmable Features Note: L This feature may lower the print quality by reducing toner consumption. 7.4 Fax features {#}{2}{1}{2} Changing the TEL/FAX delayed ring setting TEL/FAX RING RINGS=2 [V^] If you use an extension telephone in TEL/FAX mode, select the desired number of times the extension telephone rings before the unit answers the call.
FLB851E-PFQX2329ZA-en.book Page 66 Friday, December 16, 2005 3:12 PM 7. Programmable Features {#}{4}{1}{1} Sending documents overseas OVERSEAS MODE =ERROR [V^] If you cannot send a fax overseas even if the number is correct and the line is connected, activate this feature before sending the fax. This feature improves the reliability by reducing the transmission speed. {0} “OFF”: Deactivates this feature. {1} “NEXT FAX”: This setting is effective only for the next attempted fax transmission.
FLB851E-PFQX2329ZA-en.book Page 67 Friday, December 16, 2005 3:12 PM 7. Programmable Features If you wish to use an extension telephone to receive faxes, activate this feature and program the activation code. {0} “OFF” {1} “ON” (default) {#}{4}{3}{7} Setting the memory reception alert RECEIVE ALERT MODE=ON [V^] 6. Press {SET}. To alert you with a beeping sound when a received fax document is stored into memory due to some existing problem.
FLB851E-PFQX2329ZA-en.book Page 68 Friday, December 16, 2005 3:12 PM 7. Programmable Features {#}{4}{4}{1} Setting the output tray to use for faxing FAX OUTPUT TRAY =#3 [V^] You can select the output tray that will be used for printing received faxes. {1} “#1”: Upper output tray (Up to approx. 100 sheets). {2} “#2”: Middle output tray (Up to approx. 50 sheets). {3} “#3” (default): Lower output tray (Up to approx. 50 sheets).
FLB851E-PFQX2329ZA-en.book Page 69 Friday, December 16, 2005 3:12 PM 7. Programmable Features 7.5 Copy features {#}{4}{6}{0} Setting the input tray to use for copying COPY INPUT TRAY =#1 [V^] You can select the input tray that will be used for copying. {1} “#1” (default): Paper input tray {2} “#2”: Multi-purpose input tray L When the optional input tray is installed, the following will be displayed.
FLB851E-PFQX2329ZA-en.book Page 70 Friday, December 16, 2005 3:12 PM 7. Programmable Features 7.6 Scan features The following features will be displayed only when the optional LAN board is installed. For more details, see the network installation guide by clicking on the link in the Multi-Function help file.
FLB851E-PFQX2329ZA-en.book Page 71 Friday, December 16, 2005 3:12 PM 8. Help 8 Help 8.1 Error messages – Reports If a problem occurs during fax transmission or reception, one of the following messages will be printed on the sending and journal reports (page 30). Message COMMUNICATION ERROR Code 40-42 46-72 FF Cause & Solution L A transmission or reception error occurred. Try again or check with the other party. 43 44 L A line problem occurred.
FLB851E-PFQX2329ZA-en.book Page 72 Friday, December 16, 2005 3:12 PM 8. Help 8.2 Error messages – Display If the unit detects a problem, one or more of the following messages will appear on the display. Display Cause & Solution “CALL SERVICE” L There is something wrong with the unit. Contact our service personnel. “CARRIAGE ERROR” L There is something wrong with the carriage sensor. Contact our service personnel. “CHANGE DRUM” “CHANGE SUPPLIES” L There is something wrong with the drum unit.
FLB851E-PFQX2329ZA-en.book Page 73 Friday, December 16, 2005 3:12 PM 8. Help Display Cause & Solution “LOW TEMP.” L The inside of the unit is extremely cold and cannot be operated. Use the unit in a warmer area. While the unit cannot be operated, the received documents are temporarily stored into the memory, and will be printed out automatically when the unit warms up. “MAINTENANCE REQUIRED” “PRINT INFO PRESS START” L Your unit requires a scheduled maintenance.
FLB851E-PFQX2329ZA-en.book Page 74 Friday, December 16, 2005 3:12 PM 8. Help Display Cause & Solution “REMOVE DOCUMENT” L The document is jammed. Remove the jammed document (page 87). L Attempted to send a document longer than 600 mm. Press {STOP} to remove the document. Divide the document into two or more sheets and try again. “REPLACE DRUM” “CHANGE SUPPLIES” L The drum life is complete. Replace the drum unit immediately (page 81).
FLB851E-PFQX2329ZA-en.book Page 75 Friday, December 16, 2005 3:12 PM 8. Help Troubleshooting 8.3 When a function does not work, check here 8.3.1 Initial settings Problem Cause & Solution I cannot hear a dial tone. L The telephone line cord is connected to the [EXT] socket on the unit. Connect to the [LINE] socket (page 22). L If you use a splitter/coupler to connect the unit, remove the splitter/coupler and connect the unit to the wall socket directly.
FLB851E-PFQX2329ZA-en.book Page 76 Friday, December 16, 2005 3:12 PM 8. Help 8.3.3 Fax – sending Problem Cause & Solution I cannot send documents. L The telephone line cord is connected to the [EXT] socket on the unit. Connect to the [LINE] socket (page 22). L The other party’s fax machine is busy or has run out of recording paper. Try again. L The other party’s machine is not a fax machine. Check with the other party. L The other party’s fax machine failed to answer the fax automatically.
FLB851E-PFQX2329ZA-en.book Page 77 Friday, December 16, 2005 3:12 PM 8. Help Problem Cause & Solution The printing quality is poor. L If documents can be copied properly, the unit is working normally. The other party may have sent a faint document or there may be something wrong with the other party’s machine. Ask them to send a clearer copy of the document or to check their fax machine. L Some paper has instructions recommending which side to print on. Try turning the paper over.
FLB851E-PFQX2329ZA-en.book Page 78 Friday, December 16, 2005 3:12 PM 8. Help 8.3.5 Copying Problem Cause & Solution The unit will not make a copy. L You cannot make a copy during programming. Make the copy after programming. L The document was not fed into the unit properly. Re-insert the document. L Recording paper is not installed or the unit has run out of paper. Install paper (page 18). A black line, a white line or smudge appears on the copied document.
FLB851E-PFQX2329ZA-en.book Page 79 Friday, December 16, 2005 3:12 PM 8. Help 8.3.7 Multi-Function Station Problem Cause & Solution I cannot recognize the last part of an item in the list of the [One Touch], [Directory], [Journal] or [Caller ID] when using Remote Control. L Put the cursor on the line between the buttons. The cursor changes shape and you can expand the area by dragging or double-clicking. I cannot scan.
FLB851E-PFQX2329ZA-en.book Page 80 Friday, December 16, 2005 3:12 PM 8. Help Problem Cause & Solution The fax sending from the computer has been completed, but the other party cannot receive the document. L The transmission error may be occurred in the unit. Check the sending report in the journal from Remote Control. Coloured text is printed in black instead of greyscale when printing from Microsoft PowerPoint or other applications.
FLB851E-PFQX2329ZA-en.book Page 81 Friday, December 16, 2005 3:12 PM 8. Help Replacement 1 Before opening the protection bag of the new toner cartridge, shake it vertically more than 5 times. 2 Remove the new toner cartridge from the protection bag. 3 Lift the cover release lever (1) and open the top cover (2). 8.4 Replacing the toner cartridge and the drum unit When the display shows the following, replace the toner cartridge.
FLB851E-PFQX2329ZA-en.book Page 82 Friday, December 16, 2005 3:12 PM 8. Help 4 Tap on the used toner cartridge several times to allow the remaining toner to fall into the drum unit. Remove the drum and toner unit (1) by holding the tabs. 6 Remove the used cartridge (1) from the drum unit (2). 1 1 2 3 L The toner may stick to the cartridge and the drum unit. Be careful when handling. See page 4 for details. L Do not drop the toner on the black drum surface (3).
FLB851E-PFQX2329ZA-en.book Page 83 Friday, December 16, 2005 3:12 PM 8. Help 9 Turn the two green levers (1) on the toner cartridge firmly. 11 Install the drum and toner unit (1) by holding the tabs. 1 1 10 Make sure that the triangles (1) match to L Make sure that the triangles (2) match to install the drum and toner unit correctly. install the toner cartridge correctly. 1 2 12 Close the top cover, holding the cover release lever (1). Then push down the right centre edge, until locked.
FLB851E-PFQX2329ZA-en.book Page 84 Friday, December 16, 2005 3:12 PM 8. Help 1 Jams 8.5 Recording paper jam Lift the cover release lever (1) and open the top cover (2). Important: L Close the multi-purpose input tray (3) before opening the top cover. 8.5.1 When the recording paper has jammed inside of the unit 2 The display will show the following. PAPER JAMMED 1 b 4 OPEN TOP COVER Caution: L Do not pull out the jammed paper forcibly before opening the top cover.
FLB851E-PFQX2329ZA-en.book Page 85 Friday, December 16, 2005 3:12 PM 8. Help Case 2: When the recording paper has jammed near the fuser unit: Case 3: When the recording paper has jammed near the output tray: 1. Lift both green levers (1) until they stop. 1. Pull and hold the green lever (1) to release the jammed paper. 1 1 2. Remove the jammed paper (1) carefully by pulling it upwards. 2. Remove the jammed paper (1) carefully by pulling it upwards. 1 1 3.
FLB851E-PFQX2329ZA-en.book Page 86 Friday, December 16, 2005 3:12 PM 8. Help 8.5.2 When paper jam occurs near the optional input tray The display will show the following. PAPER JAMMED b 1 8.5.3 When the recording paper in the paper input tray / the optional input tray is not fed into the unit properly The display will show the following. OPEN LOWER LEFT SIDE TRAY COVER CHECK PICK UP INPUT TRAY #1 Open the cover (1) at the left side of the optional input tray.
FLB851E-PFQX2329ZA-en.book Page 87 Friday, December 16, 2005 3:12 PM 8. Help 8.5.4 When the recording paper in the multi-purpose input tray is not fed into the unit properly The display will show the following. CHECK PICK UP INPUT TRAY #2 1 2 8.6 Document jams (Auto document feeder) Caution: L Do not pull out the jammed document forcibly before lifting the ADF cover. Remove the recording paper and straighten. Re-insert the recording paper.
FLB851E-PFQX2329ZA-en.book Page 88 Friday, December 16, 2005 3:12 PM 8. Help 2 Remove the jammed document (1) carefully. When the document has jammed near the document entrance: 1 Cleaning 8.7 Cleaning the white plate and glasses Clean the white plate and glasses when a black line, a white line or a dirty pattern appears on: – your recording paper, – the original document, – the data scanned by the computer, or – the fax document received by the other party.
FLB851E-PFQX2329ZA-en.book Page 89 Friday, December 16, 2005 3:12 PM 8. Help 3 Clean the scanner glass (1) and the white cover sheet (2) and its circumference (3) with a soft and dry cloth. 5 Close the document cover (1). 1 2 3 1 6 4 Close the ADF cover (1), then hold the document cover (2) while cleaning the white plate (3) and the scanner glass (4). Turn the power switch ON. If the document cover comes off from the unit 1. Attach the hinges (1) to the document cover (2).
FLB851E-PFQX2329ZA-en.book Page 90 Friday, December 16, 2005 3:12 PM 8. Help 3. Insert the hinges (1) into the slots (2) on the unit. 8.7.2 Lower glass 1 2 Turn the power switch OFF. Lift the cover release lever (1) and open the top cover (2). Important: L Close the multi-purpose input tray (3) before opening the top cover. 1 2 1 2 4. Close the document cover. 3 4 Caution: The fuser unit (4) gets hot. Do not touch it. 3 Remove the drum and toner unit (1) by holding the tabs.
FLB851E-PFQX2329ZA-en.book Page 91 Friday, December 16, 2005 3:12 PM 8. Help 4 Clean the lower glass (1) with a soft and dry cloth. 6 Close the top cover, holding the cover release lever (1). Then push down the right centre edge, until locked. 1 1 5 Caution: L To prevent injuries, be careful not to put your hands under the top cover. Reinstall the drum and toner unit (1) by holding the tabs. 7 Turn the power switch ON.
FLB851E-PFQX2329ZA-en.book Page 92 Friday, December 16, 2005 3:12 PM 8. Help 4 Close the ADF cover. 5 Turn the power switch ON. 8.8 Cleaning the document feeder rollers Clean the rollers when the document or recording paper frequently misfeeds. 1 2 Turn the power switch OFF. Hold the ADF cover (1) firmly and lift it to open the upper part (2) of the ADF cover, then open the whole of the ADF cover.
FLB851E-PFQX2329ZA-en.book Page 93 Friday, December 16, 2005 3:12 PM 9. General Information 9 General Printed Reports Information 9.1 Reference lists and reports You can print out the following lists and reports for your reference. – “SETUP LIST”: Provides you with the current settings of the programming features (page 63 to page 70). – “TEL NO. LIST”: Provides you with names and numbers which are stored in the one-touch dial feature and navigator directory.
FLB851E-PFQX2329ZA-en.book Page 94 Friday, December 16, 2005 3:12 PM 9. General Information 9.2 Specifications Copy: Approx. 430 W Maximum: Approx. 900 W (When the fuser lamp turns on) ■ Applicable lines: Public Switched Telephone Network ■ Power supply: 220 – 240 V AC, 50 Hz ■ Document size: Max. 216 mm in width, Max. 600 mm in length ■ Fax memory capacity: 10 MB in total Approx. 630 pages of memory reception with back-up (Max. 255 pages per one reception) Approx.
FLB851E-PFQX2329ZA-en.book Page 95 Friday, December 16, 2005 3:12 PM 9. General Information Recording paper specifications Recording paper / Transparency / Label size: A4: 210 mm × 297 mm Letter: 216 mm × 279 mm Legal: 216mm × 356 mm Envelope size: #10: 105 mm × 241 mm DL: 110 mm × 220 mm Recording paper weight: 60 g/m2 to 90 g/m2 Note for recording paper: L We recommend that you test paper (especially special sizes and types of paper) on the unit before purchasing large quantities.
FLB851E-PFQX2329ZA-en.book Page 96 Friday, December 16, 2005 3:12 PM 9. General Information Note: L The image area changes with the depth, thickness and size of the characters. L If you turn on the toner save feature, the toner cartridge will last approx. 40% longer. Drum life The drum unit is a consumable item and needs to be replaced regularly.
FLB851E-PFQX2329ZA-en.book Page 97 Friday, December 16, 2005 3:12 PM 9. General Information Guarantee 9.3 Condition of guarantee 1. 2. 3. 4. 5. 6. 7. 8. 9. 10. 11. 12. 13. This machine is supplied with a one year swap out warranty. Please retain your Proof of Purchase and Packaging in the unlikely event that your machine should require attention.
FLB851E-PFQX2329ZA-en.book Page 98 Friday, December 16, 2005 3:12 PM 9. General Information Copyrights 9.4 Information of copyrights and licenses L This product uses a part of NetBSD kernel. The use of a part of NetBSD kernel is based on the typical BSD style license below. Copyright (c) The Regents of the University of California. All rights reserved. Redistribution and use in source and binary forms, with or without modification, are permitted provided that the following conditions are met: 1.
FLB851E-PFQX2329ZA-en.book Page 99 Friday, December 16, 2005 3:12 PM 9. General Information Copyright (c) 1982, 1986, 1990, 1991, 1993 The Regents of the University of California. All rights reserved. Copyright (c) 1982, 1986, 1990, 1993 The Regents of the University of California. All rights reserved. Copyright (c) 1982, 1986, 1990, 1993, 1994 The Regents of the University of California. All rights reserved. Copyright (c) 1982, 1986, 1991, 1993 The Regents of the University of California.
FLB851E-PFQX2329ZA-en.book Page 100 Friday, December 16, 2005 3:12 PM 9. General Information Copyright (c) 1996,1999 by Internet Software Consortium. Copyright (c) 1996-1999 by Internet Software Consortium. Copyright (c) 1997 Jonathan Stone and Jason R. Thorpe. All rights reserved. Copyright (c) 1997 Christos Zoulas. All rights reserved. Copyright (c) 1997 Manuel Bouyer. All rights reserved. Copyright (c) 1997, 1998 The NetBSD Foundation, Inc. All rights reserved.
FLB851E-PFQX2329ZA-en.book Page 101 Friday, December 16, 2005 3:12 PM 9. General Information L This product contains Net-SNMP software and is using it based on the following license conditions.
FLB851E-PFQX2329ZA-en.book Page 102 Friday, December 16, 2005 3:12 PM 9. General Information ---- Part 3: Cambridge Broadband Ltd. copyright notice (BSD) ----Portions of this code are copyright (c) 2001-2003, Cambridge Broadband Ltd. All rights reserved.
FLB851E-PFQX2329ZA-en.book Page 103 Friday, December 16, 2005 3:12 PM 9. General Information DAMAGES (INCLUDING, BUT NOT LIMITED TO, PROCUREMENT OF SUBSTITUTE GOODS OR SERVICES; LOSS OF USE, DATA, OR PROFITS; OR BUSINESS INTERRUPTION) HOWEVER CAUSED AND ON ANY THEORY OF LIABILITY, WHETHER IN CONTRACT, STRICT LIABILITY, OR TORT (INCLUDING NEGLIGENCE OR OTHERWISE) ARISING IN ANY WAY OUT OF THE USE OF THIS SOFTWARE, EVEN IF ADVISED OF THE POSSIBILITY OF SUCH DAMAGE.
FLB851E-PFQX2329ZA-en.book Page 104 Friday, December 16, 2005 3:12 PM 10. Index 10. Index 10.
FLB851E-PFQX2329ZA-en.book Page 105 Friday, December 16, 2005 3:12 PM 10.
FLB851E-PFQX2329ZA-en.
FLB851E-PFQX2329ZA-en.
FLB851E-PFQX2329ZA-en.book Page 108 Friday, December 16, 2005 3:12 PM 0682 Sales Department: Panasonic Business Systems U.K. Panasonic House, Willoughby Road, Bracknell, Berkshire, RG12 8FP Manufacturer: Panasonic Communications (Malaysia) Sdn. Bhd. PLO No.1, Kawasan Perindustrian Senai, KB No. 104, 81400 Senai, Negeri Johor Darul Ta zim, Malaysia Global web site: http://www.panasonic.co.