English Deutsch Nederlands Français Česky Magyar Microwave/Grill/Convection Oven Mikrowellengerät mit Grill/Heißluft De Panasonic Microgolf/Warme Lucht Oven Panasonic Four à Micro-ondes Multifonctions Forno a microonde e Convezione Kuchenka mikrofalowa z funkcjami Grill/Konwekcja Mikrovlnná / Horkovzdušná trouba/ Gril Grillezös / légkeveréses mikrohullámú sütö Polski Operating Instructions Bedienungsanleitung Gebruiksaanwijzing Mode dʼemploi Manuale di istruzioni Instrukcja obsługi Návod k obsluze Kezelé
IMPORTANT SAFETY INSTRUCTIONS: Before operating this oven, please read these instructions carefully and keep for future reference. WICHTIGE SICHERHEITSANWEISUNGEN. Bitte sorgfältig durchlesen und zur weiteren Bezugnahme aufbewahren. BELANGRIJKE VEILIGHEIDSINSTRUCTIES. Lees ze a.u.b. zorgvuldig door en bewaar ze zodat u ze opnieuw kunt raadplegen wanneer nodig. INSTRUCTIONS DE SÛRETÉ IMPORTANTES.
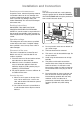
Installation and Connection Built-in Unpack the oven, remove all packing material, and examine the oven for any damage such as dents, broken door latches or cracks in the door. If you find any damage, notify your dealer immediately. Do not install a damaged microwave oven. This oven may be built into a wall cabinet by using the proper trim kit, white NN-TKA80WB, silver NN-TKA80MB which may be purchased from a local Panasonic dealer.
Installation and Connection WARNING Use of your oven 1. The door seals and door seal areas should be cleaned with a damp cloth. The appliance should be inspected for damage to the door seals and door seal areas and if these areas are damaged the appliance should not be operated until it has been repaired by a service technician trained by the manufacturer. 1. Do not use the oven for any reason other than the preparation of food. This oven is specifically designed to heat or cook food.
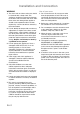
Safety Instructions 1. Before using CONVECTION, COMBINATION or GRILL function for the first time, wipe excessive oil off in the oven cavity and operate the oven without food and accessories on CONVECTION 250°C, for 10 minutes. This will allow the oil that is used for rust protection to be burned off. This is the only time the oven is used empty. 2. Never use another type of glass tray than the one specially designed for this oven. 3.
Installation and Connection 1. Cooking Times 6. Liquids • Cooking times given in the cookbook are approximate. The cooking time depends on the condition, temperature, amount of food and on the type of cookware. • When heating liquids, e.g. soup, sauces and beverages in your microwave oven, overheating the liquid beyond boiling point can occur without evidence of bubbling. This could result in a sudden boil over of the hot liquid.
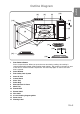
Outline Diagram [6] [4] [13] English [8] [15] [14] [5] [2] [1] [7] [9] [3] [10] [11] [12] 1. 2. 3. 4. 5. 6. 7. 8. 9. 10. 11. 12. 13. 14. 15. Door Release Button Press to open the door. When you open the oven door during cooking, the cooking is stopped temporarily without clearing earlier made settings. The cooking is resumed as soon as the door is closed and Start Pad pressed. The oven lamp lights as soon as the oven door is opened.
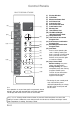
Control Panels NN-CT870S/NN-CT850W* (9) (12) (1) 1 h 10 min 1 min 10 s (1) (2) (3) (4) (5) (6) (7) (8) (9) (10) (2) (11) (12) (3) (13) (4) (5) (14) (13) (15) (6) (7) M Combi (8) (10) (14) g (16) (11) (15) (16) NN-CT870S N.B: If an operation is set and start pad is not pressed, after 6 minutes, the oven will automatically cancel the operation. The display will revert back to colon or clock mode.
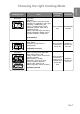
Choosing the right Cooking Mode Microwave Uses Defrosting Reheating Melting : butter, chocolate, cheese. Cooking fish, vegetables, fruits, eggs. Preparing : stewed fruits, jam, sauces, custards, choux, pastry, béchamel, caramel, meat, fish or vegetarian loaves. - Baking cakes with eggs and baking powder ingredients without colour. (Victoria sandwich, clafoutis etc.) Accessories to use Containers - Glass turntable Microwaveable, no metal. only No Preheating Grill - Grilling of meat or fish.
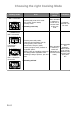
Choosing the right Cooking Mode Cooking modes Uses Accessories to use Containers Glass turntable + metal tray + round rack or enamel shelf and/or wire shelf Heatproof, metal tin can be used. Grill + Convection - Roasting red meats, thick steak (rib or beef, Tbone steaks) - braising of fish. Preheating necessary COMBINATION • Grill + microwave • Convection + microwave • Grill + convection + microwave En-8 - Roasting meat and poultry.
Oven Accessories English The following chart shows correct use of the accessories in the oven.
Controls and Operation Procedure Word Prompting: Plug-in “88:88” Word Prompting Press “FRANCAIS” In French Press “ITALIANO” In Italian Press “DEUTSCH” In German Press “NEDERLANDS” In Dutch Press “ESPANOL” In Spanish Press “POLSKI” In Polish Press “ČESKY” In Czech Press “ENGLISH” In English These models have a unique function “Word Prompting” which guides you through the operation of your microwave. After plugging in the oven press the Start Button until you locate your language.
Controls and operation procedure English Clock Setting: Example: To set 14:25 14 times twice 1 h 10 min 1 min 10 s inoperable 5 times • Press Delay/Stand Pad twice. The colon starts to blink. • Enter the time by pressing the • Press Delay/Stand Pad appropriate Time Pads. once. The time appears in the display and the colon blinks. The colon stops blinking and the time of day is entered. NOTE: 1. To reset the time of day repeat all the above steps. 2.
Microwave Cooking and Defrost There are 6 different microwave power levels available (see the chart below). Use of accessory: Glass Tray This chart shows approximate wattage for each power level. Press Power Level Wattage Max time available once HIGH power 1000 W 30 minutes twice DEFROST power 270 W 99 min. 50 sec. 3 times MEDIUM power 600 W 99 min. 50 sec. 4 times LOW power 440 W 99 min. 50 sec. 5 times SIMMER power 250 W 99 min. 50 sec. 6 times WARM power 100 W 99 min.
Grilling English The Grill Pad provides 3 Grill settings. Use of accessory: Round Rack Metal Tray Glass Tray Press once Power Level 1 HIGH Wattage 1500 W twice 2 MEDIUM 1200 W 3 times 3 LOW 950 W After preheating, place the food in the oven. • Press Grill Power Pad for the desired Grill setting. • Press Start Pad to start preheating. inoperable 1 h 10 min 1 min 10 s • Set the cooking time (up to 99 minutes 50 seconds). • Press Start Pad. NOTE ON PREHEATING: 1.
Cooking by Convection / Grill Convection These Pads offer a choice of convection temperatures 40°C (only for Convection mode) and 100 - 250°C in 10°C increments. For quick selection of the most commonly used cooking temperatures, the temperatures start at 150°C and count up to 250˚C then 40˚C (only for Convection mode) and 100°C. It is possible to cook on one or two levels when using convection cooking. See En-16 for shelf cooking. Use of accessory: For one level cooking. If using the turntable.
Cooking by Convection / Grill Convection English Cooking by Grill Convection: After preheating, place the food in the oven. • Set the desired temperature. (Grill power is preset to High.) 1 h 10 min 1 min 10 s • If desired to change • Press Start Pad to Grill power press start preheating. once; Medium, twice; Low. inoperable • Set the cooking time (up to 9 hours 59 minutes). • Press Start Pad. NOTE ON PREHEATING: 1. Do not open the door during preheating.
Cooking by Convection/Grill Convection Shelf Cooking One Level Cooking If using a shelf for one level cooking, place on the lower level. Enamel Shelf Wire Shelf Two Level Cooking When cooking on two levels use both the shelves supplied, with the enamel shelf on the lower level and the wire shelf on the upper level. Depending on the recipe, you can preheat with or without the shelves in position. See individual recipes for details.
Combination Cooking Use of accessory: Grill + Microwave Convection + Microwave Round Rack Metal Tray Metal Tray Glass Tray Glass Tray Grill Convection + Microwave Round Rack Metal Tray or Glass Tray Metal Tray Glass Tray 1) Grill + Microwave Combi 1 h 10 min 1 min 10 s inoperable • Press • Set the desired Combination Grill setting. Pad. • Set the desired microwave power level. • Press Start • Set the desired Pad. cooking time (up to 9 hours 59 minutes).
Combination Cooking 2) Convection + Microwave Combi 1 h 10 min 1 min 10 s inoperable • Set the desired • Set the desired • Set the • Press Microwave cooking time (up to desired Combination power level. 9 hours 59 minutes). temperature. Pad. • Press Start Pad. 3) Grill Convection + Microwave Combi • Set the desired temperature. (Grill power is preset to High.) • Press Combination Pad. 1 h 10 min 1 min 10 s • Set the desired • If desired to Microwave power change Grill power level.
Combination Cooking The oven can be preheated on Combination cooking. Press Start Pad before setting the cooking time and follow the NOTE ON PREHEATING on page En-15. NOTE: 1. When the selected cooking time is less than one hour, the time counts down second by second. 2. When the selected cooking time is over one hour, the time counts down minute by minute until only “1H 00” (1 hour) remains. The display then indicates minutes and seconds and counts down second by second. 3.
Auto Defrost With this feature you can defrost frozen foods according to the weight. Select the category and set the weight of the food. The weight is programmed in grams. For quick selection, the weight starts from the most commonly used weight for each category. g • Select the desired • Set the weight of the frozen food. • Press Start Auto Defrost Pad. The display g weight counts up in 100 g increments Program.
Auto Sensor Programs e.g. • Select the desired Auto Sensor Program. • Press Start Pad. Plus/Minus Control: Preferences for degree of cooking vary for each individual. After having used Auto Sensor Programs a few times, you may decide you would prefer your food cooked to a different degree of cooking. By using Plus/Minus control, the programs can be adjusted to cook food for a longer or shorter time. Press or pad before pressing Start Pad.
Auto Sensor Programs Category Weight 1 Press 4. Soup 2 Presses 1 Press 5. Rice/Pasta 6. Fresh Vegetables 2 Presses 7. Fresh Fish 1 Press 8. Frozen Gratin 300 - 1000 g 300 - 1000 g 250 - 1000 g 200 - 700 g En-22 Instructions For reheating tetra, canned or homemade soups. All foods should be at room or refrigerated temperatures. Stir before and after reheating. It is preferable to cover with a lid or plate or saucer.
Auto Weight Programs e.g. g • Select the desired Auto Weight Program. • Set the weight of the frozen food. g weight counts up in 100 g increments • Press Start Pad. weight counts up in 10 g increments weight counts down in 10 g increments NOTE: 1. When cooking time is over 60 minutes, the time will appear as Hours and Minutes. 2. Follow the charts on the following pages for the recommended weight and accessories to be used. 3.
Auto Weight Programs Category 1 Press 14. Chicken Pieces Weight 200 - 1500 g 2 Presses 15. Chicken Pieces 1000 - 2400 g 3 Presses 16. Pork / Veal 800 - 2000 g 1 Press 17. Beef 650 - 1250 g 2 Presses 18. Rib of Beef 700 - 1300 g 3 Presses 19. Lamb En-24 1000 - 2300 g Accessories Instructions For cooking chicken pieces e.g. chicken legs, thighs or drumsticks. Place the chicken on Round Rack on Metal Tray on Glass Tray. For even cooking spread out the chicken and turn at beep.
Auto Weight Programs Weight 1 Press 4-6 20 Tart portions 2 Presses 6-8 21 Tart Instructions For baking Tart from raw ingredients - see cook book for recipes. E.g. Savoury Quiche - Quiche Lorraine, mushroom tart, onion tart, spinach tart. Sweet Tart - Bourdaloue tart, fromage frais tart, rubarb tart, apple tart.
Memory This feature allows you to pre-program your oven for regular reheating or cooking tasks. You are able to pre-program your oven for a specific power level and time that is convenient for you. You are able to pre-program three memory tasks. To set a Memory Program M M Program the desired cooking program. Memory Memory • Press Memory Pad. • Press Memory Pad to store The oven is automatically pre-set to memory 1. To select memory 2 press memory pad twice.
Delay Start Cooking English By using Delay/Stand Pad, you are able to program Delay Start cooking. e.g. 1 h 10 min 1 min 10 s inoperable • Press Delay/Stand Pad. 1 h 10 min 1 min 10 s • Set the delay time by pressing Time Pads (up to 9 hours 59 minutes). • Set the desired cooking program and cooking time. • Press Start Pad. NOTE: 1. Three stage cooking can be programmed including Delay Start cooking. e.g. High Power: 10 min.
Stand Time By using Delay/Stand Pad, you can program Stand Time after cooking is completed or use to program the oven as a minute timer. e.g. To program stand time after cooking. 1 h 10 min 1 min 10 s • Set the desired cooking program and cooking time. 1 h 10 min 1 min 10 s • Press Delay/Stand Pad. inoperable • Set desired amount of time by pressing Time Pads (up to 9 hours 59 minutes). • Press Start Pad. NOTE: 1. Three stage cooking can be programmed including Stand Time. e.g. High Power: 4 min.
Questions and Answers A: When the oven does not turn on, check the following: 1. Is the oven plugged in securely? Remove the plug from the outlet, wait 10 seconds and reinsert. 2. Check the circuit breaker and the fuse. Reset the circuit breaker or replace the fuse if it is tripped or blown. 3. If the circuit breaker or fuse is all right, plug another appliance into the outlet. If the other appliance works, there probably is a problem with the oven.
Care of Your Oven Care & Cleaning of your Microwave Oven - IMPORTANT It is essential for the safe operation of the oven that it is kept clean, and wiped out after each use. Failure to maintain the oven in a clean condition could lead to deterioration of a surface that could adversely affect the life of the appliance and possibly result in a hazardous situation. 1. Turn the oven off before cleaning. 2. Keep the inside of the oven, door seals and door seal areas clean.
Technical Specifications English Rated Voltage: Operating Frequency: Input Power: 230 V, 50 Hz 2,450 MHz Maximum; Microwave; Grill; Convection; 2980 1275 1560 1500 Output Power: Microwave; Grill; Convection; 1000 W (IEC-60705) 1500 W 1400 W Outer Dimensions: Oven Cavity Dimensions: Weight with internal accessories; Noise: 530 (W) x 508 (D) x 344 (H) mm 350 (W) x 360 (D) x 250 (H) mm 21.0 Kg 52.
Panasonic Corporation Web Site:http://panasonic.com.
English Deutsch Nederlands Français Česky Magyar Microwave/Grill/Convection Oven Mikrowellengerät mit Grill/Heißluft De Panasonic Microgolf/Warme Lucht Oven Panasonic Four à Micro-ondes Multifonctions Forno a microonde e Convezione Kuchenka mikrofalowa z funkcjami Grill/Konwekcja Mikrovlnná / Horkovzdušná trouba/ Gril Grillezös / légkeveréses mikrohullámú sütö Polski Operating Instructions Bedienungsanleitung Gebruiksaanwijzing Mode dʼemploi Manuale di istruzioni Instrukcja obsługi Návod k obsluze Kezelé
IMPORTANT SAFETY INSTRUCTIONS: Before operating this oven, please read these instructions carefully and keep for future reference. WICHTIGE SICHERHEITSANWEISUNGEN. Bitte sorgfältig durchlesen und zur weiteren Bezugnahme aufbewahren. BELANGRIJKE VEILIGHEIDSINSTRUCTIES. Lees ze a.u.b. zorgvuldig door en bewaar ze zodat u ze opnieuw kunt raadplegen wanneer nodig. INSTRUCTIONS DE SÛRETÉ IMPORTANTES.
Aufstellen und Anschließen Einbaurahmen Das Gerät auspacken, Verpackungsmaterial entfernen und auf Beschädigungen wie z.B. Stoßstellen, gebrochene Türverriegelungen oder Risse in der Tür überprüfen. Sofort den Händler benachrichtigen, wenn das Gerät beschädigt ist. Kein beschädigtes Mikrowellengerät installieren. Dieses Mikrowellengerät kann mit dem als Sonderzubehör erhältlichen Einbaurahmen (NN-TKA80WB/ Weiß, NN-TKA80MB/ Silver) in eine Einbauküche integriert werden.
Aufstellen und Anschließen WARNUNG 1. Die Türverriegelungen und die Türdichtungen sollten mit einem feuchten Tuch abgewischt werden. Das Gerät ist vom Benutzer auf mögliche Beschädigungen an den Türdichtungsflächen zu prüfen, und falls ein solcher Schaden aufgetreten ist, darf das Gerät nicht betrieben werden, bevor es vom Panasonic-Kundendienst repariert worden ist. 2.
Sicherheitshinweise Grillbetrieb Automatischer Entlüftungsbetrieb Ist das Mikrowellengerät nach dem Betrieb heiß, setzt automatisch für eine Minute der Entlüftungsbetrieb ein. Dies ist keine Fehlfunktion, sondern dient zum Abkühlen der elektronischen Bauteile. Sie können währenddessen die Gerätetür öffnen und die Lebensmittel herausnehmen. Der Entlüftungsbetrieb schaltet sich automatisch ab.
Wichtige Informationen 1. Kochzeiten • Die Kochzeit ist abhängig von Beschaffenheit, Ausgangstemperatur und Menge der Lebensmittel sowie von der Art des verwendeten Kochgeschirrs. • Gehen Sie zunächst von einer kürzeren Kochzeit aus, um ein Übergaren der Speisen zu vermeiden. Hat das Lebensmittel noch nicht den gewünschten Auftau-, Erwärmungs- oder Garzustand erreicht, haben Sie immer noch die Möglichkeit, die Garzeit zu verlängern.
Schematische Ansicht [8] [6] [4] [14] [5] [2] [1] [7] [9] [3] [10] [11] [12] 1. Türöffner Drücken Sie diese Taste, um die Tür zu öffnen. Wird während des Garvorganges die Tür geöffnet, ist der Gerätebetrieb unterbrochen, das Programm bleibt aber erhalten. Wird die Tür wieder geschlossen und die Starttaste gedrückt, läuft der Garvorgang weiter ab. Die Garraumbeleuchtung schaltet sich ein, wenn die Tür geöffnet wird. 2. Sichtfenster 3. Türsicherheitsverriegelungen 4.
Bedienfelder NN-CT870S/NN-CT850W* (9) (1) (12) 1 h 10 min 1 min 10 s (1) (2) (3) (4) (5) (6) (7) (8) (9) (10) (11) (12) (2) (13) (3) (14) (4) (5) (15) (13) (6) (7) M Combi (8) (10) (14) g (16) (11) (15) (16) NN-CT870S Digitaldisplay Zeiteinstellung Ein-/Austaste für Mikrowelle Ein-/Austaste für Grill Heißluftbetrieb Grillheißluftbetrieb Kombinationsbetrieb Speicher Automatisches Auftauen Plus/Minus-Tasten Vorwahlzeit/Standzeit-Taste Sensorautomatik Mikrowellenprogramm SensorautomatikKom
Auswahl der gewünschten Betriebsart Betriebsarten Mikrowelle Erforderliches Zubehör - Auftauen - Erwärmen - Schmelzen: Butter, Schokolade, Käse - Garen/Kochen von Fisch, Gemüse, Obst, Eiern - Zubereitung von gebackenen Früchte, Marmelade, Konfitüre, Soßen, Nur Vanillesoße, Brandteig, Béchamel, Glasdrehteller Karamell, Fleisch, Fisch oder Gemüseauflauf - Backen von Kuchen mit Eiern und Backpulver, ohne Farbzusätze (Biskuitkuchen, Clafoutis usw.
Auswahl der gewünschten Betriebsart Betriebsarten Grill + Heißluft Verwendung - Braten von dunklem Fleisch, dickem Steak (Rippchen oder Rind, T-BoneSteak) - Dünsten von Fisch Vorheizen erforderlich Erforderliches Zubehör Glasdrehteller + Fettpfanne + runder Grillrost oder emailliertes Backblech und/oder Kombirost Behälter Geeignet sind hitzebeständige Metallformen KOMBINATION • Grill + Mikrowelle - Braten von Fleisch und Geflügel - Auftauen und Erwärmen von knuspri• Heißluft + Mikrowelle gen Speisen (
Gerätezubehör Die nachfolgende Tabelle veranschaulicht den richtigen Einsatz des Zubehörs im Mikrowellenherd.
Tastatur und Bedienung Wird der Netzstecker angeschlossen, erscheint “88:88” in der Digitalanzeige.
Tastatur und Bedienung Einstellen der Uhr: Beispiel: Einstellen der Uhr auf 14:25 14 mal 1 h 10 min 1 min 10 s Deutsch 5 mal zweimal nicht einstellbar • Drücken Sie zweimal die • Drücken Sie die Vorwahlzeit/Standzeitentsprechenden Taste. Uhrzeittasten zum Der Doppelpunkt beginnt Einstellen der korrekten zu blinken. Uhrzeit. Die Uhrzeit erscheint im Anzeigenfeld und der Doppelpunkt blinkt. • Drücken Sie einmal die Vorwahlzeit/StandzeitTaste.
Mikrowellen - und Auftaubetrieb Das Gerät verfügt über 6 verschiedene Mikrowellen-Leistungsstufen. Die Wattleistung der einzelnen Leistungsstufen entnehmen Sie bitte der nachfolgenden Tabelle. Zubehör: Glas-Drehteller Die in der Tabelle angegebenen Wattleistungen sind die ungefähren Werte für jede Leistungsstufe. Drücken Einmal Leistungsstufe HOCH Wattleistung 1000 W Max. verfügbare Zeit 30 Minuten Zweimal AUFTAUEN 270 W 99 Min. 50 Sek. 3 Mal MITTEL 600 W 99 Min. 50 Sek.
Grillbetrieb Mit der Grilltaste wird eine der 3 Grillstufen eingestellt. Kombirost Zubehör: Runder Grillrost Deutsch Fettpfanne Glasdrehteller Drücken Leistungsstufe Wattleistung Einmal 1 HOCH 1500 W Zweimal 2 MITTEL 1200 W 3 Mal 3 NIEDRIG 950 W Stellen Sie die Speisen nach dem Vorheizen in den Herd. • Drücken Sie die Taste für die gewünschte Grillstufe. • Drücken Sie die Starttaste zum Vorheizen.
Heißluft/Grillheißluft-Betrieb Mit diesen Tasten können Heißluft-Temperaturen von 40°C (nur für den Heißluft-Modus) und von 100 bis 250°C in Intervallen von 10°C eingestellt werden. Zur schnellen Einstellung der am häufigsten verwendeten Temperaturen beginnen die Temperaturen bei 150°C, bis 250°C, gefolgt von 40°C (nur für den Heißluft-Modus) und 100°C. Im Heißluft-Betrieb ist es möglich, auf einer oder zwei Stufen zu kochen. Hinweise zum Garen auf Rosten finden Sie auf Seite D-16.
Heißluft/Grillheißluft-Betrieb Stellen Sie die Speisen nach dem Vorheizen in den Herd. 1 h 10 min 1 min 10 s • Zum Ändern der Grillstufe einmal drücken für, Mittelʼ, zweimal drücken für 'Nierdig'. Deutsch • Stellen Sie die gewünschte Temperatur ein. (Die Grillstufe ‚ Hochʼ ist voreingestellt.) • Drücken Sie die Starttaste zum Vorheizen. nicht einstellbar • Stellen Sie die Garzeit ein (bis zu 9 Stunden 59 Minuten). • Drücken Sie die Starttaste. HINWEISE ZUM VORHEIZEN: 1.
Heißluft/Grillheißluft-Betrieb Kochen auf dem Rost oder in dem emailliertem Backblech Garen auf einer Ebene Wird der Kombirost oder das Backblech benutzt, bitte die untere Ebene benutzen. Backblech Kombirost Garen auf zwei Ebenen Beim Garen auf zwei Ebenen werden das beiliegende Backblech unten und der Rost oben eingesetzt. Das Vorheizen des Geräts ist mit oder ohne eingesetztem Backblech bzw. Rost möglich. Nähere Angaben entnehmen Sie bitte dem jeweiligen Rezept.
Heißluft/Grillheißluft-Betrieb Ihnen stehen drei Kombinationsbetriebsarten zur Verfügung: 1) Grill + Mikrowelle, 2) Heißluft + Mikrowelle, 3) Grillheißluft + Mikrowelle. Die Mikrowellen-Leistungsstufe 1000 W steht beim Kombinationsbetrieb nicht zur Verfügung, weil dies im Normalfall wenig praktisch wäre: Die Speisen wären gar, bevor sie gebräunt sind.
Heißluft/Grillheißluft-Betrieb 2) Heißluft + Mikrowelle Combi • Drücken Sie die Kombinationstaste. 1 h 10 min 1 min 10 s • Stellen Sie die gewünschte Temperatur ein. • Wählen Sie die gewünschte MikrowellenLeistungsstufe aus. nicht einstellbar • Stellen Sie die gewünschte Garzeit ein (bis zu 9 Stunden 59 Minuten • Drücken Sie die Starttaste. 3) Grillheißluft + Mikrowelle Combi • Drücken Sie die • Stellen Sie die gewünschte Kombinationstaste. Temperatur ein.
Kombinationsbetrieb HINWEISE ZUM VORHEIZEN: Für den Kombinationsbetrieb ist das Vorheizen des Gerätes möglich. Drücken Sie vor dem Einstellen der Garzeit die Starttaste und befolgen Sie die HINWEISE ZUM VORHEIZEN auf Seite D-15. 1. Beträgt die Garzeit weniger als eine Stunde, wird die ablaufende Zeit in Sekunden zurückgezählt. 2. Beträgt die Garzeit mehr als eine Stunde, wird die ablaufende Zeit in Minuten zurückgezählt, bis nur noch „1H 00" (1 Stunde) verbleibt.
Automatisches Auftauen Mit dieser Funktion werden tiefgefrorene Speisen in Abhängigkeit ihres Gewichts aufgetaut. Wählen Sie zunächst die entsprechende Lebensmittelkategorie aus und geben Sie dann das Gewicht der Speise ein. Das Gewicht wird in Gramm programmiert. Zur zeitsparenden Auswahl beginnen die Gewichte mit den gebräuchlichsten Werten in den jeweiligen Kategorien. g • Wählen Sie das gewünschte Auftauautomatik• Geben Sie das Gewicht der • Drücken Sie die Programm aus. tiefgefrorenen Speise ein.
Sensorautomatik-Programme Mit diesen Programmen können Sie die verschiedensten Lebensmittel zubereiten, ohne eine Garzeit, das Gewicht oder die Leistungsstufe eingeben zu müssen. z.B Deutsch • Wählen Sie das gewünschte SensorautomatikProgramm aus. • Drücken Sie die Starttaste. Plus/Minus-Regelung: Wie lange eine Speise gegart werden soll, ist vom Geschmack der jeweiligen Person abhängig.
Sensorautomatik-Programme Kategorie Gewicht 1mal drücken 4. Suppe 300 - 1000 g 2 mal drücken 5. Reis/Pasta 300 - 1000 g 1mal drücken 250 - 1000 g 6. Frisches Gemüse 2 mal drücken 7. Frischer Fisch 200 - 700 g 1mal drücken 8. Gefrorenes Gratin 2 mal drücken 300 - 800 g 9. Frisches Gratin D-22 500 - 800 g Zubehör Hinweise Zum Erwärmen von Suppen aus Kartons, Dosen oder selbstgemachten Suppen. Alle Speisen sollten Raum- oder Kühlschranktemperatur haben. Vor und nach dem Erwärmen umrühren.
Gewichtsautomatik-Programme Diese Funktion gestattet Ihnen die Zubereitung der meisten Ihrer Lieblingsspeisen, wofür Sie lediglich das Gewicht der Lebensmittel einzustellen brauchen. Vom Gerät werden MikrowellenLeistungsstufe, Grillstufe, Heißluft-Temperatur und Garzeit automatisch eingestellt. Wählen Sie zunächst die entsprechende Lebensmittelkategorie aus und geben Sie dann das Gewicht der Speisen ein. Das Gewicht wird in Gramm programmiert.
Gewichtsautomatik-Programme Kategorie Gewicht 1mal drücken 14. Huehnerteile 200 - 1500 g 2 mal drücken 15. Huhn ganz 1000 - 2400 g 3 mal drücken 16. Schwein /Kalb 800 - 2000 g 1 mal drücken 17. Rind 650 - 1250 g 2 mal drücken 18. Rind Rippenstueck 700 - 1300 g 3 mal drücken 19. Lamm D-24 1000 - 2300 g Zubehör Hinweise Zum Garen von Hähnchenteilen, z.B. Hähnchenbeinen oder -schenkeln. Stellen Sie den runden Grillrost mit den Hähnchenteilen in die Fettpfanne, auf den Glasdrehteller.
Gewichtsautomatik-Programme Kategorie 1mal drücken Gewicht 4-6 20. Torte 6-8 21. Torte Teilen Hinweise Rezepte zum Backen von Quiches oder Obsttörtchen mit rohen Zutaten entnehmen Sie bitte dem Kochbuch, z.B. für pikante Quiches – Quiche Lorraine, Thunfisch-Quiche, Räucherlachs-Quiche, RoquefortQuiche, Pilz-Quiche, ZwiebelQuiche, Porree-Quiche, Spinat- und Parmesan-Quiche, Muschel-Quiche. Süße Törtchen – Apfel-, Aprikosen-, Rhabarber-, Birnen- und Zimttörtchen.
Speicher Diese Funktion gestattet Ihnen, Ihr Mikrowellengerät für regelmäßige Vorheiz- und Kochvorgänge zu programmieren. Sie können Ihr Mikrowellengerät auf eine bestimmte Leistungsebene und eine für Sie passende Zeit einstellen. Es lassen sich drei Speicheraufgaben vorprogrammieren. Einstellen eines Speicherprogramms Programmieren Sie das gewünschte Kochprogramm ein.
Gerätebetrieb mit Vorwahlzeit Mittels der Vorwahlzeit/Standzeit-Taste können Sie eine Vorwahlzeit zum später einsetzenden Gerätebetrieb eingeben. z.B. 10 min 1 min 10 s Deutsch 1 h nicht einstellbar • Drücken Sie die Vorwahlzeit/Stand zeit-Taste. 1 h 10 min 1 min 10 s • Stellen Sie durch Drücken der Zeittasten die gewünschte Vorwahlzeit ein (bis zu 9 Stunden 59 Minuten). • Stellen Sie das gewünschte Garprogramm und die Garzeit ein. • Drücken Sie die Starttaste. ANMERKUNGEN: 1.
Standzeit Mittels der Vorwahlzeit/Standzeit-Taste ist es möglich, die Standzeit nach dem Garen einzuprogrammieren oder das Gerät als Minutentimer zu programmieren. z.B. 1 h 10 min 1 min 10 s • Stellen Sie das gewünschte Garprogramm und die Garzeit ein. 1 h 10 min 1 min 10 s • Drücken Sie die Vorwahlzeit/ StandzeitTaste. inoperable • Stellen Sie durch Drücken der Zeittasten den gewünschten Zeitraum ein (bis zu 9 Stunden 59 Minuten). • Drücken Sie die Starttaste. ANMERKUNGEN: 1.
Fragen und Antworten F: Warum strömt manchmal warme Luft aus dem Mikrowellengerät? A: Läßt sich das Mikrowellengerät nicht ein schalten, dann überprüfen Sie bitte folgen des: A: Die erhitzten Lebensmittel erwärmen den Garraum. Diese warme Luft wird durch die zirkulierende Luftströmung aus dem Gerät heraus befördert. In dieser erwärmten Luft sind keine Mikrowellen enthalten. Die Lüftungsöffnungen dürfen während des Garens in keinem Fall abgedeckt werden. 1.
Fragen und Antworten F: Warum sind während des Kombinationsgarens brummende und klickende Geräusche zu hören? A: Diese Geräusche sind bedingt durch das automatische Umschalten von MIKROWELLENLEISTUNG auf GRILLEISTUNG während des Kombinationsbetriebs. Dies ist normal. F: Warum riecht das Mikrowellengerät unangenehm und erzeugt beim Betrieb von Heißluft, Kombination und Grill Rauch? A: Nach mehrfachem Gebrauch ist es notwendig, das Gerät gründlich zu reinigen.
Pflege des Mikrowellengerätes Wird das Mikrowellengerät nicht in einem sauberen Zustand gehalten, kann dies zu einer Güteminderung der Oberflächen führen, was wiederum eine Beeinträchtigung der Lebensdauer des Geräts mit sich bringen und eventuell eine Gefahr für den Benutzer darstellen kann. Schalten Sie vor dem Reinigen das Gerät ab. 2. Halten Sie stets den Garraum, die Tür und den Türrahmen sauber.
Technische Daten Netzspannung: Operations Frequenz Leistungsaufnahme: Ausgangsleistung: Äußere Abmessungen: Garraumabmessungen: Gewicht: Geräusch: 230 V, 50 Hz 2,450 MHz Maximum: Mikrowelle: Grill: Heißluft: Mikrowelle: Grill: Heißluft: 530 (W) x 508 (D) x 344 (H) mm 350 (W) x 360 (D) x 250 (H) mm 21.0 kg 52, 7 dB 2980 W 1275 W 1560 W 1500 W 1000 W (IEC-60705) 1500 W 1400 W Die Angaben sind Annäherungswerte; Die technischen Daten Können ohne Vorankündigung verändert werden.
Panasonic Corporation Web Site:http://panasonic.com.
English Deutsch Nederlands Français Česky Magyar Microwave/Grill/Convection Oven Mikrowellengerät mit Grill/Heißluft De Panasonic Microgolf/Warme Lucht Oven Panasonic Four à Micro-ondes Multifonctions Forno a microonde e Convezione Kuchenka mikrofalowa z funkcjami Grill/Konwekcja Mikrovlnná / Horkovzdušná trouba/ Gril Grillezös / légkeveréses mikrohullámú sütö Polski Operating Instructions Bedienungsanleitung Gebruiksaanwijzing Mode dʼemploi Manuale di istruzioni Instrukcja obsługi Návod k obsluze Kezelé
IMPORTANT SAFETY INSTRUCTIONS: Before operating this oven, please read these instructions carefully and keep for future reference. WICHTIGE SICHERHEITSANWEISUNGEN. Bitte sorgfältig durchlesen und zur weiteren Bezugnahme aufbewahren. BELANGRIJKE VEILIGHEIDSINSTRUCTIES. Lees ze a.u.b. zorgvuldig door en bewaar ze zodat u ze opnieuw kunt raadplegen wanneer nodig. INSTRUCTIONS DE SÛRETÉ IMPORTANTES.
Installatie en aansluiting Uw magnetronoven controleren Inbouwen Pak de magnetronoven uit en verwijder alle verpakkingsmaterialen. Controleer de magnetronoven op beschadigingen zoals deuken, beschadiging van de deurafsluiting of scheuren in de deur. Waarschuw onmiddellijk uw leverancier wanneer schade wordt geconstateerd. Gebruik het apparaat niet als het beschadigd is. De oven kan, indien gebruik wordt gemaakt van een inbouwraam (wit, NN-TKA80WB, zilver, NN-TKA80MB) ingebouwd worden in een muurkast.
Installatie en aansluiting WAARSCHUWING 1. De deurafdichtingen en de plaatsen hieromheen moeten met een vochige doek worden schoongemaakt. Voordat het apparaat in werking gesteld wordt, dient het apparaat nagekeken te worden op beschadigingen bij deurafdichtingen en de plaatsen hieromheen. Mochten zich hier toch beschadigingen voordoen, dan mag het apparaat pas in gebruik worden genomen nadat de magnetronoven is gerepareerd of nagekeken door een hiervoor, door de fabrikant opgeleide, service monteur. 2.
Veiligheidsinstructies Werking van de oven en grill Werking van de ventilatiemotor Tijdens het werken met de microgolf/warme lucht-functie draait er tegelijkertijd een ventilatormotor die de elektrische onderdelen koelt. Na het beëindigen van de kookfuncties, draait de ventilatormotor soms nog een tijdje door. Dit is normaal. U kunt Het voedsel gerust uit de oven nemen ook al draait de ventilatormotor nog door. Verlichting van de magnetronoven.
Belangrijke informatie 1. Kooktijden • De in het kookboek opgegeven kooktijden zijn bij benadering gegeven. Factoren die invloed hebben op de kookduur zijn: de begintemperatuur, de hoeveelheid, grootte, afmetingen en vorm van het voedsel en van de materialen die voor het koken gebruikt worden. • Het is beter om te kort dan om te lang te koken. Als het voedsel te kort wordt gekookt, kan het altijd nog een keer in de magnetronoven geplaatst worden. N.B.
De magnetronoven [8] [6] [4] [13] [15] [14] [5] [1] [7] [9] [3] [10] [11] [12] 1. Deur ontgrendeltoets Druk de toets in om de deur te openen. Indien u de ovendeur tijdens het koken opent, stopt de magnetronoven met koken zonder het ingestelde kookprogramma te wissen. Het koken gaat weer normaal door, zodra de deur wordt gesloten en de starttoets wordt aangeraakt. Het lampje in de magnetronoven gaat, zodra u de ovendeur opent, aan. 2. Doorkijkvenster 3. Veiligheidsscharnieren 4.
Het bedieningspaneel NN-CT870S/NN-CT850W* (9) (1) (12) 1 h 10 min 1 min 10 s (1) (2) (3) (4) (5) (6) (7) (8) (9) (10) (11) (12) (2) (13) (3) (13) (4) (5) (14) (15) (6) (7) M Combi (8) (10) (14) g (16) (11) (15) (16) NN-CT870S * De uitvoering van het bedieningspaneel kan afwijken van de afbeelding (afhankelijk van de kleur). De functies zijn echter dezelfde.
De juiste kookfunctie kiezen Kookfuncties Magnetron Toepassingen Schalen Uitsluitend de glazen draaiplateau Geschikt voor de magnetron, geen metaal - Niet Voorverwarmen Grill - Grillen van vlees of vis - Roosteren van brood - Gratineren van gerechten of schuimtaarten Glazen Warmtebedraaiplateau + stendig, metalmetalen schotel en kom is + rond rek bruikbaar Voorverwarmen noodzakelijk CONVECTIE - Bakken van kleine deegwaren met korte kooktijden: pasteitjes, koekjes, soesjes, koekjes van kruimeldeeg,
De juiste kookfunctie kiezen Kookfuncties Grill + convectie Toepassingen - Roosteren van rood vlees, dikke biefs tuk (ribeye of kogel-biefstuk, T-bon esteak) - Smoren van vis Voorverwarmen noodzakelijk Te gebruiken accessoires Schalen Glazen draaiplateau + Warmtebemetalen schotel stendig, metal+ rond rek of en kom is geëmailleerd bruikbaar bakblik en/of bakrooster COMBINATIE • Grill + magnetron • Convectie + magnetron • Grill + convectie + magnetron - Roosteren van vlees en gevogelte - Ontdooien en
Toebehoren De tabel hieronder vermeldt welke accessoires voor welk programma gebruikt moeten worden.
Bedienings- en gebruiksprocedure Stap voor stap display: Plug-in “88:88” Stap voor stap display Druk op “FRANCAIS” In Frans Druk op “ITALIANO” In Italiaans Druk op “DEUTSCH” In Duits Druk op “NEDERLANDS” In Nederlands Druk op “ESPANOL” In Spaans Druk op “POLSKI” In Pools Druk op “ČESKY” In Czek Druk op “ENGLISH” In Engels Deze modellen hebben een unieke functie "Stap voor stap display" die u door de werking van de magnetronoven heen leiden.
Bedienings - en gebruiksprocedure De klok instellen: Voorbeeld: Voor het instellen van 14:25 14 maal 1 h 10 min 1 min 10 s vijfmaal niet operationeel • Toets de juiste tijd in door de betreffende tijdtoetsen aan te raken. De tijd verschijnt in het uitleesvenster en het dubbel punt knippert. • Druk eenmaal op de toets Wachttijd/Rusttijd. Het dubbel punt houdt op met knipperen en de tijd is in het geheugen opgenomen en wordt op het uitleesvenster getoond. Opmerking: 1.
Koken met de magnetronfunctie en ontdooien Er zijn 6 verschillende niveaus voor het vermogen aanwezig (zie de onderstaande tabel). Gebruik van de accessoires: Glazen draaiplateau Deze tabel geeft het gemiddelde vermogen weer dat voor ieder vermogensniveau gebruikt kan worden. Indrukken 1x Vermogen Maximaal vermogen Wattage 1000 W Max.beschikbare tijd 30 minuten 2x Ontdooitoets vermogen 270 W 99 min. 50 sec. 3x Middelmatig vermogen 600 W 99 min. 50 sec. 4x Smoor vermogen 440 W 99 min.
Grillen Bij het grillen kunt u een keuze maken uit drie standen. Gebruik van de accessoires: Rond rooster Glazen draaiplateau Indrukken 1x Vermogen 1 HOOG Wattage 1500 W 2x 2 MIDDEN 1200 W 3x 3 LAAG 950 W Nederlands Metalen draaiplateau Plaats het voedsel na het voorverwarmen in de oven. • Druk de Grill-toets in voor de gewenste grill-stand. • Druk de starttoets in t.b.v. het voorverwarmen.
Koken met de Hete Lucht/Grill + Hete lucht-functie Deze toetsen bieden de mogelijkheid om een temperatuur van 40°C (alleen voor de Hete lucht-functie) en 100 - 250°C te selecteren met een verhoging van steeds 10°C. Voor een snelle selectie van de meest gebruikte temperatuur begint de temperatuur op 150°C en telt door tot 250°C, daarna 40°C (alleen van toepassing voor de Hete lucht-functie) en 100°C. Wanneer u de convectiefunctie gebruikt dan kunt u op één of twee niveaus koken.
Koken met de Hete Lucht/Grill + Hete lucht-functie Plaats het voedsel na het voorverwarmen in de oven. 1 h 10 min 1 min 10 s • Als u het grillvermo- • Druk de starttoets in om het proces van gen wilt veranderen, voorverwarmen te druk dan eenmaal starten. voor ʻGemiddeldʼ tweemaal voor ʻLaagʼ. Nederlands • Stel de gewenste temperatuur in. (Het grillvermogen staat standaard op ʻHoogʼ.) niet operationeel • Stel de gewenste kooktijd/baktijd in (tot 9 uur 59 minuten). • Druk de starttoets in.
Koken met convectie/grill + convectie Koken met bakblik/-rooster Koken op één niveau Als u het bakblik of - rooster gebruikt, plaats dit dan op het onderste niveau. Geëmailleerd bakblik Bakrooster Koken op twee niveaus Als u op twee niveaus kookt, gebruik dan zowel het meegeleverde bakblik als het bakrooster. Plaats het geëmailleerd bakblik dan op het onderste niveau en het bakrooster op het bovenste niveau.
Combinatie koken Er zijn 3 combinaties voorgeprogrameerd; 1) Grill + Magnetron, 2) Hete lucht + Magnetron, 3) Grill + Hete lucht + Magnetron. 1000 W Magnetron vermogen is niet beschikbaar tijdens het Combinatie koken. Dit is bij regulier gebruik niet zinvol (het voedsel zou gekookt zijn voordat het bruiningsproces heeft plaatsgevonden).
Combinatie koken 2) Hete lucht + Magnetron Combi • Druk de Combinatietoets in. 1 h 10 min 1 min 10 s • Kies de gewenste temperatuur. • Kies het gewenste vermogen. niet operationeel • Kies de gewenste baktijd (tot 9 uur 59 minuten). • Druk de starttoets in. 3) Grill/Hete Lucht + Magnetron Combi • Druk de Combinatietoets in. • Kies de gewenste temperatuur. (Grill vermogen is vooraf ingesteld op Hoog.
Combinatie koken OPMERKING OVER HET VOORVERWARMEN: De oven kan voorverwarmd worden in de stand Combinatie koken. Druk de starttoets in voordat u de kooktijd/baktijd instelt en volg de instructies zoals gesteld op pagina NI-15. Opmerkingen over het voorverwarmen. OPMERKINGEN: Nl-19 Nederlands 1. Wanneer de ingestelde kooktijd/baktijd minder dan een uur bedraagt, Wordt de tijd per seconde afgeteld. 2.
Automatisch ontdooien Deze functie biedt u de mogelijkheid om het voedsel te ontdooien al naar gelang het gewicht. Kies de categorie en stel het gewicht van het voedsel in. Het gewicht is geprogrammeerd in grammen. Voor elke categorie, is het meest voor de hand liggende gewicht geprogrammeerd. g • Druk op de • • Stel het gewicht van het bevroren voedsel in. Automatische ontg instellen van het gewicht - stapsgewijs per 100 g dooitoets.
Automatische sensor programma's Het automatisch koken stelt u in staat om bepaalde etenswaren te koken zonder dat u het gewicht, het vermogen of de kooktijd hoeft in te stellen. b.v. • Kies het gewenste Automatische sensor programma. • Druk de starttoets in. Nederlands Meer/minder toets: Iedereen heeft een eigen smaak voor wat betreft het meer of minder gaar koken van het voedsel.
Automatische sensor programma's Categorie 1 keer drukken voor Gewicht 4. Soep 300 - 1000 g 2 keer drukken voor 5. Rijst/Pasta 300 - 1000 g 1 keer drukken voor 6. Verse groenten 2 keer drukken voor 7. Verse vis 1 keer drukken voor 8. Diepgevroren 250 - 1000 g 200 - 700 g 500 - 800 g pizza 2 keer drukken voor 9. Verse gratin Nl-22 300 - 800 g Toebehoren Instructies/Tips Voor het opwarmen van zelfgemaakte soep of soep in tetrapak of blik. De soep moet op kamerof koelkasttemperatuur zijn.
Automatisch koken Met deze ovenfunctie wordt het mogelijk om uw favoriete gerechten te bereiden. Het enige dat u moet doen is het gewicht instellen. De oven bepaalt automatisch het magnetronvermogen, de hete lucht temperatuur en de kooktijd. Kies de categorie en stel het gewicht van het voedsel in. Het gewicht is geprogrammeerd in gram. Voor elke categorie is het meest voor de hand liggende gewicht geprogrammeerd. b.v. g • Stel het gewicht van het bevroren voedsel in.
Automatisch koken Categorie 1 keer drukken voor 14. Stukken Kip Gewicht 200 - 1500 g 2 keer 15. Hele Kip drukken voor 1000 - 2400 g 3 keer drukken voor 16. Varkens- 800 - 2000 g vlees/ kalfsvlees 1 keer drukken voor 2 keer drukken voor 3 keer drukken voor Nl-24 17. Rund 18. Runderrib 19. Lam 650 - 1250 g 700 - 1300 g 1000 - 2300 g Toebehoren Instructies/Tips Voor het bereiden van stukjes kip zoals b.v. kippenpootjes, kippenvleugels of drumsticks.
Automatisch koken Categorie 1 keer drukken voor Gewicht Toebehoren Voor het bereiden van taarten van diverse ingredienten - zie het kookboek voor recepten. Bv. hartige quiche – quiche lorraine, champignontaart, uientaart, spinazietaart Zoete taart – perentaart, verse kaastaart, rabarbertaart, appeltaart.
Geheugen Met deze functie kunt u veel gebruikte opwarm- of kookfuncties in uw oven voorprogrammeren. Verder kunt u uw oven voorprogrammeren met het gewenste vermogen en de gewenste tijd. U kunt drie geheugentaken voorprogrammeren. Een geheugenprogramma instellen Programmeer het gewenste kookprogramma. M Memory • Druk op de Geheugentoets. De oven wordt automatisch ingesteld op geheugen 1. Om geheugen 2 te selecteren, drukt u tweemaal op de geheugentoets.
Voorgeprogrammeerde start. Deze functie maakt het mogelijk, de uitgestelde begintijd van het koken, vooraf in te stellen. b.v. 1 h 10 min 1 min 10 s niet operationeel • Stel het gewenste kookprogramma in. 1 h 10 min 1 min 10 s Nederlands • Stel het aantal uren/minuten in • Druk op de waarna de magnetronoven met programmeer/ standaardtijdtoets. koken moet beginnen door de tijdtoetsen in te drukken (tot 9 uur en 59 minuten). • Druk de starttoets in. 1.
Programmeer/Standaardtijdtoets Door het gebruik van de Programmeer/Standaardtijdtoets kunt u de wachttijd programmeren nadat de bereiding heeft plaatsgevonden of deze gebruiken om de oven als een kookwekker te gebruiken. b.v. om de standtijd na het bakken in te stellen (nagaartijd) 1 h 10 min 1 min 10 s • Stel de gewenste kooktijd en het gewenste kookprogramma in. 1 h 10 min 1 min 10 s • Druk op de programmeer/ standaardtijdtoets.
Vraag en antwoord V: Mijn microgolfoven veroorzaakt storing op mijn TV is dat normaal? A: Een bepaalde mate van storing op radio en TV kan optreden wanneer de magnetronoven wordt gebruikt. Deze storing is gelijk aan het soort interventie veroorzaakt door kleine huishoudelijke apparaten zoals mixers, stofzuigers, haardrogers, etc. Dit duidt niet op een storing in de magnetronoven. V: De oven accepteert mijn programma niet.
Onderhoud van uw magnetronoven Houd verluchtingsopeningen altijd vrij. Controleer dat stof of andere materialen de verluchtingsopeningen boven-, onder of achteraan de oven niet blokkeren. Een blokkering van de verluchtingsopeningen kan leiden tot oververhitting en de werking van de oven hinderen. 1. Schakel de magnetronoven uit voordat u deze gaat schoonmaken. 2. Hou de binnenkant van de magnetronoven, de deurafdichtingen en de plaatsen rondom deze afdichtingen schoon.
Technische specificaties Netspanning: Werkfrequentie: Opgenomen vermogen: 230 V, 50 Hz 2,450 MHz Maximaal; Magnetron; Grill; Hete lucht; Afgegeven vermogen: Magnetron; 1000 W (IEC-60705) Grill; 1500 W Hete lucht; 1400 W 530 (B) x 508 (D) x 344 (H) mm 350 (B) x 360 (D) x 250 (H) mm Nederlands Buitenafmetingen: Binnenafmetingen: Gewicht van de interne accessoires; Geluidsniveau: 2980 W 1275 W 1560 W 1500 W 21.0 Kg 52,7 dB De specificaties kunnen zonder voorafgaand bericht gewijzigd worden.
Panasonic Corporation Web Site:http://panasonic.com.
English Deutsch Nederlands Français Česky Magyar Microwave/Grill/Convection Oven Mikrowellengerät mit Grill/Heißluft De Panasonic Microgolf/Warme Lucht Oven Panasonic Four à Micro-ondes Multifonctions Forno a microonde e Convezione Kuchenka mikrofalowa z funkcjami Grill/Konwekcja Mikrovlnná / Horkovzdušná trouba/ Gril Grillezös / légkeveréses mikrohullámú sütö Polski Operating Instructions Bedienungsanleitung Gebruiksaanwijzing Mode dʼemploi Manuale di istruzioni Instrukcja obsługi Návod k obsluze Kezelé
IMPORTANT SAFETY INSTRUCTIONS: Before operating this oven, please read these instructions carefully and keep for future reference. WICHTIGE SICHERHEITSANWEISUNGEN. Bitte sorgfältig durchlesen und zur weiteren Bezugnahme aufbewahren. BELANGRIJKE VEILIGHEIDSINSTRUCTIES. Lees ze a.u.b. zorgvuldig door en bewaar ze zodat u ze opnieuw kunt raadplegen wanneer nodig. INSTRUCTIONS DE SÛRETÉ IMPORTANTES.
Installation et branchement Vérifiez lʼétat du four à micro-ondes Si vous encastrez lʼappareil Déballez le four et débarrassez-le de lʼensemble du matériel dʼemballage. Examinez soigneusement lʼappareil afin de détecter toute déformation, défectuosité du système de fermeture de la porte ou défaut de la porte elle-même. Prévenez immédiatement votre revendeur si lʼappareil est endommagé. Nʼinstallez pas un four à micro-ondes endommagé.
Installation et branchement AVERTISSEMENT 1. Nettoyez les joints dʼétanchéité de la porte à lʼaide dʼun linge humide. Vérifiez si lʼappareil ne présente pas de défauts au niveau des joints dʼétanchéité. Si cʼest le cas, ne lʼutilisez plus avant que ceux-ci aient été réparés par un technicien agréé par le fabricant. 2. Ne tentez jamais de modifier, dʼajuster ou de réparer la porte, le boîtier du panneau de commandes, les commutateurs de verrouillage de sécurité ou tout autre élément du four.
Consignes de sécurité Utilisation des résistances Anneau à roulettes 1. Nettoyez régulièrement lʼanneau à roulettes et le plancher du four afin de réduire les nuisances dues aux bruits ainsi que lʼaccumulation de particules de nourriture. 2. Utilisez toujours lʼanneau à roulettes avec le plateau tournant en verre pour la cuisson des aliments. Plateau noir émaillé 1. Le plateau noir sʼutilise en mode Gril, Turbogril, Chaleur tournante et Combiné.
Informations importantes 1. Temps de cuisson • Les temps de cuisson indiqués dans le manuel de cuisine sont approximatifs. Ils peuvent varier selon la température initiale, la hauteur de l'aliment, le volume et la forme des récipients utilisés ainsi que le degré de cuisson désiré. • Il vaut mieux éviter la surcuisson. Les aliments n'attachent pas mais peuvent brûler, se dessécher et même dans des cas extrêmes, prendre feu et endommager votre four.
Schéma descriptif [8] [6] [4] [13] [15] [14] [5] [2] [1] [7] Français [9] [3] [10] [11] [12] 1. Touche dʼouverture de la porte Appuyez sur cette touche pour ouvrir la porte. Si vous ouvrez la porte du four pendant quʼil est en marche, il sʼarrête de fonctionner sans toutefois que les instructions de programmation soient annulées. Pour poursuivre la cuisson, refermez la porte, puis appuyez sur la touche Marche. Lʼintérieur du four sʼéclaire dès que vous ouvrez la porte. 2. Fenêtre du four 3.
Panneau de commandes NN-CT870S/NN-CT850W* (1) (2) (3) (4) (5) (6) (9) (1) (7) (8) (9) (10) (12) 1 h 10 min 1 min 10 s (2) (11) (3) (12) (4) (5) (13) (13) (14) (6) (7) (15) M Combi (8) (10) (14) g (11) (15) (16) (16) NN-CT870S * N.B.: Le four annnule automatiquement une cuisson ou une opération programmée mais non démarrée au bout de 6 minutes. La fenêtre affiche de nouveau l'heure ou le 2 points (:).
Quel mode de cuisson choisir ? LES MODES DE CUISSON UTILISATIONS ACCESSOIRES RÉCIPIENTS Plateau tournant en verre uniquement Transparent aux ondes. pas de métal. Plateau tournant + plateau noir + trépied ou grille carrée et/ou lèchefrite carrée. Résistant à la chaleur. Métal autorisé. Plateau tournant + plateau noir + trépied (selon taille de lʼaliment) ou grille carrée et/ou lèchefrite carrée Résistant à la chaleur. Métal autorisé.
Quel mode de cuisson choisir ? LES MODES DE CUISSON UTILISATIONS ACCESSOIRES RÉCIPIENTS Plateau tournant + plateau noir + trépied ou lèchefrite et/ou grille carrée. Résistant à la chaleur. Métal autorisé. Plateau tournant + plateau noir + trépied (selon taille de lʼaliment) Transparent aux ondes et résistant à la chaleur. Métal lisse et non démontable autorisé sur plateau noir uniquement. Turbogril - Cuisson des viandes rouges, grillades épaisses (côte de bœuf ou de veau). - Braisage des poissons.
Accessoires Le tableau suivant vous permettra dʼutiliser correctement les accessoires du four.
Commandes et mode d'emploi Affichage du mode d'emploi : Branchement “88:88” Mode dʼemploi défilant Appuyez sur la touche “FRANCAIS” En français Appuyez sur la touche Appuyez sur la touche “ITALIANO” “DEUTSCH” Appuyez sur la touche “NEDERLANDS” En Italien En allemand En néerlandais Appuyez sur la touche “ESPANOL” En espagnol Appuyez sur la touche “POLSKI” En polonais Appuyez sur la touche “ČESKY” En tchèque Appuyez sur la touche “ENGLISH” En anglais Cet appareil est équipé dʼun mode d'
Commandes et mode d'emploi Réglage de lʼheure : Exemple : pour régler lʼheure sur 14h25 14 fois deux fois 1 h 10 min 1 min 10 s inactive 5 fois • Pressez 2 fois la touche Minuteur. Les deux points (:) commencent à clignoter. • Pressez la touche Minuteur. Les deux-points (:) cessent de clignoter et lʼheure est mémorisée. Français • Affichez lʼheure en pressant une ou plusieurs fois les touches de durée. Lʼheure s'affiche tandis que les deux-points (:) clignotent. REMARQUES : 1.
Cuisson et décongélation aux micro-ondes Les 6 puissances disponibles agissent comme le thermostat d'un four traditionnel en contrôlant la vitesse de cuisson. Certains plats - par exemple les potages et les ragoûts - requièrent l'utilisation de puissances différentes (MAX pour porter l'aliment à ébullition avant de poursuivre la cuisson sur 440 W ou 250 W).
Cuisson au gril Vous disposez de 3 puissances de gril. Acessoires utilisés : Trépied Plateau tournant en verre Plateau noir Pressez Niveau de puissance 1 fois 1 FORT Watts 1500 W 2 fois 2 MOYEN 1200 W 3 fois 3 DOUX 950 W Français Après le préchauffage, ouvrez la porte et introduisez lʼaliment dans le four. • Choisissez la puissance de gril désirée. inactive 1 h 10 min 1 min 10 s • Réglez le temps de cuisson (jusquʼà 99 minutes 50 secondes). • Pressez la touche Marche pour préchauffer.
Modes Chaleur tournante et Turbogril Ces modes de cuisson offrent un choix de températures de 40°C (en chaleur tournante uniquement) et 100 à 250°C par pas de 10°C. Par commodité, la température s'affiche d'abord à 150°C (C = centigrade) puis monte jusqu'à 250° avant de reprendre à 40° (en Chaleur tournante uniquement) puis 100°C, Il est possible de cuire sur 1 ou 2 niveaux lorsque vous utilisez le mode chaleur tournante. Voir page 16 pour la cuisson sur 2 niveaux.
Modes Chaleur tournante et Turbogril Cuisson en Turbogril : Après le préchauffage, ouvrez la porte et introduisez lʼaliment dans le four. • Choisissez la température. (la puissance Gril 1 est préselectionnée) 10 min 1 min 10 s • Pressez la touche Marche pour préchauffer. Français 1 h • Pour modifier la puissance du gril, pressez une fois (gril 2), deux fois (gril 3). inactive • Réglez le temps de cuisson (jusquʼà 9 heures 59 minutes). • Pressez la touche Marche. Remarques sur le préchauffage : 1.
Modes Chaleur Tournante et Turbogril Utilisation de la lèchefrite ou la grille carrée. Cuisson sur un seul niveau Si vous désirez cuire sur un seul niveau , il est préférable de positionner l'accessoire en niveau bas. Pensez à retirer alors tous les accessoires ronds (plateau tournant, plateau noir et anneau à roulettes) du four afin de faciliter la circulation d'air chaud.
Cuisson combinée La cuisson combinée offre 3 modes possibles : 1) Gril + Micro-ondes, 2) Chaleur tournante + Micro-ondes, 3) Turbogril + Micro-ondes. La puissance micro-ondes 1000 W nʼest pas disponible en mode de cuisson combinée. En effet, les aliments seraient cuits par les micro-ondes avant d'être dorés par la chaleur traditionnelle, ce qui n'est pas le but de la cuisson combinée.
Cuisson combinée 2) Chaleur tournante + Micro-ondes Combi 1 h 10 min 1 min 10 s inactive • Pressez la touche Combi • Sélectionnez • Sélectionnez la • Réglez la durée • Pressez la touche de cuisson la températupuissance de Marche. (jusquʼà re souhaitée. micro-ondes. 9 heures 59 minutes). 3) Turbogril + Micro-ondes (préchauffage conseillé -voir Fr-19) Combi • Choisissez la température. (Le Gril 1 est préselectionné). • Pressez la touche Combi.
Cuisson combinée Comment et quand préchauffer : Il est préférable de préchauffer la cuisson Combinée Gril + Micro-ondes et Turbo Gril + Microondes. La cuisson combinée Chaleur Tournante + Micro-ondes sera préchauffée pour les cuissons courtes (moins de 25 min, tartes, quiches, petits rôtis). Le préchauffage n'est pas nécessaire pour les cuissons longues (> 25 min). Pour préchauffer, sélectionner la cuisson combinée désirée et presser la touche Marche avant de choisir une durée de cuisson.
Décongélation automatique Cette fonction vous permet de décongeler des aliments surgelés selon leur poids. Sélectionnez la catégorie dʼaliment et affichez son poids. Celui-ci s'affiche en grammes. Par commodité, lʼaffichage indique dʼabord le poids le plus courant pour chaque catégorie dʼaliment. g • Choisissez la décon- • Indiquez le poids du produit surgelé.
Touches automatiques par Senseur Grâce au Senseur, qui équipe votre four, plus besoin d'afficher le poids. ex • Sélectionnez la touche automatique par Senseur, en pressant 1 ou 2 fois. • Pressez la touche Marche. Touche Plus / Moins : REMARQUES : 1. Les touches automatiques par Senseur ne peuvent fonctionner dans les 3 minutes qui suivent le branchement de lʼappareil. 2. Le four détermine automatiquement la durée de la cuisson ou le temps restant jusquʼà la fin de la cuisson. 3.
Touches automatiques par senseur Touche Poids min-max 1 pression 4. Soupe 300 - 1000 g 2 pressions 5. Riz/pâtes 300 - 1000 g 1 pression 2 pressions 6. Légumes frais 7. Poisson frais 250 - 1000 g 200 - 700 g 1 pression 8. Gratin surgelé 500 - 800 g 2 pressions 9. Gratin frais Fr-22 300 - 800 g Accessoires Mode d'emploi Pour réchauffer de la soupe fraîche, industrielle ou faite maison. La température initiale doit être ambiante ou réfrigérée. Mélanger avant et après le réchauffage.
Touches de cuisson automatique selon le poids Cette fonction vous permet de cuire ou réchauffer des aliments simplement en affichant leur poids. Le four détermine automatiquement la puissance des micro-ondes, la puissance du gril, la température de chaleur tournante et la durée de cuisson. Sélectionnez la catégorie dʼaliment et affichez le poids. Celui-ci s'affiche en grammes. Pour accélérer la sélection, lʼaffichage indique dʼabord le poids le plus courant de chaque catégorie dʼaliment.
Touches de cuisson automatique selon le poids Touche Poids min-max 1 pression 14. Morceaux 200 - 1500 g de poulet 2 pressions 15. Poulet entier 1000 - 2400 g 3 pressions 16. Porc / veau 1 pression 800 - 2000 g 17. Boeuf 650 - 1250 g 18. Côte de boeuf 700 - 1300 g 2 pressions 3 pressions 19. Agneau 1000 - 2300 g Fr-24 Accessoires Mode d'emploi Pour cuire et griller des cuisses, des ailes ou des pilons de volaille. Ne convient pas pour la gigolette de dinde ni le rôti de dindonneau.
Touches de cuisson automatique selon le poids Touche 1 pression Poids min-max Accessoires Pour cuire une tarte composée dʼingrédients crus - consultez le manuel de cuisson pour les recettes. Ex. Quiche salée Quiche Lorraine, quiche au thon, quiche aux oignons. Tarte sucrée tarte aux pommes, tarte au citron, tarte au fromage blanc. 4-6 20. Tarte parts 2 pressions 6-8 21.
Touches Mémoires Cette fonction vous permet de mettre en mémoire dans le four les modes et temps de cuisson correspondant à des recettes, des cuissons ou des réchauffages que vous utilisez souvent. Vous pouvez mettre en mémoire 3 cuissons différentes. Pour mettre une cuisson en mémoire. M Programmez le mode et le temps de cuisson désiré. Memory • Par défaut, le four affiche la mémoire N°= 1. Pour afficher les mémoires N°= 2 ou 3, pressez 2 ou 3 fois la touche Mémoire. • Pressez la touche Mémoire.
Cuisson différée La touche Minuteur/Cuisson différée permet de retarder le démarrage d'une cuisson. Ex. 1 h 10 min 1 h 10 min 1 min 10 s 1 min 10 s touche inactive • Réglez le temps de retardement souhaité en appuyant sur les touches de durée (jusquʼà 9 heures 59 minutes). • Appuyez sur la touche Minuteur. • Choisissez la cuisson souhaitée et sa durée. Français • Pressez la touche Marche. REMARQUES : 1.
Fonction Minuteur Cette touche vous permet d'utiliser la fonction Minuteur de votre four ou de programmer un temps de repos après une cuisson. Ex. Temps de repos après cuisson 1 h 10 min 1 min 10 s • Choisissez la cuisson souhaitée et sa durée. 1 h 10 min 1 min 10 s • Pressez la touche Minuteur. inactive • Réglez la durée désirée à lʼaide des touches de durée (jusquʼà 9 heures 59 minutes). • Pressez la touche Marche. REMARQUES : 1.
Questions et réponses Q : Pourquoi n'y a-t'il plus le mode défilant en français sur l'afficheur du four ? Q : Pourquoi le four refuse-t-il mes instructions de programmation ? R : Il y a sans doute eu une coupure de courant à votre domicile ou bien la prise du four a été débranchée. Répétez la procédure indiquée page Fr-10 R : Le four à micro-ondes est conçu pour refuser toute instruction de programmation incorrecte.
Entretien de lʼappareil IMPORTANT. Pour des raisons de sécurité, il est essentiel de maintenir propre l'intérieur du four. Le non respect de cette consigne peut entraîner une détérioration notable des revêtements susceptible de réduire la durée de vie de votre appareil et pouvant même présenter un danger. 1. Débranchez lʼappareil avant de le nettoyer. 2. Etant donné que les ondes agissent sur les molécules des aliments, il est important que votre four soit constamment propre.
Fiche technique Alimentation : Fréquence dʼutilisation : Puissance dʼentrée : Puissance de sortie : Dimensions extérieures : Dimensions intérieures : Poids (accessoires compris) ; Niveau sonore: 230 V, 50 Hz 2450 MHz Maximum ; 2980 W Micro-ondes ; 1275 W Gril ; 1560 W Convection ; 1500 W Micro-ondes ; 1000 W (IEC-60705) Gril ; 1500 W Convection ; 1400 W 530 (L) x 508 (P) x 344 (H) mm 350 (L) x 360 (P) x 250 (H) mm 21.
Panasonic Corporation Web Site:http://panasonic.com.
English Deutsch Nederlands Français Česky Magyar Microwave/Grill/Convection Oven Mikrowellengerät mit Grill/Heißluft De Panasonic Microgolf/Warme Lucht Oven Panasonic Four à Micro-ondes Multifonctions Forno a microonde e Convezione Kuchenka mikrofalowa z funkcjami Grill/Konwekcja Mikrovlnná / Horkovzdušná trouba/ Gril Grillezös / légkeveréses mikrohullámú sütö Polski Operating Instructions Bedienungsanleitung Gebruiksaanwijzing Mode dʼemploi Manuale di istruzioni Instrukcja obsługi Návod k obsluze Kezelé
IMPORTANT SAFETY INSTRUCTIONS: Before operating this oven, please read these instructions carefully and keep for future reference. WICHTIGE SICHERHEITSANWEISUNGEN. Bitte sorgfältig durchlesen und zur weiteren Bezugnahme aufbewahren. BELANGRIJKE VEILIGHEIDSINSTRUCTIES. Lees ze a.u.b. zorgvuldig door en bewaar ze zodat u ze opnieuw kunt raadplegen wanneer nodig. INSTRUCTIONS DE SÛRETÉ IMPORTANTES.
Installazione e connessione del forno alla rete elettrica Esaminate il vostro forno a microonde Incasso Togliere il forno dall'imballo avendo cura di rimuovere tutto il materiale dall'imballaggio, ed esaminarlo per accertare che non vi siano danni quali ammaccature, rotture delle chiusure o incrinature della porta. Avvertire subito il rivenditore se si riscontrano danni. Non installare il forno se risulta danneggiato.
Installazione e connessione del forno alla rete elettrica AVVERTENZA Impiego del forno 1. Le guarnizioni della porta e le zone circostanti devono essere pulite con un panno umido. Nel caso in cui esse risultino danneggiate, non bisogna mettere in funzione il forno fino a quando un tecnico autorizzato non le abbia riparate. 2. Non cercare in alcun modo di modificare o riparare il forno in NESSUNA delle sue parti.
Istruzioni per la sicurezza Riscaldamento Funzionamento della ventola di raffreddamento Durante il funzionamento del forno per la cottura o il riscaldamento di alimenti, la ventola è sempre in funzione per raffreddare i componenti elettrici. Una volta terminato l'uso, la ventola potrebbe continuare a girare per un certo periodo di tempo. Questo è perfettamente normale ed è possibile sfornare la pietanza quando la ventola è ancora in funzione.
Informazioni importanti 1. Tempi di cottura • I tempi di cottura indicati nel ricettario sono approssimativi. Il tempo di cottura dipende dalle condizioni, dalla temperatura, dalla quantità di cibo e dal tipo di stoviglie impiegate. • Cominciare a cuocere impostando il tempo di cottura più breve per evitare cotture eccessive. Se l'alimento non risulta cotto a sufficienza, si può sempre farlo cuocere ancora un pò. N.B.
Il vostro forno [8] [6] [4] [13] [15] [14] [5] [2] [1] [7] [9] [3] [10] [11] 1. 2. 3. 4. 5. 6. 7. 8. 9. 10. 11. 12. 13. Pulsante di apertura della porta Premere per aprire la porta. Se si apre il portello del forno durante il funzionamento, la cottura viene temporaneamente interrotta ma le impostazioni selezionate in precedenza non vengono cancellate. La cottura riprende non appena si richiude la porta e si preme nuovamente il pulsante di Avvio.
Pannelli di comando NN-CT870S/NN-CT850W* (9) (1) (2) (3) (4) (5) (6) (7) (8) (9) (1) (10) (12) 1 h 10 min 1 min 10 s (11) (12) (2) (3) (13) (13) (4) (5) (14) (15) (6) (7) M Combi (8) (10) (14) g (11) (16) (15) (16) NN-CT870S * Nota Se viene impostata un'operazione e non si preme il tasto di avvio, dopo 6 minuti l'operazione viene automaticamente annullata. Il display torna alla modalità di visualizzazione dell'ora.
Come scegliere il corretto modo di cottura Modi di cottura Microonde Usi Accessori da Contenitori utilizzare - Scongelare Riscaldare Fondere: burro, cioccolato, formaggi. Cuocere: pesce, verdure, frutta, uova. - Preparare: frutta cotta, marmellate, salse, creme, choux, Solo il vassoio paste per dolci/salati, besciamella, di vetro girevole caramello, carni, pesce o sformati vegetariani. - Cuocere torte con uova e lievito senza doratura. (sandwich Victoria, clafoutis, ecc.
Come scegliere il corretto modo di cottura Modi di cottura Grill + CONVEZIONE Usi - Arrostire carni rosse, bistecche spesse (costole o manzo, costate con osso) - per brasare il pesce. Necessario preriscaldare Accessori da utilizzare Contenitori Vassoio di vetro A prova di girevole + vascalore, soio di metallo può essere + griglia rotonda usata la teglia o leccarda di metallo. smaltata e/o griglia COMBINAZIONE • Grill + microonde - Arrostire carne e pollame.
Accessori del forno La seguente tabella mostra il corretto uso degli accessori per il forno.
Uso dei comandi e funzionamento del forno Collegare alla presa di corrente "88:88" Indicazione in lingua Premere “FRANCAIS” In Francese Premere “ITALIANO” In Italiano Premere “DEUTSCH” In Tedesco Premere “NEDERLANDS” In Olandese Premere “ESPANOL” In Spanish Premere “POLSKI” In Polish Premere “ČESKY” In Czek Premere “ENGLISH” In Inglese Visualizzazione della lingua Questi modelli dispongono di una funzione di "Indicazione in lingua" davvero unica, che consente di utilizzare facilmen
Uso dei comandi e funzionamento del forno Impostazione dell'orologio: Esempio: Impostazione delle ore 14:25 14 volte due volte 1 h 10 min 1 min 10 s 5 volte non operativo • Premere due volte il • Inserire l'ora premendo gli • Premere una volta il pulsante Ritardo/Attesa. pulsante Ritardo/Attesa. appropriati pulsanti di I due punti cominciano impostazione tempo. I due punti smettono di a lampeggiare. lampeggiare e l'ora è così L'ora viene visualizzata nel impostata.
Cottura e scongelamento con il forno a microonde Vi sono 6 diversi livelli di potenza per il forno a microonde (vedi la seguente tabella). Uso degli accessori: Vassoio di vetro La tabella mostra il valore in watt di ogni livello di potenza. Premere Una volta Livello potenza Potenza ALTA 2 volte Potenza SCONGELAMENTO 270 W 99 min. 50 sec. 3 volte Potenza MEDIA 600 W 99 min. 50 sec. 4 volte Potenza BASSA 440 W 99 min. 50 sec. 5 volte Potenza COTTURA LENTA 250 W 99 min. 50 sec.
Uso del grill Il pulsante Grill consente tre posizioni di impostazione. Uso degli accessori: Supporto rotondo Vassoio in metallo Vassoio di vetro Premere Livello potenza Watt una volta 1 ALTO 1500 W due volte 2 MEDIO 1200 W tre volte 3 BASSO 950 W Dopo il preriscaldamento, disporre l'alimento nel forno. • Premere il pulsante Modalità Grill per l'impostazione Grill desiderata. • Premere il pulsante Avvio per iniziare il preriscaldamento.
Cottura a Convezione e Convezione Grill Questi tasti consentono di scegliere tra le temperature di convezione di 40°C (solo per la modalità di Convezione) e da 100 a 250°C, in incrementi di 10°C. Per la selezione rapida delle temperature di cottura più comunemente usate, le temperature iniziano a 150°C, con conteggio sino a 250°C, quindi a 40°C (solo per la modalità Convezione) e a 100°C. È possibile cuocere su uno o due livelli durante la cottura CONVEZIONE.
Cottura a Convezione e Convezione Grill Cottura mediante Convezione Grill: Dopo il preriscaldamento, disporre l'alimento nel forno. • Impostare la tem- • Per modificare • Premere il pulsante peratura desideral'impostazione Avvio per iniziare il ta. (La funzione della modalità Grill preriscaldamento. modalità Grill è premere il pulpreimpostata su sante una volta Alta.) per scegliere la modalità Media, due volte per la modalità Bassa. 1 h 10 min 1 min 10 s non operativo • Premere il pulsante Avvio.
Cuocere con Convezione/Grill Convezione Cottura sui ripiani del forno Cottura su un livello Se si utilizza un solo ripiano per la cottura su un livello, collocare sul livello inferiore. Leccarda smaltata Griglia Cottura su due livelli Quando si cuoce su due livelli, utilizzare entrambi i ripiani forniti, mettendo la leccarda smaltata sul livello inferiore e la griglia sul livello superiore. In funzione della ricetta, è possibile preriscaldare il forno con o senza i ripiani in posizione.
Combinazione di modi di cottura Esistono 3 diverse impostazioni per la cottura combinata: 1) Grill + Microonde, 2) Convezione + Microonde, 3) Convezione Grill + Microonde. Per la cottura a Convezione non è disponibile il livello di potenza microonde di 1000 W. Tale livello di potenza risulterebbe infatti di norma inutile (l'alimento verrebbe cotto prima della doratura).
Combinazione di modi di cottura 2) Convezione + Microonde Combi • Premere il pulsante Cottura Combinata. 1 h 10 min 1 min 10 s • Impostare la temperatura desiderata. • Impostare il livello di potenza microonde desiderato. non operativo • Premere il pulsante Avvio. • Impostare il tempo di cottura desiderato (sino a 9 ore, 59 minuti). 3) Convezione Grill + Microonde Combi • Premere il pulsante Cottura Combinata. • Impostare la temperatura desiderata.
Combinazione di modi di cottura NOTA SUL PRERISCALDAMENTO: Nella cottura combinata il forno potrà essere preriscaldato. Premere il pulsante Avvio prima di impostare il tempo di cottura e seguire le indicazioni fornite alla NOTA SUL PRERISCALDAMENTO, a pagina It-15. NOTA: 1. Se il tempo di cottura selezionato è inferiore ad un'ora, il conto alla rovescia avverrà per secondi. 2.
Scongelamento automatico Questa caratteristica permette di scongelare automaticamente i cibi congelati in funzione del loro peso. Selezionare la categoria e impostare il peso dell'alimento. Il peso deve essere programmato in grammi. Per una selezione rapida, il peso inizia da quello utilizzato più frequentemente per ogni categoria. g • Selezionare il program- • Immettere il peso dell'alimento congelato. • Premere Start. Premere Start.
Programmi automatici a sensore Molti alimenti potranno essere cucinati senza immettere il tempo di cottura, il peso o il livello di potenza. ad esempio • Selezionare il programma automatico a sensore desiderato • Premere il pulsante Avvio. Comando Più/Meno: Le preferenze per il grado di cottura variano da individuo a individuo. Dopo aver utilizzato alcune volte i programmi automatici a sensore si potrà stabilire il grado di cottura preferito per l'alimento.
Programmi automatici a sensore Categoria Peso 1 pressione 4. Zuppe 300 - 1000 g 2 pressioni 5. Riso/pasta 300 - 1000 g 1 pressione 6. Verdure fresche 2 pressioni 250 - 1000 g 200 - 700 g 7. Pesce fresco 1 pressione 8. Gratin congelati 2 pressioni It-22 9. Gratin fresco 500 - 800 g 300 - 800 g Accessori Istruzioni Per riscaldare zuppe fatte in casa, in lattina o in tetrapack. Tutti i cibi dovrebbero essere a temperatura ambiente o da frigorifero. Agitare prima e dopo il riscaldamento.
Programmi automatici a peso Questa funzione permette di cucinare la maggior parte dei propri alimenti preferiti impostandone unicamente il peso. Il forno determina automaticamente il necessario livello di potenza delle microonde, la potenza del grill, la temperatura di convezione e il tempo di cottura. Selezionare la categoria e impostare il peso dell'alimento. Il peso deve essere programmato in grammi. Per una selezione rapida, il peso inizia da quello utilizzato più frequentemente per ogni categoria. es.
Programmi automatici a peso Categoria 1 pressione 14. Pezzi di pollo Peso 200 - 1500 g 2 pressioni 15. Pollo intero 3 pressioni 1000 - 2400 g 16. Maiale/ vitello 800 - 2000 g 17. Manzo 650 - 1250 g 1 pressione 2 pressioni 3 pressioni It-24 18. Costolette di manzo 700 - 1300 g 19. Agnello 1000 - 2300 g Accessori Istruzioni Per cucinare pezzi di pollo, ad esempio ali, petti o cosce. Disporre il pollo sul supporto rotondo, sul vassoio metallico, sul vassoio di vetro.
Programmi automatici a peso Categoria 1 pressione Peso 4-6 20 Torte 2 pressioni 21 Torte 3 pressioni porzioni 6-8 porzioni 8 - 10 22 Torte porzioni Istruzioni Accessori Per cuocere torte e pasticcini da ingredienti di base: vedi le ricette sul ricettario. Es. Quiche salata - Quiche Lorraine, torta ai funghi, torta alle cipolle, torta agli spinaci. Torte dolci – Torta Bourdaloue, torta di ricotta, torta al rabarbaro torta di mele.
Memoria Questa funzione consente di preprogrammare il forno per le normali attività di riscaldamento e cottura. Sarà possibile preprogrammare il forno per un determinato livello di potenza e per il periodo di tempo desiderato. È possibile preprogrammare tre attività di memoria. Per impostare un programma in memoria M Selezionare il programma di cottura desiderato.
Cottura con avvio ritardato Utilizzando il pulsante Ritardo/Attesa si potrà programmare l'avvio ritardato della cottura. ad esempio 1 h 10 min 1 min 10 s non operativo • Impostare il tempo di ritardo premendo i pulsanti di impostazione tempo (fino a 9 ore, 59 minuti). • Premere il pulsante Ritardo/Attesa. 1 h 10 min 1 min 10 s • Premere il pulsante Avvio. • Impostare il programma ed il tempo di cottura desiderati. NOTA: Avvio ritardato: 1 ora Italiano 1.
Tempo di attesa Con il pulsante Ritardo/Attesa si potrà programmare un tempo di attesa a ultimazione della cottura o programmare il forno come un timer a minuti. ad esempio Per programmare il tempo di attesa dopo la cottura 1 h 10 min 1 min 10 s • Premere il pulsante Ritardo/Attesa. • Impostare il programma ed il tempo di cottura desiderati. 1 h 10 min 1 min 10 s non operativo • Impostare il tempo desiderato con i pulsanti di impostazione tempo (fino a 9 ore, 59 minuti).
Domande e risposte D: Perché il forno non si accende? R: Quando il forno non si accende, verificare i punti seguenti: 1. Il forno è stato collegato saldamente alla presa di corrente? Estrarre la spina dalla presa di corrente, attendere 10 secondi e reinserirla. 2. Verificare l'interruttore principale e il fusibile. Reinserire l'interruttore principale o sostituire il fusibile se saltato o bruciato. 3.
Cura del forno a microonde La mancanza di attenzione alla pulizia del forno può portare al deterioramento delle superfici, riducendo la vita operativa dell'apparecchio e creando situazioni a rischio. 1. Prima di procedere alla pulizia del forno, spegnerlo e scollegarlo dalla presa di corrente. 2. Mantenere puliti l'interno del forno, le giunture della porta e le superfici vicine a queste.
Caratteristiche tecniche Tensione nominale: Frequenza di esercizio: Potenza in entrata: Potenza in uscita: 230 V, 50 Hz 2.450 MHz Massima; Microonde; Grill; Convezione; Microonde; Dimensioni esterne: Dimensioni della cavità del forno: Peso con accessori interni; Rumorosità: Grill; Convezione; 530 (L) x 508 (P) x 344 (A) mm 350 (L) x 360 (P) x 250 (A) mm 21.0 Kg 52, 7 dB 2980 W 1275 W 1560 W 1500 W 1000 W (IEC-60705) 1500 W 1400 W Le caratteristiche tecniche sono soggette a modifiche senza preavviso.
Panasonic Corporation Web Site:http://panasonic.com.
English Deutsch Nederlands Français Česky Magyar Microwave/Grill/Convection Oven Mikrowellengerät mit Grill/Heißluft De Panasonic Microgolf/Warme Lucht Oven Panasonic Four à Micro-ondes Multifonctions Forno a microonde e Convezione Kuchenka mikrofalowa z funkcjami Grill/Konwekcja Mikrovlnná / Horkovzdušná trouba/ Gril Grillezös / légkeveréses mikrohullámú sütö Polski Operating Instructions Bedienungsanleitung Gebruiksaanwijzing Mode dʼemploi Manuale di istruzioni Instrukcja obsługi Návod k obsluze Kezelé
IMPORTANT SAFETY INSTRUCTIONS: Before operating this oven, please read these instructions carefully and keep for future reference. WICHTIGE SICHERHEITSANWEISUNGEN. Bitte sorgfältig durchlesen und zur weiteren Bezugnahme aufbewahren. BELANGRIJKE VEILIGHEIDSINSTRUCTIES. Lees ze a.u.b. zorgvuldig door en bewaar ze zodat u ze opnieuw kunt raadplegen wanneer nodig. INSTRUCTIONS DE SÛRETÉ IMPORTANTES.
Ustawianie i podłączanie kuchenki mikrofalowej Sprawdź kuchenkę mikrofalową Zabudowa Rozpakuj urządzenie i sprawdź czy nie ma widocznych uszkodzeń, jak na przykład wgnieceń, wyłamanych rygli drzwiczek albo zarysowań drzwiczek. Jeśli urządzenie jest uszkodzone, skontaktuj się natychmiast z punktem sprzedaży. Nie instaluj uszkodzonego urządzenia.
Ustawianie i podłączanie kuchenki mikrofalowej OSTRZEŻENIE Korzystanie z kuchenki 1. Uszczelki drzwi i miejsca przyległe do uszczelek należy czyścić zwilżoną ściereczką. Kuchenka mikrofalowa powinna być sprawdzana pod kątem uszkodzeń uszczelek drzwi oraz powierzchni przylegających do nich i jeśli te powierzchnie są uszkodzone, urządzenie nie powinno być używane do czasu naprawy, przez wykwalifikowany personel autoryzowanego punktu serwisowego firmy Panasonic. 1.
Zalecenia dotyczące bezpieczeństwa Praca grzejnika 1. Przed pierwszym użyciem funkcji KONWEKCYJNEJ, KOMBINACYJNEJ lub GRILLA, wytrzyj nadmiar smaru z wnętrza kuchenki i uruchom kuchenkę, bez żywności i akcesoriów, w trybie KONWEKCYJNYM 250°C na 10 minut. Pozwoli to na całkowite wypalenie się pozostałości oleju zabezpieczającego przed korozją. Jest to jedyny przypadek użycia pustej kuchenki. 2.
Informacje ważne 1) Czasy gotowania • Czasy gotowania podane w książce kucharskiej są wartościami przybliżonymi. Czas gotowania zależy od rodzaju żywności, temperatury i ilości żywności oraz rodzaju naczynia. • Rozpocznij od minimalnego czasu gotowania, aby uniknąć rozgotowania potrawy. Jeśli potrawa będzie niedogotowana, zawsze możesz dogotować ją, ponownie ustawiając parametry.
Wygląd zewnętrzny [8] [6] [4] [13] [15] [14] [5] [2] [1] [7] [9] [3] [10] [11] [12] 1. 14. Kabel zasilający 15. Etykieta ostrzegawcza (Gorąca powierzchnia) PL-5 Polski 2. 3. 4. 5. 6. 7. 8. 9. 10. 11. 12. 13. Przycisk otwierania drzwiczek Naciśnij przycisk aby otworzyć drzwiczki. Gdy otworzysz drzwiczki podczas gotowania, gotowanie zostanie chwilowo przerwane, bez kasowania wcześniejszych ustawień.
Panel sterowania NN-CT870S/NN-CT850W* (1) (2) (3) (4) (5) (6) (9) (1) (7) (8) (9) (10) (12) 1 h 10 min 1 min 10 s (2) (3) (13) (4) (5) (6) (7) (11) (12) (13) (14) (15) M Combi (8) (10) (14) g (11) (15) (16) NN-CT870S (16) Wyświetlacz Przyciski ustawiania czasu Przycisk ustawiania mocy Mikrofal Przycisk ustawiania mocy Grill Przycisk ustawiania trybu Konwekcja Przycisk ustawiania trybu Grill/Konwekcja Przycisk ustawiania trybu Kombinacja Programowanie Przycisk automatycznego rozmrażania Pr
Dobór odpowiedniego Trybu Gotowania Tryby gotowania Mikrofale Zastosowanie - Rozmrażanie - Odgrzewanie - Topienie: masła, czekolady, sera żółtego. - Gotowanie ryb, jarzyn, owoców, jaj. - Przygotowywanie: duszonych owoców, dżemów, sosów, sosów na słodko, pasztecików, sosu beszamelowego, karmelu, mięsa, ryb lub pieczywa wegetariańskiego. - Pieczenie ciast biszkoptowych bez dodatków kolorowych (ciastka Victoria, clafoutis itp.
Dobór odpowiedniego Trybu Gotowania Tryby gotowania Ruszt + Konwekcja Zastosowanie - Pieczenie czerwonego mięsa, grubych steków (żeberek lub befsztyków, kotletów z kością) - Duszenie ryb. Niezbędne wstępne podgrzanie Akcesoria do zastosowania Pojemniki Szklany talerz obrotowy + taca metalowa + stojak okrągły lub półka emaliowana i/lub druciana Można stosować puszki metalowe odporne na ciepło.
Akcesoria kuchenki Poniższa tabela wyjaśnia prawidłowe zastosowanie akcesoriów kuchenki.
Regulatory oraz procedura obsługi Podpowiedzi: Po podłączeniu 88:88 Podpowiedzi Naciśnij “FRANCAIS” W języku francuskim Naciśnij “ITALIANO” W języku włoskim Naciśnij “DEUTSCH” W języku niemieckim Naciśnij “NEDERLANDS” W języku holenderskim Naciśnij “ESPANOL” W języku hiszpańskim Naciśnij “POLSKI” W języku polskim Naciśnij “ČESKY” W Czeky Naciśnij “ENGLISH” W języku angielskim Model ten wyposażony jest w wyjątkową funkcję podpowiedzi, która pomaga Ci wykonać kolejne kroki, ułatwiaj
Regulatory oraz procedura obsługi Ustawianie zegara: Przykład: Aby ustawić 14:25 14 razy dwukrotnie 1 h 10 min 1 min 10 s nieczynny 5 razy • • Naciśnij dwukrotnie przycisk Opóźnienie/Pauza. Dwukropek zacznie migać. • Wprowadź czas, naciskając odpowienie przyciski czasu. Czas pojawi się na wyświetlaczu, a dwukropek będzie migać. Naciśnij przycisk Opóźnienie/Pauza. Dwukropek przestanie migać. Czas jest ustawiony. UWAGA: 1. Aby na nowo ustawić zegar, wykonaj ponownie powyższe kroki. 2.
Gotowanie oraz rozmrażanie mikrofalowe Dostępnych jest 6 różnych poziomów mocy mikrofalowej (patrz tabelka poniżej). Użycie akcesoriów: W tabelce podano przybliżoną moc w Watach dla każdego poziomu gotowania. Szklany talerz Naciśnij Poziom mocy Moc raz DUŻA 1000 W Maksymalny czas 30 minut 2 razy ROZMRAŻANIE 270 W 99 min. 50 s. 3 razy ŚREDNIA 600 W 99 min. 50 s. 4 razy NISKA 440 W 99 min. 50 s. 5 razy WOLNE GOTOWANIE 250 W 99 min. 50 s. 6 razy UTRZYMANIE CIEPŁA 100 W 99 min. 50 s.
Opiekanie Przycisk Grill umożliwia 3 ustawienia tej funkcji. Użycie akcesoriów: Okrąły grill Metalowy talerz Szklany talerz Naciśnij raz Poziom mocy 1 DUŻA Moc 1500 W 2 razy 2 ŚREDNIA 1200 W 3 razy 3 NISKA 950 W Po podgrzaniu włóż potrawę do kuchenki. • Naciskaj przycisk mocy Grilla, aby uzyskać żądany poziom mocy. • Naciśnij przycisk start, aby rozpocząć podgrzewanie. nieczynny 10 min 1 min 10 s • Ustaw czas gotowania (do 99 minut 50 sekund). Polski 1 h • Naciśnij przycisk start.
Gotowanie konwekcyjne/ grill i konwekcja Przyciski te umożliwiają wybór temperatur Konwekcji 40°C (tyko w trybie konwekcji) oraz w zakresie 100° - 250°C z przyrostami co 10°C. Aby można było szybko wybrać najczęściej stosowane temperatury, ustawianie rozpoczyna się od 150°C poprzez przyrastanie do 250°C, następnie jest 40°C (tyko w trybie konwekcji) i 100°C. Przy gotowaniu konwekcyjnym istnieje możliwość gotowania jedno lub dwupoziomowego. Gotowanie na półkach patrz strona PL-16.
Gotowanie konwekcyjne/grill i konwekcja Gotowanie w trybie Grill/Konwekcja: Po podgrzaniu włóż potrawę do kuchenki. • Ustaw żądaną • Zależnie od potrzeby temperaturę. zmień poziom mocy (Poziom mocy w Grilla, naciskając raz; trybie Grill zostana Średnia, — je wstępnie naciskając dwa razy; ustawiony na na Niska. Duża). 1 h 10 min 1 min 10 s • Naciśnij przycisk start, aby rozpocząć podgrzewanie. nieczynny • Ustaw czas gotowania (do 9 godzin, 59 minut). • Naciśnij przycisk start.
Konwekcyjne/Grill i Konwekcja Gotowanie na półkach Gotowanie jednopoziomowe W razie zastosowania półki do gotowania jednopoziomowego półkę należy umieścić na dolnym poziomie. Gotowanie dwupoziomowe Podczas gotowania dwupoziomowego nalezy wykorzystać obydwie posiadane półki, przy czym półkę emaliowaną należy umieścić na dolnym poziomie, a półkę drucianą na górnym. Zależnie od przepisu, można prowadzić podgrzewanie wstępne z założonymi półkami lub bez nich.
Gotowanie kombinacyjne Do dyspozycji są 3 kombinacje ustawień; 1) Grill + Mikrofale, 2) Konwekcja + Mikrofale, 3) Grill Konwekcja + Mikrofale. Poziom mocy mikrofal 1000 W jest niedostępny przy gotowaniu w trybie kombinacyjnym. Nie jest on przydatny w normalnym użyciu (potrawa zostałaby upieczona zanim nastąpiło by przyrumienienie).
Gotowanie kombinacyjne 2) Konwekcja + Mikrofale 1 h 10 min 1 min 10 s Combi Nieczynny • Naciśnij • Ustaw żądaną przycisk temperaturę. Kombinacji. • Ustaw poziom mocy mikrofal. • Ustaw czas gotowania (do 9 godzin, 59 minut). • Naciśnij przycisk Start. 3) Grill/Konwekcja + Mikrofale Combi • Ustaw żądaną temperaturę (Moc Grilla jest ustawiona na Duża) • Naciśnij przycisk Kombinacji.
Gotowanie kombinacyjne UWAGI ODNOŚNIE PODGRZEWANIA: Kuchenka może być podgrzana, gdy ustawiony jest tryb kombinacyjny. Należy nacisnąć przycisk Start po ustawieniu mocy mikrofal lub temperatury Konwekcji; przestrzegaj UWAG ODNOŚNIE PODGRZEWANIA na str. PL-15. UWAGI: 1. Jeśli jest ustawiony czas gotowania poniżej jednej godziny, odliczanie następuje co sekundę. 2. Jeśli jest ustawiony czas gotowania powyżej jednej godziny, odliczanie następuje co minutę do chwili, gdy pozostanie tylko “1H 00“ (1 godzina).
Rozmrażanie automatyczne Dzięki tej funkcji możesz rozmrażać żywność na podstawie jej wagi. Wybierz rodzaj produktu i ustaw jego wagę. Waga jest wprowadzana w gramach. W celu przyspieszenia wyboru, waga rozpoczyna się od wielkości najczęściej używanych dla danego rodzaju produktu. g • Wybierz żądany program rozmrażania automatycznego. Wybierz odpowiedni program automatycznego rozmrażania. Przyciśnij raz - dla małych kawałków, dwa razy - dla większych i trzy razy - dla chleba.
Programy automatyczne z czujnikiem Rozmaite potrawy można gotować bez konieczności ustawiania czasu gotowania, ciężaru czy poziomu mocy. Np. • Wybierz żądany program automatyczny z czujnikiem. • Naciśnij przycisk start. Regulacja Plus/Minus: Preferencje co do stopnia wypieczenia są rzeczą gustu. Po kilkukrotnym skorzystaniu z programów automatycznych z czujnikiem, możesz zdecydować jaki stopień wypieczenia najbardziej Ci odpowiada.
Programy automatyczne z czujnikiem Program Waga 1 wciśnięcie 4. Zupa 300 - 1000 g 2 wciśnięcia 300 - 1000 g 5. Ryż/ makarony 1 wciśnięcie 6. Świeże 250 - 1000 g warzywa 2 wciśnięcia 7. Świeże ryby 200 - 700 g 1 wciśnięcie 8. Mrożone zapiekanki PL-22 500 - 800 g Akcesoria Wskazówki Do podgrzewania zup z kartonów, puszek lub domowej roboty. Wszystkie produkty muszą mieć pokojową temperaturę lub temperaturę lodówki. Wymieszaj przed i po ponownym odgrzewaniu.
Np. Programy automatyczne uwzględniające wagę produktu g • Wybierz żądany program rozmrażania automatycznego. • Ustaw wagę zamrożonego produktu. g waga zwiększa się co 100 g • Naciśnij przycisk Start. waga zwiększa się co 10 g waga zmniejsza się co 10 g UWAGA: 1. Gdy czas gotowania wynosi ponad 60 minut, czas będzie wyświetlany jako godziny i minuty. 2. Postępuj zgodnie z treścią tabel na następnych stronach, korzystając z zalecanych wag oraz akcesoriów. 3.
Programy automatyczne uwzględniające wagę produktu Program 1 wciśnięcie 2 wciśnięcia 14. Kawałki kurczaka 15. Cały kurczak Waga 200 - 1500 g 1000 - 2400 g 3 wciśnięcia 16.Wieprzowe/cielecina 800 - 2000 g 17. Wołowe 650 - 1250 g 1 wciśnięcie 2 wciśnięcia 700 - 1300 g 18. Żebra wołowe 3 wciśnięcia PL-24 19. Baranina 1000 - 2300 g Akcesoria Wskazówki Do pieczenia części kurczaka jak nóżki, udka lub skrzydełka. Umieść kawałki kurczaka w naczyniu żaroodpornym umieszczonym na ruszcie.
Programy automatyczne uwzględniające wagę produktu Program 1 wciśnięcie Waga 20 Tarta 4-6 porcji 21 Tarta 6-8 porcji Akcesoria Wskazówki Aby przygotować zapiekaną potrawę (tarta) z surowych składników - patrz przepisy w książce kucharskiej; Np. Savoury Quiche - Quiche Lorraine (rodzaj zapiekanki), tarta grzybowa, tarta cebulowa, tarta szpinakowa. Tarta na słodko tarta Bourdaloue, tarta ze świeżego sera, tarta z rabarbaru, tarta jabłkowa.
Programowanie Ta funkcja umożliwia zaprogramowanie w kuchence często wykonywanych czynności rozgrzewania i gotowania. Możliwe jest zaprogramowanie określonego poziomu mocy i czasu, w zależności od preferencji. W pamięci zapisać można trzy zadania. Ustawianie programu Skonfigurować żądany program gotowania M Memory • Naciśnij przycisk programowania pamięci. Automatycznie wybrany zostanie program 1. Aby wybrać program 2, naciśnij przycisk pamięci dwa razy.
Opóźnienie rozpoczęcia gotowania Przycisk Opóźnienie/Pauza umożliwia zaprogramowanie gotowania z opóźnionym rozpoczęciem. Np. 1 h 10 min 1 min 10 s nieczynny • Naciśnij przycisk Opóźnienie/ Pauza. 1 h 10 min 1 min 10 s • Ustaw żądany program i czas gotowania. • Ustaw czas opóźnienia rozpoczęcia gotowania, (do 9 godzin 59 minut). • Naciśnij przycisk Start. UWAGA: 1. Możesz zaprogramować trzy fazy gotowania wraz z jego opóźnionym rozpoczęciem. Np. Duża moc: 10 min Opóźnienie: 1godz.
Czas pauzy Przycisk Opóźnienie/Pauza umożliwia zaprogramowanie czasu pauzy po zakończeniu gotowania lub zaprogramowanie kuchenki do odliczania minut. Np. Do zaprogramowania czasu odczekania po gotowaniu. 1 h 10 min 1 min 10 s • Ustaw żądany program i czas gotowania. 1 h 10 min 1 min 10 s • Naciśnij przycisk Opóźnienie/ Pauza. nieczynny • Ustaw żądany czas gotowania (do 9 godzin 59 minut). • Naciśnij przycisk Start. UWAGA: 1. Możesz zaprogramować trzy fazy gotowania wraz z trybem pauzy. Np.
Pytania (P) i odpowiedzi (O) P: Dlaczego kuchenka nie włącza się? O: Jeśli kuchenka nie włącza się, sprawdź następujące punkty: 1. Czy wtyczka jest dokładnie włożona? Wyjmij wtyczkę z gniazdka zasilającego, zaczekaj 10 sekund i włóż ją ponownie. 2. Sprawdź specjalnie zainstalowany zwykły lub automatyczny bezpiecznik. Włącz bezpiecznik automatyczny lub wymień zwykły bezpiecznik (jeśli jest spalony). 3. Jeśli bezpiecznik jest dobry, podłącz do gniazdka zasilającego inne urządzenie.
Konserwacja kuchenki mikrofalowej Otwory wentylacyjne powinny być utrzymywane w czystości. Sprawdź, czy otwory wentylacyjne znajdujące się na górze, na dole i z tyłu urządzenia nie są zatkane przez kurz lub inne zanieczyszczenia. Jeśli otwory wentylacyjne są zatkane, może wystąpić przegrzanie kuchenki, co może wpłynąć negatywnie na jej działanie. 1. Przed czyszczeniem kuchenki, wyłącz ją. 2. Utrzymuj w czystości wnętrze kuchenki, uszczelki drzwiczek oraz powierzchnie wokół uszczelek.
Dane techniczne Napięcie sieciowe: Częstotliwość robocza: Pobór mocy: Moc wyjściowa: Wymiary zewnętrzne: Wymiary wnętrza kuchenki: Waga z akcesoriami: Poziom hałasu: 230 V, 50 Hz 2,450 MHz Maksymalnie Mikrofale Grill Konwekcja Mikrofale Grill Konwekcja 530 (W) x 508 (D) x 344 (H) mm 350 (W) x 360 (D) x 250 (H) mm 21.0 Kg 52, 7dB 2980 1275 1560 1500 1000 1560 1400 W W W W W (IEC-60705) W W Dane techniczne mogą ulec zmianie bez powiadomienia.
Panasonic Corporation Web Site:http://panasonic.com.
English Deutsch Nederlands Français Česky Magyar Microwave/Grill/Convection Oven Mikrowellengerät mit Grill/Heißluft De Panasonic Microgolf/Warme Lucht Oven Panasonic Four à Micro-ondes Multifonctions Forno a microonde e Convezione Kuchenka mikrofalowa z funkcjami Grill/Konwekcja Mikrovlnná / Horkovzdušná trouba/ Gril Grillezös / légkeveréses mikrohullámú sütö Polski Operating Instructions Bedienungsanleitung Gebruiksaanwijzing Mode dʼemploi Manuale di istruzioni Instrukcja obsługi Návod k obsluze Kezelé
IMPORTANT SAFETY INSTRUCTIONS: Before operating this oven, please read these instructions carefully and keep for future reference. WICHTIGE SICHERHEITSANWEISUNGEN. Bitte sorgfältig durchlesen und zur weiteren Bezugnahme aufbewahren. BELANGRIJKE VEILIGHEIDSINSTRUCTIES. Lees ze a.u.b. zorgvuldig door en bewaar ze zodat u ze opnieuw kunt raadplegen wanneer nodig. INSTRUCTIONS DE SÛRETÉ IMPORTANTES.
Instalace a připojení Kontrola mikrovlnné trouby Vestavění mikrovlnné trouby Vybalte troubu, odstraňte veškery balicí materiál a ověřte, že nedošlo k jejímu poškození, např. k promáčknutí, poškození dveřních zámků nebo poškrábání dvířek. Pokud zjistíte jakékoli poškození, uvědomte ihned prodejce. Neinstalujte poškozenou mikrovlnnou troubu.
Instalace a připojení VÝSTRAHA Použití mikrovlnné trouby 1. Těsnění dveří a okolní plochy se čistí vlhky m hadříkem. Spotřebič je nutno prohlédnout a zjistit, zda nedošlo k poškození těsnění dveří a okolních ploch. Pokud jsou tyto plochy poškozeny, spotřebič se nesmí používat, dokud servisní technik vyškoleny vy robcem neprovede opravu. 1. Nepoužívejte mikrovlnnou troubu pro jiné účely, než je příprava jídla. Mikrovlnná trouba je navržena vy slovně pro ohřev nebo vaření jídel.
Bezpečnostní pokyny Provoz topného tělesa Skleněny talíř 1. Před prvním použitím funkce CONVECTION, COMBINATION nebo GRILL vytřete z prostoru mikrovlnné trouby přebytečny olej a zapněte troubu bez potravin a příslušenství na 10 minut v režimu CONVECTION 250°C. Vypálí se tak olej používany proti korozi. Pouze v tomto případě se mikrovlnná trouba použije prázdná. 1. Nepoužívejte mikrovlnnou troubu bez nosného vozíku a skleněného talíře. 2.
Instalace a připojení 1. Délka vaření • Doba vaření uvedená v kuchařce je pouze přibližná. Délka vaření závisí na okolnostech, teplotě, množství potravin a typu nádobí. • Začněte s minimální dobou vaření, aby nedošlo k převaření. Pokud potraviny nejsou dostatečně uvařené, můžete je vždy vařit o něco déle. Poznámka: Pokud bude doporučená délka vaření překročena, dojde ke znehodnocení potravin a za extrémních okolností může vzniknout požár, ktery by mohl poškodit vnitřek trouby. 2.
Popis mikrovlnné trouby [8] [6] [4] [13] [15] [14] [5] [2] [1] [7] [9] [3] [10] [11] [12] 1. Tlačítko pro otevření dveří Stisknutím otevřete dvířka. Pokud dvířka otevřete během vaření, vaření se dočasně přeruší, aniž by se vynulovalo předchozí nastavení. Vaření se obnoví po zavření dvířek a stisknutí tlačítka Start. Když se dvířka trouby otevřou, rozsvítí se žárovka mikrovlnné trouby. Okno mikrovlnné trouby 3. Bezpečnostní zámek dvířek 4. Větrací otvor 5. Ovládací panel 6.
Ovládací panel NN-CT870S/NN-CT850W* (9) (12) (1) 1 h 10 min 1 min 10 s (2) (3) (13) (4) (5) (6) (7) M Combi (8) (10) (14) g (11) (15) (16) NN-CT870S např. Jestliže je některá činnost nastavena a nestiskne se příslušný knoflík pro spuštění, trouba automaticky po šesti minutách tuto činnost zruší. Displej se vrátí zpět na režim hodin.
Výběr správného režimu vaření Režim vaření Microwave (mikrovlnné vaření) Použití Příslušenství - Rozmrazování - Ohřívání - Rozpouštění: máslo, čokoláda, sy r. - Vaření ryb, zeleniny, ovoce, vajec. - Příprava kompotů, džemů, omáček, pudinků, koláčků, pečiva, jíšky, Pouze skleněny karamelu, masa, ryb nebo vegetaotočny talíř riánsky ch pokrmů. - Pečení moučníků s vejci a pečení sypky ch přísad bez zhnědnutí. (různé druhy koláčů, bublanina atd.) Nádoby Určené do mikrovlnné trouby, bez kovů.
Výběr správného režimu vaření Režim vaření Použití Grill + Convection - Pečení červeného masa a silny ch steaků (žebra nebo hovězí, kotlety). - Pečení ryb. Nutné předehřátí Příslušenství Nádoby Skleněny otočny talíř a kovovy talíř plus kulatá Lze použít mřížka nebo žáruvzdorné smaltovaná kovové přihrádka nebo formy.
Příslušenství mikrovlnné trouby V následující tabulce je uvedeno správné použití příslušenství v mikrovlnné troubě.
Ovládací prvky a provoz Našeptávač slov: Zadání „88:88” Našeptávač slov Stiskněte “FRANCAIS” ve francouzštině Stiskněte “ITALIANO” v italštině Stiskněte “DEUTSCH” v němčině Stiskněte “NEDERLANDS” v holanctině Stiskněte “ESPANOL” ve španělštině Stiskněte “POLSKI” v polštině Stiskněte “ČESKY” v češtině Stiskněte “ENGLISH” v angličtině Tyto modely mají jedinečnou funkci „nápovědy“, která vás bude provázet při ovládání mikrovlnné trouby.
Ovládací prvky a provoz Nastavení hodin: Příklad: nastavení 14 hodin 25 minut 14krát dvakrát 1 h 10 min 1 min 10 s nečinné 5krát • Stiskněte dvakrát tlačítko prodlení/zastavení. * Dvojtečka začne blikat. • Zadejte čas stisknutím náležity ch tlačítek času. * Čas se zobrazí na displeji a dvojtečka bliká. • Stiskněte jednou tlačítko prodlení/zastavení. * Dvojtečka přestane blikat a čas je zadán. POZNÁMKA: 1. Pro nové nastavení času opakujte všechny uvedené kroky. 2.
Vaření a rozmrazování v mikrovlnné troubě Mikrovlnná trouba nabízí šest různy ch úrovní vy konu (viz tabulka níže). Použití příslušenství: Skleněný talíř Tabulka uvádí přibližny počet wattů pro každou úroveň vy konu.
Grilování Tlačítko Grill nabízí 3 stupně nastavení grilu. Použití příslušenství: Kulatá mřížka Skleněny talíř Kovovy talíř Počet stisknutí jednou Úroveň vy konu 1 HIGH Wattů 1500 W dvakrát 2 MEDIUM 1200 W třikrát 3 LOW 950 W Po předehřátí vložte pokrm do trouby. • Stiskněte tlačítko vy konu grilování pro požadované nastavení grilu. • Stisknutím tlačítka Start spusťte předehřátí. nečinné 1 h 10 min 1 min 10 s • Zvolte délku vaření (až 99 minut 50 sekund). • Stiskněte tlačítko Start.
Vaření v režimu Convection/Grill Convection Tato tlačítka umožňují nastavit konvekční teplotu 40ºC (pouze v režimu Convection) a 100–250ºC zvyšováním po 10ºC. Pro rychly vy běr nejčastěji používany ch teplot vaření začíná teplota na 150 °C a pokračuje do 250 °C, následuje 40 °C (pouze pro režim Convection) a 100 °C. Při konvekčním vaření lze vařit na jedné nebo dvou úrovních. Vaření v přihrádkách viz strana CZ-16. Použití příslušenství: Jednoúrovňové vaření. V případě použití otočného talíře.
Vaření v režimu Convection/Grill Convection Cooking by Grill Convection: Po předehřátí vložte pokrm do trouby. • Nastavte • Pokud je potřeba požadovanou vy kon grilování teplotu. (Vy kon změnit, stiskněte jedgrilování je nou pro nastavení přednastaven na úrovně Střední , úroveň Vysoká.) dvakrát pro nastavení úrovně Nízká. 1 h 10 min 1 min 10 s • Stisknutím tlačítka Start spusťte předehřátí. nečinné • Zvolte délku vaření (až 9 hodin 59 minut). • Stiskněte tlačítko Start. POZNÁMKA K PŘEDEHŘÍVÁNÍ: 1.
Vaření v režimu Convection/Grill Convection Vaření v přihrádkách Jednoúrovňové vaření Pokud při jednoúrovňovém vaření používáte přihrádku, umístěte ji do spodní polohy. Smaltovaná polička Drátěná polička Dvouúrovňové vaření Při dvouúrovňovém vaření použijte obě dodané přihrádky, smaltovanou přihrádku umístěte do spodní polohy a drátěnou do horní. V závislosti na receptu můžete provést předehřátí s vloženy mi přihrádkami nebo bez nich. Podrobnosti najdete přímo v receptu.
Vaření v režimu combination Režim Combination nabízí tři nastavení: 1) Grill + Microwave, 2) Convection + Microwave, 3) Grill Convection + Microwave. Při vaření v režimu Combination není úroveň vy konu Microwave 1000 W dostupná. Při normálním používání by to nebylo vhodné (pokrm by byl uvařeny před zhnědnutím).
Vaření v režimu Combination 2) Convection + Microwave Combi 1 h 10 min 1 min 10 s nečinné • Stiskněte • Nastavte • Nastavte • Nastavte • Stiskněte tlačítko požadovanou požadovanou požadovanou délku tlačítko Start. Combination. teplotu. úroveň vy konu vaření (až 9 hodin v režimu 59 minut). Microwave. 3) Grill Convection + Microwave Combi • Stiskněte tlačítko Combination. • Nastavte požadovanou teplotu. (Vy kon grilování je přednastaven na úroveň Nízká.
Vaření v režimu Combination POZNÁMKA K PŘEDEHŘÍVÁNÍ: Při vaření v režimu Combination lze troubu předehřát. Před nastavením délky vaření stiskněte tlačítko Start a řiďte se instrukcemi POZNÁMKY K PŘEDEHŘÍVÁNÍ na straně CZ-15. POZNÁMKA: 1. Pokud je zvoleny čas vaření kratší než jedna hodina, čas se bude odpočítávat po sekundách. 2. Pokud zvoleny čas přesahuje jednu hodinu, čas se bude odpočítávat po minutách, dokud se na displeji nezobrazí „1H 00“ (1 hodina).
Automatické rozmrazování Tato funkce umožňuje rozmrazovat zmrazené potraviny podle hmotnosti. Vyberte kategorii a nastavte hmotnost potraviny. Hmotnost se programuje v gramech. Hmotnost v každé kategorii začíná nejčastěji používanou hmotností, aby bylo možné provést volbu rychle. g • Vyberte požadovany program automatického rozmrazování. Zvolte požadovaný program Auto Defrost (automatické rozmrazování). Jednou stiskněte při malých kouscích, dvakrát při velkém kusu a třikrát při chlebu.
Programy s automatickým čidlem Celou řadu potravin lze vařit bez zadání délky vaření, hmotnosti nebo vy konu. Např.: • Vyberte požadovany program s automaticky m čidlem. • Stiskněte tlačítko Start. Tlačítka Plus/Mínus: Předvolby pro stupeň vaření se v jednotlivy ch případech liší. Po několika použitích programů s automaticky m čidlem se můžete rozhodnout, že dáte přednost vaření potravin s jiny m stupněm. Pomocí tlačítek Plus/Mínus lze programy upravit tak, aby vařily delší nebo kratší dobu.
Programy s automaticky m čidlem Kategorie Hmotnost 1 stisknutí 4. Polévka 300 - 1000 g 2 stisknutí 1 stisknutí 5. Ry že těstoviny 300 - 1000 g 6. Čerstva zelenina 250 - 1000 g 2 stisknutí 1 stisknutí 7. Cerestve ryby 200 - 700 g 8. Zmrazene zapekane pokrmy 500 - 800 g 2 stisknutí 300 - 800 g 9. Cerstve zapekane pokrmy CZ-22 Příslušenství Pokyny Ohřev polévek v balení Tetra Pak, z konzervy nebo domácích polévek. Všechny pokrmy by měly mít pokojovou teplotu nebo teplotu jako v chladničce.
Automatické programy s nastavením hmotnosti Tato funkce umožňuje uvařit většinu vašich oblíbeny ch jídel s pouhy m nastavením hmotnosti. Trouba určí vy kon Microwave, nastavení režimu Grill, teplotu režimu Convection a dobu vaření. Vyberte kategorii a nastavte hmotnost potraviny. Hmotnost se programuje v gramech. Hmotnost v každé kategorii začíná nejčastěji užívanou hmotností, aby bylo možné provést volbu co nejrychleji. Např.: g • Vyberte požadovany automaticky program s nastavením hmotnosti.
Automatické programy s nastavením hmotnosti Kategorie 1 stisknutí Hmotnost 14. Kureci kousky 200 - 1500 g 2 stisknutí 15. Cele kure 1000 - 2400 g 3 stisknutí 16. Veprove /teleci 800 - 2000 g 1 stisknutí 650 - 1250 g 17. Hovezi 2 stisknutí 18. Hovezi zebro 700 - 1300 g 3 stisknutí 1000 - 2300 g 19. Jehneci CZ-24 Příslušenství Pokyny Vaření kuřecích kousků, např. kuřecích stehen nebo křídel. Položte kuře na kulatou mřížku na kovovém talíři umístěném na skleněném talíři.
Automatické programy s nastavením hmotnosti Kategorie Hmotnost 1 stisknutí 20 Koláč 4–6 porcí Příslušenství Pokyny Pečení koláčů ze syrovy ch přísad - recepty najdete v kuchařce, např. slané koláče - slany koláč z oblasti Lorraine, houbovy koláč, cibulovy koláč, špenátovy koláč. Sladké koláče - tvarohovy , koláč, rebarborovy koláč, jablkovy koláč.
Paměť Tato funkce umožňuje naprogramovat troubu na běžny ohřev nebo vaření. Troubu můžete naprogramovat na určity vy kon a čas podle toho, jak vám to vyhovuje. Do paměti můžete naprogramovat a uložit tři úlohy. Nastavení paměťového programu M M Naprogramujte požadovany program vaření. Memory • Stiskněte tlačítko paměti. Trouba je automaticky přednastavena na paměť 1. Chcete-li vybrat paměť 2, stiskněte dvakrát tlačítko paměti. Chcete-li vybrat paměť 3, stiskněte třikrát tlačítko paměti.
Opožděný start vaření Tlačítko prodlení/odstavení umožňuje naprogramovat opožděné vaření. Např.: 1 h 10 min 1 min 10 s nečinné • Stiskněte tlačítko prodlení/odstavení. 1 h 10 min 1 min 10 s • Nastavte zpoždění stisknutím tlačítek času (až 9 minut 59 sekund). • Nastavte požadovany program vaření a délku vaření. • Stiskněte tlačítko Start. POZNÁMKA: 1. Trojfázové vaření lze naprogramovat včetně opožděného vaření. Např.: Opožděny start: 1 hodina Úroveň High: 10 min.
Odstavná doba Tlačítko prodlení/odstavení umožňuje naprogramovat odstavnou dobu po dokončení vaření nebo naprogramovat troubu jako minutovy časovač. Např.: Programování odstavné doby po vaření. 1 h 10 min 1 min 10 s • Zvolte požadovany program vaření a délku vaření. 1 h 10 min 1 min 10 s • Stiskněte tlačítko prodlení/odstavení. nečinné • Zvolte požadovany čas stisknutím tlačítek času (až 9 minut 59 sekund). • Stiskněte tlačítko Start. POZNÁMKA: 1.
Otázky a odpovědi Ot.: Proč se mikrovlnná trouba nezapíná? Od.: Pokud se mikrovlnná trouba nezapíná, zkontrolujte následující: 1. Je zástrčka trouby dobře zasunuta do síťové zásuvky? Vytáhněte zástrčku ze zásuvky, počkejte 10 sekund a znovu ji zapojte.` Ot.: Při vaření v režimu COMBINATION se z mikrovlnné trouby ozy vá hučení a cvakání. Co tyto zvuky způsobuje? Od.: Zvuky se ozy vají při automatickém přepínání z režimu Microwave do režimu CONVECTION/GRILL pro vytvoření kombinovaného nastavení.
Péče o troubu Údržba a čištění mikrovlnné trouby - DŮLEŽITÉ Pro bezpečny provoz je třeba udržovat troubu v čistotě a po každém použití ji vytřít. Pokud trouba nebude udržována v čistotě, může dojít k narušení povrchů, což může následně snížit životnost spotřebiče a potenciálně představovat bezpečnostní riziko. 1. Před čištěním mikrovlnnou troubu vypněte. 2. Udržujte vnitřek trouby, těsnění dveří a jeho okolí v čistotě.
Technická specifikace Napětí: Provozní kmitočet: Vstupní výkon: 230 V, 50 Hz 2,450 MHz Maximum; 2980 W Režim Microwave; 1275 W Režim Grill; 1560 W Režim Convection; 1500 W Výstupní výkon: Režim Microwave; 1000 W (IEC-60705) Režim Grill; 1500 W Režim Convection; 1400 W Vnější rozměry: 530 (š) x 508 (h) x 344 (v) mm Rozměry vnitřního prostoru: 350 (š) x 360 (h) x 250 (v) mm Hmotnost s vnitřním příslušenstvím: 21,0 kg Hlučnost: 52,7 dB Technická specifikace může být změněna bez předchozího upozornění.
Panasonic Corporation Web Site:http://panasonic.com.
English Deutsch Nederlands Français Česky Magyar Microwave/Grill/Convection Oven Mikrowellengerät mit Grill/Heißluft De Panasonic Microgolf/Warme Lucht Oven Panasonic Four à Micro-ondes Multifonctions Forno a microonde e Convezione Kuchenka mikrofalowa z funkcjami Grill/Konwekcja Mikrovlnná / Horkovzdušná trouba/ Gril Grillezös / légkeveréses mikrohullámú sütö Polski Operating Instructions Bedienungsanleitung Gebruiksaanwijzing Mode dʼemploi Manuale di istruzioni Instrukcja obsługi Návod k obsluze Kezelé
IMPORTANT SAFETY INSTRUCTIONS: Before operating this oven, please read these instructions carefully and keep for future reference. WICHTIGE SICHERHEITSANWEISUNGEN. Bitte sorgfältig durchlesen und zur weiteren Bezugnahme aufbewahren. BELANGRIJKE VEILIGHEIDSINSTRUCTIES. Lees ze a.u.b. zorgvuldig door en bewaar ze zodat u ze opnieuw kunt raadplegen wanneer nodig. INSTRUCTIONS DE SÛRETÉ IMPORTANTES.
Telepítés és csatlakoztatás Ellenőrizze mikrohullámú sütőjét Beépítve Csomagolja ki a sütőt, távolítsa el a csomagolást, és ellenőrizze, hogy nem láthatók-e sérülések a sütőn, pl. bemélyedések, törött ajtófogantyúk, vagy repedések az ajtón. Ha bármilyen sérülést észlel, azonnal értesítse a kereskedőt. Ne helyezzen működésbe sérült mikrohullámú sütőt.
Telepítés és csatlakoztatás FIGYELMEZTETÉS! A sütő használata 1. Az ajtó szigetelését és a szigetelés körüli területet nedves ruhával meg kell tisztítani. A készüléken ellenőrizni kell az ajtó szigetelésének és környékének épségét, és ha ezek a területek megsérültek, a készüléket nem szabad addig használni, amíg a gyártó által képzett szakember ki nem javította. 1. Ne használja a sütőt semmilyen más célra, csak étel készítésére. Ezt a sütőt étel melegítésére vagy főzésre tervezték.
Biztonsági utasítások Melegítő funkció 1. Mielőtt először használná a HŐLÉGKEVERÉS, KOMBINÁCIÓ vagy a GRILL funkciót, törölje le a felesleges olajat a sütő belsejében, és működtesse a sütőt HŐLÉGKEVERÉS funkcióban, étel és tartozék nélkül, 250°C-on, 10 percig. Ennek segítségével a rozsdavédelemre használt olaj elégethető. Ez az egyetlen alkalom, amikor a sütő üresen használható. 2.
Telepítés és csatlakoztatás 1. Főzési idők • A szakácskönyvben megadott főzési idők közelítő értékek. A főzési idő az étel állapotától, hőmérsékletétől, mennyiségétől és az edény típusától függ. • A minimális főzési idővel kezdje, hogy megelőzze a túlfőzést. Ha az étel nem főtt meg kellőképpen, mindig főzheti egy kicsit tovább. MEGJEGYZÉS: Ha túllépi a megadott főzési időket, az étel tönkremehet, és rendkívüli esetben akár meg is gyulladhat, ami a sütő belsejének károsodásához vezethet. 2.
Áttekintő ábra [8] [6] [4] [13] [15] [14] [5] [2] [1] [7] [9] [3] [10] [11] [12] 1. Ajtónyitó gomb Nyomja meg az ajtó kinyitásához. Ha kinyitja a sütő ajtaját főzés közben, a főzés ideiglenesen leáll a korábbi beállítások törlése nélkül. A főzés újrakezdődik, amint becsukja az ajtót és megnyomja a Start gombot. A sütő világítása bekapcsol, amikor kinyitja az ajtót. 2. Sütő ablaka 3. Ajtó biztonsági záró rendszere 4. Sütő szellőző nyílása 5. Vezérlőpanel 6. Üvegtálca 7. Görgőgyűrű 8.
Vezérlőpanel NN-CT870S/NN-CT850W* (9) (1) (1) (2) (3) (4) (5) (6) (7) (8) (9) (10) (12) 1 h 10 min 1 min (2) 10 s (3) (13) (4) (5) (11) (12) (13) (14) (15) (6) (7) M Combi (8) (10) (14) g (11) (15) (16) NN-CT870S * MEGJEGYZÉS: (12) Kijelzőablak Időgombok Mikrohullám kapcsológomb Grill kapcsológomb Hőlégkeverés kapcsológomb Grill hőlégkeverés gomb Kombináció gomb Memória gomb Automatikus kiolvasztás gomb Plusz/mínusz/tömeg kiválasztási vezérlőgomb Késleltetés/várakozás gomb Automatikus érz
A megfelelő sütési üzemmód kiválasztása Sütési üzemmódok Mikrohullám Használat -Kiolvasztás - Újramelegítés - Olvasztás: vaj, csokoládé, sajt. - Halak, zöldségek, gyümölcsök és tojások főzése. - Előkészítés: párolt gyümölcsök, lekvár, szószok, vaníliasodó, káposzta, tészta, besamel, karamell, hús, hal vagy vegetáriánus ételek. - Tojásos és színtelen sütőpor összetevőjű sütemények sütése. Kiegészítők tartozékok Edények Csak üveg forgóasztal Mikrohullámozható, fémmentes.
A megfelelő sütési üzemmód kiválasztása Sütési üzemmódok Használat Grill + Hőlégkeverés - Vörös húsok, vastag marhaszeletek pirítása (borda vagy marhahús, steak) - hal párolása. Előmelegítés szükséges Kiegészítők tartozékok Edények Üveg forgó tál + fém tálca Hőálló, + kerek rács fém edényt vagy zománcos lehet használpolc és/vagy ni. rács polc. KOMBINÁCIÓ • Grill + mikrohullám • Hőlégkeverés + mikrohullám • Grill + hőlégkeverés + mikrohullám Hu-8 - Hús és szárnyas sütése.
Sütő kiegészítők A következő ábra bemutatja a tartozékok helyes használatát a sütőben.
Kezelőszervek és a működtetés Szöveges utasítás: Csatlakoztatás “88:88” Szöveges utasítás: Nyomja “FRANCAIS” Franciául pl. Nyomja “ITALIANO” Olaszul pl. Nyomja “DEUTSCH” Németül pl. Nyomja “NEDERLANDS” Hollandul pl. Nyomja “ESPANOL” Spanyolul pl. Nyomja “POLSKI” Lengyelül pl. Nyomja “ČESKY” Cseh pl. Nyomja “ENGLISH” Angolul pl. Ezek a típusok rendelkeznek egy egyedülálló funkcióval, a "szöveges utasítással", amely segít a mikrohullámú sütő irányításában.
Kezelőszervek és működtetés Órabeállítás: Példa: 14:25 beállításához 14-szer kétszer 10 min 1 min 10 s nem használható 5-ször • Nyomja meg a Késleltetés/Várakozás gombot kétszer. A kettőspont elkezd villogni. 1 h • Adja meg az időt a megfelelő időgomb megnyomásával. Az idő megjelenik a kijelzőn és a kettőspont villogni kezd. • Nyomja meg a Késleltetés/Várakozás gombot egyszer. A kettőspont abbahagyja a villogást, és az időbeállítás rögzül. MEGJEGYZÉS: 1.
Mikrohullámú sütés és kiolvasztás 6 különböző mikrohullám teljesítmény szint használható (lásd az alábbi táblázatot). Kiegészítők használata: Üvegtálca Ez a táblázat az egyes energiaszintekhez tartozó körülbelüli Watt teljesítményt mutatja. Nyomja meg egyszer Energiaszint Teljesítmény MAGAS energiaszint 1000 W Maximális rendelkezésre álló idő 30 perc kétszer KIOLVASZTÁSI energiaszint 270 W 99 perc 50 mp. 3-szor KÖZEPES energiaszint 600 W 99 perc 50 mp.
Grillezés A Grill gomb 3 grill beállítást tesz lehetővé. Kiegészítők használata: Rács Üvegtálca Fémtálca Nyomja meg egyszer Energiaszint 1 MAGAS Teljesítmény 1500 W kétszer 2 KÖZEPES 1200 W 3-ször 3 ALACSONY 950 W Az előmelegítés után tegye az ételt a sütőbe. • Nyomja meg a Grill energiaszint gombot a kívánt grill beállítás kiválasztásához. • Nyomja meg a Start gombot az előmelegítés indításához. nem használható 1 h 10 min 1 min 10 s • Állítsa be a sütési időt (99 perc 50 másodpercig).
Sütés hőlégkeveréssel / Grill hőlégkeveréssel A gombok segítségével beállíthatja a hőlégkeverési hőmérsékletet: 40°C (csak Hőlégkeverés módban) és 100 - 250°C között, 10°C lépésekben. A leggyakrabban használt főzési hőmérsékletek kiválasztása érdekében, a hőmérsékleti értékek 150°C-nál kezdődnek és 250°C-ig emelkednek, majd a 40°C következik (csak hőlégkeverés módban) és a 100°C. Egy vagy két szinten is lehet sütni a hőlégkeveréses sütés alkalmazásával. A polcon történő sütéssel kapcsolatosan ld.
Sütés hőlégkeveréssel / Grill hőlégkeveréssel Sütés hőlégkeveréssel: Az előmelegítés után tegye az ételt a sütőbe. • A sütési idő beállítása. (A Grill energiaszint Közepes értékre van előre beállítva.) 1 h 10 min 1 min 10 s • Ha meg kívánja változtatni a Grill energiaszintet, nyomja meg egyszer az Alacsony, szinthez • Nyomja meg a Start gombot az előmelegítés indításához. nem használható • Nyomja meg a • A sütési idő beállítása. Start gombot. (9 óra 59 percig).
Sütés hősugárzással / Grill hősugárzással Polcos sütés 1-szintes sütés Polc használatával történő 1-szintes sütéshez az alacsonyabb szintet használja. Zománcozott polc Rács polc 2-szintes sütés Ha két szinten süt, akkor használja mindkét tartozék polcot, a zománcos legyen az alsóbb szinten és a rácsos polc a felsőbb szinten. A recepttől függően előmelegítést végezhet a megfelelő helyzetben lévő polcokkal vagy azok nélkül. A részletek tekintetében nézze meg az adott recepteket.
Kombinációs sütés Három kombinációs beállítás van; 1) Grill + Mikrohullám, 2) Hőlégkeverés + Mikrohullám, 3) Grill hőlégkeverés + Mikrohullám. Az 1000 W-os mikrohullám teljesítmény szint a Kombinációs módban nem használható. Erre a normális használat mellett nincs is szükség (az étel megfőne, mielőtt kellőképpen megpirulna).
Kombinációs sütés 2) Hőlégkeverés + mikrohullám Combi 1 h 10 min 1 min 10 s nem használható • Nyomja meg a • A sütési idő • A kívánt mikrohullám beállítása. Kombináció energiaszint gombot. beállítása. • A kívánt sütési idő beállítása (max. 9 óra 59 percig). • Nyomja meg a Start gombot. 3) Grill hőlégkeverés + mikrohullám Combi • Nyomja meg a Kombináció gombot. • Ha meg kívánja változtatni a Grill energia szintet, nyomja meg egyszer a Közepes, kétszer az Alacsony szinthez.
Kombinációs sütés MEGJEGYZÉS AZ ELŐMELEGÍTÉSSEL KAPCSOLATBAN: A sütő a kombinációs üzemmódban is előmelegíthető. Nyomja meg a Start gombot a sütési idő beállítása előtt, és kövesse a Hu-15. oldalon található MEGJEGYZÉS AZ ELŐMELEGÍTÉSRŐL c. rész utasításait. MEGJEGYZÉS: 1. Ha a kiválasztott főzési idő kevesebb mint egy óra, a visszaszámlálás másodpercben történik. 2. Ha a kiválasztott főzési idő több mint egy óra, a visszaszámlálás percben történik, az „1H:00” (1 óra) eléréséig.
Automatikus kiolvasztás Ennek a funkciónak a segítségével kiolvaszthat fagyasztott ételeket, azok súlyának megfelelően. Válassza ki a kategóriát és állítsa be az étel súlyát. A súlyt grammban kell megadni. A gyorsabb kiválasztás érdekében a súly az adott kategóriában leggyakrabban használt súlyértéken áll. g • Válassza ki a kívánt • Állítsa be a fagyasztott étel súlyát. • Nyomja meg a Start Automatikus gombot. Nyomja g a súly 100 g-os lépésekben növekszik kiolvasztás progmeg a Start gombot.
Automatikus érzékelő programok Sokféle ételt lehet anélkül sütni, hogy be kellene állítani a sütési időt, a súlyt vagy az energiaszintet. pl. • Válassza ki a kívánt Automatikus érzékelés programot. • Nyomja meg a Start gombot. Plusz/mínusz vezérlő: Egyénenként változó, hogy ki mennyire süti meg az ételt. Az automatikus érzékelő programok néhányszori használata után dönthet úgy, hogy más mértékben szeretné megsütni az ételét.
Automatikus érzékelő programok Kategória Súly 1 gombnyomás 4 Leves újramelegítése 300 - 1000 g 2 gombnyomás 5 Rizs/tészta újramelegítése 300 - 1000 g 1 gombnyomás 6 Friss zöldségek főzése 250 - 1000 g 2 gombnyomás 7 Friss hal főzése 200 - 700 g 1 gombnyomás 8 Fagyasztott rakott ételek újramelegítése 2 gombnyomás 9 Friss rakott ételek újramelegítése Hu-22 500 - 800 g 300 - 800 g Kiegészítők Utasítások Dobozos, konzervdobozos, vagy házi készítésű levesek újramelegítése.
Automatikus súlyprogramok E funkció segítségével legtöbb kedvenc ételét elkészítheti úgy, hogy csak a súlyt kell beállítania. A sütő automatikusan meghatározza a mikrohullám energiaszintjét, a grill beállítást, a hőlégkeverés hőmérsékletét és a főzési időt. Válassza ki a kategóriát és állítsa be az étel súlyát. A súlyt grammban kell megadni. A gyorsabb kiválasztás érdekében a súly az adott kategóriában leggyakrabban használt súlyértéken áll. pl.
Automatikus súlyprogramok Kategória 1 gombnyomás 14 Csirke főzése Súly 200 - 1500 g 2 gombnyomás 15 Egész csirke főzése 1000 - 2400 g 3 gombnyomás 16 Sertés és marhahús sütése 1 gombnyomás 17 Marhahús elkészítése 2 gombnyomás 18 Marha oldalas sütése 800 - 2000 g 650 - 1250 g 700 - 1300 g 3 gombnyomás 19 Bárány elkészítése Hu-24 1000 - 2300 g Kiegészítők Utasítások Csirkedarabok pl. csirkeláb, csirkecomb vagy alsócomb főzése.
Automatikus súlyprogramok Kategória Súly 1 gombnyomás 20 Torta 4-6 adag Utasítások Kiegészítők Nyers összetevőkből készített torta sütéséhez -Pl. tésztában sült sós sodó, gombatorta, hagymatorta, parajtorta. Édes torta - sajttorta, almatorta. • Válassza ki a Torta auto menüt 2 gombnyomás 21 Torta 6-8 adag 3 gombnyomás 22 Torta 8 - 10 gombnyomás adag átmérő 1 4-6 25 cm gombnyomás adag átmérő 2 6-8 27 cm gombnyomás adag átmérő 3 8-10 30 cm adag • Sütés után hagyja állni néhány percig.
Memória Ez a funkció lehetővé teszi, hogy sütőjét előre programozza a szokásos felmelegítési és sütési feladatokra. Előre programozhatja a sütőjét az Önnek megfelelő speciális energiaszintre és időtartamra. Három memóriafeladatot lehet előre beprogramozni. A memória program beállításához M Memory M Programozza be a kívánt sütőprogramot. • Nyomja meg a Memória gombot. Memory • A feladat tárolásához A sütő automatikusan az 1. memóriára van előre beállítva. A 2.
Késleltetett indítású sütés A Késleltetés/várakozás gomb használatával késleltetett indítású sütést lehet beprogramozni. pl. 1 h 10 min 1 min 10 s nem használható • Nyomja meg a Késleltetés/ Várakozás gombot. 1 h 10 min 1 min 10 s • Állítsa be a késleltetési időt az Idő gomb nyomogatásával (max. 9 óra 59 percig). • A kívánt sütési program és idő beállítása. • Nyomja meg a Start gombot. MEGJEGYZÉS: 1. Három fokozatú sütést lehet beprogramozni, beleértve a Késleltetett indítású sütést. pl.
Várakozási idő A Késleltetés/Várakozás gomb segítségével beprogramozhatja a sütés befejeztét követő várakozási időt, vagy percszámlálóként programozhatja a sütőt. pl. Sütés utáni várakozási idő beprogramozása. 1 h 10 min 1 min 10 s • Állítsa be a kívánt sütési programot és időt. 1 h 10 min 1 min 10 s • Nyomja meg a Késleltetés/Várakozás gombot. nem használható • Állítsa be a kívánt időt az Idő gombot nyomogatásával (max. 9 óra 59 perc). • Nyomja meg a Start gombot. MEGJEGYZÉS: 1.
Kérdések és válaszok K: Miért nem kapcsol be a sütőm? V: Ha a sütő nem kapcsol be, ellenőrizze az alábbiakat: 1. Megfelelően csatlakoztatva van a sütő? Húzza ki a csatlakozót a konnektorból, várjon 10 másodpercet, és dugja be újra. 2. Ellenőrizze a megszakítót és a biztosítékot. Állítsa vissza a megszakítót, vagy cserélje ki a biztosítékot, ha bekapcsolt, vagy kiégett. 3. Ha a megszakító és a biztosíték rendben van, csatlakoztasson egy másik készüléket a konnektorhoz.
A sütő karbantartása Mikrohullámú sütőjének ápolása és tisztítása FIGYELEM! A biztonságos működés érdekében fontos, hogy a sütő mindig tiszta legyen és minden használat után ki legyen törölve. A sütő tisztán tartásának elmulasztása a felületek károsodásához vezethet, ami csökkentheti a készülék élettartamát és esetleg kockázatos helyzethez is vezethet. 1. Tisztítás előtt kapcsolja ki a sütőt. 2. Tartsa tisztán a sütő belsejét, az ajtó szigetelését, és ajtó szigetelésének környékét.
Műszaki adatok Tápfeszültség: Működési frekvencia: Teljesítményfelvétel: 230 V, 50 Hz 2450 MHz Maximum Mikrohullám Grill Hősugárzás Kimenő teljesítmény: Mikrohullám Grill Hősugárzás 530 (Sz) x 508 (M) x 350 (Sz) x 360 (M) x 21,0 kg 52,7 dB Külső méretek: Sütőtér méretek: Tömeg a belső tartozékokkal: Zajszint: 2980 1275 1560 1500 W W W W 1000 W (IEC-60705) 1500 W 1400 W 344 (Mag) mm 250 (Mag) mm Ez a termék megfelel az elektromágneses kompatibilitásra vonatkozó (EMC) EN 55011 európai szabványnak.
Panasonic Corporation Web Site:http://panasonic.com.