
Operating Instructions


5
English
5
Installation
This section explains how to install your appliance for the most energy-efcient, safe and quiet operation.
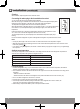
Dimensions
W601 x D648 x H1898 (mm)
Unpacking your appliance
Remove all packaging and tape.
Choosing the right location
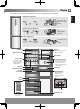
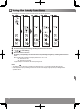
Ventilation
As the appliance gives off heat during operation, it should be installed
in a well-ventilated, dry room with plenty of space above and behind it,
as shown in Figure 1.
If you can hear it vibrating, it needs more space.
Temperature
The room temperature affects the refrigerator’s energy-efciency, i.e.
how much electricity it uses to chill and freeze foods.
For the best results, install your refrigerator:
● away from direct sunlight
● away from radiators, cookers or other heat sources
● where the room temperature corresponds to the climate classication
for which the appliance is designed. Refer to the Specications
Section for your appliance’s climate classication.
Level
Install on a level oor that’s strong enough to support a fully loaded
refrigerator.
You can adjust the level of the refrigerator by screwing or unscrewing
the two adjustable front legs as shown in Figure 2.
This prevents vibration and noise.
If the appliance is to stand on a carpeted or vinyl oor, put a solid board
underneath it rst. This will protect your oor against possible colour
change due to heat given off by the appliance.
Refrigerator door
WARNING
The refrigerator’s door hinges can be swapped over,
from the right side to the left, so that the doors open in
the opposite direction. If this is more convenient in your
home, please contact our service centre listed on the
attached sheet or access to our Web site
(http://panasonic.net).
We could not be held responsible if you replace the
hinges by yourself.
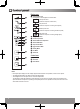
Installing the spacers
Install the spacers on the back panel of the refrigerator to ensure the minimum
amount of space required to allow the heat generated by the refrigerator.
Spacer (accessory)
Attach to the back panel of the refrigerator after
removing the double-sided tape's release liner.
Parts for switching door
opening direction
(accessory)
100 mm or more
50 mm
or more
20 mm
or more
Figure 1
Figure 2
Spacers