Model No.
English 3-19 Thank you for purchasing this Panasonic product. Please read these instructions carefully before using this product. Please keep this manual for future reference. Included installation Instructions. Español 71-87 Gracias por comprar este producto de Panasonic. Lea atentamente estas instrucciones antes de usar este producto. Guarde este manual para poder consultarlo en el futuro. Incluye instrucciones para su intalación. Deutsch 20-36 Wir danken Ihnen für den Kauf dieses Panasonic Produkts.
Contents Using the handy functions ...........................................11 Making ice cubes ...........................................................14 Care and Cleaning instructions ...................................14 FAQs ...............................................................................17 Specifications ................................................................19 English Safety instructions ..........................................................
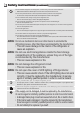
Safety instructions (continued) Do not install the refrigerator in a damp place, or where it may come into contact with water. • Deteriorated insulation of electrical parts can cause short circuit, electric shock or fire. Do not store pharmaceuticals or other temperature-sensitive products in the refrigerator. • You should not store products that require strict temperature controls in the refrigerator. Do not let children climb, swing or hang on the refrigerator door.
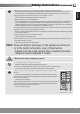
Safety instructions (continued) English Remove any dirt or dust from the mains plug’s pins before connecting to the power supply. • Dust build-up on the mains plug can cause insulation failure, especially in humid conditions. This can cause short circuit, fire or electric shock. Unplug the mains lead and wipe it with a dry cloth. Never use a wet or damp cloth. Plug your appliance into the socket, making sure the connection is secure. • A loosely connected mains plug can cause fire or electric shock.
Caring for the environment Disposing of the packaging Please recycle where possible (e.g. cardboard, plastic bags, adhesive tape and polystyrene) and make sure you dispose of all other packing materials safely. Keep the packaging out of the reach of babies and young children, to avoid injury or suffocation.
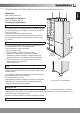
Installation This section explains how to install your appliance for the most energy-efficient, safe and quiet operation. English Dimensions W599 x D638 x H1856 (mm) Unpacking your appliance Remove all packaging and tape. Choosing the right location Ventilation As the appliance gives off heat during operation, it should be installed in a well-ventilated, dry room with plenty of space above and behind it, as shown in Figure 1. If you can hear it vibrating, it needs more space.
First plugged in When the power is first connected, the control panel lights up for two seconds, the freezer temperature display on the control panel flickers, and the freezer temperature is displayed. Press any button or wait five seconds for the flickering to stop, and the set temperature for the freezer is displayed. Default settings for the control panel When the power is connected for the first time, the control panel is set to “Home” mode.
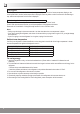
Parts Fridge compartment English Cooked food, drinks, eggs, cakes, dairy products The temperature can be set in a range from 2 °C to 8 °C. Freezer compartment Frozen meat, poultry, fish, ice cream The temperature can be set in a range from -24 °C to -16 °C. This illustration shows the BN30PGW.
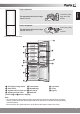
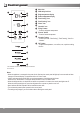
Control panel 1 2 3 4 5 6 7 8 9 1 Alarm icon 2 Child safety lock icon 3 Fridge temperature display 4 Freezer temperature display 5 “Fast-Cooling” icon 6 “Fast-Freezing” icon 7 “Home” icon 8 “Vacation” icon 9 “Fridge” button • To set the refrigerator temperature : “Freezer” button • To set the freezer temperature ; “Function” button • To select the mode: “Fast-Cooling”, “Fast-Freezing”, “Home” or “Vacation” < “OK” button • To adjust the temperature, or to confirm, set, or quit the existing function :
Setting the temperature Fridge compartment 2 3 9 : ; < 1. Press “Fridge” 9, and when the fridge temperature display c flickers, the temperature can be set. Each time the button is pressed, the temperature changes (the fridge temperature display 3 shows the temperature accordingly). Press “OK” < to apply the displayed setting. (Temperatures cannot be set when in the following modes: “Fast-Cooling”, “Home” and “Vacation”.) 2.
Using the handy functions Fast Freezing Mode 5 6 7 8 9 : ; (continued) Under Fast-Freezing Mode, the refrigerator temperature can be set, but not the freezer temperature. 1. To enter Fast-Freezing Mode Press “Function” ; until the “Fast-Freezing” icon 6 flickers, and then press “OK” <. Fast-Freezing Mode is activated, and the “Fast-Freezing” icon 6 lights up. 2. To quit Fast-Freezing Mode While in Fast-Freezing Mode, press “Function” ; until the “Fast-Freezing” icon 6 flickers, and then press “OK” <.
Using the handy functions Alarm Mode 2 3 4 5 6 7 8 Child safety lock 1 2 3 Refrigerator door alarm When the refrigerator door is open over three minutes, the beep will sound. Close the door or press any button to stop the beep. If you do the latter, the beep will sound again after 3 minutes. Sensor fault alarm The alarm icon a on the control panel lights up, and “E0”, “E1” or “E2” is displayed in area c or d.
Making ice cubes Ice tray Water level line Open the freezer, pull out the freeze drawer and take out the ice tray. (The ice tray is in the Vegetable and fruit crisper of the fridge compartment when delivered.) Fill water in the ice tray to the water level line and then place back the ice tray. When ice cubes are ready, pull out the freeze drawer and take out the ice tray. Slightly twist the ice tray by holding its two sides, the ice cubes will drop from the ice tray.
Care and Cleaning instructions (continued) Daily cleaning English Wipe regularly with a dry cloth. Places to pay particular attention to: Door opening seal If the seal gets dirty and damaged, cold air is more likely to leak. Bottle shelf Wipe away any dirt and liquid before it builds up. Each year, unplug your refrigerator, remove the shelves and give them a thorough clean.
Maintenance check Is the mains lead damaged? Does the mains plug get hot? Is the mains plug firmly in the mains socket? If the mains lead is damaged, please consult an authorized service centre. DO NOT attempt to replace these items yourself. Extended disuse If you’re not going to use the refrigerator for a long time, unplug it and clean the mains plug as described above. Then leave the doors open for 2-3 days. This lets the interior dry out properly, and prevents odour and the build up of mould.
FAQs If you feel that the refrigerator is not working properly, check out the following points first. If the trouble persists, disconnect the mains plug and contact your dealer or an authorized service centre. English General You hear unusual sounds from the • Has the refrigerator been installed on a sturdy and level floor? refrigerator.
Fridge and freezer The fridge is not chilling (and the freezer is not freezing). • Is the power to the refrigerator on? The fridge is not chilling (and the freezer is not freezing) satisfactorily.
Specifications Product fiche (EU Regulation 1060/2010) SUPPLIER'S NAME CATEGORY ENERGY EFFICIENCY CLASS ANNUAL ENERGY CONSUMPTION NET FRIDGE VOLUME NET FREEZER VOLUME STAR RATING OF THE FREEZER 'FROST FREE' COMPARTMENTS TEMPERATURE RISE TIME FREEZING CAPACITY CLIMATE CLASS AIRBORNE ACOUSTICAL NOISE EMISSIONS Other Information TOTAL GROSS VOLUME TOTAL NET VOLUME OUTSIDE DIMENSIONS WIDTH × DEPTH × HEIGHT NET WEIGHT RATED VOLTAGE RATED FREQUENCY REFRIGERANT/CHARGE BLOWING AGENT Panasonic NR-BN30QGW NR-BN30QGB
Inhaltsverzeichnis Sicherheitsanweisungen ..............................................20 Hinweise zur Entsorgung .............................................23 Montage ..........................................................................24 Schematische Ansicht ..................................................26 Display und Bedienfeld .................................................27 Einstellen der Temperatur ............................................28 Verwendung der Zusatzfunktionen .........
Sicherheitsanweisungen (Fortsetzung) Montieren Sie den Kühlschrank nicht an einem feuchten Ort oder einem Ort, wo er mit Wasser in Berührung kommen kann. English • Eine schlechte Isolierung von Elektroteilen kann einen Kurzschluss, einen elektrischen Schlag oder einen Brand verursachen. Keine Arzneimittel oder andere temperaturempfindliche Produkte im Kühlschrank aufbewahren. • Sie sollten keine Produkte im Kühlschrank lagern die eine strenge Temperaturkontrolle erfordern.
Sicherheitsanweisungen (Fortsetzung) Die Steckerstifte vor dem Anschließen an die Stromversorgung von Schmutz oder Staub säubern. • Staubablagerungen auf dem Stecker können, besonders bei feuchten Bedingungen, einen Isolationsausfall verursachen. Dies kann zu einem Kurzschluss, Brand oder elektrischen Schlag führen. Ziehen Sie das Netzkabel ab, und wischen Sie es mit einem trockenen Tuch ab. Verwenden Sie keinesfalls ein nasses oder feuchtes Tuch.
Hinweise zur Entsorgung Entsorgung von Verpackungsmaterial English Recyceln Sie, wenn möglich, Verpackungen wie Kartons, Plastiktüten, Klebeband und Polystyrol und stellen Sie sicher, dass alle weiteren Verpackungsmaterialien sicher entsorgt werden. Halten Sie die Verpackungen außerhalb der Reichweite von Babys und Kleinkindern, um Erstickungsgefahr vorzubeugen.
Montage Dieser Abschnitt erklärt, wie Sie Ihr Gerät für Lärm- und Energiereduzierung und einen effizienteren Betrieb aufstellen soll. Maße B599 x T638 x H1856 (mm) Auspacken des Geräts Entfernen Sie jegliche Verpackungen und Klebebänder. Die richtige Platzauswahl Lüftung Das Gerät gibt, während es in Betrieb ist, Wärme ab und sollte deswegen in einem gut durchlüfteten, trockenen Raum mit ausreichend Freiraum aufgestellt werden (siehe Abbildung 1).
Erstmalig an den Strom angeschlossen Deutsch English Wenn das Gerät zum ersten Mal an den Strom angeschlossen wird, leuchtet das Bedienfeld für zwei Sekunden auf, die auf dem Bedienfeld angezeigte Gefrierraumtemperatur blinkt und dann wird die Gefrierraumtemperatur auf dem Display angezeigt. Drücken Sie eine beliebige Taste oder warten Sie fünf Sekunden bis das Blinken aufhört und die eingestellte Gefrierraumtemperatur auf dem Dislay angezeigt wird.
Schematische Ansicht Kühlraumfach Gekochte Speisen, Getränke, Eier, Kuchen, Milchprodukte Die Temperatur kann in einem Bereich von 2 °C bis 8 °C eingestellt werden. Gefrierfach Gefrorenes Fleisch, Geflügel, Fisch, Eis Die Temperatur kann in einem Bereich von -24 °C bis -16 °C eingestellt werden. Die Abbildung zeigt den BN30PGW.
Bedienfeld 2 3 5 6 7 8 9 4 Gefrierfachtemperaturanzeige 5 “Super-Kühlmodus” Anzeige 6 “Super-Gefriermodus” Anzeige 7 “Home” Anzeige Deutsch 4 English 1 1 Alarmanzeige 2 Kindersicherheitsanzeige 3 Kühlraumtemperaturanzeige 8 “Urlaubsmodus” Anzeige 9 “Kühlschrank” Modus • Zum Einstellen der Kühlschranktemperatur : “Gefriermodus” Taste • Zum Einstellen der Gefrierfachtemperatur ; “Funktion” Taste • Zum Einstellen des Modus: “Schnellkühl”, „Schnellgefrier“, “Home” oder “Urlaub” < “OK” Taste • Zum An
Einstellen der Temperatur Kühlraumfach 1 2 3 9 : ; < 1. Drücken Sie “Kühlschrank” 9, und sobald die Temperaturanzeige c aufblinkt, kann die Temperatur eingestellt werden. Mit jedem Drücken der Taste ändert sich die Temperatur (die Temperaturanzeige 3 zeigt die letzte eingestellte Temperatur an). Drücken Sie “OK” < um die Einstellung zu bestätigen. (Temperaturen können im folgenden Modus nicht eingestellt werden: “Schnellkühl”, “Home” und “Urlaub”.) 2.
Verwendung der Zusatzfunktionen Schnellgefrier-Modus 6 7 8 : ; Deutsch 9 Im Schnellgefrier-Modus kann die Kühlschranktemperatur eingestellt werden, aber nicht die Gefriertemperatur. 1. Um den Schnellgefrier-Modus einzugeben, drücken Sie “Funktion” ; bis das “Schnellgefrier“ Symbol 6 aufblinkt und drücken Sie dann “OK” <. Der Schnellgefrier-Modus ist aktiviert und das “Schnellgefrier” Symbol 6 leuchtet auf. 2.
Verwendung von Zusatzfunktionen Alarmmodus 1 2 3 4 5 6 7 8 Kindersicherung 1 2 3 (Fortsetzung) Alarm für geöffnete Kühlschranktür Wenn die Kühlschranktür länger als drei Minuten geöffnet bleibt, wird ein Alarmsignal hörbar. Schließen Sie die Tür oder drücken Sie eine beliebige Taste, um das Alarmsignal zu deaktivieren. Beim Drücken einer Taste wird das Alarmsignal nach 3 Minuten erneut ertönen.
Produktion von Eiswürfeln Eiswürfelschale English Wasserstandmarkierung Deutsch Öffnen sie den Gefrierraum, ziehen Sie das Gefrierfach heraus und nehmen Sie die Eiswürfelschale heraus. (Die Eiswürfelschale befindet sich bei der Lieferung des Geräts im Gemüsefach des Kühlschranks). Füllen Sie die Eiswürfelschale bis zur Wasserstandmarkierung mit Wasser und stellen Sie die Eiswürfelschale wieder zurück.
Pflege- und Reinigungsanweisungen (Fortsetzung) Tägliches Reinigen Reinigen Sie die Teile mit einem trockenen Tuch. Orte die leicht verschmutzt werden: Türdichtungsöffnung Bei Verschmutzung kann die Dichtung leicht beschädigt werden und die Kaltluft kann entweichen. Türfächer und Schubladen Reinigen Sie die Türfächer und Schubladen, bevor sich Schmutz und Flüssigkeit ansammeln. Ziehen Sie einmal jährlich den Netzstecker und entfernen Sie die Regale zur Reinigung.
Wartungskontrolle English Ist das Anschlusskabel beschädigt? Wird der Netzstecker heiß? Ist der Netzstecker komplett in der Steckdose eingesteckt? Wenn das Netzkabel beschädigt ist, wenden Sie sich an ein zugelassenes Kundendienstzentrum. Ersetzen Sie es NICHT selbst. Deutsch Lange Nichtbenutzung Wenn Sie beabsichtigen, den Kühlschrank längere Zeit nicht zu benutzen, trennen Sie ihn wie oben beschrieben vom Stromnetz und reinigen Sie den Stecker wie oben erläutert.
Fragen und Antworten Wenn Sie das Gefühl haben, dass der Kühlschrank nicht ordnungsgemäß funktioniert, überprüfen Sie zuerst die folgenden Punkte. Falls die Störung weiterhin besteht, ziehen Sie den Netzstecker und wenden Sie sich an Ihren Fachhändler oder zugelassenes Servicezentrum. Allgemeines Sie hören ungewöhnliche Geräusche vom Kühlschrank.
Kühlraum und Gefrierraum Der Kühlraum (und der Gefrierraum) funktioniert nicht zufriedenstellend.
Technische Daten Produktdaten (EU Verordnung 1060/2010) NAME DES LIEFERANTEN NR-BN30PGW NR-BN30PGB MODELL KATEGORIE ENERGIEEFFIZIENZKLASSE JÄHRLICHER ENERGIEVERBRAUCH NETTOKÜHLVOLUMEN NETTOGEFRIERVOLUMEN STERNEKENNZEICHNUNG DES GEFRIERFACHS '”FROSTFREIE”' FÄCHER TEMPERATUREANSTIEGZEIT GEFRIERVERMÖGEN KLIMAKLASSE LUFTSCHALLEMISSIONEN Weitere Informationen GESAMTBRUTTOVOLUMEN GESAMTNETTOVOLUMEN AUSSENMASSE BREITE × TIEFE × HÖHE NETTOGEWICHT NENNSPANNUNG NENNFREQUENZ KÜHLMITTEL/LADUNG GEBLÄSEMITTEL Panasonic
Table des matières Utilisation des fonctions pratiques..............................45 Production de glaçons ..................................................48 Conseils d’entretien et de nettoyage ...........................48 Foire aux questions.......................................................51 Caractéristiques ............................................................53 English Consignes de sécurité ..................................................37 Protection de l’environnement ...........
Consignes de sécurité (suite) N’installez pas le réfrigérateur dans un endroit humide ou dans lequel il pourrait entrer en contact avec de l’eau. • La détérioration de l’isolation des pièces électriques pourrait être a l’origine d’un court-circuit, d’une décharge électrique ou d’un incendie. Ne stockez pas de produits pharmaceutiques ou sensibles à la température dans le réfrigérateur. • Les produits nécessitant un contrôle de température strict ne doivent pas être stockés dans le réfrigérateur.
Consignes de sécurité (suite) Retirez toutes les salissures ou poussières susceptibles de se trouver sur les broches de la fiche électrique avant de la brancher sur l’alimentation électrique. English • L’accumulation de poussière sur la fiche électrique pourrait se traduire par un défaut d’isolation, en particulier dans des conditions de forte humidité. Cela peut provoquer un court-circuit, un incendie ou une décharge électrique. Débranchez le cordon d’alimentation et essuyez-le avec un chiffon sec.
Protection de l’environnement Mise au rebut des matériaux d’emballage Veuillez recycler les emballages dans la mesure du possible (ex. le carton, les sacs en plastique, le ruban adhésif et le polystyrène) et assurez-vous que tous les autres matériaux d’emballage sont éliminés de façon sécurisée. Conservez l’emballage hors de portée des bébés et des jeunes enfants pour éviter blessure et étouffement.
Installation Cette section explique comment installer votre appareil afin qu'il fasse le moins de bruit possible et consomme le moins d’énergie possible. English Dimensions L599 x P638 x H1856 (mm) Déballage de votre appareil Retirez tous les emballages et les bandes adhésives.
D`abord branchez-le Quand le congélateur est branché sur le secteur pour la première fois, l`écran d`affichage s`allume pendant 2 secondes, le témoin de température du congélateur clignote sur l`écran d`affichage et la température du congélateur s`affiche. Pressez n`importe quel bouton ou attendez 5 secondes que le témoin cesse de clignoter et que s`affiche le réglage de la température.
Identification des pièces Compartiment du réfrigérateur English Plats cuisinés, boissons, œufs, gâteaux, produits laitiers Vous pouvez régler la température dans une plage comprise entre 2 °C et 8 °C. Compartiment du congélateur Français Viande congelée, volaille, poisson, crème glacée Vous pouvez régler la température dans une plage comprise entre -24 °C et -16 °C. Les dessins montrent le BN30PGW.
Panneau de commande 1 2 3 4 5 6 7 8 9 1 Indicateur d’alarme 2 Bouton sécurité enfants 3 Afficheur de température du réfrigérateur 4 Afficheur de température du congélateur 5 Bouton “Fast-Cooling” 6 Bouton “Fast-Freezing” 7 Bouton “Home” 8 Bouton “Vacation” 9 Bouton “Fridge” • Pour programmer la température du réfrigérateur : Bouton “Freezer” • Pour programmer la température du congélateur ; Bouton “Function” • Pour sélectionner la fonction: “Fast-Cooling”, “Fast-Freezing”, “Home” ou “Vacation” < Bouto
Réglage de la température Compartiment du réfrigérateur 2 3 9 : < Français ; 1. Appuyez sur “Fridge” 9, et dès lors que le panneau d’affichage de la température du réfrigérateur clignote c, la température peut être réglée. Chaque fois que vous appuyez sur le bouton, la température change sur le panneau d’affichage de la température 3 et montre la température en conséquence. Appuyez sur “OK” < pour appliquer les paramètres affichés.
Utilisation des fonctions pratiques Mode Fast Freezing 5 6 7 8 9 : ; < Mode Home 7 8 9 : ; < Mode Vacation 7 8 9 : ; < 46 (suite) Sous le mode Fast-Freezing, la température du réfrigérateur peut être réglée mais pas la température du congélateur. 1. Activation du mode Fast-Freezing Appuyez sur “Function” ; jusqu'à ce que la touche “Fast-Freezing” 6 clignote, puis appuyez sur “OK” <. Le mode Fast-Freezing est activé et la touche “FastFreezing” 6 s’allume. 2.
Utilisation des fonctions pratiques Mode Alarm 2 3 4 6 7 8 Fonction Sécurité enfants 1 2 3 9 Français 5 Alarme d’ouverture de la porte du réfrigérateur Si la porte du réfrigérateur reste ouverte pendant plus de trois minutes, une alarme sonore se déclenche. Fermez la porte ou appuyez sur n’importe quel bouton pour arrêter l’alarme. Si vous choisissez la dernière option, l’alarme sonnera à nouveau au bout de trois minutes.
Production de glaçons Bac à glaçons Démarcation du niveau d’eau Ouvrez le congélateur, tirez le tiroir de congélation et retirez le bac à glaçons (le bac à glaçons se trouve dans le bac à fruits et légumes du réfrigérateur lors de la livraison). Remplissez le bac à glaçons d’eau jusqu’à la démarcation du niveau d’eau et remettez le bac à glaçons en place. Lorsque les glaçons sont prêts, tirez le tiroir de congélation et retirez le bac à glaçons.
Consignes d’entretien et de nettoyage (suite) Nettoyage quotidien English Essuyez régulièrement avec un chiffon sec. Endroits qui se salissent facilement : Joint d’ouverture de porte En se salissant, le joint s’abîme facilement et une fuite d’air froid est plus probable. Français Étagère à bouteille Si de la saleté et du liquide sont accumulés, essuyez immédiatement. Chaque année, débranchez la fiche d’alimentation et retirez les étagères pour effectuer un nettoyage minutieux.
Vérifications d’usage Le cordon d’alimentation est-il endommagé? La fiche électrique devient-elle chaude? La fiche électrique est-elle complètement insérée dans la prise? Si le cordon d’alimentation est endommagé, veuillez consulter un revendeur agréé. Ne remplacez PAS ces pièces vous-même. Non utilisation prolongée S’il est prévu une longue période de non-utilisation de l’appareil, débranchez la fiche électrique, effectuez un nettoyage comme décrit ci-dessus. Laissez la porte ouverte pendant 2 ou 3 jours.
Foire aux questions English Si vous avez l’impression que votre réfrigérateur ne fonctionne pas correctement, vérifiez tout d’abord les points suivants. Si le problème persiste, débranchez la fiche d’alimentation électrique et contactez votre revendeur ou un centre de service après-vente agréé.
Réfrigérateur et congélateur Le réfrigérateur ne refroidit pas (et • Le réfrigérateur est-il bien sous tension? le congélateur ne congèle pas). Le réfrigérateur ne refroidit pas (et • La température est-elle réglée trop haut? le congélateur ne congèle pas) de • Le réfrigérateur est-il exposé directement aux rayons du soleil ou placé près manière satisfaisante.
Caractéristiques Fiche produit (Règlementation UE 1060/2010) NOM DE LA MARQUE CATÉGORIE CLASSE D’EFFICACITÉ ÉNERGÉTIQUE CONSOMMATION D’ÉNERGIE ANNUELLE VOLUME UTILE DU RÉFRIGÉRATEUR VOLUME UTILE DU CONGÉLATEUR NOMBRE D’ÉTOILES DU CONGÉLATEUR MENTION ‘SANS GIVRE’ POUR LES COMPARTIMENTS CORRESPONDANTS DURÉE DE MONTÉE EN TEMPÉRATURE POUVOIR DE CONGÉLATION CLASSE CLIMATIQUE ÉMISSIONS ACOUSTIQUES DANS L’AIR Autres Informations VOLUME TOTAL BRUT VOLUME TOTAL NET DIMENSIONS EXTÉRIEURES LARGEUR × PROFONDEUR × HAUT
Indice Istruzioni di sicurezza ...................................................54 Rispetto dell’ambiente ..................................................57 Installazione ...................................................................58 Parti.................................................................................60 Pannello comandi ..........................................................61 Impostazione della temperatura ..................................62 Uso delle funzioni utili ......
Istruzioni di sicurezza (continua) Non istallare il frigorifero in luoghi umidi o dove possa entrare a contatto con l’acqua. • Se l’isolamento delle parti elettriche è deteriorato, possono verificarsi cortocircuiti, scosse elettriche o incendi. English Non conservare prodotti farmaceutici o sensibili alla temperatura del frigorifero. • I prodotti che richiedono un attento controllo della temperature non devono essere conservati nel frigorifero.
Istruzioni di sicurezza (continua) Rimuovere eventuale sporcizia o polvere dalle spine di alimentazione prima di collegare l’apparecchio ala presa elettrica. • Gli accumuli di polvere sulla spina possono impedire l’isolamento, soprattutto in condizioni di umidità. In caso contrario, potrebbero verificarsi cortocircuiti, incendi o scosse elettriche. Scollegare il cavo di alimentazione e pulirlo con un panno asciutto. Non usare mai un panno bagnato o umido.
Rispetto dell’ambiente Smaltimento del materiale di confezionamento English Riciclare tutto il materiale possibile (ad es. Cartone, buste di plastica, nastro adesivo e polistirolo) e accertarsi di smaltire in modo sicuro il resto del materiale di confezionamento. Tenere il materiale di confezionamento lontano dalla portata di neonati e bambini per evitare infortuni o soffocamento.
Installazione Questo paragrafo spiega come installare l’apparecchio in modo da ridurre il rumore e ottenere un funzionamento a energia ottimizzata. Dimensioni Larghezza 599 x Profondità 638 x Altezza 1856 (mm) Apertura della confezione dell’apparecchio Rimuovere tutte le protezioni e il nastro adesivo della confezione dall’apparecchio.
Primo collegamento English Quando l'alimentazione è collegata, il pannello di controllo si accende per due secondi, il display della temperatura congelatore sul pannello di controllo lampeggia e poi viene visualizzata la temperatura del congelatore. Premere un tasto qualsiasi o attendere cinque secondi che il baluginio si fermi, e viene visualizzata la temperatura impostata per il congelatore.
Parti Comparto frigorifero Cibo cotto, bevande, uova, torte, prodotti caseari E’ possibile impostare la temperatura in un intervallo compreso tra 2 °C e 8 °C. Scomparto congelatore Carne, pollame, pesce surgelati, gelato E’ possibile impostare la temperatura in un intervallo compreso tra -24 °C e -16 °C. L’illustrazione mostra il modello BN30PGW.
Pannello comandi 2 3 4 6 7 8 9 4 Display della temperatura del freezer 5 Icona “Fast-Cooling” 6 Icona “Fast-Freezing” 7 Icona “Home” 8 Icona “Vacation” 9 Pulsante frigo • Per selezionare la temperatura del frigo : Pulsante “Freezer” • Per selezionare la temperatura del freezer ; Pulsante “Function” • Per selezionare la modalità: “Fast-Cooling”, “Fast-Freezing”, “Home” or “Vacation” Italiano 5 English 1 1 Indicatore allarme 2 Icona blocco per bambini 3 Display della temperatura del frigorifero <
Impostazione della temperatura Scomparto frigorifero 1 2 3 9 : ; < 1. Premere “Frigo” 9, e appena il display della temperatura del frigo lampeggia c, la temperatura potrà essere regolata. Ogni volta che il pulsante viene premuto, la temperatura cambia (il display della temperatura del frigo 3 mostra la temperatura corrispondente). Premere “OK” < per applicare le modifiche. (le temperature non possono essere selezionate nelle seguenti modalità: “FastCooling”, “Home” e “Vacation”.) 2.
Uso delle funzioni utili Modalità Fast Freezing 6 7 8 9 : ; < 7 8 9 : ; < Modalità Vacation 7 8 9 : ; < Nella modalità Home, il frigo ha una temperatura di 4 °C, e il freezer di -18 °C. Nella modalità Home, la temperatura del frigorifero e del freezer non possono essere cambiate. 1. Per accedere alla modalità Home Premi “Funzione” ; finché l’icona “Home” 7 lampeggia e poi premi “OK” <. La modalità Home è attiva, e l’icona “Home” 7 si accende. 2.
Uso delle funzioni utili Modalità Allarme 1 2 3 4 5 6 7 8 Blocco per la sicurezza dei bambini 1 2 3 (continua) Allarme porta frigorifero Se la porta del frigo è aperta per più di tre minuti, il segnale acustico viene attivato. Chiudi la porta o premi un pulsante qualsiasi per fermare il suono. Se premi il pulsante, il suono ricomincerà dopo 3 minuti. Allarme sensore guasto L’icona allarme sul pannello di controllo si accende a e “E0”, “E1” o“E2” viene mostrato nell’area c o d.
Produzione di cubetti di ghiaccio Portaghiaccio English Linea di livello dell’acqua Apri il freezer, estrai il cassetto del congelatore e rimuovi il portaghiaccio. (Il portaghiaccio si trova nel ripiano per frutta e verdura del compartimento frigo al momento della consegna). Riempi d’acqua il portaghiaccio fino alla linea di livello e poi reinserisci nel freezer il portaghiaccio. Quando i cubetti di ghiaccio sono pronti, estrarli dal cassetto del congelatore.
Istruzioni per la cura e la pulizia (continua) Pulizia quotidiana Pulire le parti con un panno asciutto regolarmente. Punti che si sporcano facilmente: Guarnizione della porta Quando si sporca, la guarnizione si danneggia facilmente ed è probabile una fuoriuscita di aria fredda. Ripiano delle bottiglie Se ci sono degli accumuli di sporco e liquido, pulire rimuovendoli subito. A cadenza annuale, staccare la spina di alimentazione del frigorifero e rimuovere i ripiani per la pulizia.
Controllo di manutenzione English Il cavo dell’alimentazione è danneggiato? La spina di alimentazione si surriscalda? La spina di alimentazione è inserita completamente nella presa? Se il cavo dell’alimentazione è danneggiato, consultare un centro assistenza autorizzato. NON cercare di sostituirli da soli.
Domande frequenti Se si ha motivo per ritenere che il frigorifero non funzioni correttamente, verificare innanzitutto i punti seguenti. Se il problema persiste, scollegare la spina di alimentazione e contattare il rivenditore o un centro assistenza autorizzato. Problemi generali Il frigorifero emette un rumore anomalo.
Frigorifero e congelatore • Il frigorifero è acceso? English Il frigorifero non raffredda ( e il congelatore non congela). C’è differenza tra la temperatura impostata e la temperatura effettiva. • Se all’interno del frigorifero vengono collocati alimenti caldi, la temperatura aumenta temporaneamente. Gli alimenti all’interno del frigorifero congelano.
Specifiche tecniche Scheda prodotto (Regolamento UE 1060/2010) NOME DEL FORNITORE NR-BN30PGW NR-BN30PGB MODELLO CATEGORIA CLASSE DI EFFICIENZA ENERGETICA CONSUMO ANNUO DI ENERGIA VOLUME UTILE FRIGORIFERO VOLUME UTILE CONGELATORE NUMERO DI STELLE CONGELATORE SCOMPARTI ‘ANTIBRINA’ TEMPO DI RISALITA DELLA TEMPERATURA CAPACITA’ DI CONGELAMENTO CLASSE CLIMATICA EMISSIONI DI RUMORE ACUSTICO Altre Informazioni VOLUME TOTALE LORDO VOLUME TOTALE NETTO DIMENSIONI ESTERNE LARGHEZZA × PROFONDITA’ × ALTEZZA PESO NETTO T
Contenido Uso de las funciones prácticas ....................................79 Hacer cubitos de hielo ..................................................82 Instrucciones de cuidado y limpieza ...........................82 Preguntas más frecuentes............................................85 Especificaciones ...........................................................87 English Instrucciones de seguridad ..........................................71 Cuidado del medioambiente..................................
Instrucciones de seguridad (continuación) No instale el frigorífico en un lugar húmedo o donde pueda entrar en contacto con agua. • El deterioro del aislamiento de los componentes eléctricos puede causar un cortocircuito, una descarga eléctrica o un incendio. No guarde productos farmacéuticos u otros productos sensibles a la temperatura en el frigorífico. • No debería guardar productos que requieren un estricto control de la temperatura en el frigorífico.
Instrucciones de seguridad (continuación) English Quite la suciedad y el polvo de los conectores de la clavija antes de conectarla a la fuente de alimentación. • El polvo acumulado en la clavija puede causar fallos en el aislamiento, especialmente en condiciones de humedad. Esto puede causar un cortocircuito, un incendio o una descarga eléctrica. Desenchufe el cable de alimentación y límpielo con un paño seco. Nunca utilice un paño mojado o húmedo.
Cuidado del medioambiente Eliminación del material de embalaje Por favor, recicle siempre que sea posible (cartón, bolsas de plástico, cinta adhesiva y poliestireno) y asegúrese de que el resto de materiales de embalaje se eliminan de forma segura. Mantenga el material de embalaje fuera del alcance de niños y bebés para evitar riesgos de asfixia.
Instalación Esta sección explica cómo instalar su electrodoméstico para obtener un funcionamiento eficaz energéticamente, seguro y silencioso. English Dimensiones An. 599 x Pr. 638 x Al.1856 (mm) Cómo desembalar su electrodoméstico Quite todo el material de embalaje y la cinta adhesiva.
Conectado por primera vez Cuando se conecta a la fuente de energía por primera vez, las luces del panel de control se iluminan durante dos segundos, la pantalla de la temperatura del congelador en el panel de control parpadea y se muestra la temperatura del congelador. Presionar cualquier botón o esperar cinco segundos para que pare el parpadeo de luz, y se mostrará la temperatura configurada para el congelador.
Partes Compartimento del frigorífico English Alimentos cocinados, bebidas, huevos, pasteles y productos lácteos La temperatura puede ajustarse en un rango de entre 2 ºC y 8 ºC. Compartimento del congelador Carne y productos avícolas congelados, pescado, helado La temperatura puede ajustarse en un rango de entre -24 ºC y -16 ºC. Esta ilustración muestra el BN30PGW.
Panel de control 1 2 3 4 5 6 7 8 9 1 Icono de alarma 2 Icono de bloqueo de seguridad infantil 3 Visor de la temperatura del frigorífico 4 Visor de la temperatura del congelador 5 Icono de "Refrigeración rápida" 6 Icono de "Congelación rápida" 7 Icono "Hogar" 8 Icono "Vacaciones" 9 Botón del "Frigorífico" • Para establecer la temperatura del frigorífico : Botón del "Congelador" • Para establecer la temperatura del congelador ; Botón de "Función" • Para seleccionar el modo: "Refrigeración rápida", "Conge
Ajuste de la temperatura Compartimento del frigorífico 2 3 9 : ; < 1. Presione "Frigorífico" 9 y cuando el visor de temperatura del frigorífico c parpadee, podrá ajustar la temperatura. Cada vez que se pulsa un botón, la temperatura cambia (el visor de temperatura del frigorífico 3 muestra la temperatura correspondiente). Presione "Aceptar" < para aplicar la configuración que se muestra en la pantalla.
Uso de las funciones prácticas Modo de Congelación rápida 5 6 7 8 9 : ; < Modo Hogar 7 8 9 : ; < Modo Vacaciones 7 8 9 : ; < 80 (continuación) En el Modo de Congelación rápida, se puede ajustar la temperatura del frigorífico, pero no la temperatura del congelador. 1. Para entrar en el Modo de Congelación rápida Presione "Función" ; hasta que el icono de "Congelación rápida" 6 parpadee y luego presione "Aceptar" <. El Modo de Congelación rápida y el icono de "Congelación rápida" 6 se iluminará.
Uso de las funciones prácticas Modo de Alarma 2 3 4 5 6 7 8 Bloqueo de seguridad infantil 1 2 3 Cuando presiona y mantiene el botón de "Aceptar" < presionado durante tres segundos, el icono de bloqueo de seguridad infantil b se ilumina y el bloqueo de seguridad infantil se activa. Cuando se presiona cualquier otro botón mientras se usa la función de bloqueo de seguridad infantil, las configuraciones actuales se muestran, suena un pitido y la operación no es posible.
Hacer cubitos de hielo Bandeja para hielo Línea del nivel de agua Abra el congelador, saque el cajón del congelador y quite la bandeja para hielo. (La bandeja para hielo está en el cajón de fruta y vegetales del frigorífico cuando es enviado). Ponga agua en la bandeja para hielo hasta la línea del nivel de agua y luego colóquela de nuevo en el congelador. Cuando los cubitos de hielo estén listos, saque el cajón del congelador y quite la bandeja para hielo.
Instrucciones de cuidado y limpieza (continuación) Limpieza diaria English Límpielo regularmente con un paño seco. Lugares en los que prestar una atención especial: Sellado de apertura de la puerta Si el sellado se ensucia o se daña, es más probable que se produzca una fuga de aire frío. Estante para botellas Limpie cualquier resto de suciedad o líquido antes de que se acumule. Anualmente, desconecte la clavija de alimentación, saque los estantes y límpielos minuciosamente.
Verificación de mantenimiento ¿Está dañado el cable de alimentación? ¿Se calienta la clavija de alimentación? ¿La clavija de alimentación está insertada firmemente en la toma de corriente? Si el cable de alimentación está dañado, por favor, consulte con un centro de servicio autorizado. NO intente sustituir estos elementos usted mismo. En desuso durante mucho tiempo Si no va a usar el frigorífico durante mucho tiempo, desenchúfelo y limpie la clavija de alimentación como se describe más arriba.
Preguntas más frecuentes English Si observa que el frigorífico no funciona adecuadamente, compruebe los siguientes puntos primero. Si el problema persiste, desconecte la clavija de alimentación y póngase en contacto con su distribuidor o con un centro de servicio autorizado.
Frigorífico y congelador 86 El frigorífico no refrigera (y el congelador no congela). • ¿Está conectada la alimentación del frigorífico? El frigorífico no refrigera (y el congelador no congela) satisfactoriamente.
Especificaciones Ficha del producto (Reglamento UE 1060/2010) NOMBRE DEL PROVEEDOR CATEGORÍA CLASE DE EFICIENCIA ENERGÉTICA CONSUMO DE ENERGÍA ANUAL VOLUMEN NETO DEL FRIGORÍFICO VOLUMEN NETO DEL CONGELADOR CLASIFICACIÓN POR ESTRELLAS DEL CONGELADOR COMPARTIMENTOS "LIBRE DE ESCARCHA" PERÍODO DE SUBIDA DE LA TEMPERATURA CAPACIDAD DE CONGELACIÓN CLASE CLIMÁTICA EMISIONES DE RUIDO ACÚSTICO AÉREO Otra información VOLUMEN TOTAL BRUTO VOLUMEN TOTAL NETO DIMENSIONES EXTERIORES ANCHO x PROFUNDIDAD x ALTURA PESO NETO
Índice Instruções de Segurança ..............................................88 Preocupação com o ambiente......................................91 Instalação .......................................................................92 Peças ..............................................................................94 Painel de Controlo .........................................................95 Configuração da temperatura ......................................96 Uso das funções manuais .....................
Instruções de Segurança (continuação) Não instale o frigorífico num lugar húmido, ou onde ele possa entrar em contacto com a água. • Detioração do isolamento dos componentes elétricos pode causar curto-circuito, choque elétrico ou incêndio. English Não guarde produtos farmacêuticos ou outros produtos sensíveis à temperatura no frigorífico. • Não deve armazenar produtos que requerem uma temperatura específica e controlada no frigorífico.
Instruções de Segurança (continuação) Remova qualquer sujidade ou poeira dos pinos da ficha antes de ligar a uma fonte de alimentação. • A acumulação de poeira sobre a ficha pode causar falha de isolamento, especialmente em condições húmidas. Isto pode causar curto-circuito, incêndio ou choque elétrico. Desconecte o cabo de alimentação e limpe-o com um pano seco. Nunca use um pano húmido ou molhado. Ligue o aparelho à tomada, e certifique-se de que a conexão é segura.
Preocupação com o ambiente Eliminação da embalagem English Por favor recicle quando possível (por exemplo, sacos de plástico, papelão, fita adesiva e poliestireno) e certifique-se de eliminar todos os outros materiais de embalagem com segurança. Guarde a embalagem fora do alcance de bebês e crianças pequenas, para evitar ferimentos ou asfixia.
Instalação Esta secção explica como instalar o seu aparelho para obter uma operação mais segura, tranquila, e com eficiência energética. Dimensões W599 x D638 x H1856 (mm) Desembalar o aparelho Remova a embalagem e a fita. Escolher a localização correta Ventilação Como o aparelho emite calor durante a operação, deve ser instalado em um quarto bem ventilado, seco, com abundância de espaço acima e por trás, como mostrado na Figura 1. Se conseguir ouvi-lo a vibrar, precisa de mais espaço.
Primeira Ligação English Quando a energia é ligada pela primeira vez, o painel de controlo acende por dois segundos, é exibida a temperatura do congelador, enquanto o painel de controlo pisca. Pressione qualquer botão ou espere 5 segundos para que o painel de controlo pare de piscar, e defina a temperatura do congelador. Configurações padrão para o painel de controlo Quando a energia é liga pela primeira vez, o painel de controlo está predefinido para o modo "Casa".
Peças Compartimento do frigorífico Alimentos Cozinhados, bebidas, ovos, bolos, produtos lácteos A temperatura pode ser definida entre um intervalo de 2 ºC a 8 °C. Compartimento do congelador Carne congelada, aves, peixes, gelados A temperatura pode ser definida entre um intervalo de -24 ºC a -16 °C. Esta ilustração mostra o BN30PGW.
Painel de controle 2 3 4 5 6 7 8 9 English 1 1 Ícone de alarme 2 Ícone de fechadura de segurança para crianças 3 Indicador de temperatura do frigorífico 4 Indicador de temperatura do congelador 5 Ícone de “Arrefecimento-Rápido” 6 Ícone de “Congelamento-Rápido” 7 Ícone “Casa” 8 Ícone de “Férias” 9 Botão “Refrigeração” • Para definir a temperatura do frigorífico : Botão “Congelador” • Para definir a temperatura do congelador ; Botão "Função" • Para selecionar o modo: “Arrefecimento-Rápido”, “Congelamento
Configuração da temperatura Compartimento do frigorífico 1 2 3 9 : ; < 1. Pressione “Frigorífico” 9, e quando o indicador de temperatura do frigorífico c piscar, pode definir a temperatura. Por cada vez que o botão é pressionado, a temperatura altera-se (o indicador de temperatura do frigorífico 3 demonstra a temperatura em conformidade). Pressione "OK" < para aplicar a configuração exibida. (Temperaturas não podem ser definidas quando está a usar os seguintes modos: “Arrefecimento-Rápido”, “Casa” ou “Férias”.
Uso das funções manuais Modo de Congelamento Rápido 6 7 8 9 : ; < Modo Casa 7 8 9 ; < Modo de Férias 7 8 9 : ; < Sob o Modo Casa, o frigorífico está a 4° C e o congelador a -18° C. Sob o Modo Casa, as temperaturas do frigorífico e do congelador não podem ser alteradas. 1. Para entrar no Modo Casa Pressione “Função” ; até que o ícone de “Casa” 7 pisque e pressione “OK” <. O Modo Casa é ativado, e o ícone “Casa” 7 acende-se. 2.
Uso das funções manuais Modo de Alarme 1 2 3 4 5 6 7 8 Ícone de fechadura de segurança para crianças 1 2 3 9 (continuação) Alarme da porta do frigorífico Quando a porta do frigorífico está aberta por mais de três minutos, soará um sinal sonoro. Feche a porta ou pressione qualquer tecla para interromper o sinal. Se clicar em uma tecla, o sinal sonoro soará novamente depois de 3 minutos.
Fazer cubos de gelo Bandeja para o gelo English Linha de nível da água Abra o congelador, retire a gaveta do gelo e retire a bandeja do gelo. (A bandeja do gelo está no compartimento para fruta e vegetais do frigorífico). Encha a bandeja do gelo com água até à linha de nível de água e em seguida coloque a bandeja do gelo de volta. Quando os cubos de gelo estão prontos, retire a gaveta do gelo e extraia a bandeja do gelo.
Instruções de Limpeza e Cuidados (continuação) Limpeza diária Limpe regularmente com um pano seco. Lugares que necessitam de atenção especial: Selo de abertura da porta Se o selo ficar sujo ou danificado, a probabilidade de fugas de ar frio é aumentada. Prateleira de garrafas Limpe toda a sujidade e líquido antes que este se acumule. A cada ano, desligue o seu frigorífico, remova as prateleiras e faça uma limpeza profunda.
Manutenção English O cabo de alimentação está danificado? A ficha da corrente fica quente? A ficha está colocada com firmeza na tomada? Se o cabo de alimentação estiver danificado, consulte um centro de serviço autorizado. NÂO TENTE substituí-lo sozinho. Desuso prolongado Se não for usar o frigorífico durante muito tempo, desligue-o e limpe a ficha de energia, conforme descrito acima. Então, deixe as portas abertas durante 2-3 dias.
Perguntas Frequentes Se sente que o frigorífico não está a funcionar corretamente, verifique primeiro os seguintes pontos. Se o problema persistir, desconecte da tomada e contacte o revendedor ou um centro de serviço autorizado. Problemas Gerais Ouvir sons incomuns do frigorífico.
Frigorífico e congelador O frigorífico não está a arrefecer (e o congelador não está a congelar) satisfatoriamente.
Especificações Ficha de produto (Regulamento da UE 1060/2010) NOME DO FORNECEDOR NR-BN30PGW NR-BN30PGB MODELO CATEGORIA CLASSE DE EFICIÊNCIA ENERGÉTICA CONSUMO ANUAL DE ENERGIA VOLUME LÍQUIDO DO FRIGORÍFICO VOLUME LÍQUIDO DO CONGELADOR CLASSIFICAÇÃO POR ESTRELAS DO CONGELADOR COMPARTIMENTOS “ANTI-CONGELADOR” TEMPO DE SUBIDA DE TEMPERATURA CAPACIDADE DE CONGELAÇÃO CLASSE CLIMÁTICA EMISSÕES DE RUÍDO AÉREO Outras Informações VALOR BRUTO TOTAL VOLUME LÍQUIDO TOTAL DIMENSÕES EXTERIORES LARGURA X PERFUNDIDADE X A
Obsah Používání užite ných funkcí.......................................113 Tvorba kostek ledu ......................................................116 Pokyny pro pé i a išt ní ...........................................116 FAQs .............................................................................119 Specifikace ...................................................................121 English Bezpe nostní pokyny..................................................105 Pé e o životní prost edí ...........
Bezpečnostní pokyny (pokračování) Chladni ku neinstalujte ve vlhku nebo v míst , kde m že p ijít do styku s vodou. • Poškozená izolace elektrických částí muže způsobit úraz elektrickým proudem nebo požár. V chladni ce neskladujte farmaceutické produkty nebo produkty citlivé na teplotu. • Produkty vyžadující přísně kontrolovanou teplotu nesmí být v chladničce skladovány. Nenechte d ti lézt, šplhat nebo se v šet na dve e chladni ky. • Mohly by tím poškodit chladničku a vážně se zranit.
Bezpečnostní pokyny (pokračování) English P ed p ipojením k napájení z kolíku zástr ky odstra te cizorodý materiál nebo prach. • Nahromaděný prach na zástrčce může způsobit poškození izolace zejména ve vlhkém prostředí. Hrozí nebezpečí zkratu, požáru nebo úrazu elektrickým proudem. Odpojte napájecí kabel a otřete jej suchým hadrem. Nikdy nepoužívejte vlhký nebo mokrý hadr. Pevn zapojte napájecí kabel s kolíky do zásuvky. • Volně připojený napájecí kabel může způsobit požár nebo úraz elektrickým proudem.
Péče o životní prostředí Nakládání s obalovým materiálem Zajistěte, aby všechny obalové materiály (např. karton, plastové pytle, lepicí pásky a polystyren) byly pokud možno recyklovány a zkontrolujte, že jste všechen ostatní obalový materiál bezpečně zlikvidovali. Spíš, než abyste jen vyhodili tento odpad, zajistěte, že bude recyklován, pokud tato možnost existuje. Likvidace použitých za ízení Jen pro státy Evropské unie a zem s fungujícím systémem recyklace a zpracování odpadu.
Instalace Tato část vysvětluje, jak nainstalovat váš spotřebič se sníženým hlukem a energeticky úspornějším provozem. English Rozm ry Š599 x H638 x V1856 (mm) Vybalení vašeho spot ebi e Odstra te veškerou pěnovou ochranu a lepicí pásky, které drží příslušenství spotřebiče uvnitř i vně.
První zapojení Když je elektrika poprvé připojena, řídící panel se rozsvítí na dvě sekundy, teplota mrazáku zabliká na kontrolním panelu, a poté se zobrazí aktuální teplota. Stiskněte jakékoli tlačítko nebo vyčkejte 5 sekund pro zastavení blikání, a nastavená teplota bude zobrazena. P vodní nastavení ídícího panelu Když je elektrika poprvé připojena, řídící panel je nastaven na mod „Home“. Tento mod musí být vypnutý když nastavujete teplotu chladničky nebo mrazničky.
Díly Prostor chladni ky English Vařené potraviny, nápoje, vajíčka, koláče, mléčné produkty Teplotu lze nastavit v rozmezí od 2 do 8 °C. Prostor mrazáku Zmrazené maso, drůbež, ryby, zmrzlina Teplotu lze nastavit v rozmezí od -24 do -16 °C. Tyto ilustrace zobrazují model BN30PGW.
Řídicí panel 1 2 3 4 5 6 7 8 9 1 Ikona alarmu 2 Ikona zámku ochrany d tí 3 Displej teploty chladni ky 4 Displej teploty mrazáku 5 Ikona "Fast-Cooling" 6 Ikona "Fast-Freezing" 7 Ikona "Home" 8 Ikona "Vacation" 9 Tla ítko "Fridge" • Pro nastavení teploty chladničky : Tla ítko "Freezer" • Pro nastavení teploty mrazáku ; Tla ítko "Function" • Pro výběr režimu: “Fast-Cooling”, “Fast-Freezing”, “Home” nebo “Vacation” < Tla ítko "OK" • Pro upravení teploty, nebo potvrzení, nastavení a ukončení existující f
Nastavení teploty Prostor chladni ky 2 3 9 : ; < 1. Stiskněte "Fridge" 9 a když začne blikat displej teploty chladničky c, teplota může být nastavena. Pokaždé když je stisknuté tlačítko, teplota se mění (displej teploty chladničky 3 ukazuje teplotu podle toho). Stiskněte "OK" < pro potvrzení zobrazeného nastavení. (Teploty nemohou být nastaveny v režimech: “Fast-Cooling”, “Home” a “Vacation”.) 2.
Používání užitečných funkcí Rychlomrazení 5 6 7 8 9 : ; (pokračování) Při režimu rychlomrazení, teplota chladničky může být nastavena, ale teplota mrazničky ne. 1. Pro vstup do režimu rychlomrazení Stiskněte "Function" ; dokud nezačne blikat ikona "Fast-Freezing" 6 a poté stiskněte "OK" <. Režim rychlomrazení je aktivován a jeho ikona "Fast-Freezing" 6 se rozsvítí. 2. Pro ukončení režimu Stiskněte "Function" ; dokud nezačne blikat ikona "Fast-Freezing" 6 a poté stiskněte "OK" <.
Používání užitečných funkcí Režim Alarmu 2 3 4 5 6 7 8 D tská pojistka 1 2 3 Alarm dve í chladni ky Pokud jsou dveře chladničky otevřené déle než 3 minuty ozve se pípnutí. Zavřete dveře nebo stiskněte jakékoli tlačítko pro zastavení pípání. Pokud tak učiníte podruhé, bude pípání opět znít po 3 minutách. Alarm poruchy sníma e Ikona alarmu a na ovládacím panelu se rozsvítí, a "E0", "E1" nebo "E2" se zobrazí v oblasti c nebo d.
Tvorba kostek ledu Ledova Linka hladiny vody Otevřete mrazák, vytáhněte zásuvku mrazáku a vyjměte misky na led. (Ledový zásobník je v zeleninových a ovocných komorách v chladničce při dodání.) Napl te vodu do misky na led k lince hladiny vody a potom umístěte zásobník zpět do mrazáku. Když jsou ledové kostky připraveny, vytáhněte zásuvku mrazáku a vyjměte misky na led. Mírně otočte zásobník tak, že ho držíte za obě strany, kostky ledu vypadnou ze zásobníku. Potom umístěte zásobník zpět na své místo.
Pokyny pro péči a čištění (pokračování) Denní išt ní English Otřete součásti suchým hadrem. Místa, které se snadno zašpiní: T sn ní dve í Špinavé těsnění se snadno poškodí a může dojít k úniku studeného vzduchu. Police na lahve Dojde-li k nahromadění nečistot, okamžitě je otřete. Jednou za rok vypojte chladničku ze zásuvky a vyjměte poličky na čištění.
Kontroly Není poškozen napájecí kabel? Není napájecí zástrčka horká? Je zástrčka pevně zasunuta do zásuvky? Je-li napájecí kabel poškozený, obra te se prosím na autorizované servisní středisko. NEVYM UJTE je sami. Delší doba nepoužívání Pokud chladničku delší dobu nebudete používat, odpojte ji od sítě a vyčistěte zásuvku podle popisu výše. Poté nechte dveře 2 - 3 dny otevřené. Prostor chladničky tak dokonale vyschne a nedošlo k vzniknu záspachu nebo plísně. Chladničku většinou není nutné vypínat.
FAQs Pokud se vám zdá, že chladnička nefunguje správně, zkontrolujte nejprve tyto body. Pokud problém nemizí, odpojte zástrčku a kontaktujte prodejce nebo autorizované servisní středisko. English Obecné • • • • Nainstalovali jste chladničku na pevnou a rovnou plochu? Jsou kolem chladničky dostatečné odstupy? Nevibruje něco na horní straně chladničky? Je normální slyšet hluk, když se chladnička spouští nebo vypíná. Slyšíte zvuk po vypnutí kompresoru.
Chladni ka a mrazni ka Chladni ka nechladí (a mrazni ka nemrazí). • Je chladnička zapnutá? Chladni ka nechladí (a mrazni ka nemrazí) dostate n .
Specifikace Informa ní list (EU Regulace 1060/2010) NÁZEV DODAVATELE KATEGORIE T ÍDA ENERGETICKÉ Ú INNOSTI RO NÍ SPOT EBA ENERGIE ISTÝ OBJEM CHLADNI KY ISTÝ OBJEM MRAZNI KY HODNOCENÍ CHLADNI KY BEZNÁMRAZOVÉ P IHRÁDKY DOBA NÁB HU TEPLOTY MRAZICÍ VÝKON KLIMATICKÁ T ÍDA EMISE HLUKU ŠÍ ENÉHO VZDUCHEM Další informace CELKOVÝ HRUBÝ OBJEM CELKOVÝ ISTÝ OBJEM VENKOVNÍ ROZM RY ŠÍ KA x HLOUBKA x VÝŠKA ISTÁ HMOTNOST NOMINÁLNÍ NAP TÍ NOMINÁLNÍ FREKVENCE CHLADICÍ MÉDIUM/ZÁT Ž P NI Panasonic NR-BN30QGW NR-BN30QGB 7 (Chla
Spis Tre ci Zasady bezpiecze stwa ..............................................122 Ochrona rodowiska ...................................................125 Instalacja ......................................................................126 Cz ci ...........................................................................128 Panel sterowania .........................................................129 Ustawianie temperatury ..............................................
Zasady bezpiecze stwa (kontynuacja) Nie wolno umieszcza lodówki w wilgotnym miejscu lub w miejscu, w którym urz dzenie mo e mie kontakt z wod . • Zu yta izolacja części elektrycznych mo e spowodowa zwarcie, pora enie pr dem lub po ar. English W lodówce nie wolno przechowywa leków ani produktów wra liwych na zmiany temperatury. • Produkty, które wymagaj ścisłej kontroli temperatury, nie mog by przechowywane w lodówce. Nie wolno pozwala dzieciom wspina si , hu ta lub zawiesza na drzwiach lodówki.
Zasady bezpiecze stwa (kontynuacja) Przed umieszczeniem wtyczki w gnie dzie nale y usun wszelkie cia a obce i kurz z bolców wtyczki. • Kurz nagromadzony na wtyczce mo e przyczyni się do braku izolacji, szczególnie w wilgotnym otoczeniu. Mo e to spowodowa zwarcie, po ar lub pora enie pr dem. Nale y odł czy kabel elektryczny i wytrze go such szmatk . U ycie mokrej lub wilgotnej szmatki jest zabronione. Umie wtyczk kabla elektrycznego w gnie dzie elektrycznym, upewniaj c si , e jest bezpiecznie pod czona.
Ochrona rodowiska Utylizacja opakowania Opakowanie nale y przechowywa z dala od niemowl t i dzieci, aby unikn English Nale y się upewni , e wszystkie materiały opakowaniowe, takie jak karton, worki plastikowe, taśma samoprzylepna i styropian zostan zutylizowane w bezpieczny sposób. uszkodze ciała lub uduszenia. Polski Pozbywanie si zu ytych urz dze Dotyczy wy cznie obszaru Unii Europejskiej oraz krajów posiadaj cych systemy zbiórki i recyklingu.
Instalacja Ten rozdział opisuje sposób instalacji urz dzenia zapewniaj cy cich i energooszczędn eksploatację. Wymiary Szer. 599 x Gł. 638 x Wys. 1856 (mm) Rozpakowanie urz dzenia Usu elementy opakowania i taśmę klej c . Wybór odpowiedniego miejsca Wentylacja W czasie eksploatacji urz dzenie wydziela ciepło, dlatego powinno by zainstalowane w dobrze wentylowanym, suchym pomieszczeniu. Nale y zapewni odpowiedni odstęp wokół urz dzenia, zgodnie z rysunkiem 1.
Pierwsze pod czenie English Po podł czeniu urz dzenia do ródła zasilania na dwie sekundy podświetli się panel sterownia, wyświetlacz temperatury zamra alki na panelu sterowanie zacznie miga i zostanie wyświetlona temperatura zamra alki. Naciśnij dowolny przycisk i odczekaj pię sekund na zako czenie migania, aby wyświetli ustawion temperaturę zamra alki. Ustawienia domy le panelu sterowania Po pierwszym podł czeniu urz dzenia do ródła zasilania, panel sterowania zostanie ustawiony na tryb „Dom”.
Cz ci Komora ch odziarki Ugotowana ywnoś , napoje, jajka, ciasta, nabiał Temperatur mo na ustawi w zakresie od 2 °C do 8 °C. Komora zamra arki Zamro one mięso, drób, ryby, lody Temperatur mo na ustawi w zakresie od -24 °C do -16 °C. Ta ilustracja pokazuje BN30PGW.
Panel sterowania 2 3 4 5 6 7 8 9 English 1 1 Ikona alarmu 2 Ikona zabezpieczenia przed dzie mi 3 Wy wietlacz temperatury ch odziarki 4 Wy wietlacz temperatury zamra arki 5 Ikona “Fast-Cooling” 6 Ikona “Fast-Freezing” 7 Ikona “Home” 8 Ikona “Vacation” 9 Przycisk “Fridge” • Aby ustawi temperaturę chłodziarki : Przycisk “Freezer” • Aby ustawi temperaturę zamra arki ; Przycisk “Function” • Aby wybra tryb: “Fast-Cooling”, “Fast-Freezing”, “Home” lub “Vacation” < Przycisk “OK” • Aby ustawi temperaturę, l
Ustawianie temperatury Komora ch odziarki 1 2 3 9 : ; < 1. Naciśnij “Fridge” 9, a gdy wyświetlacz temperatury chłodziarki miga c, mo na ustawi temperaturę. Za ka dym dotknięciem przycisku, temperatura się zmienia( wyświetlacz temperatury chłodziarki 3 pokazuje temperaturę). Wciśnij “OK” < aby zatwierdzi . (Temperatury nie mog by ustawiane, gdy urz dzenie jest w trybie: “FastCooling”, “Home” oraz “Vacation”.) 2.
Korzystanie z por cznych funkcji Tryb Fast Freezing 6 7 8 9 : ; < Tryb Home 7 8 9 : ; < Tryb Vacation 7 8 : ; < W trybie Home, chłodziarka jest ustawiona na 4 °C, natomiast zamra arka na -18 °C. W trybie Home temperatura chłodziarki i zamra arki nie mo e by zmieniona. 1. Aby wejś w tryb Home Naciskaj przycisk “Function” ; a ikona “Home” 7 zacznie miga , następnie naciśnij “OK” <. Tryb Home został wł czony, ikona “Home” 7 jest podświetlona. 2.
Korzystanie z por cznych funkcji Tryb Alarmu 1 2 3 4 5 6 7 8 Blokada przed dzie mi 1 2 3 (kontynuacja) Alarm drzwi ch odziarki Gdy drzwi chłodziarki s otwarte dłu ej ni trzy minuty, pojawi się d więk alarmu. Zamknij drzwi lub wciśnij jakikolwiek przycisk, aby wył czy alarm. Jeśli zrobisz to drugie, alarm się znowu wł czy po 3 minutach. Alarm b du sensora Ikona alarmu a na panelu steruj cym się podświetli, a “E0”, “E1” lub “E2” zostanie wyświetlone w obszarze c lub d.
Produkcja kostek lodu Tacka do lodu English Linia poziomu wody Otwórz zamra arkę, wysu szufladę i wyci gnij tackę do lodu. (Tacka znajduje się w szufladzie na warzywa i owoce w momencie dostarczenia urz dzenia.) Napełnij tackę wod do poziomu linii wody i umieś tackę z powrotem w zamra arce. Gdy kostki lodu s gotowe, wysu szufladę w zamra arce i wyjmij tackę. Delikatnie wygnij tackę do lodu, trzymaj c z obu stron, kostki wypadn z tacki. Następnie, odłó tackę z powrotem na miejsce w zamra arce.
Konserwacja i czyszczenie (kontynuacja) Codzienne czyszczenie Przecieraj regularnie such szmatk . Miejsca, na które trzeba zwróci szczególn uwag : Uszczelka drzwi Jeśli uszczelka się zabrudzi, łatwo mo e ulec uszkodzeniu, co mo e spowodowa wydostawanie się zimnego powietrza. Pó ka na butelki W przypadku nagromadzenia się brudu i płynu natychmiast wytrzyj półkę szmatk . Raz w roku odł cz lodówkę od zasilania, wyjmij półki i wyczyś je dokładnie.
Przegl d konserwacyjny English Czy kabel elektryczny jest uszkodzony? Czy wtyczka kabla się nagrzewa? Czy wtyczka kabla jest całkowicie wsunięta do gniazdka elektrycznego? Jeśli przewód zasilaj cy jest uszkodzony, nale y skontaktowa się z autoryzowanym centrum serwisowym. NIE WOLNO wymienia tych elementów samodzielnie. D u sza przerwa w eksploatacji Jeśli lodówka nie jest u ywana przez dłu szy czas, nale y wyj wtyczkę kabla elektrycznego z gniazda i wyczyści j w opisany powy ej sposób.
Cz sto zadawane pytania Je eli uwa asz, e lodówka nie funkcjonuje poprawnie, sprawd najpierw poni sze kwestie. Je eli problem utrzymuje się, odł cz wtyczkę kabla elektrycznego i skontaktuj się ze sprzedawc lub autoryzowanym centrum serwisowym. Ogólne Lodówka wydaje dziwne odg osy.
Ch odziarka i zamra arka Ch odziarka nie ch odzi (a zamra alnik nie zamra a) w zadowalaj cy sposób.
Dane techniczne Karta produktu (EU Regulacja 1060/2010) NAZWA DOSTAWCY NR-BN30PGW NR-BN30PGB MODEL KATEGORIA KLASA EFEKTYWNO CI ENERGETYCZNEJ ROCZNE ZU YCIE ENERGII POJEMNO U YTKOWA CH ODZIARKI POJEMNO U YTKOWA ZAMRA ARKI OZNACZENIE GWIAZDKOWE KOMORY ZAMRA ANIA KOMORY 'FROST FREE' CZAS WZROSTU TEMPERATURY ZDOLNO ZAMRA ANIA KLASA KLIMATYCZNA POZIOM EMISJI HA ASU Inne Informacje CA KOWITA POJEMNO BRUTTO CA KOWITA POJEMNO NETTO WYMIARY ZEWN TRZNE SZEROKO x G BOKO x WYSOKO MASA NETTO NAPI CIE ZNAMIONOWE CZ STO
Panasonic Corporation Website : http://www.panasonic.com Pursuant to the directive 2004/108/EC, article 9(2) Panasonic Testing Centre Panasonic Marketing Europe GmbH Winsbergring 15, 22525 Hamburg, Germany ©Panasonic Corporation 2016 Y0916-0 Printed in P.R.C.