VQT0T85ENG.book 1 ページ 2006年12月19日 火曜日 午後2時49分 Operating Instructions Instrukcja obsługi Digital Video Camera NV-GS230EP Model No. NV-GS180EP Before use, please read these instructions completely. Przed pierwszym włączeniem kamery prosimy o dokładne przeczytanie instrukcji obsługi.
VQT0T85ENG.book 2 ページ 2006年12月19日 Information for your safety WARNING: TO REDUCE THE RISK OF FIRE, ELECTRIC SHOCK OR PRODUCT DAMAGE, ≥DO NOT EXPOSE THIS APPARATUS TO RAIN, MOISTURE, DRIPPING OR SPLASHING AND THAT NO OBJECTS FILLED WITH LIQUIDS, SUCH AS VASES, SHALL BE PLACED ON THE APPARATUS. ≥USE ONLY THE RECOMMENDED ACCESSORIES. ≥DO NOT REMOVE THE COVER (OR BACK); THERE ARE NO USER SERVICEABLE PARTS INSIDE. REFER SERVICING TO QUALIFIED SERVICE PERSONNEL.
VQT0T85ENG.book 3 ページ 2006年12月19日 火曜日 午後2時49分 ENGLISH Files recorded on SD Memory Card It may not be possible to play back the files on this Movie Camera recorded on and created by other equipment or vice versa. For this reason, check the compatibility of the equipment in advance. Pages for reference Pages for reference are indicated by dashes either side of a number, for example: -00The menu operation flow is indicated by >> in the description.
VQT0T85ENG.book 4 ページ 2006年12月19日 火曜日 午後2時49分 Contents Information for your safety ................................... 2 Before using Accessories.......................................................... 5 Optional................................................................ 5 Parts identification and handling .......................... 5 Fitting the lens cap............................................... 7 The grip belt .........................................................
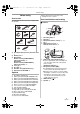
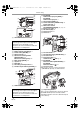
VQT0T85ENG.book 5 ページ 2006年12月19日 火曜日 午後2時49分 Before using ≥Some optional accessories may not be available in some countries. Before using Accessories The followings are the accessories supplied with this product.
VQT0T85ENG.
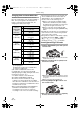
VQT0T85ENG.book 7 ページ 2006年12月19日 火曜日 午後2時49分 Before using ≥You cannot open the card slot cover when the tripod is used. Insert the card first and then attach the tripod. (37) (37) Shoulder strap fixture (NV-GS180) Fitting the lens cap Fit the lens cap to protect the surface of the lens. If you do not use the movie camera when the MC protector or the ND filter of the Filter Kit (VW-LF37WE; optional) is attached to the front of the lens hood, attach the lens cap to protect the surface of the lens.
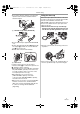
VQT0T85ENG.book 8 ページ 2006年12月19日 火曜日 午後2時49分 Before using The grip belt Using the viewfinder Adjust the belt length so it fits your hand. 1 Adjust the belt length and the pad position. ª Extending the viewfinder 1 Pull out the viewfinder. Extend it by pinching the extension knob and pulling. 2 1 3 ª Adjusting the field of view 1 Adjust the focus by sliding the eyepiece corrector knob. 1 Flip the belt. 2 Adjust the length. 3 Fix the belt.
VQT0T85ENG.book 9 ページ 2006年12月19日 火曜日 午後2時49分 Before using Power supply 1 Connect the AC mains lead to the AC ª Charging the battery When this product is purchased, the battery is not charged. Charge the battery before using this product. ≥Battery charging time (-10-) ≥We recommend using Panasonic batteries. (-5-) ≥If you use other batteries, we cannot guarantee the quality of this product. ≥If the DC input lead is connected to the AC adaptor, then the battery will not get charged.
VQT0T85ENG.book 10 ページ 2006年12月19日 火曜日 午後2時49分 Before using Charging time and recordable time The times shown in the table below show the times at a temperature of 25 oC and a humidity of 60%. This is just a guide. If the temperature is higher or lower than the specified value, the charging time will become longer. Supplied battery/ CGR-DU06 (7.2 V/ 640 mAh) CGA-DU12 (7.2 V/ 1150 mAh) A B C A B C CGA-DU14 (7.2 V/ 1360 mAh) A B C CGA-DU21 (7.2 V/ 2040 mAh) A B C CGA-DU07 (7.
VQT0T85ENG.book 11 ページ 2006年12月19日 火曜日 午後2時49分 Before using ≥After using, make sure to rewind the cassette completely, remove it, and put it in a case. Store the case in an upright position. (-55-) ≥When condensation is formed on the lens or the main unit of the movie camera, even if no condensation alarm is indicated, condensation may have formed on the heads or the cassette tape. Do not open the cassette cover.
VQT0T85ENG.book 12 ページ 2006年12月19日 火曜日 午後2時49分 Before using ª Card access lamp ª How to turn off the power 1 While pressing the button 1, set the [OFF/ON] switch to [OFF]. ≥The status indicator goes off. 1 ª SD Memory Card ≥The memory capacity indicated on the SD Memory Card label corresponds to the total amount of capacity to protect and manage the copyright and the capacity available as conventional memory for a movie camera, personal computer or other equipment.
VQT0T85ENG.book 13 ページ 2006年12月19日 火曜日 午後2時49分 Before using How to use the joystick ª Basic joystick operations Operations on the menu screen and selection of files to be played back on the multi-image display Move the joystick up, down, left, or right to select an item or file, and then push in the centre to set it.
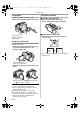
VQT0T85ENG.book 14 ページ 2006年12月19日 火曜日 午後2時49分 Before using 5) Card recording mode ([AUTO/MANUAL/FOCUS] switch is set to [MANUAL]) Using the menu screen For each individual menu, please refer to -42-. 1 Press the [MENU] button. OFF 4 1 2 White balance Shutter speed Iris or gain value Select/Adjust Select/Adjust MENU -30- -30-30- ≥The menu corresponding to the mode selected by the mode dial is displayed. ≥Do not switch the mode dial when the menu is displayed.
VQT0T85ENG.book 15 ページ 2006年12月19日 火曜日 午後2時49分 Before using 7 Press the joystick to determine the setting. ª To exit the menu screen Press the [MENU] button. ª To get back to the previous screen Move the joystick left. ª About the menu setting ≥The menu screen does not appear during recording. And you cannot record when the menu screen appears. ª Operating with remote control The menu screen transition is the same as when the buttons on the main unit are used. 1 Press the [MENU] button.
VQT0T85ENG.book 16 ページ 2006年12月19日 火曜日 午後2時49分 Before using Adjusting LCD monitor/viewfinder ª In order to increase the brightness of ª Adjusting the brightness and colour the entire LCD monitor 1 Press the [POWER LCD] button. level 1 Set [SETUP] >> [LCD SET] or [EVF SET] >> [YES]. POWER LCD ≥The [POWER LCD] lamp lights up. ≥If the [POWER LCD] button is pressed, the entire LCD monitor will become approx. twice as bright as the normal.
VQT0T85ENG.book 17 ページ 2006年12月19日 火曜日 午後2時49分 Before using Using the remote control (10) ª Remote control Using the remote control supplied will enable controlling almost all the functions of this camera to be controlled.
VQT0T85ENG.book 18 ページ 2006年12月19日 火曜日 午後2時49分 Before using Warning Risk of fire, explosion and burns. Do not recharge, disassemble, heat above 60 xC or incinerate. ª Concerning the button-type battery ≥When the button-type battery runs down, replace it with a new battery (part number: CR2025). The battery is normally expected to last about 1 year, but it depends on operation frequency. ≥Keep the button-type battery out of the reach of children.
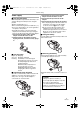
VQT0T85ENG.book 19 ページ 2006年12月19日 火曜日 午後2時49分 Record mode Record mode Check before recording Check the following by trying recording before important events such as weddings in order to verify that the image recording and audio recording work properly and that you know how to use the movie camera. ª Basic camera holding 1) 2) 4) ª About auto mode ≥Set the [AUTO/MANUAL/FOCUS] switch to [AUTO], and colour balance (white balance) and focusing will be adjusted automatically.
VQT0T85ENG.book 20 ページ 2006年12月19日 火曜日 午後2時49分 Record mode ª Concerning the remaining tape time Remove the lens cap. (-7-) (When the camera is turned on with the lens cap fitted, the automatic white balance adjustment may not function properly. Please turn the camera on after removing the lens cap.) ≥Set to Tape Recording Mode. ≥The remaining tape time is indicated in minutes. (When it reaches less than 3 minutes, the indication starts flashing.
VQT0T85ENG.book 21 ページ 2006年12月19日 火曜日 午後2時49分 Record mode Check the recording 1 ≥Set to Card Recording Mode. PC The last image recorded is played back for 2 to 3 seconds. After checking, the camera will be set to a recording pause. ≥Set to Tape Recording Mode. 1 Press the joystick during the recording pause until the icon 1 appears. 2 Move the joystick down to select the recording check icon [ ].
VQT0T85ENG.book 22 ページ 2006年12月19日 火曜日 午後2時49分 Record mode ≥For the number of still pictures to be recorded on a card, refer to -59-. ≥The sound cannot be recorded. ≥While data are recorded on a card, do not operate the mode dial. ≥When the access lamp is lit, do not insert or remove a card. ≥Another product may degrade or not play back data recorded on this camera. ≥If set [PICT. QUALITY] >> [ ], mosaic-pattern noise may appear on a playback image depending on the picture content.
VQT0T85ENG.book 23 ページ 2006年12月19日 火曜日 午後2時49分 Record mode ª To use the zoom microphone function Interlocked with the zooming operation, the microphone will collect sounds clearly far away with the tele-shot or those in the vicinity with the wide-angle shot. ≥Set to Tape Recording Mode. 1 Set [ADVANCE] >> [ZOOM MIC] >> [ON]. Zoom in/out function You can zoom in up to 10k optically. ≥Set to Tape/Card Recording Mode. 1 Wide-angle recording (zoom out): Push the [W/T] lever towards [W].
VQT0T85ENG.book 24 ページ 2006年12月19日 火曜日 午後2時49分 Record mode Quick start This camera will be put into standby in approx. 1.7 seconds after the power is turned on. ≥Please note in Quick Start Mode approximately half the pause recording power is being consumed. Using Quick Start Mode will reduce the battery recording/playback time. ≥This is only activated in the following cases. ≥A tape or a card is inserted, while the Tape Recording Mode is set. ≥A card is inserted, while the Card Recording Mode is set.
VQT0T85ENG.book 25 ページ 2006年12月19日 火曜日 午後2時49分 Record mode Night view functions ª To cancel the colour night view This function allows you to record colour subjects in dark locations to stand out against the background. Attach the camera to a tripod, and you can record images free from vibration. ≥Only manual focusing can be used. ≥Recorded scene is seen as if frames were missed. Colour night view function You can record dark locations brightly in colour.
VQT0T85ENG.book 26 ページ 2006年12月19日 火曜日 午後2時49分 Record mode Tele-macro function Fade in/fade out function By focusing only on the subject and blurring the background, the image can be impressive. This camera can focus on the subject at a distance of approx. 40 cm. ≥Set to Tape/Card Recording Mode. 1 Press the joystick until the icon 1 appears. 2 Move the joystick up to select the tele-macro icon [ ]. Fade in The image and audio gradually appear. Fade out The image and audio gradually disappear.
VQT0T85ENG.book 27 ページ 2006年12月19日 火曜日 午後2時49分 Record mode Wind noise reduction function This reduces the wind noise coming into the microphone when recording. ≥Set to Tape Recording Mode. 1 Set [BASIC] >> [WIND CUT] >> [ON]. ª To cancel the wind noise reduction function Set [BASIC] >> [WIND CUT] >> [OFF]. ≥Reduces the wind noise depending on the wind strength. (If this function is activated in strong winds, the stereo effect may be reduced. When the wind weakens, the stereo effect will be restored.
VQT0T85ENG.book 28 ページ 2006年12月19日 火曜日 午後2時49分 Record mode Image stabilizer function Continuous Photoshot Reduces the image shaking due to hand movement when recording. ≥Set to Tape Recording Mode. 1 Set [ADVANCE] >> [SIS] >> [ON]. Records still pictures continuously at a certain interval. ≥Set to Card Recording Mode. 1 Set [BASIC] >> [PICTURE SIZE] >> [640]. 2 Set [ADVANCE] >> [BURST MODE] >> [ON]. ª To cancel the image stabilizer function Set [ADVANCE] >> [SIS] >> [OFF].
VQT0T85ENG.book 29 ページ 2006年12月19日 火曜日 午後2時49分 Record mode Recording in various situations (Scene mode) When you record images in different situations, this mode automatically sets optimum shutter speeds and apertures. ≥Set to Tape/Card Recording Mode. 1 Set the [AUTO/MANUAL/FOCUS] switch to [MANUAL]. AUTO MANUAL FOCUS 2 Set [BASIC] >> [SCENE MODE] >> select the desired mode.
VQT0T85ENG.book 30 ページ 2006年12月19日 火曜日 午後2時49分 Record mode Recording in natural colours (White balance) The automatic white balance function may not reproduce natural colours depending on the scenes or lighting conditions. If so, you can adjust the white balance manually. ≥Set to Tape/Card Recording Mode. 1 Set the [AUTO/MANUAL/FOCUS] switch to [MANUAL]. AUTO MANUAL FOCUS 2 Move the joystick down until the white balance indication appears. ([ AWB ] etc.
VQT0T85ENG.book 31 ページ 2006年12月19日 火曜日 午後2時49分 Record mode Manual focus adjustment If auto focusing is difficult due to the conditions, then manual focusing is available. ≥Set to Tape/Card Recording Mode. 1 Set the [AUTO/MANUAL/FOCUS] switch to [MANUAL]. AUTO MANUAL FOCUS Manual shutter speed/aperture adjustment Shutter Speed Adjust it when recording fast-moving subjects. Aperture Adjust it when the screen is too bright or too dark. ≥Set to Tape/Card Recording Mode.
VQT0T85ENG.book 32 ページ 2006年12月19日 火曜日 Record mode Manual iris/gain adjustment ≥If the value does not become “OPEN”, you cannot adjust the gain value. ≥If the gain value is increased, the noise on the screen increases. ≥Depending on the zoom magnification, there are iris values that are not displayed. ª Shutter speed range 1/50 to 1/8000 seconds: Tape Recording Mode 1/25 to 1/500 seconds: Card Recording Mode The shutter speed closer to 1/8000 is faster. ª Iris/gain value range CLOSE (Closed), F16, ...
VQT0T85ENG.book 33 ページ 2006年12月19日 火曜日 午後2時49分 Playback mode ª Repeat playback When the tape end is reached, the tape will be rewound and played back again. 1 Set [ADVANCE] >> [REPEAT PLAY] >> [ON]. Playback mode Playing back tape ≥Set to Tape Playback Mode. PC ≥The [ ] indication appears. (In order to cancel the repeat playback mode, set [REPEAT PLAY] >> [OFF] or set [OFF/ON] switch to [OFF].
VQT0T85ENG.book 34 ページ 2006年12月19日 火曜日 午後2時49分 Playback mode Frame-by-frame playback 1 During playback, press the [;] button on the remote control. 2 Press the [E] button or the [D] button on the remote control. Variable-speed search function The speed of cue/review playback can be varied. (This operation is only available when using the remote control.) ≥Set to Tape Playback Mode and play back a tape. 1 Press the [VAR SEARCH] button on the remote control.
VQT0T85ENG.book 35 ページ 2006年12月19日 火曜日 午後2時49分 Playback mode Playback on TV ª To display the on-screen information Images recorded by this camera can be played back on a TV. ≥Insert a recorded tape into this camera. 1 Connect the movie camera and a TV. The information displayed on the LCD monitor or the viewfinder (operation icon, time code and mode indication, etc.), date and time can be displayed on the TV. 1 Press the [EXT DISPLAY] button on the remote control.
VQT0T85ENG.book 36 ページ 2006年12月19日 火曜日 午後2時49分 Playback mode ª To display multiple playback files Multiple files on the card (6 files on 1 screen) are displayed. 1 Move the [s /VOLr] lever to switch the images. 640 640 640 640 NO.25 Towards [r]: Towards [`]: Deleting files recorded on a card The deleted files cannot be restored. ≥Set to Picture Playback Mode. 1 Move the joystick left or right to select a file to delete. 640 640 100-0005 Full-screen display (Displays 1 image.
VQT0T85ENG.book 37 ページ 2006年12月19日 火曜日 午後2時49分 Playback mode Formatting a card Please be aware that if a card is formatted, then all the data recorded on the card will be erased. Store important data on a personal computer, etc. ≥Set to Picture Playback Mode. 1 Set [ADVANCE] >> [CARD FORMAT] >> [YES]. 2 When the confirmation message appears, select [YES] and press the joystick in order to format the card. ª To complete the settings Press the [MENU] button.
VQT0T85ENG.book 38 ページ 2006年12月19日 火曜日 午後2時49分 Edit mode Edit mode Recording from a tape onto a card Still pictures can be recorded on a memory card from scenes that have already been recorded on a cassette. ≥Set to Tape Playback Mode. ≥Insert a tape which already has recorded contents and a card. 1 Start playback. Copying onto a DVD recorder or a VCR (Dubbing) Pictures recorded by the movie camera can be stored on a DVD-RAM or other such media. Refer to the instructions for the recorder.
VQT0T85ENG.book 39 ページ 2006年12月19日 火曜日 午後2時49分 Edit mode ≥For more information, refer to the operating instructions for your TV set and recorder. ≥When you do not need functional indications or date and time indications, press the [EXT DISPLAY] button on the remote control for no indication. (When you connect the movie camera and a recorder with the DV cable, these indications may not appear.
VQT0T85ENG.book 40 ページ 2006年12月19日 火曜日 午後2時49分 Edit mode Audio dubbing You can add music or narration to the recorded cassette. ≥Set to Tape Playback Mode. 1 Insert an external microphone securely into the [MIC] terminal as far as it will go. MIC ª Before recording with audio dubbing ≥Set to Tape Recording Mode. ≥When you want to preserve the original sound taken during recording, set [SETUP] >> [AUDIO REC] >> [12bit] to take pictures.
VQT0T85ENG.book 41 ページ 2006年12月19日 火曜日 午後2時49分 Edit mode Printing pictures by directly connecting to the printer (PictBridge) To print pictures by directly connecting the movie camera to the printer, use a printer compatible with PictBridge. (Read the operating instructions for the printer.) ≥Insert a card and set to Picture Playback Mode. 1 Connect the movie camera and the printer with the supplied USB cable. 1 3 Move the joystick left and right to select a desired picture, and then press it.
VQT0T85ENG.book 42 ページ 2006年12月19日 火曜日 午後2時49分 Menu Menu ª [TAPE PLAYBACK MENU] Menu list Menu figures and illustrations are provided for easy-to-understand explanations, and so they are different from the actual menu indications. ª [TAPE RECORDING MENU] 1) [BASIC] [DATE/TIME] -44[AV JACK] -45[USB FUNCTION] (Refer to the operating instructions for PC connection.) 1) [BASIC] [SCENE MODE] -29[REC SPEED] -19[BLANK SEARCH] -21[WIND CUT] -27[CLOCK SET] -152) [ADVANCE] [PICT.
VQT0T85ENG.book 43 ページ 2006年12月19日 火曜日 午後2時49分 Menu ª [CARD RECORDING MENU] 1) [BASIC] [SCENE MODE] -29[PICT.
VQT0T85ENG.book 44 ページ 2006年12月19日 火曜日 午後2時49分 Menu Menus related to taking pictures ª [DATE/TIME] This switches between date and time indications. ≥The movie camera automatically records the date and time of picture taking on the tape. ≥You can also show or change the date/time indication by repeatedly pressing the [DATE/ TIME] button on the remote control. ª [AUDIO REC] Switches the audio (PCM audio) recording systems. [12bit]: Records audio in “12 bit 32 kHz 4 tracks”.
VQT0T85ENG.book 45 ページ 2006年12月19日 火曜日 午後2時49分 Menu Menus related to playback Other menus ª [AV JACK] This switches among the output settings of the AV/headphone terminal. [OUT/Ë]: Automatically switches between AV and headphone output. [OUT]: Use this setting when image or sound is not output normally to the TV in [OUT/Ë]. ≥When using the headphone, set to [SETUP] or [BASIC] >> [AV JACK] >> [OUT/Ë]. If set to [OUT], you may hear noises on the right.
VQT0T85ENG.book 46 ページ 2006年12月19日 火曜日 午後2時49分 Others Others Indications Various functions and the movie camera status are shown on the screen. Basic indications r: Remaining battery power 0h00m00s00f: Time code 15:30:45: Date/Time indication Recording indications R0:45: Remaining tape time ≥Remaining tape time is indicated in minutes. (When it reaches less than 3 minutes, the indication starts flashing.
VQT0T85ENG.book 47 ページ 2006年12月19日 火曜日 午後2時49分 Others QXGA : UXGA : SXGA : XGA : SVGA : 640 : 2048 or more 1600 or more, less than 2048 1280 or more, less than 1600 1024 or more, less than 1280 800 or more, less than 1024 640 or more, less than 800 (The size is not displayed at under 640 pixels.) Warning/alarm indications If any one of the following indications lights up or flashes, please check the movie camera.
VQT0T85ENG.book 48 ページ 2006年12月19日 火曜日 午後2時49分 Others CHANGE MODE TO USE USB: The USB cable is connected to the movie camera in Card Recording Mode. DISCONNECT USB CABLE: You are attempting to turn the mode dial in PC mode with the USB cable connected to the movie camera. You are attempting to record pictures on a tape/card with the USB cable connected to the movie camera. NO INK IN PRINTER: There is no ink. Check the connected printer. NO PAPER IN PRINTER: There is no paper.
VQT0T85ENG.
VQT0T85ENG.book 50 ページ 2006年12月19日 火曜日 午後2時49分 Others 5: The movie camera cannot be operated though powered up. The movie camera does not operate normally. • Remove the cassette and then press the [RESET] button. (-52-) If normal conditions are not restored yet, turn off the power. Then, about 1 minute later, turn on the power again. (Conducting the above operation when the access lamp is on may destroy the data on the card.) 6: The cassette cannot be removed.
VQT0T85ENG.book 51 ページ 2006年12月19日 火曜日 午後2時49分 Others Playback (Sound) 1: Sound is not played back from the built-in speaker of the movie camera or the headphones. 0 Is the volume too low? During playback, push the [s /VOLr] lever to display the volume indication and adjust it. (-33-) 2: Different sounds are reproduced at the same time.
VQT0T85ENG.book 52 ページ 2006年12月19日 火曜日 午後2時49分 Others 5: During playback, [UNPLAYABLE CARD] is displayed. • The image was either recorded in a different format, or data is damaged. Others 1: The indication disappears, the screen is frozen, or no operation can be performed. • Turn off the power to the movie camera. If the power cannot be turned off, press the [RESET] button, or detach the battery or AC adaptor and then reattach it. After that, turn on the power again.
VQT0T85ENG.book 53 ページ 2006年12月19日 火曜日 午後2時49分 Others Cautions for Use ª About condensation If you turn the movie camera on when condensation occurs on the head or the tape, condensation Indication [3] (yellow or red) is displayed on the viewfinder or the LCD monitor and the messages [3DEW DETECT] or [3EJECT TAPE] (only when the tape is inserted) appear. If so, follow the procedure below. 3 in yellow: Dews are slightly adhering on the head or the tape.
VQT0T85ENG.book 54 ページ 2006年12月19日 火曜日 午後2時49分 Others ≥Recorded data may be damaged, or pictures may be distorted, by strong magnetic fields created by speakers or large motors. ≥Electromagnetic wave radiation generated by microprocessors may adversely affect the Digital Video Camera, disturbing the pictures and sound.
VQT0T85ENG.book 55 ページ 2006年12月19日 火曜日 午後2時49分 Others ≥To store the battery for a long period of time, we recommend you charge it once every year and store it again after you have completely used up the charged capacity. ≥Dust and other matter attached to the battery terminals should be removed. Do not throw old battery into fire. ≥Heating a battery or throwing it into a fire may result in an explosion.
VQT0T85ENG.book 56 ページ 2006年12月19日 火曜日 午後2時49分 Others ª LCD monitor/viewfinder LCD monitor ≥When the LCD monitor gets dirty, wipe it with a dry soft cloth. ≥In a place with drastic temperature changes, condensation may form on the LCD monitor. Wipe it with soft dry cloth. ≥If your movie camera is extremely cold, the LCD monitor is slightly darker than usual immediately after you turn the power on. However, as the internal temperature increases, it goes back to normal brightness.
VQT0T85ENG.book 57 ページ 2006年12月19日 火曜日 午後2時49分 Others ª White balance The image recorded by the movie camera may become bluish or reddish under the influence of light sources. To avoid such phenomena, adjust the white balance. White balance adjustment determines the white colour under different light sources. By recognizing which is the white colour under sunlight and which is the white colour under a fluorescent lamp, the movie camera can adjust the balance among the other colours.
VQT0T85ENG.book 58 ページ 2006年12月19日 火曜日 午後2時49分 Specifications Specifications Specifications Digital Video Camera Information for your safety Power source: DC 7.9/7.2 V Power consumption: Recording 5.1 W Recording format: Mini DV (Consumer-use digital video SD format) Tape used: 6.
VQT0T85ENG.book 59 ページ 2006年12月19日 火曜日 午後2時49分 Specifications Maximum number of still pictures recordable on an SD Memory Card (optional) PICTURE SIZE [640] [1280] [1760] PICT.
VQT0T85POL.book 124 ページ 2006年12月21日 木曜日 午前10時21分 L VQT0T85-1 F1105Nm1126 ( 2500 J ) C Matsushita Electric Industrial Co., Ltd. Web site: http://www.panasonic.