
Owner's manual


VHS Recording
^Important: If thè remote control POWER, ACTION, PROG, CHA/T, INDEX or ADD/DLT button does not work
when pressed, press the VCR button on the remote and try the button again.
Check list before you begin.
O All connections are made.
(See pages 6-11.)
O D-VHS VCR is piugged in.
r~l TV is turned on and set to the D-VHS
VCR channel (CH 3 or 4).
1
PAUSE
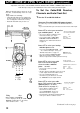
Multi Function Display
Insert a cassette with record tab.
D-VHS VCR power comes on
automatically.
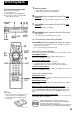
Press CH A/T* or NUMBERED
keys to select a channel.
• Or, press CH A/T on the D-VHS VCR.
• Holding down CH A/T will increase
the channel search speed.
• To record from an outside source,
press CH A/V or INPUT to select
"LINE” (see page 17).
Press SPEED to change the
recording speed.
• SP = Standard Play
LP - Long Play
SLP = Super Long Play
(See page 34.)
t Press REC/TIME on the remote control or D-VHS
VCR to start recording.
• To edit out unwanted portions, press PAUSE to pause the
recording in progress.
To release, press PAUSE again.
(After the D-VHS VCR has been in Pause mode for 5 minutes, it
will stop automatically to protect the tape and video head.)
One Touch Timer Recording (OTR)
The D-VHS VCR starts recording and turns itself off at a preset time.
In step 4, press REC/TIME repeatedly to set the length of
the recording. Each push will change the stop time as
shown.
-Normal Rec—►0:30—»-LOO-
C
4:00-«—3:00-►“2:00 *«—1:30
“TIMER” lights and the stop time is displayed in the Multi Function
Display.
The remaining recording time can be displayed by pressing
DISPLAY in OTR mode.
5
Press STOP to stop recording.
• Or, press STOP on the D-VHS VCR.
16