R Digital Video Camcorder Operating Instructions Model No. PV-DV53 Mini Before attempting to connect, operate or adjust this product, please read these instructions thoroughly. Spanish Quick Use Guide is included. Guía para rápida consulta en español está incluida. For assistance, please call : 1-800-211-PANA(7262) or send e-mail to : consumerproducts@panasonic.com LSQT0650B DV53.p 1-4.
Things You Should Know Thank you for choosing Panasonic! You have purchased one of the most sophisticated and reliable products on the market today. Used properly, we’re sure it will bring you and your family years of enjoyment. Please take time to fill in the information below. The serial number is on the tag located on the underside of your Palmcorder. Be sure to retain this manual as your convenient Palmcorder information source. Date of Purchase Dealer Purchased From Dealer Address Dealer Phone No.
Important Safeguards 11. Grounding or Polarization — This video unit may be equipped with either a polarized 2-wire AC (Alternating Current) line plug (a plug having one blade wider than the other) or 3-wire grounding type plug, a plug having a third (grounding) pin. The 2-wire polarized plug will fit into the power outlet only one way. This is a safety feature. If you are unable to insert the plug fully into the outlet, try reversing the plug.
Important Safeguards 15. Power Lines — An outside antenna system should not be located in the vicinity of overhead power lines or other electric light or power circuits, or where it can fall into such power lines or circuits. When installing an outside antenna system, extreme care should be taken to keep from touching such power lines or circuits as contact with them might be fatal. 16. Overloading — Do not overload wall outlets and extension cords as this can result in a risk of fire or electric shock. 17.
Table of Contents Before Use Things You Should Know ................................................................................................ 2 Important Safeguards ..................................................................................................... 3 Precautions ..................................................................................................................... 4 Before Using ..........................................................................................
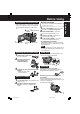
Before Using Unpack your Palmcorder 1 pc. AC Adaptor (PV-DAC11) with AC Cable and DC Cable 1 pc. Battery Pack (CGR-D08/CGR-D08R) 1 pc. Lens Cap (LSYF0521) with Lens Cap Strap (LSGQ0066) 1 pc. Shoulder Strap (LSFC0012) 1 pc. A/V Cable (LSJA0452) Microsoft® and Windows® are registered trademarks of Microsoft in the United States and other countries. Intel® Pentium® is a registered trademark. i.LINK is a trademark. PHOTOVU LINK is a registered trademark. IBM is a registered trademark of IBM Company.
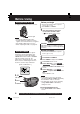
Before Using Easy Cassette Eject/Insertion 4PUSH 2TAPE EJECT CLOSE 1LCD-OPEN • Connect the Palmcorder to a power source. (pp. 11, 12) 1 2 3 4 Before Use • If the Palmcorder is connected to a power source, the cassette can be inserted and ejected without turning the Palmcorder on. Before you begin Press LCD-OPEN to unlock the LCD monitor, and swing it fully open. Slide TAPE EJECT to open the Cassette Compartment Cover. Insert a cassette record tab up, window side facing out.
Before Using Using the Built-in Light To brighten the natural colors in a scene. Before you begin • Connect the Palmcorder to a power source. (pp. 11, 12) • Set POWER to CAMERA. 1 Hold down LIGHT for more than 0.7 second to turn ON or OFF. • “ ” will appear on the screen. Built-in Light Note • Using Light reduces battery time. • Provide adequate ventilation if using Light in a hot environment for a long time. • Set LIGHT to OFF when not in use. • When replacing the bulb, see page 48.
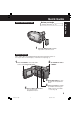
Quick Guide Before you begin Insert the Battery Pack 2 1 Before Use • Charge the Battery. (p. 11) 1 Insert the Battery Pack and slide it up until it locks with a click. Insert Cassette These Palmcorders are equipped with the Easy Cassette Eject System so it is easy to insert or remove tapes, even when on a tripod. (p. 7) 1 2 Press LCD-OPEN to unlock the LCD monitor, and swing it fully open. 3 5 4 Press PUSH CLOSE mark to close the Cassette Compartment Cover. Set POWER to VCR or CAMERA.
Quick Guide Camera Recording When the LCD monitor is fully open, the Viewfinder automatically turns OFF. 1 2 Set POWER to CAMERA. Adjust the Vision Adjustment Control to your eyesight. Viewfinder 180° 90° 4 Press REC/PAUSE to start recording. Press REC/PAUSE again to pause recording. To Watch Playback in the LCD (Liquid Crystal Display) When the LCD monitor is fully open, the Viewfinder automatically turns OFF. 3 LCD Monitor Press LCD-OPEN to unlock the LCD monitor.
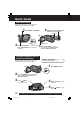
Supplying Power 1 2 POWER Lamp 3 CHARGE Lamp Connect and plug in the Power Cord as shown. • POWER Lamp will light. • Remove the DC Cable, if attached, from the adaptor. Attach the Battery as shown to charge. • CHARGE Lamp lights up. It goes out when charging is complete (approx. 1 hour). Expect approx. 1 hour 50 minutes of operation (using EVF) when fully charged. Remove the Battery. Slide the Battery out and then lift up.
Supplying Power Battery Care Caution: To avoid damage to the Battery: • Charge only with specified charger. • Charge the Battery within an ambient temperature range of 10 °C (50 °F) and 30 °C (86 °F). • The Battery may be warm after charging or just after use. This is normal. • Do not use an insufficiently charged or worn out Battery. • If charging is done in extreme low or high temperatures, Battery charge time increases. • Do not drop or jar the Battery. • Use the Battery with specified models only.
Setting the Clock Set the Date and Time • Connect the Palmcorder to a power source. (pp. 11, 12) • Set POWER to CAMERA or VCR. 1 2, 3, 4 JOG KEY CAMERA FUNCTIONS 1MENU 2 EXAMPLE: YEAR : 2003 PUSH MONTH Push 3 : JAN PUSH MONTH Press MENU to display the Camera or VCR mode menu screen. (p. 14) Rotate 4 : FEB VCR FUNCTIONS Rotate JOG KEY to select OTHER FUNCTIONS , and then press JOG KEY to display the OTHER FUNCTIONS menu screen.
Using the Palmcorder Menu The Palmcorder features two menu displays: one for CAMERA mode (recording) and the other for VCR mode (Playback). (pp. 59~62) • While the Menu screen is displayed, you cannot record on or play a tape. • While recording, the Menu screen cannot be displayed. • During playback, the Menu screen can be displayed. Before you begin • Connect the Palmcorder to a power source. (pp. 11, 12) • Set POWER to CAMERA or VCR.
Camera Recording Simple Recording Before you begin Remove the lens cap and clip it to the hand strap. • Connect the Palmcorder to a power source. (pp. 11, 12) • Insert a cassette with the record tab closed. (p. 6) 1 EVF REC/PAUSE mode 3 4 POWER Lamp 1, 5 POWER 5 2Vision With the Viewfinder Eye Cup held up against your eye, adjust the Vision Adjustment Control to your eyesight. • Adjust the EVF Brightness of the Viewfinder if necessary.
Camera Recording Using the LCD Monitor The LCD (Liquid Crystal Display) monitor can be used while recording. 1 2 Press LCD-OPEN to unlock the LCD monitor. 1LCD-OPEN 180° 3 90° Swing the LCD monitor fully open and adjust the viewing angle. • The LCD monitor will automatically turn on. • When the LCD monitor is completely closed, it will shut off automatically to save power. • Adjust the LCD Brightness and/or color of the LCD monitor if necessary.
Camera Recording Digital PhotoShot™ Mode Use this feature to record a seven second (approx.) still image from the current camera picture. Audio is also recorded for on-thespot narration. Or, you can add narration later with the Audio Dubbing feature to make an interesting slide show, etc. (p. 38) 1 2 Set POWER to CAMERA. Press PHOTOSHOT in Record/Pause mode. “PHOTO” will appear in the EVF or the LCD monitor.
Camera Recording Zoom You can gradually zoom in for close ups or zoom out for wide angle shots. 2POWER 1 2 ZOOM 1POWER Set POWER to CAMERA. Zoom slowly : by lightly pressing the “T” (Telephoto) or the “W” (Wide Angle) side of the POWER ZOOM. Zoom quickly: by applying more pressure. 3 Start recording. Note • The zooming speed ranges from a slow 17 seconds to a fast 1.5 seconds according to the amount of pressure applied to the POWER ZOOM.
Camera Recording Recording Still Pictures You can record still pictures of any desired duration together with sound. 1, 2STILL 1 2 While in RECORD mode, press STILL and hold for 2 seconds to capture a still picture. The captured still picture will be recorded together with sound. Self Recording Rotate the LCD monitor 180 degrees so it faces the same direction as the lens to record yourself. 3, 4 JOG KEY 2MENU 5REC/ 1 2 3 PAUSE 1POWER 4 180° 5 Set POWER to CAMERA.
Special Effect Features CINEMA Mode You can record a picture compatible with a wide-screen TV equipped with an S-Video picture terminal and Zoom/Wide features. 3, 4 JOG KEY 1 2 3 1POWER 4 2MENU 5REC/PAUSE 5 Backlight Use when recording a subject that is darker than the surrounding scene, is in a shadowed area, or when the light source is in back of your subject. 1 2 3 1POWER Set POWER to CAMERA. Press MENU to display the CAMERA FUNCTIONS menu screen.
Special Effect Features Program AE The Auto Exposure feature can be used to make quality recordings in a variety of scene situations. 1 2 2AUTO/MANUAL 4, 5 3 4 JOG KEY 3MENU 5 (No display) 6 SPORTS PORTRAIT Press MENU to display the CAMERA FUNCTIONS menu screen. Rotate JOG KEY to select CAMERA SETUP , and then press JOG KEY to display the CAMERA SETUP menu screen. Rotate JOG KEY to select PROG. AE , then press JOG KEY repeatedly to select one of the five modes shown below. • Press MENU to exit.
Special Effect Features Audio/Video Fade In/Out You can make smoother scene transitions for a more professional look. 1, 3, AFADE Fade In Starting the first scene with “fade in” is very effective. 1 2 3 In REC/PAUSE mode, hold down FADE until the picture fades out. Press REC/PAUSE to start recording. Release FADE and the picture will gradually fade in. Fade Out Use to create a soft ending or (together with fade in) for a soft transition from one scene to the next.
Advanced Settings White Balance Auto White Balance (“AWB”) automatically maintains optimum color balance in most lighting conditions. However, when using Digital Functions, etc., you may get better results by using the manual adjustment. 3, 4, A, B 1 2 3 JOG KEY 4 2AUTO/MANUAL Hold down AUTO/MANUAL for more than 0.7 second so that the “MNL” indication appears in the EVF or the LCD monitor. Press JOG KEY repeatedly until “AWB” appears in the EVF or LCD monitor. Rotate JOG KEY to select other modes.
Advanced Settings Auto Focus The Palmcorder automatically adjusts the focus over the entire zoom range. Manual Focus Use Manual Focus (MF) when recording ... • a subject through glass. • a scene where the subject is far from the Palmcorder and there are objects in the foreground. • a subject with distinct horizontal stripes. • a subject not centered in the Viewfinder. • subjects with shiny surfaces. • an obliquely angled subject. • a bright, flat subject such as a white wall. • in low light situations.
Advanced Settings High Speed Shutter To record high speed motion (e.g. tennis stroke) with improved STILL or SLOW MOTION playback when watching the tape on this Palmcorder. Auto Shutter In the AUTO mode (no indication in the EVF and LCD monitor), the Palmcorder will automatically adjust the shutter speed (up to 1/350). • AUTO mode is automatically selected whenever the POWER Switch is set to CAMERA. 1 2 3, 4 JOG KEY 1POWER 2AUTO/MANUAL 3 4 Set POWER to CAMERA. Hold down AUTO/MANUAL for more than 0.
Advanced Settings Adjusting the Iris Manually Normally, the Palmcorder adjusts the exposure automatically. However, when the background is extremely bright, or when the subject is backlit, you can compensate by adjusting the Iris manually. 1 2 3 3, 4 JOG KEY 4 1POWER 2AUTO/MANUAL Set POWER to CAMERA. Hold down AUTO/MANUAL for more than 0.7 second so that the “MNL” indication appears in the EVF or the LCD monitor.
Playback Your Recordings Playback using the LCD Monitor Before you begin • Connect the Palmcorder to a power source. (pp. 11, 12) • Insert a recorded cassette. You can also use the LCD monitor to playback your recording. 1 1POWER 180° 90° 90° 2LCD-OPEN 4PLAY Press LCD-OPEN to unlock the LCD monitor and swing open. Press (REWIND/SEARCH) to rewind the tape. Press (PLAY) to start playback. Press (STOP) to stop playback.
Playback Your Recordings Repeat Playback 1 1PLAY EVF/LCD R Adjusting the Volume 1, 2 2 1 VOLUME Built-in Speaker 2 Press PLAY for more than 5 seconds in STOP mode. • The Palmcorder will go into Repeat Playback mode when the tape reaches its end. • The letter “R ” will appear in the EVF and LCD monitor. Turn the Palmcorder OFF to exit the Repeat Playback mode. Rotate VOLUME to adjust the volume of the built-in speaker in PLAY mode. • The volume setting screen appears.
Special Effect Features Note • Sound is muted during all special effects. A During playback, hold down (FAST FORWARD/SEARCH) or Rapid Visual Search BPLAY B A, B A, B REWIND/ FAST FORWARD/ SEARCH SEARCH (REWIND/SEARCH). The search will continue for as long as the button is held down. OR Press (FAST FORWARD/ SEARCH) or (REWIND/SEARCH) once for a continuous rapid visual search. Press (PLAY) to release. Note • When executing a rapid visual search, the picture may become bluish for an instant or mosaic.
Special Effect Features Note • Sound is muted during all special effects. Variable Speed Search 2, 3 JOG KEY 1 2 3 Press (PLAY) to start playback. Press JOG KEY for about 1 second. Rotate JOG KEY to adjust the playback speed. • Rotate JOG KEY clockwise for forward playback. • Rotate JOG KEY counterclockwise for reverse playback. To return to normal playback: (PLAY). Playback will continue at Press normal speed.
Special Effect Features Strobe Multi Mode In Strobe Multi Mode, you can select the rate at which a succession of still screens are captured from the playback picture. 3, 4, 5 1 2 3 JOG KEY 1POWER 4 5 2MENU Set POWER to VCR. Press MENU to display the VCR FUNCTIONS menu screen. Rotate JOG KEY to select PLAYBACK FUNCTIONS , then press JOG KEY to display the PLAYBACK FUNCTIONS menu screen. Rotate JOG KEY to select PLAYBACK MULTI SPEED in the PLAYBACK FUNCTIONS menu screen. (Menu OSD: p.
Special Effect Features View Recording/Playback on your TV [ TV with AUDIO/VIDEO IN Jacks ] A/V OUT 2 3 A/V Cable (Supplied) Back of TV Audio In Video In Set POWER to CAMERA or VCR. To view what the Palmcorder is recording or to playback a tape on your TV. Turn your TV ON and set it to LINE INPUT. Check your TV operating instructions for further information. Start playback or begin a recording. • Make sure the Palmcorder and TV are turned off while connecting. • Please connect the A/V Cable securely.
Digital Features Digital Zoom CAMERA mode This feature is useful when you want to record close-up shots of subjects located beyond a normal zoom range of 1X to 10X magnification. With the digital zooming feature, you can select a magnification of 25X or even to 700X. Note • Other Digital Functions are turned off automatically when the EIS and Digital Zoom are selected. 1 2 3 4 EVF/LCD Zoom In (“T”) D.
Digital Features Digital Zoom (Continued) VCR mode 1 2 3 3, 4 JOG KEY 2MENU 1POWER 5PLAY 4 5 6 Set POWER to VCR. Press MENU to display the VCR FUNCTIONS menu screen. Rotate JOG KEY to select DIGITAL EFFECT , then press JOG KEY to display the DIGITAL EFFECT menu screen. Rotate JOG KEY to select D. ZOOM , then press JOG KEY to select ON. • Press MENU to exit. Press (PLAY) to start playback. • The center portion of the image doubles in size. Repeat steps 2~4 to select OFF to cancel this feature.
Digital Features Dual Digital Electronic Image Stabilization System (D.E.I.S.) This feature helps compensate for any unintentional hand or body movement. It can be used in both the Recording and Playback (VCR) modes. CAMERA mode 1 2 Set POWER to CAMERA. Press EIS to stabilize the picture. • Picture flicker may be observed when taping under fluorescent lighting conditions. • The EIS indicator flashes when the light level is inadequate. • Turn D.E.I.S. OFF during recording when using a tripod.
Digital Features Other Digital Functions Use the following features to add interest and professionalism to your recordings or playback. Select from twelve special effects. 3, 4, 5 JOG KEY 1 2 3 2MENU 1POWER 4 Types of Digital Functions MIRROR Symmetrical image from the current camera picture. STROBE The recording appears as a sequence of still frames. MOSAIC The picture appears in a mosaic pattern. SLIM The picture is expanded vertically. TRAIL The subject being recorded creates a trail when in motion.
Digital Features Picture in Picture (PinP) You can display a PinP (still image) screen on the Main Picture. Note • PinP position is fixed at the bottom right of the screen. 1 2 3 Main Picture Picture in Picture (PinP still image) 4 PHOTOSHOT Set POWER to CAMERA. Press MENU to display the CAMERA FUNCTIONS menu screen. Rotate JOG KEY repeatedly to select DIGITAL EFFECT , then press JOG KEY to display the DIGITAL EFFECT menu screen. Press JOG KEY to select P-IN-P . • Press MENU to exit this menu.
Editing Features Audio Dubbing using the Built-in Microphone The original sound can be replaced with new sound using the built-in Palmcorder microphone. Before you begin • Turn on the Palmcorder. • Insert a pre-recorded tape to be dubbed. 12 bit Built-in Microphone 16 bit The original sound is recorded on ST (Stereo) 1, and the new sound will be recorded on ST (Stereo) 2. The original sound is replaced with the new sound.
Editing Features 6, 7PAUSE 6 Press (PAUSE) to start Audio Dubbing. “A.DUB ” indication appears. • Connect the Palmcorder to the TV in order to monitor the sound. (p. 32) To listen to the desired audio sound, set the 12 bit AUDIO setting of the VCR mode MENU (Menu OSD: p. 61) as follows: 12 bit AUDIO:The following selections are available for 12 bit AUDIO dubbed recordings only (sound recorded in SP mode only). ST 1 ST 2 MIX Set this position to listen to the original sound.
Editing Features Copying your Tapes to VHS Cassette Source (Playing) Palmcorder Before you begin • Connect both Palmcorder and VCR to their power sources. • Connect the Palmcorder to a VCR as illustrated left. • Turn ON both units. • Set the recording VCR’s Input Signal Selector to LINE. • Set the Palmcorder POWER to VCR.
Editing Features Copying from Digital Equipment (dubbing) Before you begin High quality digital-to-digital copying can be accomplished if both Palmcorders incorporate the DV Input/Output (i.LINK) Connector (DV Interface cable (i.LINK) is not supplied). • Connect both Palmcorders to their power sources. • Connect the two Palmcorders using the DV Interface cable (i.LINK) (4-pin to 4-pin). • Turn both Palmcorders ON. 1 Source (Playing) Palmcorder DV Input/Output (i.
PC Connection PC Connection with DV Interface Cable (i.LINK) A video clip can be transferred directly to your PC (Personal Computer) via a DV Interface Cable (i.LINK) (not supplied) using products and software from a number of video editing software companies. Using products from video editing software companies allows you to capture and edit video clips using the DV Interface (i.LINK).
PC Connection PHOTOVU LINK Driver (Optional) An image recorded on the DV Tape can be transferred to your PC (Personal Computer). System Requirements for PHOTOVU LINK Driver (Optional) • IBM PC/AT or compatible • 3.5 inch 1.
PHOTOVU LINK (Optional) 1 2 3 4 5 Running the Software PHOTOVU LINK: You can transfer images from your Palmcorder tape to your PC. Turn your PC (Personal Computer) on and start up Windows. Insert PHOTOVU LINK DRIVER Disk (Optional) into a floppy disk drive. …” Click on Start, then “Run… Type in “a:\setup.exe” and click OK. • If your 3.5 inch floppy disk drive is not “A”, use the appropriate letter. Follow the instructions as they appear on the PC screen until the installation is complete.
PHOTOVU LINK (Optional) Using Tape Image Data Pictures captured with the Palmcorder can be transferred to your PC. Before you begin • Insert a recorded tape. (p. 9) • Make Palmcorder-PC connections. (p. 43) • Turn your PC on. • Set Palmcorder POWER to VCR. 1 2 3 Transfer Button Repeat steps 1 and 2 on page 44 to run the Software. “Preview Window” screen appears. Search and Select a still scene you want to transfer to your PC using VCR Operation Buttons on the “Preview window” screen.
Palmcorder Accessory System Accessory # Figure Description Price PV-DAC11A AC Adaptor with AC Cable and DC Cable $119.95 CGR-D08A/1B 800mAh / 1 h 30 min, Battery Pack $69.95 CGR-D16A/1B 1600mAh / 3 h, Battery Pack $99.95 CGP-D28A/1B 2800mAh / 5 h, Battery Pack $129.95 CGR-D53A/1K 5300mAh / 9 h, Battery Pack $229.95 PV-DDC9 DV Interface Cable (i.LINK) (4-pin to 4-pin) $55.
Palmcorder Accessory Order Form Please photocopy this form when placing an order. 1. Palmcorder Model # 2. Items Ordered Accessory # Description Price Each Quantity Total Price Subtotal Your State & Local Sales Tax Shipping & Handling 6.95 Total Enclosed 3. Method of payment (check one) Check of Money Order enclosed (NO C.O.D.SHIPMENTS) VISA Credit Card # MasterCard Expiration Date Discover Customer Signature Make Check or Money Order to: PANASONIC ACCESSORIES (Please do not send cash) 4.
Notes On Operations Before you begin Replacing the Bulb 1 • Set POWER to OFF. Insert a rigid wire, such as an extended paper clip into point (A) and lift cover up. 3 Replace bulb using a clean cloth or tissue. (Do not touch with fingers.) (A) 4 2 Replace lens cover. Using Tweezers or needle-nose pliers, carefully remove bulb. • Take unit to servicenter if you need assistance. Note • Handle bulb gently. Excessive force may cause bulb to crack. DANGER: Use only replacement bulb (PART NO.
Notes On Operations Approximate Brightness Values Your Palmcorder has been designed for normal scene illumination of 150 footcandles (1500 lx). However, the Palmcorder may be used at F1:1.8, if illumination is more than 0.5 footcandles (5 lx). The table below shows the color temperature for reference.
Specifications Power Source: Palmcorder: 7.2 V DC (Battery) 7.8 V DC (AC Adaptor) AC Adaptor: 110/120/220/240 V AC, 50/60 Hz Battery: Lithium-Ion Type DC 7.2 V Power Consumption: Palmcorder : 7.2 V/7.8 V DC 6.5 W (Max. 9.5 W) AC Adaptor : 18 W 1 W (when not in use.) Digital Interface i.LINK (IEEE1394) Video Signal: EIA Standard (525 lines, 60 fields) NTSC color signal Video Recording System: 2 rotary heads.
Before Requesting Service Cleaning Care for Video Heads Clogged Video Head (a) Video Head Cleaning: Normally, your Palmcorder will not require head cleaning. However, it is possible that the heads may become clogged due to dust in the air, playing damaged tapes, long term use, etc. If “NEED HEAD CLEANING” appears for 5 seconds in the EVF or LCD monitor, the heads may require cleaning. (b) Cleaning the Heads: It is recommended that head cleaning be performed by a qualified service technician.
Before Requesting Service If you have a problem with your Palmcorder, it may be something you can correct yourself. Check the list below for symptoms and corrections. Symptom Correction No picture in the EVF or LCD Monitor... • Make sure the Power Source is connected. (pp. 11, 12) • Make sure the POWER switch is set to VCR or CAMERA. (pp. 15, 27) • Check the Dew Indicator. (p. 53) • Make sure the Battery is fully charged. (p. 11) • Make sure all necessary cables are connected correctly and firmly. (p.
On-Screen Displays (OSD) The following warning displays appear in the EVF and the LCD monitor. Indications Condition If the Palmcorder is in CAMERA mode without a cassette inserted, “ ” will flash and “TAPE NOT INSERTED” will appear for 5 seconds. Recording will not start. If the Palmcorder is in CAMERA mode or Audio dub mode with the cassette sliding record tab opened, “ ” will flash and “CHECK REC TAB” will appear for 5 seconds. Recording will not start.
Limited Warranty PANASONIC CONSUMER ELECTRONICS COMPANY, DIVISION OF MATSUSHITA ELECTRIC CORPORATION OF AMERICA One Panasonic Way Secaucus, New Jersey 07094 Limited Warranty Coverage PANASONIC SALES COMPANY, DIVISION OF MATSUSHITA ELECTRIC OF PUERTO RICO, INC., AVE. 65 de Infantería, Km. 9.
Customer Services Directory For Product Information, Operating Assistance, Literature Request, Dealer Locations, and all Customer Service inquiries please contact: 1-800-211-PANA (7262), Monday-Friday 9 am-9 pm; Saturday-Sunday 9 am-7 pm, EST. or send e-mail : consumerproducts@panasonic.com For hearing or speech impaired TTY users, TTY: 1-877-833-8855 Web Site: http://www.panasonic.com You can purchase parts, accessories or locate your nearest servicenter by visiting our Web Site.
Spanish Quick Use Guide/Guía Para Uso Rápido Precauciones para su seguridad ADVERTENCIA: PARA EVITAR INCENDIOS Y DESCARGAS ELÉCTRICAS, NO EXPONGA ESTE EQUIPO A LA LLUVIA NI A LA HUMEDAD. Su Mini Palmcorder está diseñada para grabar y reproducir en el modo de Reproducción Estándar (SP) y modo Largo (LP). Se recomienda el uso sólo de cintas de cassette que hayan sido probadas e inspeccionadas para su uso en aparatos VCR con la marca Mini .
Spanish Quick Use Guide/Guía Para Uso Rápido Antes de comenzar Inserte de la batería • Cargue la battería. (Página 11.) 2 1 1 Coloque la batería y deslícela hacia arriba hasta que se quede bloqueada con un clic. Inserte el Cassette Esta videocámara contiene un sistema de ejecución fácil del cassette. Por eso, es fácil de introducir o sacar el cassette aunque esté montado sobre un trípode. (Página 7.) 1 2 Presione LCD-OPEN y abra completamente el monitor LCD.
Spanish Quick Use Guide/Guía Para Uso Rápido Grabación con la cámara Cuando el monitor LCD se enchuentra totalmente abjerto, el visor se DESACTIVA automàticamente. 1 2 Ajuste el interruptor de alimentación (POWER) a la posición CAMERA. Ajuste el control lde ajuste de visión según lo desee. Visor 180° 90° 4 Monitor LCD Presione el botón de grabación/ pausa (REC/PAUSE) para iniciar la grabación. Vuelva a pulsar el botón de grabación/pausa (REC/PAUSE) para hacer una pausa en la grabación.
MENU OSD Camera Mode Menu Screen PROG. AE (p. 21) To select one of the 5 Program AE modes. Setting to OFF cancels the previously selected Program AE mode. 2 PROGRESSIVE (p. 17) When set to ON, still pictures taken with PhotoShot are recorded with a higher resolution than with normal PhotoShot. 3 D. ZOOM (p. 33) To select 25X (from 10X to 25X) or 700X (from 10X to 700X). Setting to OFF cancels the previously selected digital zoom. 4 CINEMA (p.
MENU OSD 9 9 10 C. DISPLAY (p. 63) To select the desired type of counter indication displayed on the LCD Monitor or in the viewfinder. 11 C. RESET (p. 63) Setting to ON resets the counter to zero. 12 DISPLAY (p. 63) To select the desired type of display changes to all function display, Partial display, and Minimum display. 13 LCD/EVF SETUP (p. 16) Setting to ON displays the menu for adjusting the LCD brightness, color level, and the EVF brightness.
MENU OSD VCR Mode Menu Screen 1 BLANK SEARCH (p. 28) Select ON to go directly to a blank portion of the tape. 2 12bit AUDIO (p. 39) To select the desired audio playback mode after performing audio dubbing in the 12 bit mode (SP mode only). ST1 : The original sound alone is played back. ST2 : The dubbed sound alone is played back. MIX : The original sound and the dubbed sound are played back together. 3 MULTI SPEED (p.
MENU OSD 7 REC SPEED (p. 6) SP: Normal recording speed mode. LP: Recording time is 1.5 times as long as in the SP mode. For example, 120 minutes of recording is possible on an 80 minute tape. 8 AUDIO DUB (p. 38) Set to AUDIO DUB “ON” in the Menu OSD to use the Audio Dub feature. 9 DATE/TIME (p. 64) The date and time can be set and displayed on the screen. 7 8 9 10 10 C. DISPLAY (p. 63) To select the desired type of counter indication displayed on the LCD Monitor or in the viewfinder. 11 C.
Electronic Viewfinder/LCD Monitor Indications Here are some of the basic indications which will appear on the Palmcorder EVF and LCD Monitor. Only Date and Time indications will be recorded onto the tape. CAMERA/VCR Mode g a h b c d e f a Battery Remaining b Tape Remaining (AY-DVM30EJ) FULL EMPTY (AY-DVM60EJ) R0:30 R1:00 R0:00 R0:00 f g Volume Display (p. 28) The volume bar appears when the volume of the built-in speaker is being adjusted. Tape Speed Indication (Menu OSD: p.
Electronic Viewfinder/LCD Monitor Indications CAMERA/VCR Mode l n m o p q r t u s v j i kj i Date and Time Indication (Menu OSD: pp. 60, 62) As shown below, the date and time indication changes each time DATE/TIME is selected from the Palmcorder’s MENU (Menu OSD: pp. 60, 62). o Tape Mode Indications REC Recording. PHOTO PhotoShot recording. PAUSE Paused during recording. Playback. Still. Slow (forward). Slow (reverse). Frame Advance (forward). Frame Advance (reverse). Repeat Playback.
Index of Controls Front View Built-in Microphone Shoulder Strap Attachment Ring p. 7. Lens BATT RELEASE pp. 11, 12. Built-in Light pp. 8, 48. Side View JOG KEY pp. 13, 14. M.FOCUS DIAL p. 24. Built-in Speaker p. 28. Shoulder Strap Attachment Ring p. 7. Hand Strap p. 7. POWER (VCR•OFF•CAMERA) pp. 9, 10. Rear View TAPE EJECT pp. 7, 9. DV Input/Output (i.LINK) Connector pp. 41, 42. LCD (Liquid Crystal Display) Monitor pp. 9, 10, 16, 27. DC IN Terminal p. 12. LCD-OPEN pp. 9, 10, 16, 27.
Index of Controls Rear View PHOTOSHOT p. 17. Electronic Viewfinder (EVF) p. 10. POWER ZOOM pp. 18, 33. VOLUME p. 28. MENU pp. 13, 14. A/V Output Connector p. 32. PHONE Jack p. 27. Lens Cap p. 7. Top View FOCUS p. 24. PAUSE pp. 29, 39, 41. CAMERA STILL p. 37. AUTO/MANUAL pp. 23~26. FADE p. 22. REC p. 41. PLAY pp. 10, 27. MULTI p. 31. LIGHT p. 8. STOP pp. 10, 27. EIS p. 35. FF p. 29. BACK LIGHT p. 20. REW pp. 10, 27. RECORDING CHECK p. 18. Back View Vision Adjustment Control pp. 10, 15.
Index of Controls Underside View Tripod Receptacle AC Adaptor AC Power Cord pp. 11, 12. POWER Lamp pp. 11, 12. CHARGE Lamp p. 11. VCR DC Output Connector p. 12. 67 DV53.p65-68.p65 67 03/01/21, 16:28 For Your Information CAUTION: This unit will operate on 110/120/220/ 240 V AC. An AC plug adaptor may be required for voltages other than 120V AC. Please contact either a local or foreign electrical parts distributor for assistance in selecting an alternate AC plug.
Index A AC Adaptor ... 6, 11, 12, 46 Accessories (Optional) . 46 Accessories (Supplied) ... 6 Adjusting the Volume .... 28 A/V Cable ................. 6, 32 Approximate Brightness Values ......................... 49 Audio Dubbing ........ 38, 39 Audio/Video Fade In/Out ...................................... 22 B Backlight ....................... 20 Battery Pack ... 6, 9, 11, 46 Battery Remaining Indication .................... 63 Battery Warning ............ 53 Before Requesting Service ....................