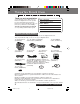
R Digital Camera Operating Instructions Model No. PV-SD5000 ® For assistance, please call : 1-800-272-7033. Before attempting to connect, operate or adjust this product, please read these instructions thoroughly, and keep them for future reference. LSQT0287A SD5000. p 1-5.
Things You Should Know Attach your purchase receipt here Thank you and congratulations on your purchase of this state of the art Panasonic Digital Camera. This product has been manufactured and tested to Panasonic’s highest standards to give you the best in performance and reliability. Save this operating instruction manual as an operating and information guide. Date of Purchase Dealer Purchased From Dealer Address Dealer Phone No. Model No. Serial No.
Safety Precautions Note: This equipment has been tested and found to comply with Part 15 of the FCC rules. These limits are designed to provide reasonable protection against harmful interference when operated in a residential environment. If this equipment does cause interference to radio or television reception, which can be determined by turning the equipment off and on, use the equipment in another location and/or utilize an electrical outlet different from that used by the receiver.
Important Safeguards 1. Read Instructions — All the safety and operating instructions should be read before the unit is operated. 2. Retain Instructions — The safety and operating instructions should be retained for future reference. 3. Heed Warnings — All warnings on the unit and in the operating instructions should be adhered to. 4. Follow Instructions — All operating and maintenance instructions should be followed. 5. Cleaning — Unplug this video unit from the wall outlet before cleaning.
Important Safeguards 18.Replacement Parts — When replacement parts are required, be sure the service technician has used replacement parts specified by the manufacturer or have the same characteristics as the original part. Unauthorized substitutions may result in fire, electric shock or other hazards. 19.Safety Check— Upon completion of any service or repairs to this video unit, ask the service technician to perform safety checks to determine that the video unit is in safe operating order.
Table of Contents Getting Started Things You Should Know .................................................................................................. 2 Safety Precautions ........................................................................................................... 3 Important Safeguards ....................................................................................................... 4 Precautions ......................................................................................
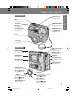
Index of Controls Light Sensor See page 36. MIC See page 24. Self-Timer Indicator MANUAL Button See pages 29, 30. See page 39. FLASH Emitter MANUAL Select / Buttons See page 36. See page 29. Lens Lens Cap See page 15. Rear View Emergency Eject hole ZOOM (T/W) See page 16. See pages 21, 22, 24. EJECT Button See page 16. POWER LED Speaker SuperDisk Slot See page 18. See pages 16, 50, 57. ACCESS LED See page 17. ACCESS LED See page 17. VOL+ Button See pages 32, 33.
Index of Controls Rear View LCD Viewfinder See pages 21, 22, 24, 31, 32. To PC Terminal See pages 49, 50, 56, 57. REC MODE Button A/V OUT Jack See pages 21, 22, 24, 25, 27, 29. See page 35. DC IN Jack FLASH Button See page 14. See pages 36, 42, 44. MENU Button See pages 18, 19. Top View SHTR (SHUTTER) See pages 21, 34, 39, 40, 41~45. POWER Switch (PC•PLAY•OFF•REC•MANUAL REC) Bottom View See pages 18, 19. Battery Compartment See page 13. 8 SD5000. p 6-8.
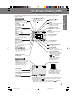
On On Screen Screen Display Display (OSD) REC OSD Light Metering Mode (See page 38.) AUTO : No Indication SPOT : White Balance Mode (See page 37.) AUTO : No Indication INDOOR : OUTDOOR : WHITE SET : WS (See page 39.) Audio Displayed when image with AUDIO is recorded. (See pages 22, 24.) Flash Mode (See page AUTO ON RED EYE OFF Self-Timer Mode RapidFire™ Page Remain (See page 27.) 36.) : No Indication : : : REC Displayed when image is recorded. SLOW (See pages 21, 22.
LCD Monitor Indication Recording Menu [ REC Mode ] 1 AUDIO (See pages 22, 24.) To select audio recording ON/OFF. 1 2 3 2 SELF TIMER (See page 39.) To set Self Timer. 3 BRIGHTNESS (See page 31.) To adjust LCD Viewfinder brightness. 4 4 OSD (See pages 9, 10, 11.) To select OSD display ON/OFF. 5 5 RAPID (See page 27.) To select RapidFire™ mode ON/OFF. 6 CLOCK SET (See page 20.) To set clock. 7 BEEP (See page 26.) To select beep mode when capturing images. 8 QUICK REC (FD) (See page 28.
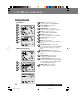
LCD LCD Monitor Monitor Indication Indication 1 2 3 4 5 1 DISPLAY MODE (See pages 32, 33, 34.) Select playback mode. 2 DELETE (See pages 41, 42, 43.) Delete image from SuperDisk Diskette or Floppy Disk. 3 COPY (See pages 44, 45.) To set copy. 4 PRINT MARK (See page 67.) To set print mark. 5 SLIDE SHOW (See page 46.) Playback images as slide show. On Screen Display Order Note • Press MENU to display MENU screen, then select OSD: ON. • If you select OFF, OSDs will not be displayed. 11 SD5000.
Power Supply Supply Charge the Battery Pack on the AC Adaptor 1 AC Cable AC Adaptor 2 POWER Lamp 3 Connect AC Cable (supplied) to AC IN on the AC Adaptor and plug the AC Adaptor into an AC outlet. • POWER Lamp lights red. • Disconnect DC Cable if it is connected to AC Adaptor. Attach the Battery as shown to charge. • Charge Lamp on the AC Adaptor flashes green. When lamp stops flashing, the Battery is fully charged. (Takes approx. 1 hour 40 minutes.) Remove the Battery.
Power Power Supply Supply [ Bottom View ] 1 Latch 2 3 Slide the Battery Compartment lid in the direction of the arrow and swing it open. While sliding Latch, insert the Lithium Ion Battery until it locks into place. • Be sure to use a Lithium Ion Battery. Be sure that the direction of the arrow on the battery is facing down when inserting it into the camera. Swing the Battery Compartment lid down and slide it shut.
Power Supply Supply Using AC Adaptor Jack Cover 4 1 3 2 AC Cable (supplied) 2 DC IN DC POWER Cable (supplied) AC Adaptor (supplied) 1 2 Pull up the Jack Cover. Connect DC POWER Cable (supplied) to DC OUT on the AC Adaptor and DC IN on the Digital Camera. 3 Connect AC Cable (supplied) to AC IN on the AC Adaptor. 4 Plug the AC Adaptor into an AC outlet. • • • • Note While not in use, unplug the AC Adaptor from the AC outlet. Use the supplied Panasonic AC Adaptor.
Removing the Lens Cap and Attaching the Camera Strap 1 2 Thread the Lens Cap cord through the Strap Attachment Ring. Run the Lens Cap through the cord loop and pull tight. Attaching the Camera Strap Lens Cap Holder 1 2 3 2 1 3 Thread the Lens Cap Holder onto the strap. Thread the strap ends through the Strap Attachment Rings. Reinsert the strap ends through their buckles. • Make sure the straps are not twisted. Min. 1 inch (25.
Inserting the SuperDisk™ Diskette or Floppy Disk 1 Inserting the Disk Media: • The captured images will be stored on the Disk Media. • Be sure to insert the Disk Media before using the camera. EJECT Button 2 Turn the Power ON, open the cover and insert the Disk Media. Push the Disk Media fully into the SuperDisk Drive. Removing the Disk Media: 2 Set the POWER Switch to REC, PLAY or PC. Push the EJECT button so the Disk Media pops out. (Be careful not to drop the Disk Media.
Inserting the SuperDisk™ Diskette or Floppy Disk • Do not, under any circumstances, eject the Disk Media immediately after pressing the SHUTTER Button (during recording of an image) or while deleting (when “PLEASE WAIT” is displayed). This could damage the format of the Disk Media and make them unusable. • When the Disk Media does not eject after pressing the EJECT Button, push the Disk Media fully into the slot again and then press the EJECT Button firmly.
Operating Operating the the MENU MENU Screen Screen How to operate the MENU screen Please refer to pages 10~11 for explanation of each menu item. 1POWER Switch Example of Menu Screens [ REC mode ] [ PLAY mode ] [ MANUAL REC mode ] 3, 4 Select Button / / / 2, 5 POWER LED MENU Button When selecting REC mode 2 Press MENU to display MENU screen. 3 Press or 4 Press or 5 Press MENU to exit. 1 1 Remove the Lens Cap. Set POWER Switch to REC. • Turn the dial so that it clicks into position.
Operating the MENU Screen 1 1 Remove the Lens Cap. Set POWER Switch to MANUAL REC. • Turn the dial so that it clicks into position. • The POWER LED lamp lights up. When selecting PLAY mode 2 Press MENU to display MENU screen. 3 Press or 4 Press or 5 2 1 3 1 Set POWER Switch to PLAY. • Turn the dial so that it clicks into position. • The POWER LED lamp lights up. 4 to select the item. to set it. Press MENU to exit. Press MENU to display the MENU screen. Press or to select the item.
Setting the Clock Before you begin Remove the Lens Cap. Set the POWER Switch to REC, MANUAL REC or PLAY. (See pages 18, 19.) Press MENU to display the MENU screen. 1 Press or to select CLOCK SET in the MENU screen. [ REC mode ] [ MANUAL REC mode ] [ PLAY mode ] POWER Switch 2 3 1, 2, 3 Select Button / / 4 Press to display CLOCK SET menu. Press or hold down or to select hour, then press to set. • Repeat for minute, month, day and year. • Double check all items before exiting the menu.
Capturing Images Super Fine Mode, Fine Mode, Normal Mode, Zoom (2X, 3X) Mode, TIFF Mode 1 Before you begin Remove the Lens Cap. Set the POWER Switch to REC or MANUAL REC. (See pages 18, 19.) Press REC MODE repeatedly to select recording mode (SF, F, N, ZOOM (2X, 3X), TIFF). (See page 25.) • If you want to use SLOW SHUTTER: In Manual Rec mode, press MENU to display the MENU screen, and then press or to select SLOW SHUTTER. Press or to select ON. (MANUAL REC only). (See page 10.
Capturing Capturing Images Images Capturing images (AUDIO ON) 1 You can record audio with a still image. The still image and audio can then be played back in the PLAY mode. (See page 32.) Note • AUDIO is set to ON, the RAPIDFIRE™ is automatically disabled and can not be set to ON. (See page 27.) Before you begin Remove the Lens Cap. Set the POWER Switch to REC or MANUAL REC. (See pages 18, 19.) 2 Press MENU to select AUDIO, and then press or to select AUDIO ON .
Capturing Images 4 4, 5SHTR (SHUTTER) 5 Press SHTR down halfway to lock Auto Focus. • Beep sounds twice. (See page 26.) • While the Digital Camera processes the image, REC will flash on the LCD Viewfinder and the captured image will be displayed on the LCD Viewfinder for a few seconds. Images cannot be captured while REC flashes. Note • The next image cannot be captured until the previously captured image is no longer displayed on the LCD Viewfinder.
Capturing Capturing Images Images Motion Image Rec Mode, Burst Rec Mode 1 You can select Motion Image capture or Burst Image capture as the REC MODE. Before you begin Remove the Lens Cap. Set the POWER to REC or MANUAL REC. (See pages 18, 19.) 2 3 4 POWER Switch 2ZOOM Switch LCD Viewfinder Press REC MODE repeatedly to select Motion ( ) or Burst ( ) recording mode. Press ZOOM T or W to zoom In and Out. • Zoom magnification level is up to 3X. Press SHTR down halfway to lock Auto Focus.
Capturing Capturing Images Images Recording Mode SF F : Fine Mode (with audio) (High compression) Select for high resolution (e.g., for printing or archiving an image). Image Resolution and Capacity (SuperDisk Diskette) REC Mode SF 2 048 × 1 536 Approx. 240 images F 2 048 × 1 536 Approx. 340 images N : Motion Image Rec Mode (with audio) Create a short motion picture (one frame captured every 0.
Capturing Capturing Images Images Beep 1 Set Digital Camera to beep (low or high volume), when an image is captured, or set to OFF. Press or to select BEEP and press or to select one of the three settings shown below. [ REC mode ] Before you begin Set the POWER Switch to REC, MANUAL REC or PLAY. (See pages 18, 19.) Press MENU to display the MENU screen. [ MANUAL REC mode ] BEEP QUICK REC (FD) [ PLAY mode ] POWER Switch OFF : Select to turn OFF the beep sound. LOW : Select to hear a low beep sound.
Capturing Images RapidFire™ Picture Taking With this feature, captured images are first stored in Camera memory. This speeds up the processing time and allows you to capture the next image right away. Note • AUDIO, SELF TIMER and TIME LAPSE functions are automatically disabled when RAPIDFIRE™ is set to ON. Before you begin Press REC MODE repeatedly to select recording mode (SF, F, N). (See page 25.) • If the REC mode is set to ZOOM (2X, , or TIFF mode, change 3X), REC mode. (See page 25.
Capturing Capturing Images Images Quick Rec (FD) This function works only for Floppy Disk. This feature allows quick recording on a floppy disk which is readable on this unit, however it may not be readable on another floppy drive. 1 Press or to select QUICK REC (FD) in the MENU screen and press or to select ON. [ REC mode ] Before you begin Set the POWER Switch to REC or MANUAL REC. (See pages 18, 19.) Press MENU to display the MENU screen.
Capturing Images Manual Mode With this feature you can select the desired settings for various recording modes. Before you begin Set the POWER Switch to MANUAL REC. (See page 19.) 1 2 3 1REC MODE Button Press MANUAL to enter Manual mode. • The current settings appear on the left side of the screen. • Each additional press of MANUAL selects “Focus”, “Exposure”, and mark shows “Program AE” mode. selection. Press MANUAL Select or to select the desired setting in the current mode.
Capturing Capturing Images Images [ Recording Modes ] Mode Display Explanation Use AUTO FOCUS for normal recording. Focus is adjusted automatically from 30 cm ~ ∞. AF Focus will be fixed between approx. 1.0 m~2.0 m. Focus will be fixed between approx. 2.5 m~3.5 m. FOCUS Focus will be fixed at infinity (for distant objects). Macro mode is entered. Focus is adjusted within a 6.5 cm ~ 50 cm range. 0 EV is the standard (center) value. 0 EV EXPOSURE +1.5 ~ -1.5 EV Program AE (auto exposure) mode.
Adjusting Adjusting LCD LCD Viewfinder Viewfinder Brightness Brightness You may want to brighten or darken the LCD (Liquid Crystal Display) Viewfinder for easier viewing. This adjustment will not affect the captured image brightness. Before you begin 1 Press or to select BRIGHTNESS in the MENU screen. [ REC mode ] [ MANUAL REC mode ] Set POWER Switch to REC, MANUAL REC, or PLAY. (See pages 18, 19.) Press MENU to display the MENU screen.
Playing Playing Back Back Captured Captured Images Images Manual Playback You can playback recorded images on the LCD Viewfinder. • For images recorded with audio, a mark is displayed on the screen and audio is played back when SHTR is pressed. 1 Press MENU to display PLAY MENU and press to set DISPLAY MODE to NORMAL. Before you begin Set the POWER Switch to PLAY. (See page 19.) • Press MENU to exit.
Playing Playing Back Back Captured Captured Images Images Motion Image Playback • To adjust volume, press VOL When an image captured in Motion Image Rec mode (see page 25) is displayed, a message like the one at right appears. SHTR (SHUTTER) 1 (-). Press SHTR to start playback of Motion image. While Motion Image data is being read, “NOW LOADING” is displayed on the LCD.
Playing Playing Back Back Captured Captured Images Images 4 POWER Switch 5 Press (-) to move back through the images on the page until the number of the desired image is highlighted. Press or to go directly to the next or previous page of images. 4, 5, A, C Select Button / / / A, B, EMENU Button 6, DSHTR (SHUTTER) 6 Press SHTR to playback the selected image, and to return to Manual Playback. Zoom Playback Before you begin Set the POWER Switch to PLAY. (See page 19.
Viewing Images on a TV Screen and Transferring Images to a VCR 3POWER A/V OUT Switch 1 1 2 3 Connect the Digital Camera to your TV or VCR using the A/V Cable (supplied) as shown. Turn on your TV and select its video input mode. If using a VCR, set it to LINE input. (See TV/VCR manual.) • The POWER LED lamp lights up. 4 A/V Cable (supplied) TV Monitor If using a VCR, you can record the desired images. (See VCR manual.
Using Using the the Built-in Built-in Flash Flash This camera features a Built-in Flash which can be used to capture images in dimly lit conditions. Before you begin Set the POWER Switch to REC or MANUAL REC. (See pages 18, 19.) 1 Press (FLASH) repeatedly to select flash mode. The mode that is selected will be displayed on the LCD Viewfinder. AUTO (No indication) : The flash automatically lights depending on lighting conditions.
White White Balance Balance During normal use, Auto White Balance automatically maintains optimum color balance. If this is not the case, set manually. 1 Before you begin Press or to select WHITE BALANCE and press or to select one of the four settings shown below. • Default setting is AUTO. Set the POWER Switch to MANUAL REC. (See page 19.) Press MENU to display the MENU screen. AUTO (No indication) : Automatically maintains optimum color balance in most lighting conditions.
Light Light Metering Metering According to the recording condition and purpose, set light metering to measure exposure time. 1 Before you begin Press or to select LIGHT METER and press or to select one of the two settings shown below. • Default setting is AUTO. Set the POWER Switch to MANUAL REC. (See page 19.) Press MENU to display the MENU screen. AUTO (No indication) : Ideal for normal capturing, the focus is set to the center portion of the finder and the entire image is metered.
Self Timer Recording The Self-Timer allows you to capture an image about 10 seconds after pressing the shutter. Note • SELF TIMER is set to ON, the RAPIDFIRE™ and TIME LAPSE functions are automatically disabled and can not be set to ON. 1 Press or to select SELF TIMER and press or to select ON. This puts the camera in self-timer mode. [ REC Mode ] [ MANUAL REC Mode ] Before you begin Set the POWER Switch to REC or MANUAL REC. (See pages 18, 19.) Press MENU to display the MENU screen.
Time Lapse Recording Time Lapse enables you to set the camera to automatically capture an image from once every minute to once every 24 hours. 1 Note • TIME LAPSE is set to ON, the RAPIDFIRE™ and SELF TIMER functions are automatically disabled and can not be set to ON. Before you begin Press or to select TIME LAPSE and press or to select time interval. You can select a capture rate of approx. 1MIN, 5MIN, 10MIN, 30MIN, 1HOUR, 6HOUR, 12HOUR, or 24HOUR. Set the POWER Switch to MANUAL REC. (See page 19.
To To Delete Delete Specific Specific Images Images You can delete unwanted images and increase the remaining image memory. Warning: Once deleted, images cannot be restored. 1 Press press or to select DELETE and to display DELETE menu. Press menu. to display DELETE PAGE Before you begin Set the POWER Switch to PLAY. (See page 19.) Press MENU to display the MENU screen. 2 POWER Switch 1, 2, 3 Select Button / / / 4MENU Button Press or to select the image page to be deleted.
Multi Delete You can delete selected images on the Multi playback screen from memory easily with this operation. Warning: Once deleted, images cannot be restored. 1 Press press or to select DELETE and to display DELETE menu. Before you begin Set the POWER Switch to PLAY. (See page 19.) Press MENU to display the MENU screen. 2 Press or to select MULTI DELETE and press to display MULTI DELETE menu. POWER Switch • The multi playback screen is displayed.
Formatting Formatting the the Disk Disk Media Media You can easily format your Disk Media using this operation. Quick formatting will be done. Warning: Formatting permanently removes all image data as well as any other files on the Disk. 1 Press press or to select DELETE and to display DELETE menu. Press press or to select FORMAT and to display FORMAT menu. Press or Before you begin Set the POWER Switch to PLAY. (See page 19.) Press MENU to display the MENU screen.
Multi Multi Copy Copy You can copy specific images from one Disk Media to another Disk Media using this operation. 1 Press or to select COPY. Press press to display COPY menu and or to select MULTI COPY. Before you begin Set the POWER Switch to PLAY. (See page 19.) Press MENU to display the MENU screen. 2 POWER Switch 3 1, 2, 3, 4 Select Button / / / 4 5 FLASH MENU Button Button SHTR (SHUTTER) 4 Press to display the multi playback screen.
To To Copy Copy All All Images Images You can copy all of the images stored on a Disk Media to another Disk Media using this operation. 1 Press or to select COPY. Press press to display COPY menu and or to select COPY ALL. Before you begin Set the POWER Switch to PLAY. (See page 19.) Press MENU to display the MENU screen. 2 POWER Switch 3 • Select NO to return to the COPY MENU.
Slide Slide Show Show You can playback captured images as a slide show. Before you begin 1 Press or 2 Press to start slide show. to select SLIDE SHOW. Set the POWER Switch to PLAY. (See page 19.) Press MENU to display the MENU screen. POWER Switch • Press MENU to exit this mode. 1, 2 Select Button / / MENU Button Note • SLIDE SHOW automatically stops after approx. 20 minutes when SuperDisk is inserted. • SLIDE SHOW continues endlessly when Floppy Disk is inserted.
Transferring Your Images (Windows) (Windows) System Requirements: • IBM PC/AT or compatible • Windows 98/2000 preinstalled PC with USB port • 486 CPU or higher (Pentium recommended) • 32 MB on-board memory • 10 MB available hard disk space • 256 Color Monitor or Full Color Monitor recommended (24 bits per pixel or 16.
Transferring Your Images (Windows) • If installation cannot be done with steps on page 47, please follow the steps below. To install software 1 Insert supplied Software CD into the CD-ROM drive. A window may appear letting you choose the software you want to install. Note • If a window does not appear automatically, click the “Start” button on your desktop and then click “Run”. When the Run box is open, type in “D:\Instmenu.exe” where “D:” is the drive letter of your CD; then click “OK”.
Transferring Your Images (Windows) By using the included USB cable to connect to a PC, you can use your SuperDisk camera as an external storage device. 2 TO PC Terminal * Data transfer using USB cable is applicable only for Microsoft® Windows® 98 preinstalled PC with USB port, Windows® 2000 PC, iMac®, iBook®, Power Macintosh® G3 with USB port or Power Mac™ G4 and Mac OS version 8.1 or later.
Transferring Your Images (Windows) Reading and Writing the Disk Media Personal Computer To read or write to the Disk Media using Windows follow the instructions below. USB Cable (supplied) Before you begin Set the POWER Switch to PC. Connect the Digital Camera to the PC using the supplied USB Cable. Refer to page 49 for additional details. To PC Terminal Reading the Disk Media 1 2 Insert the Disk Media into the SuperDisk Slot. Click “Start”, “Programs”, and the Image Viewing Software.
Transferring Your Images (Windows) 3 Click on the “File” Menu and “Open File”. The File Open MENU is displayed. Select the 3.5″″ FD Drive for the Digital Camera and find the image data file in the Digital Camera. 4 Open the image to view it. Note • End all applications, if, after playing back a Motion image, etc. with “QuickTime”, you want to change from PC mode to another mode. Only change from PC mode while a message, such as the one shown at right is displayed.
Transferring Your Images (Windows) PalmCam File Converter When the Digital Camera cannot playback image data which is transferred from another Drive to the Drive of the Digital Camera, even if the data is JPEG, PalmCam File Converter is necessary. Connect the Digital Camera to the PC Before you begin using the supplied USB Cable. Refer to Set the POWER Switch to PC. page 49 for additional details. 1 2 3 Insert the Disk Media into the SuperDisk Slot. (See page 16.
Transferring Your Images (Windows) 5 6 Select the folder in which the converted file is to be saved. • The Conversion results screen is displayed. Use “Help” of “PalmCam File Converter 2.0” for detailed instructions. [When selecting “To convert format for camera playback”] 4 Select the file to be converted. Special Features 5 Select the drive in which the converted file is to be saved. • The Conversion results screen is displayed. 6 Use “Help” of “PalmCam File Converter 2.
Transferring Your Images (Windows) Deleting a File (Folder) from the SuperDisk Drive To delete a file (folder) from the Digital Camera. • Click on the file or folder you want to delete. Then, from the “File” menu, click on “Delete” to delete the file. Disconnection 1 2 3 End all applications and close all windows. (i.e. QuickTime, PhotoDeluxe, etc.) Eject the Disk Media from the SuperDisk Slot. (See page 16.
Transferring Your Images Images (Macintosh) (Macintosh) System Requirements: • Mac OS 8.1, 8.5, 8.5.1, 8.6 • iMac, iBook or Power Macintosh® G3 with USB port or Power Mac™ G4 • 32 MB of RAM • 10 MB available hard disk space USB Driver Installation 1 2 3 4 5 • 256 Color Monitor or Full Color Monitor recommended (24 bits per pixel or 16.7 million colors) • CD-ROM drive (for installation) • USB Port • Mouse or other pointing device Turn on the Macintosh.
Transferring Your Your Images Images (Macintosh) By using the included USB cable to connect to a PC, you can use your SuperDisk camera as an external storage device. 2 TO PC Terminal * Data transfer using USB cable is applicable only for Microsoft® Windows® 98 preinstalled PC with USB port, Windows® 2000 PC, iMac®, iBook®, Power Macintosh® G3 with USB port or Power Mac™ G4 and Mac OS version 8.1 or later.
Transferring Transferring Your Your Images Images (Macintosh) iMac Reading and Writing the Disk Media To read or write to the Disk Media using Macintosh, follow the instructions below. R USB Cable (supplied) Before you begin Set the POWER Switch to PC. Connect the Digital Camera to the PC using the supplied USB Cable. Refer to page 56 for additional details. Reading the Disk Media 1 2 To PC Terminal Insert the Disk Media into the SuperDisk Slot.
Transferring Your Images (Macintosh) 3 Click on the “File” Menu and “Open File”. The File Open MENU is displayed. Select the 3.5″″ FD Drive for the Digital Camera and find the image data file in the Digital Camera. • When the Digital Camera POWER Switch is set to PC, the Digital Camera Drive is recognized as the 3.5″ FD Drive. • The Camera Disk consists of DCIM and MISC Folders. • The DCIM Folder is used to store image data, and the MISC Folder is used to store Print Mark data.
Transferring Your Images (Macintosh) PalmCam File Converter When the Digital Camera cannot playback image data which is transferred from another Drive to the Drive of the Digital Camera, even if the data is JPEG, PalmCam File Converter is necessary. Connect the Digital Camera to the Before you begin Macintosh using the supplied USB Cable. Set the POWER Switch to PC. Refer to page 56 for additional details. 1 2 3 Double click on “FileConverter”.
Transferring Your Images (Macintosh) 6 Click “Convert” to convert the selected file. 7 Use “Help” of “File Converter” for detailed instructions. 5 [When selecting “To convert format for camera playback”] Select the store volume for converted files from the “Volume” list box. 6 Click “Convert” to convert the selected file. 7 Use “Help” of “File Converter” for detailed instructions. 60 SD5000. p58-60.p65 For assistance, please call : 1-800-272-7033.
Transferring Transferring Your Your Images Images (Macintosh) Deleting a File (Folder) from the SuperDisk Drive To delete a file (folder) from the Digital Camera. • Drag and Drop the selected file or folder into the “Trash” icon. Disconnection End all applications and close all windows. (i.e. QuickTime, PhotoDeluxe, etc.) Eject the Disk Media from the SuperDisk Slot. (See page 16.
SuperDisk Drive You can use this Digital Camera as an external SuperDisk storage drive. You can only use SuperDisk Diskette media or 2HD Floppy Disks in this camera. Note • When a DOS formatted Floppy Disk is read by a Macintosh, the PC/File Exchange function will be necessary. Media Format Type & Explanation Type Format Style Explanation Note SuperDisk Diskette DOS Format (120 MB) This format is usable with DOS and Windows. This format is usable with Windows and Macintosh.
Using the SuperDisk Drive (Windows) Before Formatting Before formatting the Disk Media, close all applications and all windows. If you format the Disk Media while any of the disk’s files are open, an error may occur on the display. Formatting the Disk Media Special Features 1 2 Insert the Disk Media into the SuperDisk Slot. Click “My Computer”. Click right mouse button on the 3 1/2 Floppy icon. 3 Click “FormatUtility for SuperDisk”. 4 Follow the instructions as they appear on your PC screen.
Using the SuperDisk Drive (Windows) Copying the Disk Media • The DISKCOPY command at the DOS prompt cannot be used. SuperDisk Diskette/ Floppy Disk (2HD) Floppy Disk (2HD) SuperDisk Drive Floppy Disk Drive • Disk copy cannot be performed with SuperDisk Diskette. SuperDisk Diskette SuperDisk Diskette SuperDisk Drive SuperDisk Drive • Explorer CopyDisk is only possible with 2HD Floppy Disk.
Using the SuperDisk Drive (Macintosh) Formatting the Disk Media Note • Do not format the Disk Media under DOS format with Macintosh. 1 2 Insert the SuperDisk Diskette or Floppy Disk into the SuperDisk Slot. Click the SuperDisk Diskette or Floppy Disk icon displayed on the desktop. Select “Erase Disk” in the “Special” MENU. 4 Select format style. Then, click “Erase”.
Using the SuperDisk Drive Important Operating Notes • FORMAT command cannot be used. The FORMAT command at the DOS prompt cannot be used for the Digital Camera. • DISKCOPY command cannot be used. The DISKCOPY command at the DOS prompt cannot be used for the Digital Camera. • You cannot boot your PC from this Digital Camera. • When using the Digital Camera, never remove the Disk Media while data is being written to it.
Print Print Mark Mark Use this feature when a laboratory service that supports DPOF (Digital Print Order Format) is used. Before you begin Stamp Print Marker 1 Set the POWER Switch to PLAY. (See page 19.) Press MENU to display the MENU screen. Press or to select PRINT MARK and press to display PRINT MARK menu. POWER Switch • Select “SET/CANCEL PAGE” to select image, “CANCEL ALL” to cancel all image print marks, and “INDEX” to set or clear index print mark on all pages.
Digital Camera Accessory For ordering instructions, see the Accessory Order Form page. Accessory # Figure Description Price CGR-B/ 202A1B Lithium Ion Battery $100.00 PV-FA52 Lens Adaptor & Protective Filter Kit $69.95 PV-H150 System Carrying Case $49.95 68 SD5000. p68-72.p65 For assistance, please call : 1-800-272-7033.
Digital Camera Accessory Order OrderForm Form Please photocopy this form when placing an order. 1. Model # 2. Items Ordered Accessory # Description Price Each Quantity Total Price Subtotal Your State & Local Sales Tax Shipping & Handling 5.00 Total Enclosed 3. Method of payment (check one) Check of Money Order enclosed (NO C.O.D.SHIPMENTS) VISA Credit Card # MasterCard Expiration Date Discover Customer Signature Make Check or Money Order to: MATSUSHITA ACCESSORIES (Please do not send cash) 4.
Before Requesting Service If you have a problem with your Digital Camera, it may be something you can correct yourself. Check the list below for symptoms and corrections. Symptom Possible Solution Cannot charge the Battery Pack. • Make sure the rechargeable Lithium Ion Battery Pack is attached. (p. 12) • Make sure all necessary connections are correct and tight. (p. 12) No power. • Lithium Ion Battery is depleted. (p. 13) • Make sure polarities are aligned properly. (p.
Warning Indications These displays will alert you of a missed operation or provide further instructions. Indication Phenomenon Solution Failed to initialize the drive. If, after Power Switch is set to OFF, then REC or PLAY again, DRIVE ERROR is still displayed, the camera may be broken and needs repair. READ ERROR Failed to read. The camera cannot read this image. Press + or - button to play the next image. A READ ERROR file cannot be delete in DELETE menu.
Warning Warning Indications Indication Phenomenon Solution FORMAT ERROR Failed to format the disk. If after second attempt to format again, FORMAT ERROR is displayed, the disk may be defective. Change disks. THIS DISK IS PROTECTED The disk is protected. If THIS DISK IS PROTECTED is displayed, change disks or disengage protect. NOT ENOUGH MEMORY PUSH MENU TO EXIT Insufficient disk memory. (1.44 MB) Copy capacity was exceeded. If NOT ENOUGH MEMORY is displayed, delete unnecessary images.
Specifications Specifications CCD Lens 73 SD5000. p73-76.p65 73 80/01/04, 11:43 For For Your Your Information Information 1/1.8 inch 3 340 k Pixels f=7.0-21.0 mm (equivalent to a 35-105 mm lens on a 35 mm still camera.)/F2.0-2.5 Focus Auto / Preset (Zone) Focusing Area 30 cm ~ ∞ (AF)/6 cm ~ 50 cm (Macro) Iris (Shutter Speed) F2.0 ~ F8.0 (wide) Shutter Speed 1/30-1/1 000 seconds (Auto), 1/4-1/1 000 seconds (Slow Shutter mode) White Balance Auto/Indoor/Outdoor/White Set LCD Viewfinder 2.5 inch (63.
Warranty Warranty Panasonic Consumer Electronics Company, Division of Matsushita Electric Corporation of America One Panasonic Way Secaucus, New Jersey 07094 Panasonic Sales Company, Division of Matsushita Electric of Puerto Rico, Inc. Ave. 65 de Infanteria. Km. 9.
Service Center Directory For Product Information, Operating Assistance, Literature Request, Dealer Locations, and all Customer Service inquiries please contact: 1-800-272-7033, Monday-Friday 8:30am-8pm EST. Web Site: http://WWW.Panasonic.com You can purchase parts, accessories or locate your nearest servicenter by visiting our Web Site. Product Repairs Centralized Factory Servicenter Panasonic Services Company 1705 N.
Index A AC Adaptor (Supplied) AC Cable (Supplied) Accessory (optional) Accessory (Supplied) A/V Cable 2, 12, 14 2, 12, 14 68 2 2, 35 B Battery Remaining Indication Before Requesting Service Beep Brightness (LCD Viewfinder) Built-in Flash C Camera Strap Capturing Images Copy Image 9 70 26 31 36 2, 15 21~30 44, 45 D DC POWER Cable 2, 14 Delete Image 41, 42 Digital Camera Accessory Order Form 69 F Formatting the Disk Media 43 I Index of Controls L LCD Viewfinder Lens Cap Low Light Warning Light Metering