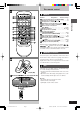
Portable Stereo CD System Operating Instructions 電源 スリープ タイマーフェーダー プログラム 1 2 4 5 7 8 3 6 9 反転モード カウンターリセット デッキ1/2 巻戻し TPS 早送り 選局 ・メモリー ラジオオート プリセット ≥10 0 AUX テープ FMモード/BP FM/AM /クリアー / RX-ED50 音質 S.バーチャライザー 表示切換 プレイモード 音量 PORTABLE STEREO CD SYSTEM Note: The “ EB ” indication shown on the packing case in-dicates United Kingdom. Before connecting, operating or adjusting this product, please read these instructions completely. Please keep this manual for future reference.
Dear customer CLASS 1 LASER PRODUCT Thank you for purchasing this product. For optimum performance and safety, please read these instructions carefully. Before use Table of contents (Back of product) DANGER ADVARSEL INVISIBLE LASER RADIATION WHEN OPEN. AVOID DIRECT EXPOSURE TO BEAM. USYNLIG LASERSTRÅLING VED ÅBNING, NÅR SIKKERHEDSAFBRYDERE ER UDE AF FUNKTION. UNDGÅ UDSÆTTELSE FOR STRÅLING.
Caution for AC mains lead (“EB” area code model only) For your safety, please read the following text carefully. This appliance is supplied with a moulded three pin mains plug for your safety and convenience. A 5-ampere fuse is fitted in this plug. Should the fuse need to be replaced please ensure that the replacement fuse has a rating of 5-ampere and that it is approved by ASTA or BSI to BS1362. Check for the ASTA mark m or the BSI mark o on the body of the fuse.
Supplied accessories Before use Please check and identify the supplied accessories. Use numbers indicated in parentheses when asking for replacement parts. Remote control (EUR644864) . . . . . . . . . . . . . . 1 pc. AC mains lead . . . . . . . . . . . . . . . . . . . . . . . . . . . 1 pc. (For United Kingdom: RJA0038-1U) (For Australia and New Zealand: RJA0035-A) The included AC mains lead is for use with this unit only. Do not use it with other equipment.
Power sources Operating the unit on AC power To household mains socket AC mains lead Connect the AC mains lead. The AC mains lead must be disconnected from the unit if you intend to power the unit with batteries. Using batteries (not included) Before use FOR UNITED KINGDOM ONLY BE SURE TO READ THE CAUTION FOR THE AC MAINS LEAD ON PAGE 3 BEFORE CONNECTION. The unit cannot be powered by batteries if the AC mains lead is connected. The remote control cannot turn the unit on when batteries are used.
Location of controls Basic controls Number Designation Reference Page Before use Standby/on switch ( ) .................. 8 Press to switch the unit from on to standby mode or vice versa. In standby mode, the unit is still consuming a small amount of power. Volume control buttons (–,+ VOLUME) . . . 9,12,14 Preset EQ button (PRESET EQ) . . . . . . . . . . . . . 22 AUX button ( ) . . . . . . . . . . . . . . . . . . . . . . . 23 Play timer/record timer button ( PLAY/REC) . . . . . . . . . . . . . . . . . .
The remote control Buttons Designation Reference Page Sound virtualizer button (S.VIRTUALIZER) . . . . 22 CD skip/search buttons ( , ) . . . . . . . . . . . . 11 Tuning buttons (–TUNE+) Rewind/fast forward TPS buttons (REW FF) Tape counter reset button (C-RESET) . . . . . . . . 16 Reverse mode select button (REV MODE) . . . . . . . . . . . . . . . . . . . . . . . . . . 15–16 Numbered buttons . . . . . . . . . . . . . . . . . . . 10–11,13 Sleep timer button (SLEEP) . . . . . . . . . . . . . . . . .
Setting the time This is a twenty-four hour clock. The example shows how to set the clock to 13:30. Press [ ] to turn the unit on. Press [CLOCK/TIMER] to select “CLOCK”. Before use Each time the button is pressed: “CLOCK” “ON PLAY” “ PLAY OFF” Original display “OFF REC” “ON REC” Within 10 seconds Turn [ to set the time. TIME/PRE.TUNE/CD] Press [CLOCK/TIMER] to start the clock. The original display is restored shortly after.
CDs REW TUNE FF Preparation: (when using batteries) Press [ Press [ ]. TAPE/CD] to switch to CD mode. (Unit comes on when using AC power.) Each time the button is pressed CD TAPE Press [ CD OPEN/CLOSE] to open the tray, load a CD, and press [ CD OPEN/ CLOSE] to close the tray. Press [ ] to start play. Press [–,+ VOLUME] to adjust the volume. To stop play Press [ Displayed when CD not loaded. TAPE/CD].
CDs Other modes of play Preparation: Press [ /CLEAR] to switch to CD mode. Numbered buttons Remote control only Direct access play Starts normal play from a selected track Select the track with the numbered buttons. Compact disc operations For tracks numbered 10 and over, press [≥10] then the two digits. Repeat play Plays a track or all tracks repeatedly PORTABLE STEREO CD SYSTEM Press [PLAY MODE] before or during play to select the mode.
CDs Program play: Select up to 36 tracks to play in the order you choose Preparation: Press [ /CLEAR] to switch to CD mode. Remote control only Press [PROGRAM]. For tracks numbered 10 and over, press [≥10] then the two digits. Repeat this step to program the tracks in the required order. Press [ PORTABLE STEREO CD SYSTEM ]. All the tracks are played in the selected order. The program remains intact even if play is stopped or the unit is turned off.
The radio: manual tuning Preparation: (when using batteries) Press [ Press [BAND ]. ] to select FM or AM. (Unit comes on when using AC power.) Each time the button is pressed FM AM Press [ , REW–TUNE/ to select a station. “ –FF] ” is displayed during FM stereo broadcasts. Press [–,+VOLUME] to adjust the volume. Auto-tuning Radio operations Press and hold [ , REW–TUNE/ –FF] until the frequency starts changing rapidly. Stops when it finds a station. (Interference may also cause it to stop.
The radio: preset tuning Presetting radio stations Remote control only Tuning is simpler if you preset stations. You can preset 12 FM and 12 AM stations. Preset the stations one at a time. Preparation: Tune to the station you want to preset Press [PROGRAM]. While “ ” is flashing Press the numbered buttons to enter the station into a channel (1 to 12). The station occupying a channel is erased if another station is preset in that channel.
Cassettes You can play cassettes in either deck 1 or deck 2. Deck 1 is used in this example. ]. Preparation: (when using batteries) Press [ Press [ mode. TAPE/CD] to switch to TAPE (Unit comes on when using AC power.) Press [ DECK 1] to open the deck and load a cassette. Play starts from the side facing up Close deck by hand. (Play direction automatically switches to “ deck is closed.) Press [ ” when the ] to start play.
Cassettes Tape Program Sensor (TPS) TPS finds the beginning of a track and resumes play from there. During play Press [ or [ REW–TUNE/ ] (backward) TUNE/ –FF] (forward). Each press increases the number of tracks skipped (up to 9). REW TUNE FF Number of tracks skipped TPS may not operate correctly in the following situations: •If the interval between tracks is less than 4 seconds. •If there is noise between tracks. •If there are silent parts within tracks.
Before recording Use household AC power or new batteries when recording to avoid poor recordings caused by the batteries running down. Televisions can cause interference to recordings made on this unit if the two are too close to each other. Selection of tapes for recording The unit automatically identifies the type of tape. Normal position/TYPE High position/TYPE Metal position/TYPE O.K. O.K. NO Metal position tapes can be used, but the unit will not be able to record or erase them correctly.
Recording CDs (Deck 2 only) Preparation: •Insert a CD ( page 9). •To record from the beginning of the tape Wind on the leader tape. •Select the reverse mode. Recording tape Press [ DECK 2] to open the deck and load a cassette. Leader tape Recording starts from the side facing up Close deck by hand. (Play direction automatically switches to “ the deck is closed.) Press [ ” when TAPE/CD] to switch to CD mode. Each time the button is pressed CD TAPE Press [ ] to start recording.
Automatic CD recording You can record the whole CD (AUTO) or a selected track(1REC). If a track is interrupted at the end of the side facing up, it is recorded again on the side facing down. AUTO Recording begins from the side facing up and the reverse mode is set to “ ”. Preparation: Insert a CD ( page 9) Press [ TAPE/CD] to switch to CD mode. Press [CD REC MODE] so “AUTO” is displayed. Each time the button is pressed AUTO 1-REC OFF The display shows the length of tape needed.
Recording the radio Preparation: •Wind on the leader tape. •To record from part way through the tape Wind the tape on to where you want to start recording. •Select the reverse mode. Press [ DECK 2] to open the deck and load a cassette. Tune to the station ( Press [ Lights pages 12 and 13). ] to start recording. To stop recording Press [ TAPE/CD]. To pause recording Recording direction Press [ ]. Press again to resume recording.
Using the timer The timer has two functions. It can be set to come on at a certain time to wake you up, or it can be set to record the radio. Be aware that weak batteries can cause the timers to malfunction. Use household AC power for best operation. Preparations: •Turn the unit on and set the clock ( page 8). •For the play timer, prepare the music source you want to listen to; tape, CD or radio, and set the volume.
Using the timer To cancel the timer Press [ PLAY/REC] to clear the timer indicator from the display. The timers come on at the same time everyday until they are canceled. Checking the settings Press [CLOCK/TIMER] when the unit is off. The settings are shown in the following order. Start time, Finish time Source Volume Clock To change the settings To change the times Do steps , , , and . To change the source Turn the unit on, choose the source and press [ to turn the timer on ( step ).
The timer fader Remote control only Volume fades in gradually when a timer turns the unit on and fades out gradually when the sleep timer turns the unit off. Press [TIMER FADER]. Press again to cancel. All timers are affected by this function whenever “ ” is on the display. Recordings made with the record timer are unaffected. Sound quality You can choose one of four types of sound quality.
Using auxiliary equipment AUX IN You can play or record sound from other equipment through this unit's AUX IN terminal. Plug type: 3.5 mm stereo Playback OUT Preparation: (when using batteries) Press [ Press [ ]. ] to switch to AUX mode. Start playback on the equipment. Recording Do steps Press [ and as described above. ]. When this unit and the other equipment are connected to each other, do not set input on both unit's to “AUX”. This can cause feedback noise to occur.
Troubleshooting Before requesting service, make the below checks. If you can’t fix the system as described below, or if something not listed here occurs, refer to the enclosed directory to locate an Authorized Service Center convenient to you or contact your dealer. Reference pages are shown as black circled numbers . Common problems “E” is displayed Indicates incorrect operation. Read the instructions. “UO1” is displayed Replace the batteries or use household AC power.