SD Multi AV Device Operating Instructions Model No. SV-AV10E/B/EN Before use, please read these instructions completely.
Contents Information for Your Safety ................................. 3 Caution for AC mains lead (SV-AV10B only) ................................................. 3 Introduction.......................................................... 4 To find the beginning of a music file: .................... 20 Using the Earphone ...........................................21 Adjusting the Volume.........................................21 Power supply frequency.......................................
Dear Customer, We would like to take this opportunity to thank you for purchasing this Panasonic SD Multi AV Device. Please read these Operating Instructions carefully and keep them handy for future reference. Information for Your Safety WARNING TO REDUCE THE RISK OF FIRE OR SHOCK HAZARD AND ANNOYING INTERFERENCE, USE ONLY THE RECOMMENDED ACCESSORIES AND DO NOT EXPOSE THIS EQUIPMENT TO RAIN OR MOISTURE. DO NOT REMOVE THE COVER (OR BACK); THERE ARE NOT USER SERVICEABLE PARTS INSIDE.
Introduction This SD Multi AV Device can record both still picture data and MPEG4 moving picture. Additionally, it can play back a high quality music file of the MPEG2-AAC and MP3 format (Record files with the supplied real jukebox® and USB Reader/Writer). And using the viewer software SDMovieStage (supplied accessory), this SD Multi AV Device can display the pictures recorded with it as thumbnails and edit the MPEG4 moving picture data.
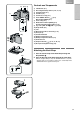
2) 3) 4) 5) Controls and Components 1) 2) 3) 4) 5) 6) 7) 8) MODE/ VOL 9) VOL / MENU 1) 14) 11) 12) 13) 15) 10) LCD Monitor (l 7) Recording Start/Stop Button (l 14, 16, 18) Card Slot Cover (l 7) Card Slot (l7) Card Access Lamp (l 7) 6) Power ON/OFF Button [ ] (l 8) Menu Button [MENU] (l 9) 7) Power Lamp (l 8) 8) Mode Selector Button [MODE] (l 8) Volume Adjustment Button [VOL] (l 21) 9) Jog Lever [:s1/;/_s9/_] (l 8,22) 10) Strap Holder (l5) 11) Lens 12) Microphone (built-in, monaural) (l 18) 13) F
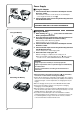
Power Supply ª Using AC Adaptor 1 Connect the AC Mains Lead to the AC Adaptor and the 1 AC mains socket. DC IN 4.8V 1 2 ≥The AC Mains Lead does not fit entirely into the AC Adaptor socket. A gap will remain as shown 1. 2 Connect the DC Input Lead to the [DC IN 4.8V] socket on the SD Multi AV Device. The SOCKET OUTLET SHALL BE INSTALLED NEAR THE EQUIPMENT AND SHALL BE EASILY ACCESSIBLE.
Inserting a Card Inserting a Card 2 1 Slide the Card Slot Cover 1, and flip it to open. ≥Turn off the SD Multi AV Device, when inserting a Card. 1 2 Hold the Memory Card placing the cut off corner 2 at the left and showing the label 3 frontward, and then insert it fully until it clicks. 3 After the Memory Card is set, close the Card Slot Cover 1. 3 ª Removing the Card 2 Open the Card Slot Cover and push the top of the Card.
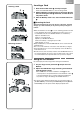
/ MENU Turning the Power ON 2 1 Install the battery or plug in the AC adaptor. (l 6) ] button for two seconds or more. 2 Hold down the [ ≥The SD Multi AV Device is turned on. ≥The message [PLEASE WAIT] is displayed for a while and then the mode selection screen will be displayed. ≥ ≥If the device is not used for 10 minutes or longer , the power is automatically turned off. Press the power button again to turn it back on.
- VOL + / MENU Using the Menu Screen 2,6 Allows the functions useable in the selected mode to be set from the menu. 3,4,5 1 Select a desire mode. (l 8) 2 Press the [MENU] Button. 2 3 ≥A list of menus useable in the selected mode is displayed 3. 3 Move the Jog Lever up or down to select a desired menu. 4 Press down the centre of the Jog Lever 2. PICTURE RECORD ≥Menu screen appears.
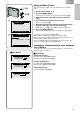
Sub-Menu for REC MODE List of Menus (Cont.
Sub-Menu for PLAYBACK 1 Sub-Menu for PLAYBACK MODE CARD EDITING ERASE ALL FILES YES FILE PROTECTION YES YES CARD FORMAT 2 OTHER FUNCTIONS DATE/TIME DISPLAY LCD SET DISPLAY SIZE LCD MONITOR NORMAL CLOCK SET OFF OFF D/T TIME ON YES NORMAL FULL UPSIDE-DOWN YES PRESS MENU TO RETURN 3 CARD EDITING ERASE ALL FILES YES FILE PROTECTION YES YES YES YES DPOF SETTING SLIDE SHOW CARD FORMAT PRESS MENU TO RETURN 4 FUNCTIONS DATE/TIME DISPLAY LCD MONITOR NORMAL CLOCK SET 5 List of Menus (Cont.
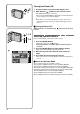
/ MENU 1 - VOL + MODE/ VOL Setting the power supply frequency 2,3 1,2,3 Set the power supply frequency before using the SD Multi AV Device. The power supply frequency is different depending on the country or region. Adjustment of the frequency will help reduce the appearance of horizontal stripes consisting of light and dark patterns under fluorescent lighting. 1 Set the Operation Mode to [REC>> MPEG4] or [REC>> PLAY MPEG4 REC VOICE PICTURE 2 PICTURE] 1.
Adjusting Brightness and Colour Level - VOL + / MENU 1,5 LCD Brightness [BRIGHTNESS] 4 It adjusts the brightness of the image on the LCD screen. LCD Colour Level [COLOUR LEVEL] 5 It adjusts the colour saturation of the image on the LCD screen. 1,2,3,4 ª To Adjust 1 Select the [OTHER FUNCTIONS] 1. 2 Set the [LCD SET] to [Yes] 2. 3 Press down the centre of the Jog Lever 3 to select the 3 1 MPEG4 RECORD item to be adjusted.
Basic Functions / MENU 1 1 PLAY MPEG4 1,2,3 REC VOICE PICTURE 2 Recording the Moving Picture (MPEG4) You can record moving pictures on the Card. 1 Set the Operation Mode to [REC>> MPEG4] 1 2 Select the [RECORDING SETUP]2. 3 Set the [MPEG4 MODE] 3 to desired picture quality. ≥Select one of the options of [FINE], [NORMAL], [ECONOMY1], or [ECONOMY2]. ≥Press the [MENU] Button twice to exit menu.
Playing the Moving Picture (MPEG4) - VOL + MODE/ VOL Plays back moving pictures recorded on the card. 1 1 Set the Operation Mode to [PLAY>>MPEG4] 1 1,2,3 2 Move the Jog Lever up or down to select a desired file. 3 Press down the centre of the Jog Lever 3. ≥A moving picture file is played back. ≥After playing back the files with the number selected and after, the file list reverts. ≥Wear the Earphone (supplied) to listen to the sound.
- VOL + MODE/ VOL / MENU Recording Still Pictures 6 2,5 1 Records still pictures. 1,2,3,4 4 To use the flash, Set the [FLASH] on the [RECORDING 1 Set the Operation Mode to [REC>>PICTURE] 1 2 Select [RECORDING SETUP] 2. 3 Set the [PICTURE QUALITY] 3 to desired picture quality. ≥Select one of [FINE], [NORMAL], or [ECONOMY]. SETUP] 4 Menu to [ON]. ≥At a dark place, will be displayed and the Flash will be available. (The display disappears at a bright place.
Playing back Still Pictures - VOL + MODE/ VOL Plays back still pictures recorded on the card. 1 1 Set the Operation Mode to [PLAY>>PICTURE] 1 1,2,3 2 Move the Jog Lever up or down to select a desired file. 3 Press down the centre of the Jog Lever 3. ≥Still picture files recorded on the card are displayed in the form of a list (six files per page) 2. ≥A still picture file is played back.
Recording Voice (Voice Recording Function) You can record voice data on the card. 1 - VOL + MODE/ VOL 2 3 1 1 Set the Operation Mode to [RECORD>>VOICE] 2. 2 Press the Recording Start/Stop Button. ≥Recording starts. 3 Speak into the built-in microphone 1 of this SD Multi AV 1 Device. ª To stop recording While recording Voice, press the Recording Start/Stop Button.
Hearing the Voice Recorded (Playback Sound) Ë Plays back the voice files recorded by this SD Multi AV Device. Plays back the voice files recorded by this SD Multi AV Device. Wear the Earphone (supplied) to listen to the sound. 1 1 Plug the earphone into the [ ] jack. (l 21) 2 Set the Operation Mode to [PLAY>>VOICE] 1. ≥Voice files recorded on the card are displayed in the form of a list (six files per page) 2. 3 Move the Jog Lever up or down to select a desired file.
Listening to Music (Music Play) Ë You can play MPEG-2 AAC format and MP3 data. Music files must be written on the SD Memory Card using a USB Reader/Writer for SD Memory Card (supplied accessory) and the Panasonic Media Manager (supplied accessory) special software programme in order for the SD Multi AV Device to play music. For more detailed information, please refer to the supplied Panasonic Media Manager Basic Operating Instructions.
Listening to Music (Music Play) (Cont.) Ë 1 ≥During playback, the date is not displayed. ≥MP3 is the abbreviation for MPEG1 Audio Layer3. ≥Normal MP3 files cannot be played back. Use the data created with Panasonic Media Manager. ≥Some MP3 or MPEG2-AAC files which were written with Panasonic Media Manager may not be played back. ≥The bit rates (recommended) supported are 64 kbps, 96 kpbs or 128 kbps for both the MPEG2-AAC and MP3 files. ≥The WMA data cannot be played back.
- VOL + MODE/ VOL Advanced Functions 1 Backlight Compensation Function This prevents a recording subject from being recorded darker in backlight. (Backlight is the light that shines from behind a recording subject.) 1,2 1 Set the Operation Mode to [REC>>MPEG4] or PLAY MPEG4 REC VOICE PICTURE [REC>>PICTURE] 1. PUSH/SET SELECT 1 2 2 Move the Jog Lever up for about 1 second. ≥The [ª] Indication 2 is displayed. To Resume Normal Recording Move the Jog Lever up for about 1 seconds.
/ MENU Erasing the Files Recorded on a Card 2 Using SD Multi AV Device, you can erase the files recorded on a Card. After the file is erased, it cannot be restored. - VOL + 1 Play back the file to be erased or let it pause. (l 15, 17 ,19) 3,4 3 2 Press the [MENU] Button. ≥The [CARD EDITING] screen appears 1. ≥Except for the still picture mode, [DPOF SETTING] and [SLIDE SHOW] is not displayed.
- VOL + / MENU Protecting the file (Lock Setting) 2, 1,2 Precious files recorded on a Card can be locked (to prevent accidental erasure). 1 Play back the file to be locked or let it pause. (l 15, 17 ,19) 3,4 1,2 3 2 Press the [MENU] Button ≥The [CARD EDITING] screen appears 1. ≥Except for the still picture mode, [DPOF SETTING] and [SLIDE SHOW] is not displayed. 3 Move the Jog Lever up or down to select the [FILE PROTECTION], and press down the centre of the Jog Lever 3.
- VOL + / MENU Writing Printing Data on a Card (DPOF Setting) DPOF Setting Printing data (DPOF Setting), such as the number of images to be printed, can be written to the Card. 2, 1,2 1 Play back a still picture to be DPOF-set.(l 17) 2 Press the [MENU] Button. 3,4 1,2 ≥The [CARD EDITING] screen appears 1.
/ MENU MODE/ VOL 1 - VOL + 2 Playing back still pictures one by one (Slide Show) The recorded still picture in the Card can be played back like a Slide Show. 1,2 to [YES]. ≥Slide show starts from the selected still picture. ≥All pictures are sequentially displayed, each for about 5 seconds, and the show stops at the last picture. 2 PLAY REC MPEG4 VOICE PICTURE MUSIC PUSH/SET SELECT 3 1 1 Set the Operation Mode to [PLAY>>PICTURE] 1.
For using SD-MovieStage • For using the SD-MovieStage software, refer to the PDF manual. This manual describes installation only. Operating environment SD-MovieStage can be installed in a PC/AT compatible personal computer which can run Microsoft® Windows® 98SE/Me/2000 Professional/XP. Compatible machines: PC/AT compatible PC with Microsoft Windows® 98 Second Edition/Me/ XP/2000 Professional pre-installed.(Intel® Pentium® Ⅱ 333MHz or higher CPU recommended) Graphic display: High Colour (16 bit) or more.
Installing SD-MovieStage 2 1 Insert the supplied CD-ROM into the personal computer’s CD-ROM drive. 2 Double-click [My Computer], double-click CD-ROM icon, double-click [SD-MovieStage Ver.1.0E], and double-click [SETUP.EXE]. 3 Select the Language to be installed and click the [OK] Button. 4 Click the [Next] Button. 3 ≥The next screen will be displayed. 5 Read License Agreement carefully, and click [Yes] Button, if you accept the terms of the agreement.
Installing SD-MovieStage (Cont.) 8 8 Click the [YES] Button. ≥The necessary software for the SD-MovieStage is installed. 9 Click [Yes] Button to create the short-cut icon on the desktop. 10 At the end of the Setup, click on the [Finish] Button. ≥After rebooting the computer, the SD MovieStage is enabled. ≥For the information of the operation of SD-MovieStage, refer to the instruction in the PDF file that was installed together with this software. Adobe® Acrobat® Reader® (refer to http:// www.adobe.
ª Using a Card in a Personal Computer ≥To erase pictures that you recorded on the Card by using the SD Multi AV Device, be sure to erase them on the SD Multi AV Device, not on the computer. ≥You may not be able to properly play back on the SD Multi AV Device after editing the recorded data or changing the image data on a personal computer.
2 2 1 MPEG4 6 ß PICTURE 7 PLEASE WAIT 100-0001 8 6 5 APR 10 2002 0h10m14s N R 0h10m VOLUME 1) Remaining Battery Power [ ] When the battery power becomes low, the indication changes. When the battery level indicator indicates [ ], the battery will run out in a few minutes. Recharge the battery. may be displayed when the AC Adaptor is used. This is not abnormal.
8) Displayed by the text [LOW BATTERY]: The battery may be exhausted. Replace it with fully charged battery. [NO CARD]: The Memory Card is not inserted. Otherwise, the Card may not be inserted correctly. [CARD FULL]: The memory capacity is fully utilized. Erase any unneccessaly files or replace it with a new card. [CARD LOCKED]: The write enable switch of the SD Memory Card is set to [LOCK] (see page 24). [CHECK CARD]: Re-insert the Card.
Do not use benzine, thinner or alcohol for cleaning the SD Multi AV Device. ≥The camera body may be deformed and the surface finish may peel off. ≥Before cleaning, detach the Battery or pull out the AC Mains Lead from the AC Mains socket. ≥Wipe the SD Multi AV Device with a soft dry cloth. To remove stubborn stains, wipe with a cloth that is soaked in a detergent diluted with water, and afterward, finish wiping with a dry cloth.
ª Notes on the SD Memory Card WriteProtect Switch ≥The SD Memory Card has a write-protect switch. Sliding the switch to [LOCK] prevents the recording of data to the card as well as the deletion of data from the card. Sliding back the switch permits such operations. The Power Lamp flashes while charging. (Flashes approx. every two seconds when charging is normal.) When the Power Lamps flashes more quickly or slowly (or tuns off), some abnormality may have happened.
Before Requesting Service If the trouble persists even when the action suggested below has been taken, press the the [ ] Button to turn off the power and disconnect and re-connect the Power Cable. Consult your dealer. Power 1: The SD Multi AV Device power cannot be turned on. 1: Is the power source connected correctly? 2: The SD Multi AV Device power shuts off automatically. 2: If you do not use the SD Multi AV Device for more than 10 minutes, the power shuts off automatically to save the Battery power.
Specifications SD Multi AV Device Information for your safety Power Source: Power Source: Power Consumption: Image Sensor: Lens: Monitor: Microphone: Standard Illumination: Minimum Required Illumination: Recording Media: Image Compression: Video Compression: Voice Compression: Music Expansion Dimensions: Weight: Operating Temperature: Operating Humidity: DC 4.8 V (AC Adaptor) DC 3.7 V (Battery) Recording 3.1W (When using the AC Adaptor) 2.8 W (When using the battery) 1/4-inch C-MOS Image Sensor F3.
ИНФОРМАЦИЯ О СЕРТИФИКАЦИИ ПРОДУКЦИИ БЛОК ПИТАНИЯ ДЛЯ ИНФОРМАЦИОННОЙ ТЕХНИКИ МОДЕЛЬ VSK0621 Panasonic сертифицирован ОС ГОСТ-АЗИЯ, (Регистрационный номер в Госреестре—РОСС SG.0001.11BZ02) BZ02 Сертификат соответствия: № РОСС СN. BZ02.B03196 Сертификат соответствия выдан: 10 января, 2002 года Сертификат соответствия действителен до: 10 января, 2005 года Модель VSK0621 Panasonic соответствует требованиям нормативных документов: ГОСТ Р50377-92 (МЭК 950-86) ГОСТ Р 51318.