
Operating instructions


-6-
INSTALLATION
Important Notices:
• The following installation should be made by
qualified service personnel or system installers
and should confirm to all local codes.
• Be sure to use a ceiling board having enough
strength to support this camera.
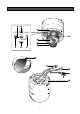
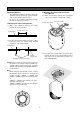
1. Mounting the camera fixing bracket
1-1. Make a hole (diameter 75mm) in the ceiling
board in the desired location.
1-2. Fix the camera fixing bracket onto the ceiling
board by using four camera fixing bracket
mounting screws (not provided).
Caution: Noise may be produced in the picture on
the monitor screen if the camera is installed on
metallic ceiling. To prevent the hum, using the
optional wall mounting bracket WV-Q103A is
recommended.
Note:
Before fixing the bracket with screws, confirm
the direction of the camera by checking the
position of signs “FRONT g UPPER” and
“REAR g LOWER” on the camera fixing brack-
et.
“FRONT g UPPER” sign indicates the direc-
tion of the camera head.
“REAR g LOWER” sign indicates the direction
opposite to the camera head.
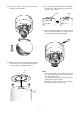
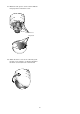
2. Mounting the camera onto the camera
fixing bracket
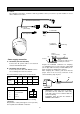
2-1. Make sure the video output cable and power
cable are fixed by the coaxial cable clamps.
2-2. Pass the video output cable and power cable
through the hole in the camera fixing bracket,
and connect as described in the previous sec-
tion “CONNECTION.”
REAR LOWER
FRONT UPPER
OPEN
LOCK
ø75 mm (ø2-15/16”)
Mounting hole
Ceiling board
Coaxial cable clamps
Power cable
Video output cable
Mounting screws (not provided)
Ceiling board
Camera
fixing bracket