
manual

© Panduit Corp. 2007
For Instructions in Local Languages
and Technical Support:
www.panduit.com/resources/install_maintain.asp
INSTRUCTIONS CM334
E-mail:
cs@panduit.com
Fax:
(708) 444-6993
www.panduit.com
Page 1 of 1
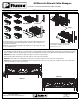
NETMANAGER Network Cable Managers
Part Numbers: NM1,NMF1,NM2,NMF2,NM3,NMF3, NM4,NMF4
NM1
NMF1
NMF2
NMF3
NMF4
NM2
NM3
NM4
Install the managers to the rack with 12-24x1 screws provided. Install the Covers
to the manager by positioning it flat against the front/rear of the manager and
pushing to snap in place.
Note: The recommended assembly torque shall be 9+/- in-lb. for #12-24 screws,
1+/-0.1 N-m M6 screws
The hinged cover opens from the top or
the bottom. Pull flanges to open and
push cover to close.
Flange
Screws
Cover
19” Rack
NM2 (Shown)
The NETMANAGER cable manager is recommended for use with Panduit 24 or 48 port patch panels mounted above and below the manager.
When routing the cables for the patch panels, either of the following two methods are recommended to help maintain cable bend radius.
METHOD 1:For each row of 24 ports, place two cables in each slot on the manager.
Route half the cables through each of the wire retainers on the ends of the manager.
METHOD 2: If the cables are coming from one side of the rack, place 2 cables in each of the slots on the manager.
NOTE: When using front and back NETMANNAGERS to manage cables on the rear of the rack, place 6 cables in each of the 4 slots in the
rear of the manager, for each row of 24 ports.
Method 1
Method 2