
Acculink DSU/CSU Data Service Unit Models 3160-A4, 3161, 3164-A2, and 3165-A4 Operator's Guide


I. Asynchronous Terminal Interface Operation
I-2
March 2001 3160-A2-GB24-10
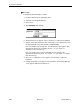
Initiating an ATI Session
Once the appropriate configuration option changes have been made and access is
established, the Main Menu screen appears (unless a password is required).
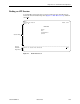
Figure I-1, Main Menu Screen, shows the Main Menu screen for a standalone
DSU/CSU.
The carrier-mounted DSU/CSU shows the 3000 Series carrier slot number under
the Customer ID. The slot number field (e.g.,
Slot: 1
) is changed to access specific
DSU/CSUs in the carrier. For Telnet or SNMP access to the carrier, specify the IP
address of the applicable communication port (see Appendix G,
IP Network
Addressing Scenarios
).
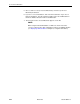
NOTE:
By convention throughout this appendix, examples of screens are shown as
they appear with the standalone DSU/CSU.
If a password is required, the Login screen displays the prompt for password input.
(Refer to
Entering a Password to Gain Access
on page I-14.)
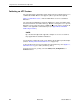
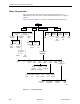
To move between the Screen area and the Screen Function Keys area (Figure I-1,
Main Menu Screen), press Ctrl-a (Control key and a).
From the Screen area, you may select the
Status,
Test,
Configuration
, or
Control
branches.