
Installation Guide
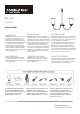


(FIG.1)
2
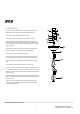
INSTALLATION (Fig.1)
1. Fasten mounting strap (B) to outlet box (A) with two 8-32 screws (C).
2.Thread hex nut (A.c) and washer (A.b) onto threaded tubing (A.a).
3.Thread one end of threaded tubing (A.a) into loop (D).
4.Thread other end of threaded tube (A.a) into mounting strap (B).
5. Slip canopy (E) over loop (D) and adjust height of loop so half of the
threaded area on the loop is exposed. After loop height is adjusted, tighten
hex nut (A.c) and washer (A.b) up against mounting strap, to lock threaded
tubing in position.
6.Taking the chain, determine the length you require to hang the fixture.
7.Attach one end of the chain (A.d) to the top loop of the fixture.
8. Now slip loop collar (F) and canopy (E) onto chain.
9. Attach other end of chain to loop (D). Request assistance for this step
since fixture may be heavy and difficult to hold while attaching the chain.
10. Unwrap supply wire and ground wire and weave them up through the
chain.
11. Slip supply wire and ground wire through center of loop (A.a).
12.Connect ground wire to mounting strap (B) using green ground screw (F).
13.Connect positive supply wire (typically black or the smooth, umarked side
of the two-conductor cord) to positive fixture lead with appropriately sized
twist on connector.
14. Connect negative supply wire (typically white or the ribbed, marked side
of the two-conductor cord) to negative fixture lead with appropriately sized
twist on connector.
15.After wires are connected, tuck them carefully inside outlet box. slip
canopy up firmly against the ceiling and secure by turning the threaded
collar(F) on loop (D) until tight.
Fergusonshowrooms.com
© 2018 Ferguson Enterprises, Inc. 00000 10/2018