
Installation Manual


Page 4
301 Fulling Mill Road, Suite G ©Copyright 2008 by On-Q/Legrand,
Middletown, PA 17057 Inc All Rights Reserved.
(800)-321-2343 www.onqlegrand.com
IV. System Wiring Overview
A. Pre-Wiring (Rough-In)
The rough-in of the Selective Call Intercom System should be completed during the construction
phase of the home and prior to the installation of drywall. The following section will instruct you on
the proper methods to pre-wire your cable and rough-in the openings for the various Selective
Call Intercom System components.
Selective Call Room Unit(s)
The procedure to rough-in the Selective Call Room Unit(s) is as follows:
• Typically the Room Unit(s) will be installed on the same wall as the door to the room. Verify
each Room Unit location with the homeowner before proceeding. Avoid installing Room Units in
the same stud cavity on opposite sides of the wall to prevent feedback problems. If Room Units
must be mounted back-to-back, place insulation in the back of both electrical boxes.
• The Room Unit mounts in a standard 2 gang electrical box. The use of an enclosed box rather
than an open mud ring will help minimize the potential for feedback between units.
• Any UL approved metal or plastic gang box can be used.
• To avoid damage from debris during construction or after construction, use a gang box that will
completely enclose the unit.
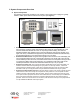
• To provide optimal display quality of the LCD on the Room Unit, the bottom of the 2 gang box
should be installed at a height of 56” (see Figure 2).
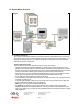
• ONE Cat 5e run is required to operate the Room Unit.
• Run ONE Cat 5e cable from the 2 gang box directly to the enclosure where the Intercom
Distribution Module will be installed. Label both ends of your cable run to indicate Room Unit
number (ex: “Room Unit 5). Follow the wiring guidelines listed in this manual to ensure a quality
cable installation.
Figure 4