
Users Guide User guide

DMXPathfinder LR Installation & Assembly
3
Chapter 1: Installation and Assembly
SUMMARY
This section describes how to correctly assemble the DMXPathfinder MR
hardware into an equipment rack and connect permanently installed external
wiring.
To ensure a trouble-free installation, you should follow this sequence:
1. Install the equipment rack
2. Run conduit and pull cable
3. Install auxiliary rack equipment and power bars
4. Mount termination boards (if applicable)
5. Dress cable in the rack and terminate (if possible)
6. Unpack the DMXPathfinder MR I/O Modules and prepare
7. Install the I/O Modules in the rack
8. Connect cabling to the I/O Modules
9. Power up and test
BEFORE STARTING
Before installing the DMXPathfinder MR equipment rack, you should
carefully consider the environment in which the equipment is to be installed, the
proximity to power sources, and the required conduit and/or cable runs.
Environmental Considerations -- To maximize equipment life and minimize
the possibility of unreliable operation or failures, the following conditions should
be adhered to:
• Ambient temperature extremes: -10 to 50 degrees C
• Recommended operating temperature: +10 to +40 degrees C
• Relative humidity: 10-95% non-condensing
• General conditions: clean, dust-free environment
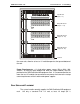
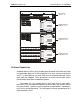
Fan Cooling -- Each of the DMXPathfinder MR Output Modules is provided with
an internal cooling fan. These fans draw air in on the right hand side and
exhaust air on the left. To ensure adequate air circulation, do not block the
modules at either side. If more than two or three Output Modules are installed in