
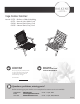
Instructions / Assembly

Á>UÁ¿É¸¿tµ¿>¸¸¸Á>Ug[¿¿£l½½¤¿lu¼l¼¼¿¿N¿¿ÑÑѦL>ggg¦U ¿¿¿¿¿¿w
PREPARATION
%HIRUHEHJLQQLQJDVVHPEO\EHVXUHWRHPSW\FRQWHQWVRIFDUWRQDQGPDNHVXUHDOOSDUWVDUHSUHVHQWΖIDQ\SDUWV
DUHPLVVLQJSOHDVHFRQWDFW&XVWRPHU6HUYLFH
3ODFHDOOSDUWVRQDVRIWOHYHOVXUIDFHIRUDVVHPEO\(VWLPDWHG$VVHPEO\7LPH0LQXWHV
'2127RYHUWLJKWHQKDUGZDUH2YHUWLJKWHQLQJKDUGZDUHFDQFDXVHZRRGWRFUDFN
ASSEMBLY
Ä
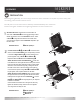
Assemble the seat: insert the tenon at the bottom of
each side of Seat Back
A
into the corresponding mortise
drilled opposite the curve of the Seat
B
as shown. Insert
a
Screw
1
through the hole drilled in the inside of the
curve and finger-tighten into the Seat Back. Repeat to join
the other side.
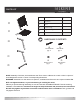
Hardware U
sed:
1
Screw (7x90) x2
Connect the Arms
C
/D
and Brace E: insert the tenon
at one end of the Brace
E
into the corresponding mortise
in the side of Right Arm/Leg
D
. Loosely fasten the two
pieces together using a Screw
1
with Washer
3
.
Repeat to attach the Brace to the Left Arm/Leg
C
.
Attach the Arms to the assembled Seat
B
: locate the
hole drilled on the front right side of the seat (a few inches
back from the front edge) and align it with the hole drilled
above the notch in the front right leg, resting the side of
the seat on the notch in the inner edge of the right leg.
Connect the two pieces using a Bolt
2
with Washer
3
.
Finger-tighten, then repeat to attach the left side.
Attach the Arms to the Seat Back: align the hole drilled
through the back end of the right arm with the hole about
halfway down the right side of the Seat Back
A
. Insert a
Bolt
2
with Washer
3
and finger-tighten to join. Repeat
to attach the left side.
Check that the chair sits level on the ground, then fully
tighten all hardware, being careful not to over-tighten.
Your Vega chair is ready for use!
Hardware Used:
1
Screw (7x90) x2
2
Bolt (6x45) x4
3
Washer x6