
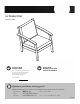
User Manual

Contact us for assistance: (866) 985-7877 | www.balkenehome.com
4
Right Arm
Left Arm
F
G H I
G H I
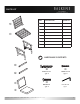
PrEParaTion
Before beginning assembly, be sure to empty contents of carton and make sure all parts are present. If any parts
are missing, please contact Customer Service.
Place all parts on a soft, level surface for assembly. Estimated Assembly Time: 30 Minutes. DO NOT over-tighten
hardware! Over-tightening hardware can cause wood to crack.
Right Arm
Left Arm
E
F
G H I
G H I
Right Arm
Left Arm
E
F
G H I
G H I
Right Arm
Left Arm
E
F
G H I
Right Arm
Left Arm
E
G H I
G H I
Right Arm
Left Arm
F
G H I
G H I
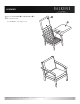
aSSEMBLY
1
Hardware Used: 1 M7x70 Screw x4
3 M8x35 Bolt x4
Insert the end of the Rear Support Bar F into the
mortise on the Left Side Panel D as shown. Secure
by inserting a Screw 1 through the Left Side Panel
and into the end of the Rear Support Bar. Use the
Hex Wrench to tighten, but do not fully tighten
hardware yet. Insert the opposite end of the Rear
Support Bar into the mortise on the Right Side
Panel C and secure using another Screw 1.
Follow the above steps to install the Front Support
Bar E.
Place the Backrest A between the back (higher)
ends of the Side Panels, then align the holes drilled
through the sides of the Backrest with the holes
drilled into the inside of each Side Panel. Secure
the Backrest to the frame using 4 Bolts 3 as
shown.
1
x4
x4
3
x4
2
2
Carefully lay the chair frame on its back and place
the Seat B in place, aligning the holes drilled
horizontally through the sides of the Seat (below
the surface slats) with the holes drilled into the
Side Panels C/D. Secure by inserting a Screw 2
into each aligned hole. Fully tighten all Screws
using the Hex Wrench, being careful not to over-
tighten.
Turn the chair upright, check all hardware, and
tighten as necessary without overtightening.
Hardware Used: 2 M7x45 Screw x4