
Installation Instructions

DD
3
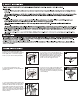
3. Connect the black to black (power), the
white to white (neutral) and copper wire to
ground wire with the wire nuts (DD) and
secure with electrical tape (not included).
Helpful Hint: If wires out of xture are the
same color, attach the side with markings or
letters to black (positive) and the other to
white (neutral).
AA
BB
CC
2
2. Connect the ground wire to the
mounting unit (AA) by securing it with the
ground screw.
1
1. Attach the mounting unit (AA) to the
junction box (not included) with mounting
screws (BB). Then screw in the support
screws (CC) into the mounting unit (AA).
AA
5. First secure the support stem (EE). Then
place the crystal shade (B) over the light
xture (A) and add the crystal cup (C) and
cover (D). Secure the assembly by screwing
on the nial (E).
4
4. Line up the holes in the light xture (A)
with the support screws and rotate the light
xture (A) until the support screws of the
mounting bracket (AA) are aligned with the
smaller section of the mounting hole as
shown. Secure the support screws.
5
A
B
D
E
C
EE