
Installation Instructions

FI NI AL
BLACK WIRE
WIRE CONNECTOR
OUTL ET BOX
GROUND WIRE
SCREW
CROS SBAR
WHI TE WIRE
HEX NUT
THREAD NI PPLE
TOP COVER
THUMBSCREW
BODY
NUTS (2 PCS)
THREAD NI PPLE
FI NI AL
TOP FINIAL
TOP COVER
SCREW
THUMBSCREW
BODY
BOTTOM FINIAL
MAIN STREETLIGHT
CABLE
CUSTOMER SERVICE
1-888-867-6095
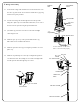
8. Lantern Assembly
8.1 Remove the top cover by removing the 2 thumbscrews.
8.2 Insert the six (6) glass panels inside the fixture body
and install the clips as per clip installation drawings.
8.3
Remove the top finial from inside the top cover and
install onto the outside of the cover with screw.
8.4
Insert one light bulb (maximum 100 Watt A type) into
each lantern head (not included). Do not exceed
recommended wattage.
8.5 Attach the top cover to the fixture by replacing the
two (2) thumbscrews
8.6 Install the bottom finial by screwing it into the arm.
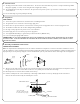
It is now time to make the final electrical connections.
Bring the assembled top section near the base section. Take the main cable and ground wires from the streetlight and make the electrical
connections with the line voltage cable using three wire nuts (not included - as the size will vary depending on the size and number of cables).
Connects wires as follows:
• Ground wire from line voltage to ground (bare copper) from the streelight.
• White wire from line voltage to white labelled wire from the main streetlight cable.
• Black wire from the line voltage cable to black labeled wire from the main streetlight cable.
• Securely tighten the wire nuts and cover with UL listed electrical tape. Put the cables and
wires back in the bottom section post.
6. Electrical connection
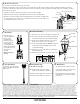
If the bulb does not light:
10.1 Check that the main power supply
(main fuse/breaker box) is turned on.
10.2 Check that the light switch is turned on.
10.3 Ensure that the bulb is not defective.
9. Test Installation
7. Install Post
10. Troubleshooting 11. Maintenance
Raise the top part
of the streetlight and
place it on the
assembled base.
Rotate the top part
to line up the holes.
Secure with the
3 screws (M6 x 20)
with the provided 5mm
tool. At this point you
may require an
assistant.
Caution: This part
is heavy.
• To clean, wash with a damp soft cloth.
• To replace the bulb, reverse procedures
of the Lantern Assembly section.
• Replacement parts may be ordered by
using the fixture model number and the
part’s name.
Restore the main power supply
and turn the light switch to the
ON position.
Clip Installation Drawings
ILUSTRACIONES PARA
INSTALAR LOS CLIPS
Clip Installation Drawings
Clip Installation Drawings
ILUSTRACIONES PARA
INSTALAR LOS CLIPS
Clip Installation Drawings
Clip Installation Drawings
ILUSTRACIONES PARA
INSTALAR LOS CLIPS
Clip Installation Drawings
MAIN STREETLIGHT CABLE
WIRE NUT
BLACK WIRES
GROUND WIRES
WHITE WIRES
BASE
LINE VOLTAGE CABLE
BOTTOM POST SECTION
PATRIOT LIGHTING
®
(Garden Light) WARRANTY 5-YEAR LIMITED WARRANTY:
This PATRIOT LIGHTING
®
brand light fixture carries a five (5) Year Limited Warranty to the original purchaser. If, during normal use, this PATRIOT LIGHTING
®
light fixture fails due to a defect in material
and workmanship within five (5) years from the date of purchase, simply bring this light fixture with your original sales receipt back to your nearest MENARDS
®
retail store. At its discretion, PATRIOT
LIGHTING
®
agrees to have the lighting fixture replaced with the same or similar PATRIOT LIGHTING
®
product free of charge, within the stated warranty period, when returned by the original purchaser
with original sales receipt. Notwithstanding the foregoing, this limited warranty does not cover damage or failure caused by misuse or abuse including but not limited to improper installation, accident,
unauthorized repair, maintenance, or modifications of the merchandise. This warranty: (1) excludes expendable parts including but not limited to light bulbs, batteries; (2) carries a 2-year finish warranty
protecting finish against tarnishing, flaking, and discoloration; (3) shall be void if this lighting fixture is not installed in the U.S.A; (4) does not cover products installed within three miles of saltwater
coastline or any area prone to salt spray; and (5) does not cover any losses, labor, injuries to persons/property or costs. This warranty does give you specific legal rights and you may have other rights,
which vary from state to state. Be careful, it is recommended that installation be done by a qualified professional; the purchaser has sole responsibility for proper installation in compliance with all state and
local code requirements. Seller’s employees are not qualified to advise you on the use of this Merchandise. Any oral representation(s) made will not be binding on seller or its employees. The rights under
this limited warranty are to the original purchaser of the Merchandise and may not be transferred to any subsequent owner. This limited warranty is in lieu of all warranties, expressed or implied including
warranties or merchantability and fitness for a particular purpose. Seller shall not be liable for any special, incidental, or consequential damages. The sole exclusive remedy against the seller will be for the
replacement of any defects as provided herein, as long as the seller is willing or able to replace this product or is willing to refund the purchase price as provided above. For questions / comments, technical
assistance or repair parts – Please call toll free at: 1-888-867-6095 - SAVE YOUR RECEIPTS. THIS WARRANTY IS VOID WITHOUT THEM.