
Installation Instructions


8
ASSEMBLY INSTRUCTIONS
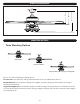
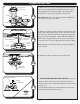
15. Remove the three switch housing screws from the top
edge of the switch housing cap. Then, connect the single-
pin connectors from the switch housing to the single-pin
connectors from the light kit -- Blue to Black and White to
White. Then, using the three previously removed switch
housing screws, secure the light kit to the switch housing.
Note: Align the notch in the switch housing cap with the
reverse switch.
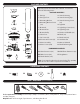
15
Light Cage
Bracket
Bulb
Cage Screw
Shade
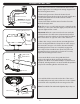
14. Remove the four cage screws from the brackets inside
the shade. Install the E26-base LED bulb into the socket
of the light kit. Then attach the light cage to the shade
using the four cage screws. Repeat for each shade.
Important: Make sure you allow the bulb and light kit to
cool before you replace the bulb.
14
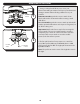
16. Attach pull chain extensions to the pull chains.
Switch
Housing
Screw
Switch Housing
Reverse Switch
Light Kit
Notch
Single-Pin
Connector
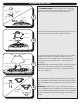
17. INSTALLATION WITHOUT THE LIGHT KIT (optional) -
a. Remove the hex nut and lock washer from inside the
switch housing cap to detatch the light kit from the switch
housing cap.
b. Insert the plug button from the hardware bag into the
center hole in the switch housing cap.
Pull Chain
Extensions
16
Hex Nut
Lock Washer
Plug Button
Switch Housing Cap
17