52” IRON SONESTA IV CEILING FAN Owner’s Manual Model #20698 (355-0714) If a problem cannot be remedied or you are experiencing difficulty in installation, please contact the Service Department: 1-877-459-3267, 9 a.m.- 5 p.m. Central time.
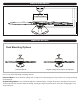
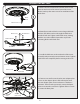
PACKAGE CONTENTS Unpack your fan and check the contents. You should have the following items: 1 2 PACKAGE CONTENTS 3 4 5 6 15 16 8 3. Canopy Cover 15. Downrod 19. Blade Arm (x5) 8. Motor Assembly 11 22 9. Motor Screw (x10) 19 10. Fitter Plate 11. Fitter Plate Screw (x3) 20 Hardware Kit 21 Owner’s Manual 12. Light Kit 20. Hardware Kit 21. Owner’s Manual 22. Thumbscrew (x9) 23. Adapter Plate 24. Adapter Plate Screw (x3) HARDWARE CONTENTS 14 13 14. E26 LED Bulb (x3) 7.
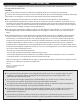
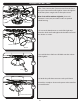
DIMENSION REFERENCE E D B C A A. 19.72 in. B. 12.6 in. C. 13.8 in. D. 10.96 in. E. 5.13in. MOUNTING OPTIONS Dual Mounting Options Downrod Mount Angled Ceiling Mount (Up to 16 degrees) Choose one of the following mounting options: Downrod Mount is best suited for ceilings 8 ft. or higher. For taller ceilings you may want to use a longer downrod (not included). Angled Ceiling Mount is best suited for angled or vaulted ceilings.
SAFETY INSTRUCTIONS READ ALL SAFETY INFORMATION AND INSTALLATION INSTRUCTIONS BEFORE YOU BEGIN INSTALLING THE FAN AND SAVE INSTRUCTIONS. CAUTION: All set screws of the fan must be checked and retightened where necessary before installation. To reduce the risk of personal injury, do not bend the blade brackets when installing the brackets, balancing the blades or cleaning fan. Do not insert foreign objects in between rotating fan blades.
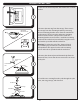
ASSEMBLY INSTRUCTIONS 1. Turn OFF the electrical power at the main fuse or circuit breaker. 1 Mounting Bracket Screw 2 2. Remove the trim ring from the canopy. Then remove the canopy from the mounting bracket by removing the two mounting bracket screws from the round holes in the canopy. Then, loosen the other two mounting bracket screws from the J-shaped slots. Retain the mounting bracket screws for later.
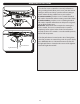
ASSEMBLY INSTRUCTIONS Downrod Yoke Downrod Clip Downrod Pin Set Screw 5 Mounting Bracket Tab Slot Downrod 6 5. Insert the downrod into the yoke and reinstall the downrod pin and downrod clip. Then retighten the two set screws. Note: With wires extending out of the downrod, measure 8 inches of lead wire and cut the excess wire with wire cutters (not included). Then strip 1/2” of insulation from the end of each wire. 6. Lift the downrod into the mounting bracket.
ASSEMBLY INSTRUCTIONS 9. Remove the five motor blocks and ten motor screws from the underside of the motor. Discard the motor blocks, but keep the motor screws for installation of the blade arms. Motor Motor Block 9 Motor Screw Blade Washer Blade Screw Rubber Washer 10 10. Partially insert three blade screws along with blade washers and rubber washers through the blade and into the blade arm. Tighten each blade screw, starting with the one in the middle.
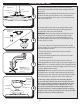
ASSEMBLY INSTRUCTIONS 13. Remove the three fitter plate screws from the fitter plate. Then, connect the 9-pin connector from the fan to the 9-pin connector from the light kit. Secure the light kit to the fitter plate using the three fitter plate screws. 13 Fitter Plate Screw 9-pin Connectors Light Kit Note: To install fan without a light kit, please call Customer Service (877) 459-3267 to order an optional switch housing. 14. Loosen the thumbscrews in each of the light cups.
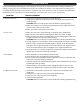
OPERATING INSTRUCTIONS Reverse Switch 1 2 Light Pull Chain Fan Pull Chain 1. Use the fan reverse switch for seasonal performance. Using a ceiling fan will allow you to raise your thermostat setting in summer and lower your thermostat setting in winter without feeling a difference in your comfort. In warmer weather, push the reverse switch left which will result in downward airflow creating a wind chill effect.
TROUBLESHOOTING If you have difficulty operating your new ceiling fan, it may be the result of incorrect assembly, installation or wiring. In some cases, these installation errors may be mistaken for defects. If you experience any faults, please check the Troubleshooting section below. If a problem cannot be remedied or you are experiencing difficulty in installation, please contact the Service Department: 1-877-459-3267, 8 a.m.- 5 p.m. Central time. PROBLEM SUGGESTED REMEDY 1. Fan does not start 1.
LIMITED LIFETIME WARRANTY To obtain Service, please contact the Service Department: 1-877-459-3267, 8 a.m.- 5 p.m. Central time. Model Name: 52” Iron Sonesta IV Ceiling Fan Model No: 20698 Rustic Iron (SKU: 355-0714) Subject to the limitations set forth below, Hong Kong China Electric appliance Company (HKC) warrants the fan motor for this ceiling fan to be free from defects in workmanship and material for fifteen years.